Build with a coding agent
npm install -g @scalekit-inc/cliscalekit setupnpx @scalekit-inc/cli setupSecure your Model Context Protocol (MCP) servers with Scalekit's drop-in OAuth 2.1 authorization solution and protect your AI integrations
This guide shows you how to add production-ready OAuth 2.1 authorization to your Model Context Protocol (MCP) server using Scalekit. You’ll learn how to secure your MCP server so that only authenticated and authorized users can access your tools through AI hosts like Claude Desktop, Cursor, or VS Code.
npm install -g @scalekit-inc/cliscalekit setupnpx @scalekit-inc/cli setupMCP servers expose tools that AI hosts can discover and execute to interact with your resources. For example:
When you build MCP servers, multiple AI hosts may need to discover and use your server to interact with your resources. Scalekit handles the complex authentication and authorization for you, so you can focus on building better tools and improving functionality.
To get started, make sure you have your Scalekit account and API credentials ready. If you haven’t created a Scalekit account yet, you can sign up and get a free account.
Next, install the Scalekit SDK for your language:
npm install @scalekit-sdk/nodepip install scalekit-sdk-pythonUse the Scalekit dashboard to register your MCP server and configure MCP hosts (or AI agents following the MCP client protocol) to use Scalekit as the authorization server. The Scalekit SDK validates tokens after users have been authenticated and authorized to access your MCP server.
In the Scalekit dashboard, go to MCP servers and select Add MCP server.
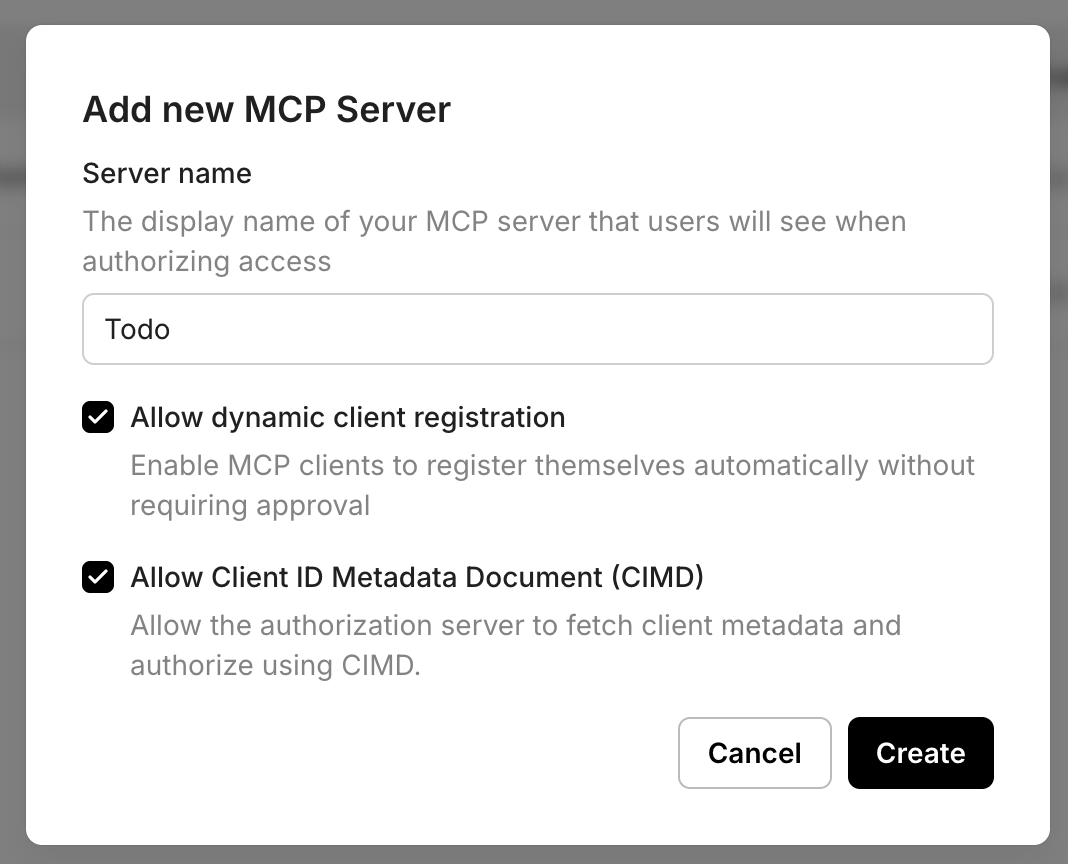
Note: If your MCP server is intended for use by public MCP clients such as Claude, Cursor, or VS Code, it is recommended to keep both DCR and CIMD enabled. Clients that support CIMD will use the CIMD flow, while clients that do not yet support CIMD can fall back to Dynamic Client Registration. This ensures your MCP server remains compatible with the widest range of MCP clients while preserving a smooth authorization experience.
https://mcp.yourapp.com). This is an optional field. If not provided, Scalekit will use the generated resource_id as the resource identifier. If provided, access tokens minted by Scalekit will have the resource identifier as aud claim along with the Scalekit generated resource_id.todo:read or todo:write. These scopes are pre-approved when users authenticate to use your MCP server, streamlining the authorization process.MCP protocol directs any MCP client to discover your OAuth2.1 authorization server by calling a public endpoint on your MCP server. This endpoint is called .well-known/oauth-protected-resource and your MCP server must host this endpoint.
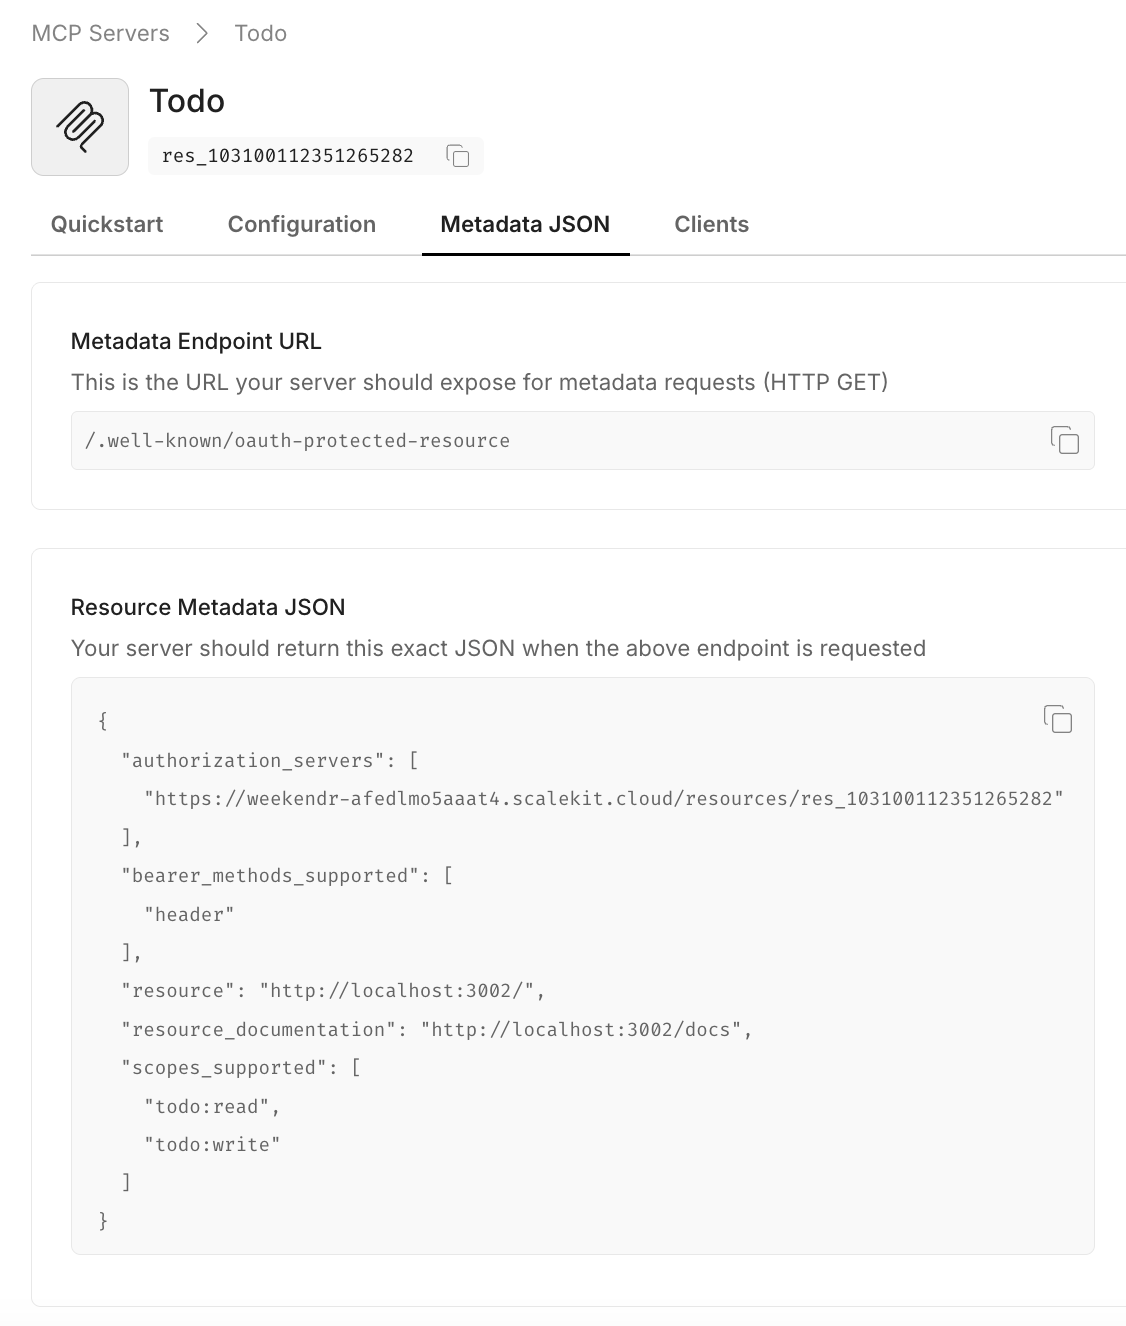
Copy the resource metadata JSON from Dashboard > MCP Servers > Your server > Metadata JSON and implement it in your .well-known/oauth-protected-resource endpoint. The authorization_servers field contains your Scalekit resource identifier, which clients use to initiate the OAuth flow.
// MCP client discovery endpoint// Use case: Allow MCP clients to discover OAuth authorization server configurationapp.get('/.well-known/oauth-protected-resource', (req, res) => { res.json({ // From Scalekit dashboard > MCP servers > Your server > Metadata JSON "authorization_servers": [ "https://<SCALEKIT_ENVIRONMENT_URL>/resources/<YOUR_RESOURCE_ID>" ], "bearer_methods_supported": [ "header" // Bearer token in Authorization header ], "resource": "https://mcp.yourapp.com", // Your MCP server URL "resource_documentation": "https://mcp.yourapp.com/docs", // A URL to the documentation of the resource server "scopes_supported": ["todo:read", "todo:write"] // Dashboard-configured scopes });}); from fastapi import FastAPI from fastapi.responses import JSONResponse
app = FastAPI()
# OAuth Protected Resource Metadata endpoint - Required for MCP client discovery # Copy the actual authorization server URL and metadata from your Scalekit dashboard. # The values shown here are examples - replace with your actual configuration. @app.get("/.well-known/oauth-protected-resource") async def get_oauth_protected_resource(): return JSONResponse({ "authorization_servers": [ "https://<SCALEKIT_ENVIRONMENT_URL>/resources/<YOUR_RESOURCE_ID>" ], "bearer_methods_supported": [ "header" ], "resource": "https://mcp.yourapp.com", "resource_documentation": "https://mcp.yourapp.com/docs", "scopes_supported": ["todo:read", "todo:write"] })Your MCP server should validate that all incoming requests contain a valid access token. Leverage Scalekit SDKs to validate tokens and verify essential claims such as aud (audience), iss (issuer), exp (expiration), iat (issued at), and scope (permissions).
10 collapsed lines
import { Scalekit } from '@scalekit-sdk/node';
// Initialize Scalekit client with environment credentials// Reference installation guide for client setup detailsconst scalekit = new Scalekit( process.env.SCALEKIT_ENVIRONMENT_URL, process.env.SCALEKIT_CLIENT_ID, process.env.SCALEKIT_CLIENT_SECRET);
// Resource configuration// Get these values from Scalekit dashboard > MCP servers > Your server// For FastMCP: Use base URL with trailing slash (e.g., https://mcp.example.com/)const RESOURCE_ID = 'https://your-mcp-server.com'; // If no Server URL is set in Scalekit, use the autogenerated resource ID (e.g., res_123456789) from your dashboard.const METADATA_ENDPOINT = 'https://your-mcp-server.com/.well-known/oauth-protected-resource';
// WWW-Authenticate header for unauthorized responses// This helps clients understand how to authenticate properlyexport const WWWHeader = { HeaderKey: 'WWW-Authenticate', HeaderValue: `Bearer realm="OAuth", resource_metadata="${METADATA_ENDPOINT}"`};12 collapsed lines
from scalekit import ScalekitClientfrom scalekit.common.scalekit import TokenValidationOptionsimport os
# Initialize Scalekit client with environment credentials# Reference installation guide for client setup detailsscalekit_client = ScalekitClient( env_url=os.getenv("SCALEKIT_ENVIRONMENT_URL"), client_id=os.getenv("SCALEKIT_CLIENT_ID"), client_secret=os.getenv("SCALEKIT_CLIENT_SECRET"))
# Resource configuration# Get these values from Scalekit dashboard > MCP servers > Your server# For FastMCP: Use base URL with trailing slash (e.g., https://mcp.example.com/)RESOURCE_ID = "https://your-mcp-server.com" # If no Server URL is set in Scalekit, use the autogenerated resource ID (e.g., res_123456789) from your dashboard.METADATA_ENDPOINT = "https://your-mcp-server.com/.well-known/oauth-protected-resource"
# WWW-Authenticate header for unauthorized responses# This helps clients understand how to authenticate properlyWWW_HEADER = { "WWW-Authenticate": f'Bearer realm="OAuth", resource_metadata="{METADATA_ENDPOINT}"'}Extract the Bearer token from incoming MCP client requests. MCP clients send tokens in the Authorization: Bearer <token> header format.
// Extract Bearer token from Authorization header// Use case: Validate requests from AI hosts like Claude Desktop, Cursor, or VS Codeconst authHeader = req.headers['authorization'];const token = authHeader?.startsWith('Bearer ') ? authHeader.split('Bearer ')[1]?.trim() : null;
if (!token) { throw new Error('Missing or invalid Bearer token');}# Extract Bearer token from Authorization header# Use case: Validate requests from AI hosts like Claude Desktop, Cursor, or VS Codeauth_header = request.headers.get("Authorization", "")token = Noneif auth_header.startswith("Bearer "): token = auth_header.split("Bearer ")[1].strip()
if not token: raise ValueError("Missing or invalid Bearer token")Validate the token against your configured resource audience to ensure it was issued for your specific MCP server. The resource identifier must match the Server URL you registered earlier.
// Security: Validate token against configured resource audience// This ensures the token was issued for your specific MCP serverawait scalekit.validateToken(token, { issuer: '<SCALEKIT_ENVIRONMENT_URL>' audience: [RESOURCE_ID]}); # Method 1: validate_access_token - Returns boolean (True/False) # Use this method when you only need to verify token validity without detailed error information. # This approach is suitable for simple authorization checks where you don't need token claims. def validate_token_with_issuer_audience(token: str) -> bool: """ Validates a token and returns True if valid, False otherwise.
:param token: The token to validate :return: True if token is valid, False otherwise """ options = TokenValidationOptions( issuer="<SCALEKIT_ENVIRONMENT_URL>", audience=[RESOURCE_ID] )
try: is_valid = scalekit_client.validate_access_token(token, options=options) return is_valid except Exception as ex: print(f"Token validation failed: {ex}") return False
# Method 2: validate_token - Returns token claims/payload # Use this method when you need access to token claims (user info, scopes, etc.) or detailed error information. # This approach is suitable for authorization that requires specific user context or scope validation. def validate_token_and_get_claims(token: str) -> dict: """ Validates a token with specific audience and raises exception on failure.
:param token: The token to validate :raises: ScalekitValidateTokenFailureException if validation fails """ options = TokenValidationOptions( issuer="<SCALEKIT_ENVIRONMENT_URL>", audience=[RESOURCE_ID], required_scopes=["todo:read", "todo:write"] # Optional: validate specific scopes for finer access control )
scalekit_client.validate_token(token, options=options)Combine token extraction and validation into a complete authentication middleware that protects all your MCP endpoints.
import { Scalekit } from '@scalekit-sdk/node';import { NextFunction, Request, Response } from 'express';
const scalekit = new Scalekit(  process.env.SCALEKIT_ENVIRONMENT_URL,  process.env.SCALEKIT_CLIENT_ID,  process.env.SCALEKIT_CLIENT_SECRET);
const RESOURCE_ID = 'https://your-mcp-server.com';  // If no Server URL is set in Scalekit, use the autogenerated resource ID (e.g., res_123456789) from your dashboard.const METADATA_ENDPOINT = 'https://your-mcp-server.com/.well-known/oauth-protected-resource';
export const WWWHeader = {  HeaderKey: 'WWW-Authenticate',  HeaderValue: `Bearer realm="OAuth", resource_metadata="${METADATA_ENDPOINT}"`};
export async function authMiddleware(req: Request, res: Response, next: NextFunction) {  try {    // Security: Allow public access to well-known endpoints for metadata discovery    // This enables MCP clients to discover your OAuth configuration    if (req.path.includes('.well-known')) {      return next();    }
    // Extract Bearer token from Authorization header    const authHeader = req.headers['authorization'];    const token = authHeader?.startsWith('Bearer ')      ? authHeader.split('Bearer ')[1]?.trim()      : null;
    if (!token) {      throw new Error('Missing or invalid Bearer token');    }
    // Security: Validate token against configured resource audience    await scalekit.validateToken(token, {      audience: [RESOURCE_ID]    });
    next();  } catch (err) {    // Return proper OAuth 2.0 error response with WWW-Authenticate header    return res      .status(401)      .set(WWWHeader.HeaderKey, WWWHeader.HeaderValue)      .end();  }}
// Apply authentication middleware to all MCP endpointsapp.use('/', authMiddleware);
from scalekit import ScalekitClientfrom scalekit.common.scalekit import TokenValidationOptionsfrom fastapi import Request, HTTPException, statusfrom fastapi.responses import Responseimport os
scalekit_client = ScalekitClient( env_url=os.getenv("SCALEKIT_ENVIRONMENT_URL"), client_id=os.getenv("SCALEKIT_CLIENT_ID"), client_secret=os.getenv("SCALEKIT_CLIENT_SECRET"))
RESOURCE_ID = "https://your-mcp-server.com" # If no Server URL is set in Scalekit, use the autogenerated resource ID (e.g., res_123456789) from your dashboard.METADATA_ENDPOINT = "https://your-mcp-server.com/.well-known/oauth-protected-resource"
# WWW-Authenticate header for unauthorized responsesWWW_HEADER = { "WWW-Authenticate": f'Bearer realm="OAuth", resource_metadata="{METADATA_ENDPOINT}"'}
async def auth_middleware(request: Request, call_next): # Security: Allow public access to well-known endpoints for metadata discovery if request.url.path.startswith("/.well-known"): return await call_next(request)
# Extract Bearer token from Authorization header auth_header = request.headers.get("Authorization", "") token = None if auth_header.startswith("Bearer "): token = auth_header.split("Bearer ")[1].strip()
if not token: raise HTTPException( status_code=status.HTTP_401_UNAUTHORIZED, headers=WWW_HEADER )
# Security: Validate token against configured resource audience try: options = TokenValidationOptions( issuer=os.getenv("SCALEKIT_ENVIRONMENT_URL"), audience=[RESOURCE_ID] ) scalekit_client.validate_token(token, options=options) except Exception: raise HTTPException( status_code=status.HTTP_401_UNAUTHORIZED, headers=WWW_HEADER )
return await call_next(request)
# Apply authentication middleware to all MCP endpointsapp.middleware("http")(auth_middleware)Add scope validation at the MCP tool execution level to ensure tools are only executed when the user has authorized the MCP client with the required permissions. This provides fine-grained access control and follows the principle of least privilege.
// Security: Validate token has required scope for this specific tool execution// Use case: Ensure users only have access to authorized MCP toolstry { await scalekit.validateToken( token, { audience: [RESOURCE_ID], requiredScopes: [scope] } );} catch(error) { // Return OAuth 2.0 compliant error for insufficient scope return res.status(403).json({ error: 'insufficient_scope', error_description: `Required scope: ${scope}`, scope: scope });}# Security: Validate token has required scope for this specific tool execution# Use case: Ensure users only have access to authorized MCP toolstry: scalekit_client.validate_access_token( token, options=TokenValidationOptions( audience=[RESOURCE_ID], required_scopes=[scope] ) )except ScalekitValidateTokenFailureException as ex: # Return OAuth 2.0 compliant error for insufficient scope return { "error": "insufficient_scope", "error_description": f"Required scope: {scope}", "scope": scope }Beyond the OAuth 2.1 authorization you’ve implemented, you can enable additional authentication methods that work seamlessly with your MCP server’s token validation:
Enable organizations to authenticate through their identity providers (Okta, Azure AD, Google Workspace). Your MCP server continues validating tokens the same way, while Scalekit handles:
Allow users to authenticate via Google, GitHub, Microsoft, and other social providers. Your existing token validation logic remains unchanged while providing:
These authentication methods require no changes to your MCP server implementation—you continue validating tokens exactly as shown in the previous steps.
Bring your own auth allows you to use your own authentication system to authenticate users to your MCP server.
Your MCP server now has production-ready OAuth 2.1 authorization! You’ve successfully implemented a secure authorization flow that protects your MCP tools and ensures only authenticated users can access them through AI hosts.
Try the demo: Download and run our sample MCP server with authentication already configured to see the complete integration in action.
In summary,
Scalekit OAuth authorization server
Acts as the identity provider for your MCP server.
Your MCP server
Validates incoming access tokens and enforces the permissions encoded in each token. Only requests with valid, authorized tokens are allowed.
This separation of responsibilities ensures a clear boundary: Scalekit handles identity and token issuance, while your MCP server focuses on business logic of executing the actual tool calls.