Build with a coding agent
npx @scalekit-inc/cli setupnpm install -g @scalekit-inc/cliscalekit setupEnable enterprise SSO for any customer in minutes with built-in SAML and OIDC integrations
Enterprise customers often require Single Sign-On (SSO) support for their applications. Rather than building custom integrations for every identity provider such as Okta, Entra ID, or JumpCloud and managing their OIDC and SAML protocols, you can let Scalekit handle those connections with each of your customer’s identity providers.
After your customer’s identity provider verifies the user, Scalekit forwards the authentication response directly to your application. You receive the verified identity claims and handle all subsequent user management—creating accounts, managing sessions, and controlling access—using your own systems.
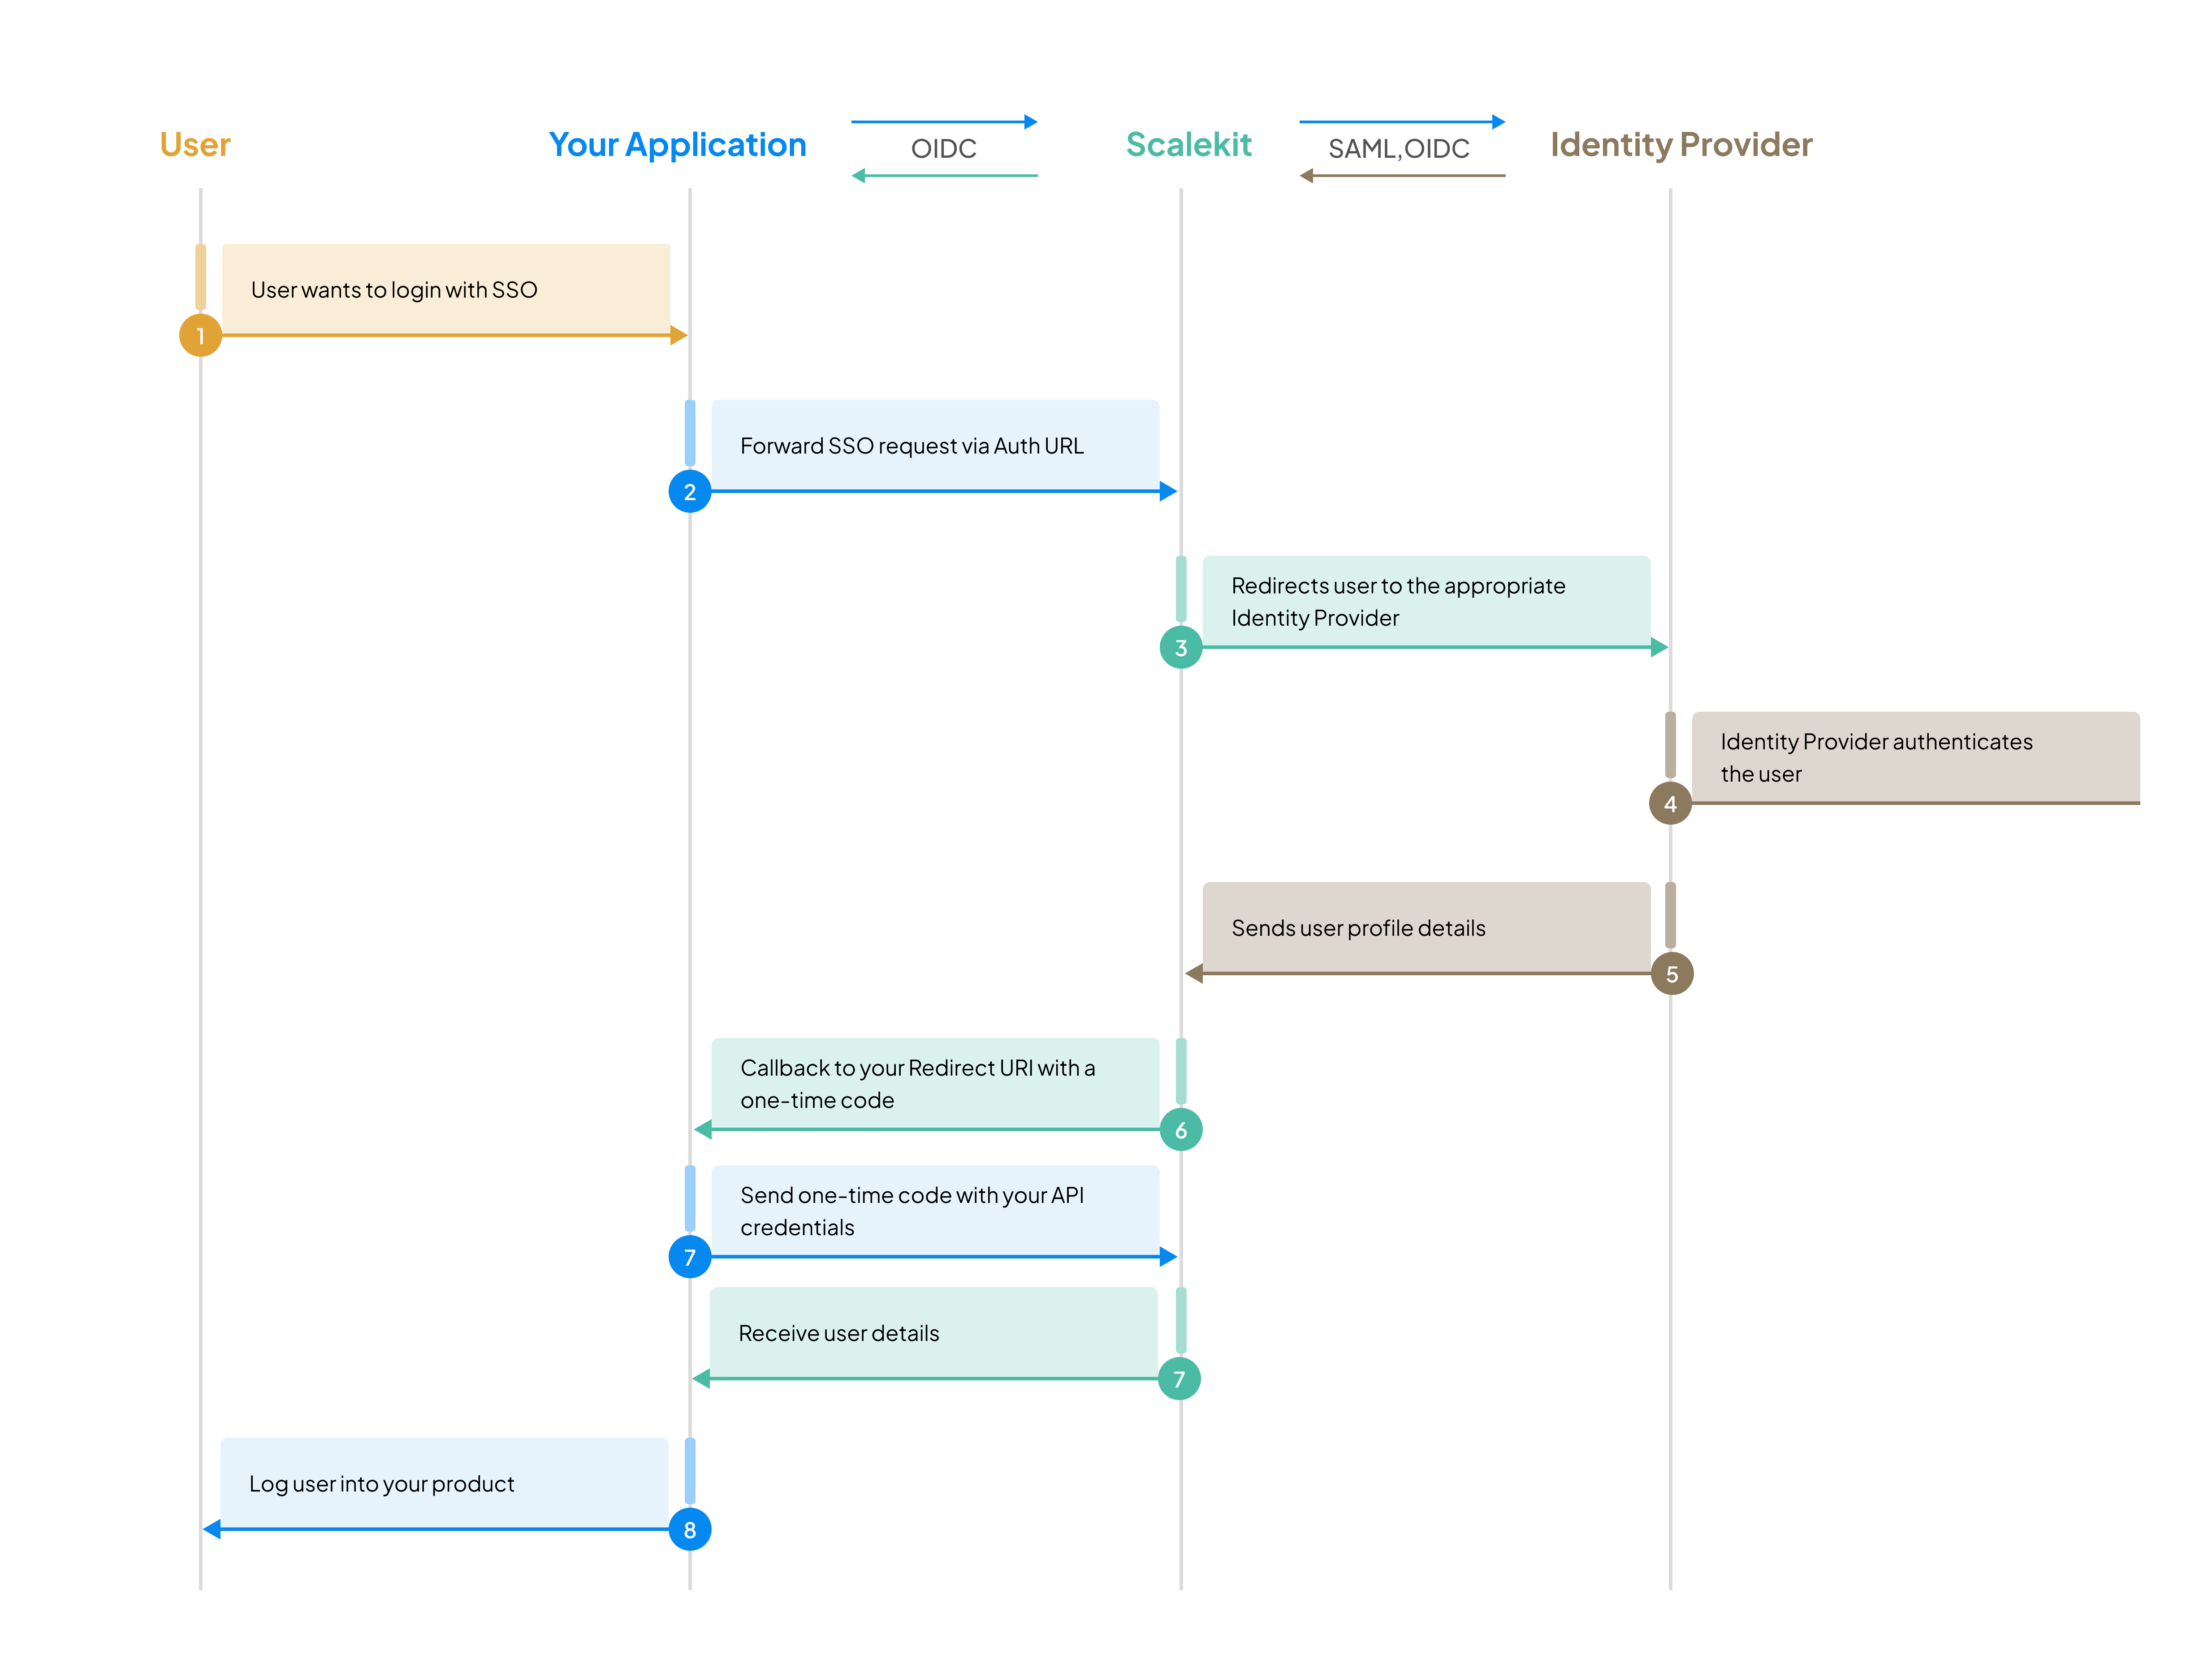
This approach gives you maximum flexibility to integrate SSO into existing authentication architectures while offloading the complexity of SAML and OIDC protocol handling to Scalekit.
Modular SSO is designed for applications that maintain their own user database and session management. This lightweight integration focuses solely on identity verification, giving you complete control over user data and authentication flows.
Choose Modular SSO when you:
npx @scalekit-inc/cli setupnpm install -g @scalekit-inc/cliscalekit setupUse the following instructions to install the SDK for your technology stack.
npm install @scalekit-sdk/nodepip install scalekit-sdk-pythongo get -u github.com/scalekit-inc/scalekit-sdk-go/* Gradle users - add the following to your dependencies in build file */implementation "com.scalekit:scalekit-sdk-java:2.1.3"<!-- Maven users - add the following to your `pom.xml` --><dependency> <groupId>com.scalekit</groupId> <artifactId>scalekit-sdk-java</artifactId> <version>2.1.3</version></dependency>Since we will using Modular SSO, you need to disable complete auth:
Now you’re ready to start integrating SSO into your app!
Use the Scalekit SDK to construct authorization URL with your redirect URI and required scopes. Scalekit will automatically redirect the user to the user’s enterprise identity provider login page to authenticate.
8 collapsed lines
import { Scalekit } from '@scalekit-sdk/node';
const scalekit = new ScalekitClient( '<SCALEKIT_ENVIRONMENT_URL>', // Your Scalekit environment URL '<SCALEKIT_CLIENT_ID>', // Unique identifier for your app '<SCALEKIT_CLIENT_SECRET>',);
const options = {};
// Specify which SSO connection to use (choose one based on your use case)// These identifiers are evaluated in order of precedence:
// 1. connectionId (highest precedence) - Use when you know the exact SSO connectionoptions['connectionId'] = 'conn_15696105471768821';
// 2. organizationId - Routes to organization's SSO (useful for multi-tenant apps)// If org has multiple connections, the first active one is selectedoptions['organizationId'] = 'org_15421144869927830';
// 3. loginHint (lowest precedence) - Extracts domain from email to find connection// Domain must be registered to the organization (manually via Dashboard or through admin portal during enterprise onboarding)options['loginHint'] = 'user@example.com';
// redirect_uri: Your callback endpoint that receives the authorization code// Must match the URL registered in your Scalekit dashboardconst redirectUrl = 'https://your-app.com/auth/callback';
const authorizationURL = scalekit.getAuthorizationUrl(redirectUrl, options);// Redirect user to this URL to begin SSO authentication8 collapsed lines
from scalekit import ScalekitClient, AuthorizationUrlOptions
scalekit = ScalekitClient( '<SCALEKIT_ENVIRONMENT_URL>', # Your Scalekit environment URL '<SCALEKIT_CLIENT_ID>', # Unique identifier for your app '<SCALEKIT_CLIENT_SECRET>')
options = AuthorizationUrlOptions()
# Specify which SSO connection to use (choose one based on your use case)# These identifiers are evaluated in order of precedence:
# 1. connection_id (highest precedence) - Use when you know the exact SSO connectionoptions.connection_id = 'conn_15696105471768821'
# 2. organization_id - Routes to organization's SSO (useful for multi-tenant apps)# If org has multiple connections, the first active one is selectedoptions.organization_id = 'org_15421144869927830'
# 3. login_hint (lowest precedence) - Extracts domain from email to find connection# Domain must be registered to the organization (manually via Dashboard or through admin portal during enterprise onboarding)options.login_hint = 'user@example.com'
# redirect_uri: Your callback endpoint that receives the authorization code# Must match the URL registered in your Scalekit dashboardredirect_uri = 'https://your-app.com/auth/callback'
authorization_url = scalekit_client.get_authorization_url( redirect_uri=redirect_uri, options=options)# Redirect user to this URL to begin SSO authentication11 collapsed lines
import ( "github.com/scalekit-inc/scalekit-sdk-go")
func main() { scalekitClient := scalekit.NewScalekitClient( "<SCALEKIT_ENVIRONMENT_URL>", // Your Scalekit environment URL "<SCALEKIT_CLIENT_ID>", // Unique identifier for your app "<SCALEKIT_CLIENT_SECRET>" )
options := scalekitClient.AuthorizationUrlOptions{}
// Specify which SSO connection to use (choose one based on your use case) // These identifiers are evaluated in order of precedence:
// 1. ConnectionId (highest precedence) - Use when you know the exact SSO connection options.ConnectionId = "conn_15696105471768821"
// 2. OrganizationId - Routes to organization's SSO (useful for multi-tenant apps) // If org has multiple connections, the first active one is selected options.OrganizationId = "org_15421144869927830"
// 3. LoginHint (lowest precedence) - Extracts domain from email to find connection // Domain must be registered to the organization (manually via Dashboard or through admin portal during enterprise onboarding) options.LoginHint = "user@example.com"
// redirectUrl: Your callback endpoint that receives the authorization code // Must match the URL registered in your Scalekit dashboard redirectUrl := "https://your-app.com/auth/callback"
authorizationURL := scalekitClient.GetAuthorizationUrl( redirectUrl, options, ) // Redirect user to this URL to begin SSO authentication}package com.scalekit;
import com.scalekit.ScalekitClient;import com.scalekit.internal.http.AuthorizationUrlOptions;
public class Main {
public static void main(String[] args) { ScalekitClient scalekitClient = new ScalekitClient( "<SCALEKIT_ENVIRONMENT_URL>", // Your Scalekit environment URL "<SCALEKIT_CLIENT_ID>", // Unique identifier for your app "<SCALEKIT_CLIENT_SECRET>" );
AuthorizationUrlOptions options = new AuthorizationUrlOptions();
// Specify which SSO connection to use (choose one based on your use case) // These identifiers are evaluated in order of precedence:
// 1. connectionId (highest precedence) - Use when you know the exact SSO connection options.setConnectionId("con_13388706786312310");
// 2. organizationId - Routes to organization's SSO (useful for multi-tenant apps) // If org has multiple connections, the first active one is selected options.setOrganizationId("org_13388706786312310");
// 3. loginHint (lowest precedence) - Extracts domain from email to find connection // Domain must be registered to the organization (manually via Dashboard or through admin portal during enterprise onboarding) options.setLoginHint("user@example.com");
// redirectUrl: Your callback endpoint that receives the authorization code // Must match the URL registered in your Scalekit dashboard String redirectUrl = "https://your-app.com/auth/callback";
try { String url = scalekitClient .authentication() .getAuthorizationUrl(redirectUrl, options) .toString(); // Redirect user to this URL to begin SSO authentication } catch (Exception e) { System.out.println(e.getMessage()); } }}<SCALEKIT_ENVIRONMENT_URL>/oauth/authorize? response_type=code& # OAuth2 authorization code flow client_id=<SCALEKIT_CLIENT_ID>& # Your Scalekit client ID redirect_uri=<REDIRECT_URI>& # URL-encoded callback URL scope=openid profile email& # "offline_access" is required to receive a refresh token organization_id=org_15421144869927830& # (Optional) Route by organization connection_id=conn_15696105471768821& # (Optional) Specific SSO connection login_hint=user@example.com # (Optional) Extract domain from emailSSO identifiers (choose one or more, evaluated in order of precedence):
connection_id - Direct to specific SSO connection (highest precedence)organization_id - Route to organization’s SSOdomain_hint - Lookup connection by domainlogin_hint - Extract domain from email (lowest precedence). Domain must be registered to the organization (manually via Dashboard or through admin portal when onboarding an enterprise customer)https://tinotat-dev.scalekit.dev/oauth/authorize? response_type=code& client_id=skc_88036702639096097& redirect_uri=http%3A%2F%2Flocalhost%3A3000%2Fauth%2Fcallback& scope=openid%20profile%20email& organization_id=org_15421144869927830Enterprise users see their identity provider’s login page. Users verify their identity through the authentication policies set by their organization’s administrator. Post successful verification, the user profile is normalized and sent to your app.
If your application needs to verify whether an SSO connection exists for a specific domain before proceeding, you can use the list connections by domain SDK method.
For details on how Scalekit determines which SSO connection to use, refer to the SSO identifier precedence rules.
After successful authentication, Scalekit redirects to your callback URL with an authorization code. Your application exchanges this code for the user’s profile information and session tokens.
https://your-app.com/auth/callback)In authentication flow, Scalekit redirects to your callback URL with an authorization code. Your application exchanges this code for the user’s profile information.
// Extract authentication parameters from the callback requestconst { code, error, error_description, idp_initiated_login, connection_id, relay_state} = req.query;
if (error) { // Handle authentication errors returned from the identity provider}
// Recommended: Process IdP-initiated login flows (when users start from their SSO portal)
const result = await scalekit.authenticateWithCode(code, redirectUri);const userEmail = result.user.email;
// Create a session for the authenticated user and grant appropriate access permissions# Extract authentication parameters from the callback requestcode = request.args.get('code')error = request.args.get('error')error_description = request.args.get('error_description')idp_initiated_login = request.args.get('idp_initiated_login')connection_id = request.args.get('connection_id')relay_state = request.args.get('relay_state')
if error: raise Exception(error_description)
# Recommended: Process IdP-initiated login flows (when users start from their SSO portal)
result = scalekit.authenticate_with_code(code, '<redirect_uri>')
# Access normalized user profile informationuser_email = result.user.email
# Create a session for the authenticated user and grant appropriate access permissions// Extract authentication parameters from the callback requestcode := r.URL.Query().Get("code")error := r.URL.Query().Get("error")errorDescription := r.URL.Query().Get("error_description")idpInitiatedLogin := r.URL.Query().Get("idp_initiated_login")connectionID := r.URL.Query().Get("connection_id")relayState := r.URL.Query().Get("relay_state")
if error != "" { // Handle authentication errors returned from the identity provider}
// Recommended: Process IdP-initiated login flows (when users start from their SSO portal)
result, err := scalekitClient.AuthenticateWithCode(r.Context(), code, redirectUrl)
if err != nil { // Handle token exchange or validation errors}
// Access normalized user profile informationuserEmail := result.User.Email
// Create a session for the authenticated user and grant appropriate access permissions// Extract authentication parameters from the callback requestString code = request.getParameter("code");String error = request.getParameter("error");String errorDescription = request.getParameter("error_description");String idpInitiatedLogin = request.getParameter("idp_initiated_login");String connectionID = request.getParameter("connection_id");String relayState = request.getParameter("relay_state");
if (error != null && !error.isEmpty()) { // Handle authentication errors returned from the identity provider return;}
// Recommended: Process IdP-initiated login flows (when users start from their SSO portal)
try { AuthenticationResponse result = scalekit.authentication().authenticateWithCode(code, redirectUrl); String userEmail = result.getIdTokenClaims().getEmail();
// Create a session for the authenticated user and grant appropriate access permissions} catch (Exception e) { // Handle token exchange or validation errors}The result object
// Validate and decode the ID token from the authentication resultconst idTokenClaims = await scalekit.validateToken(result.idToken);
// Validate and decode the access tokenconst accessTokenClaims = await scalekit.validateToken(result.accessToken); # Validate and decode the ID token from the authentication result id_token_claims = scalekit_client.validate_token(result["id_token"])
# Validate and decode the access token access_token_claims = scalekit_client.validate_token(result["access_token"]) // Create a background context for the API call ctx := context.Background()
// Validate and decode the access token (uses JWKS from the client) accessTokenClaims, err := scalekitClient.GetAccessTokenClaims(ctx, result.AccessToken)if err != nil { // handle error} // Validate and decode the ID token Map<String, Object> idTokenClaims = scalekitClient.validateToken(result.getIdToken());
// Validate and decode the access token Map<String, Object> accessTokenClaims = scalekitClient.validateToken(result.getAccessToken());{ user: { email: 'john@example.com', familyName: 'Doe', givenName: 'John', username: 'john@example.com', id: 'conn_70087756662964366;dcc62570-6a5a-4819-b11b-d33d110c7716' }, idToken: 'eyJhbGciOiJSU..bcLQ', accessToken: 'eyJhbGciO..', expiresIn: 899}{ iss: '<SCALEKIT_ENVIRONMENT_URL>', // Issuer: Scalekit environment URL (must match your environment) aud: [ 'skc_70087756327420046' ], // Audience: Your client ID (must match for validation) azp: 'skc_70087756327420046', // Authorized party: Usually same as aud sub: 'conn_70087756662964366;e964d135-35c7-4a13-a3b4-2579a1cdf4e6', // Subject: Connection ID and IdP user ID (SSO-specific format) oid: 'org_70087756646187150', // Organization ID: User's organization exp: 1758952038, // Expiration: Unix timestamp (validate token hasn't expired) iat: 1758692838, // Issued at: Unix timestamp when token was issued at_hash: 'yMGIBg7BkmIGgD6_dZPEGQ', // Access token hash: For token binding validation c_hash: '4x7qsXnlRw6dRC6twnuENw', // Authorization code hash: For code binding validation amr: [ 'conn_70087756662964366' ], // Authentication method reference: SSO connection ID used for authentication email: 'john@example.com', // User's email address preferred_username: 'john@example.com', // Preferred username (often same as email for SSO) family_name: 'Doe', // User's last name given_name: 'John', // User's first name sid: 'ses_91646612652163629', // Session ID: Links token to user session client_id: 'skc_70087756327420046' // Client ID: Your application identifier} { "iss": "<SCALEKIT_ENVIRONMENT_URL>", // Issuer: Scalekit environment URL (must match your environment) "aud": ["skc_70087756327420046"], // Audience: Your client ID (must match for validation) "sub": "conn_70087756662964366;dcc62570-6a5a-4819-b11b-d33d110c7716", // Subject: Connection ID and IdP user ID (SSO-specific format) "exp": 1758693916, // Expiration: Unix timestamp (validate token hasn't expired) "iat": 1758693016, // Issued at: Unix timestamp when token was issued "nbf": 1758693016, // Not before: Unix timestamp (token valid from this time) "jti": "tkn_91646913048216109", // JWT ID: Unique token identifier "client_id": "skc_70087756327420046" // Client ID: Your application identifier}When users start the login process from their identity provider’s portal (rather than your application), this is called IdP-initiated SSO. Scalekit converts these requests to secure SP-initiated flows automatically.
Your initiate login endpoint receives an idp_initiated_login JWT parameter containing the user’s organization and connection details. Decode this token and generate a new authorization URL to complete the authentication flow securely.
https://yourapp.com/login?idp_initiated_login=<encoded_jwt_token>Configure your initiate login endpoint in Dashboard > Authentication > Redirects
// Your initiate login endpoint receives the IdP-initiated login tokenconst { idp_initiated_login, error, error_description } = req.query;5 collapsed lines
if (error) { return res.status(400).json({ message: error_description });}
// When users start login from their IdP portal, convert to SP-initiated flowif (idp_initiated_login) { // Decode the JWT to extract organization and connection information const claims = await scalekit.getIdpInitiatedLoginClaims(idp_initiated_login);
const options = { connectionId: claims.connection_id, // Specific SSO connection organizationId: claims.organization_id, // User's organization loginHint: claims.login_hint, // User's email for context state: claims.relay_state // Preserve state from IdP };
// Generate authorization URL and redirect to complete authentication const authorizationURL = scalekit.getAuthorizationUrl( 'https://your-app.com/auth/callback', options );
return res.redirect(authorizationURL);}# Your initiate login endpoint receives the IdP-initiated login tokenidp_initiated_login = request.args.get('idp_initiated_login')error = request.args.get('error')error_description = request.args.get('error_description')4 collapsed lines
if error: raise Exception(error_description)
# When users start login from their IdP portal, convert to SP-initiated flowif idp_initiated_login: # Decode the JWT to extract organization and connection information claims = await scalekit.get_idp_initiated_login_claims(idp_initiated_login)
options = AuthorizationUrlOptions() options.connection_id = claims.get('connection_id') # Specific SSO connection options.organization_id = claims.get('organization_id') # User's organization options.login_hint = claims.get('login_hint') # User's email for context options.state = claims.get('relay_state') # Preserve state from IdP
# Generate authorization URL and redirect to complete authentication authorization_url = scalekit.get_authorization_url( redirect_uri='https://your-app.com/auth/callback', options=options )
return redirect(authorization_url)// Your initiate login endpoint receives the IdP-initiated login tokenidpInitiatedLogin := r.URL.Query().Get("idp_initiated_login")errorDesc := r.URL.Query().Get("error_description")
5 collapsed lines
if errorDesc != "" { http.Error(w, errorDesc, http.StatusBadRequest) return}
// When users start login from their IdP portal, convert to SP-initiated flowif idpInitiatedLogin != "" { // Decode the JWT to extract organization and connection information claims, err := scalekitClient.GetIdpInitiatedLoginClaims(r.Context(), idpInitiatedLogin) if err != nil { http.Error(w, err.Error(), http.StatusInternalServerError) return }
options := scalekit.AuthorizationUrlOptions{ ConnectionId: claims.ConnectionID, // Specific SSO connection OrganizationId: claims.OrganizationID, // User's organization LoginHint: claims.LoginHint, // User's email for context }
// Generate authorization URL and redirect to complete authentication authUrl, err := scalekitClient.GetAuthorizationUrl( "https://your-app.com/auth/callback", options )8 collapsed lines
if err != nil { http.Error(w, err.Error(), http.StatusInternalServerError) return }
http.Redirect(w, r, authUrl.String(), http.StatusFound)}// Your initiate login endpoint receives the IdP-initiated login token@GetMapping("/login")public RedirectView handleInitiateLogin( @RequestParam(required = false, name = "idp_initiated_login") String idpInitiatedLoginToken, @RequestParam(required = false) String error, @RequestParam(required = false, name = "error_description") String errorDescription, HttpServletResponse response) throws IOException {
if (error != null) { response.sendError(HttpStatus.BAD_REQUEST.value(), errorDescription); return null; }
// When users start login from their IdP portal, convert to SP-initiated flow if (idpInitiatedLoginToken != null) { // Decode the JWT to extract organization and connection information IdpInitiatedLoginClaims claims = scalekit .authentication() .getIdpInitiatedLoginClaims(idpInitiatedLoginToken);
if (claims == null) { response.sendError(HttpStatus.BAD_REQUEST.value(), "Invalid token"); return null; }
AuthorizationUrlOptions options = new AuthorizationUrlOptions(); options.setConnectionId(claims.getConnectionID()); // Specific SSO connection options.setOrganizationId(claims.getOrganizationID()); // User's organization options.setLoginHint(claims.getLoginHint()); // User's email for context
// Generate authorization URL and redirect to complete authentication String authUrl = scalekit .authentication() .getAuthorizationUrl("https://your-app.com/auth/callback", options) .toString();
response.sendRedirect(authUrl); return null; }
return null;}This approach provides enhanced security by converting IdP-initiated requests to standard SP-initiated flows, protecting against SAML assertion theft and replay attacks.
Learn more: IdP-initiated SSO implementation guide
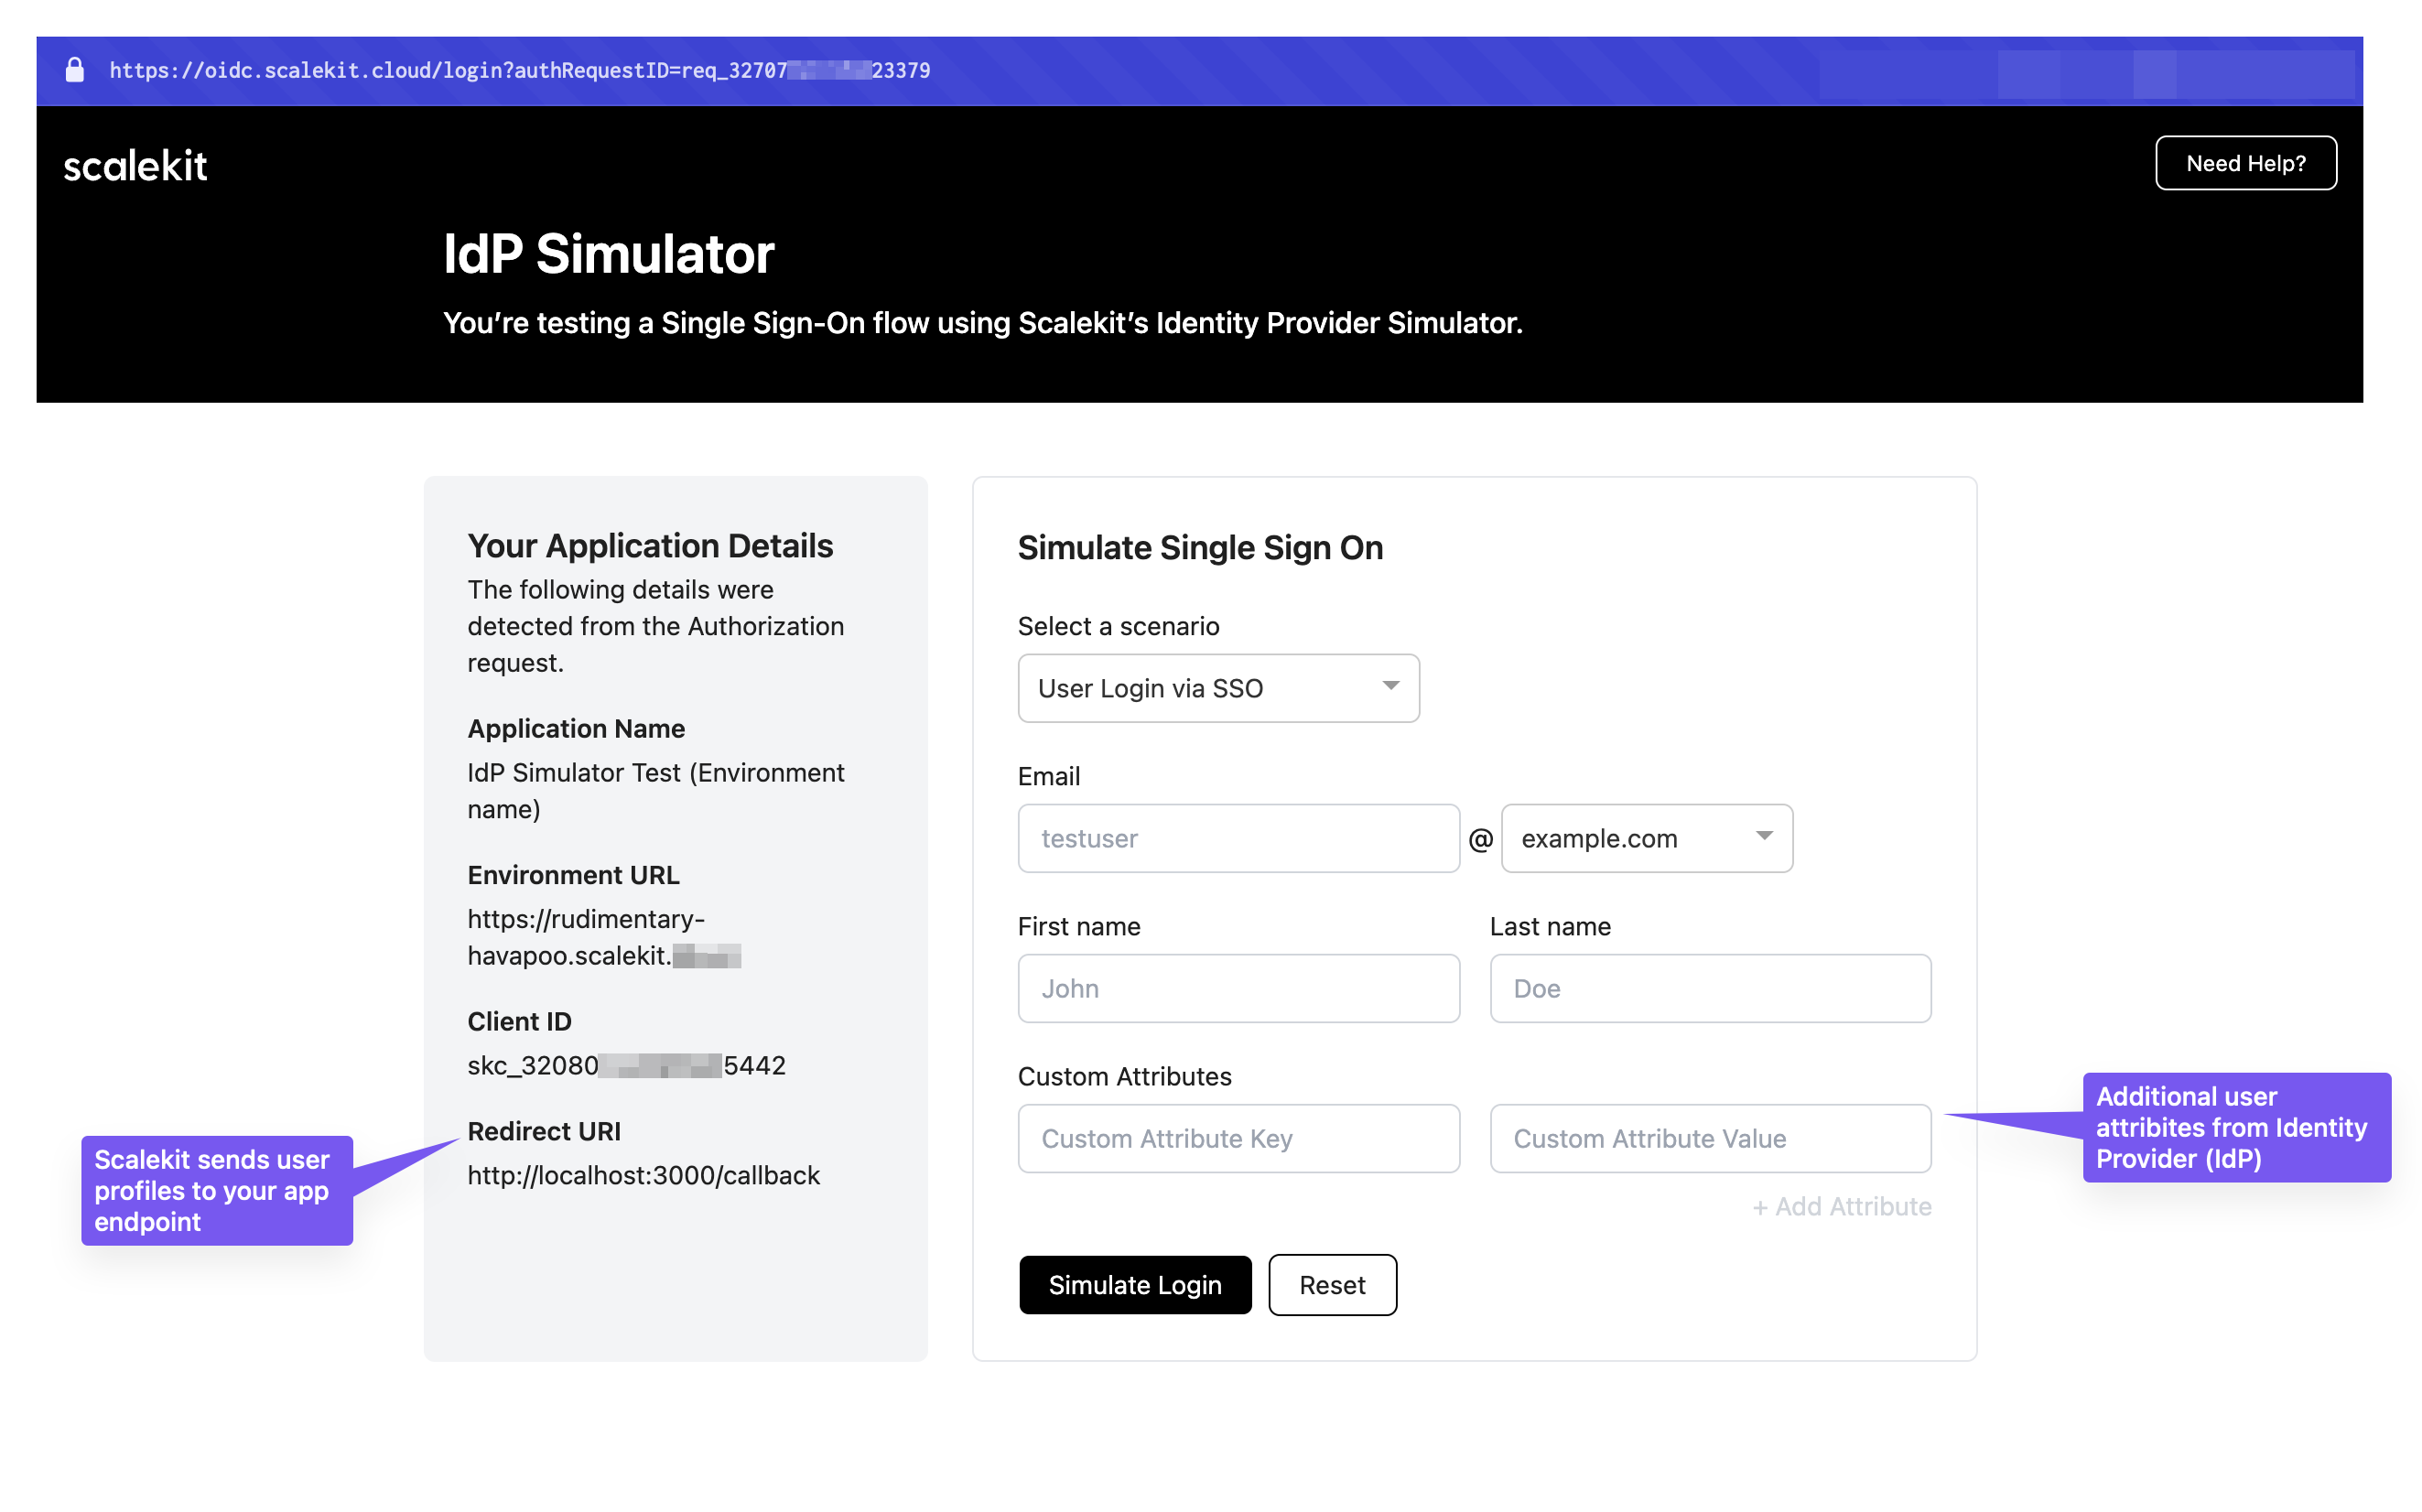
Validate your implementation using the IdP Simulator and Test Organization included in your development environment. Test all three scenarios before deploying to production.
Your environment includes a pre-configured test organization (found in Dashboard > Organizations) with domains like @example.com and @example.org for testing.
Pass one of the following connection selectors in your authorization URL:
@example.com or @example.org domainThis opens the SSO login page (IdP Simulator) that simulates your customer’s identity provider login experience.
For detailed testing instructions and scenarios, see our Complete SSO testing guide
Many applications already use an authentication provider such as Auth0, Firebase, or AWS Cognito. To enable single sign-on (SSO) using Scalekit, configure Scalekit to work with your current authentication provider.
Integrate Scalekit with Auth0 for enterprise SSO
Know more →Add enterprise authentication to Firebase projects
Know more →Configure Scalekit with AWS Cognito user pools
Know more →Enable SSO for your enterprise customers by creating an organization in Scalekit and providing them access to the Admin Portal. Your customers configure their identity provider settings themselves through a self-service portal.
Create an organization for your customer in Dashboard > Organizations, then provide Admin Portal access using one of these methods:
Generate a secure link your customer can use to access the Admin Portal:
// Generate a one-time Admin Portal link for your customerconst portalLink = await scalekit.organization.generatePortalLink(  'org_32656XXXXXX0438'  // Your customer's organization ID);
// Share this link with your customer's IT admin via email or messaging// Example: '<SCALEKIT_ENVIRONMENT_URL>/magicLink/8930509d-68cf-4e2c-8c6d-94d2b5e2db43console.log('Admin Portal URL:', portalLink.location);
Send this link to your customer’s IT administrator through email, Slack, or your preferred communication channel. They can configure their SSO connection without any developer involvement.
Embed the Admin Portal directly in your application using an iframe:
// Generate a secure portal link at runtimeconst portalLink = await scalekit.organization.generatePortalLink(orgId);
// Return the link to your frontend to embed in an iframeres.json({ portalUrl: portalLink.location });<!-- Embed in your application's settings page --><iframe src="https://random-subdomain.scalekit.dev/magicLink/8930509d-68cf-4e2c-8c6d-94d2b5e2db43" width="100%" height="600" frameborder="0" allow="clipboard-write"></iframe>Customers configure SSO without leaving your application, maintaining a consistent user experience.
Learn more: Embedded Admin Portal guide
Enable domain verification for seamless user experience. Once your customer verifies their domain (e.g., @megacorp.org), users can sign in without selecting their organization. Scalekit automatically routes them to the correct identity provider based on their email domain.
Pre-check SSO availability before redirecting users. This prevents failed redirects when a user’s domain doesn’t have SSO configured:
// Extract domain from user's email addressconst domain = email.split('@')[1].toLowerCase(); // e.g., "megacorp.org"
// Check if domain has an active SSO connectionconst { connections } = await scalekit.connection.listConnectionsByDomain(domain);
if (connections.length > 0) { // Domain has SSO configured - redirect to identity provider const authUrl = scalekit.getAuthorizationUrl(redirectUri, { domainHint: domain // Automatically routes to correct IdP }); return res.redirect(authUrl);} else { // No SSO for this domain - show alternative login methods return showPasswordlessLogin();}# Extract domain from user's email addressdomain = email.split('@')[1].lower() # e.g., "megacorp.org"
# Check if domain has an active SSO connectionconnections = scalekit_client.connection.list_connections_by_domain(domain=domain).connections
if len(connections) > 0: # Domain has SSO configured - redirect to identity provider options = AuthorizationUrlOptions() options.domain_hint = domain # Automatically routes to correct IdP
auth_url = scalekit_client.get_authorization_url( redirect_uri=redirect_uri, options=options ) return redirect(auth_url)else: # No SSO for this domain - show alternative login methods return show_passwordless_login()// Extract domain from user's email addressparts := strings.Split(email, "@")domain := strings.ToLower(parts[1]) // e.g., "megacorp.org"
// Check if domain has an active SSO connectionconnections, err := scalekitClient.Connections.ListConnectionsByDomain(domain)if err != nil { // Handle error return err}
if len(connections) > 0 { // Domain has SSO configured - redirect to identity provider options := scalekit.AuthorizationUrlOptions{ DomainHint: domain, // Automatically routes to correct IdP }
authUrl, err := scalekitClient.GetAuthorizationUrl(redirectUri, options) if err != nil { return err }
c.Redirect(http.StatusFound, authUrl.String())} else { // No SSO for this domain - show alternative login methods return showPasswordlessLogin()}// Extract domain from user's email addressString[] parts = email.split("@");String domain = parts[1].toLowerCase(); // e.g., "megacorp.org"
// Check if domain has an active SSO connectionList<Connection> connections = scalekitClient .connections() .listConnectionsByDomain(domain);
if (connections.size() > 0) { // Domain has SSO configured - redirect to identity provider AuthorizationUrlOptions options = new AuthorizationUrlOptions(); options.setDomainHint(domain); // Automatically routes to correct IdP
String authUrl = scalekitClient .authentication() .getAuthorizationUrl(redirectUri, options) .toString();
return new RedirectView(authUrl);} else { // No SSO for this domain - show alternative login methods return showPasswordlessLogin();}This check ensures users only see SSO options when available, improving the login experience and reducing confusion.