
MCP quickstart with AI coding agents
Use AI coding agents to add OAuth 2.1 authentication to your MCP servers in minutes
Use AI coding agents to accelerate your MCP authentication integration. This guide shows you how to configure and use coding agents like Claude Code to implement Scalekit’s OAuth 2.1 authentication end-to-end in your MCP servers.
AI-assisted development reduces implementation time from hours to minutes. The coding agent analyzes your codebase, applies authentication patterns, and generates production-ready code that follows security best practices.
Prerequisites
- A Scalekit account with MCP server management access
- Basic familiarity with OAuth 2.1 and MCP server architecture
- Terminal access for installing coding agent tools
-
Install your coding agent
Section titled “Install your coding agent”Install an AI coding agent that supports plugin ecosystems. Claude Code provides native integration with Scalekit’s authentication plugins.
Run the installation script to set up Claude Code on your system:
Terminal curl -fsSL https://claude.ai/install.sh | bashAfter installation completes, verify the setup by running:
Terminal claude --versionLearn more about Claude Code in the official quickstart guide.
-
Add the Scalekit Auth Stack marketplace
Section titled “Add the Scalekit Auth Stack marketplace”Register Scalekit’s plugin marketplace to access pre-configured authentication skills. This marketplace provides context-aware prompts and implementation guides that help coding agents generate correct authentication code.
Start the Claude Code REPL and add the marketplace:
Terminal # Start Claude REPLclaude# Add Scalekit Auth Stack marketplace/plugin marketplace add scalekit-inc/claude-code-authstackWhen the marketplace registers successfully, you’ll see confirmation output:
Terminal ❯ /plugin marketplace add scalekit-inc/claude-code-authstack⎿ Successfully added marketplace: scalekit-auth-stackThe marketplace provides specialized authentication plugins that understand MCP server architectures and OAuth 2.1 security requirements. These plugins guide the coding agent to generate implementation code that matches your project structure.
To remove the Scalekit Auth Stack marketplace, use the uninstall command:
Claude REPL /plugin marketplace remove scalekit-auth-stack -
Enable authentication plugins
Section titled “Enable authentication plugins”Select which authentication capabilities to activate in your development environment. Each plugin provides specific skills that the coding agent uses to generate authentication code.
Run the plugin wizard to browse and enable available plugins:
Claude REPL /pluginsNavigate through the visual interface to enable the MCP authentication plugin:

Or, directly install the specific plugin:
Claude REPL /plugin install mcp-auth@scalekit-auth-stackTo remove an installed plugin, use the uninstall command:
Claude REPL /plugin uninstall mcp-auth@scalekit-auth-stack -
Generate authentication implementation
Section titled “Generate authentication implementation”Use a structured prompt to direct the coding agent. A well-formed prompt ensures the agent generates complete, production-ready authentication code that includes all required security components.
Copy the following prompt into your coding agent:
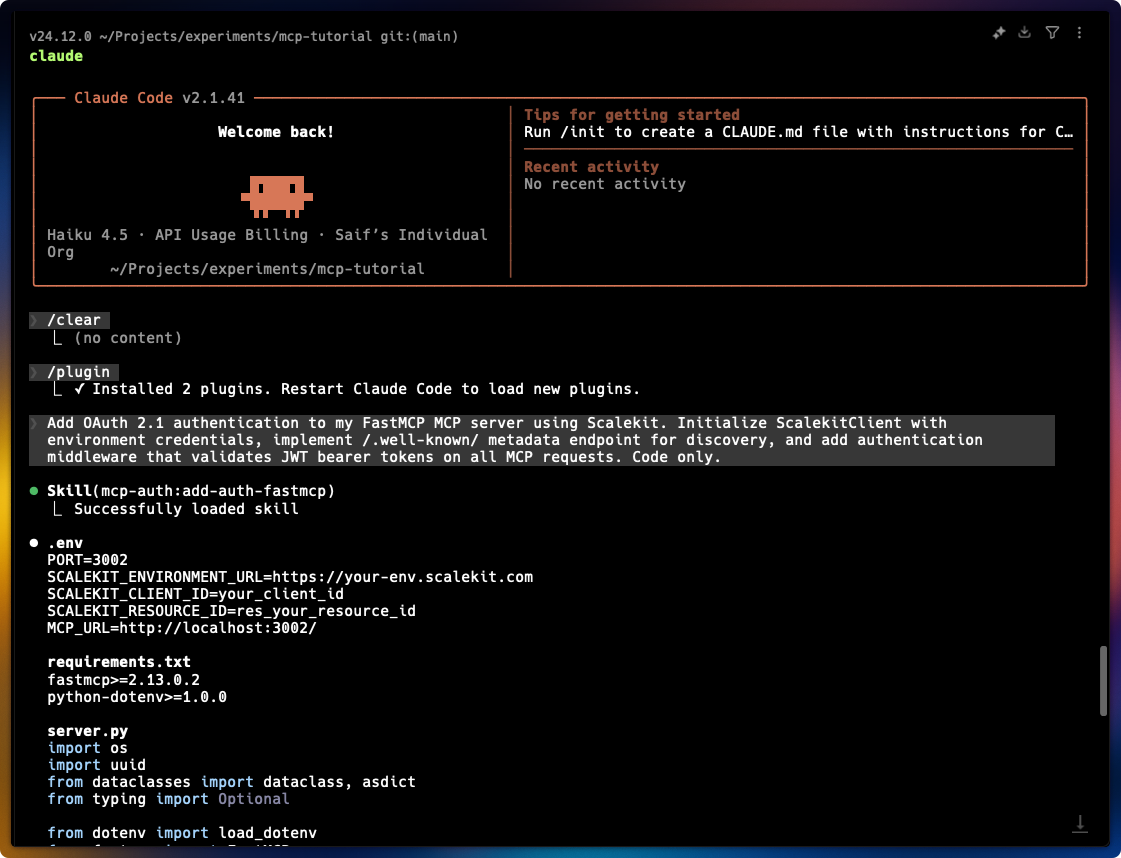
Authentication implementation prompt Add OAuth 2.1 authentication to my MCP server using Scalekit. Initialize ScalekitClient with environment credentials, implement /.well-known/ metadata endpoint for discovery, and add authentication middleware that validates JWT bearer tokens on all MCP requests. Code only.When you submit this prompt, Claude Code:
- Loads the MCP authentication skill from the marketplace
- Analyzes your existing MCP server structure
- Generates authentication middleware with token validation
- Creates the OAuth discovery endpoint
- Configures environment variable handling
-
Verify and test the implementation
Section titled “Verify and test the implementation”After the coding agent completes, verify that all authentication components are properly configured:
Check generated files:
- Authentication middleware with JWT validation
- Environment variable configuration (
.env.example) - OAuth discovery endpoint (
/.well-known/oauth-authorization-server) - Error handling for invalid or expired tokens
Test the authentication flow:
Claude REPL Now that your MCP server has authentication integrated, let's verify it's working correctly by testing the flow step by step. First, start your MCP server using npm start (Node.js) or python server.py (Python) and confirm it's running without errors. Next, test the OAuth discovery endpoint by running curl http://localhost:3000/.well-known/oauth-authorization-server to verify your server exposes the correct authorization configuration. Then, verify authentication is enforced by calling curl http://localhost:3000/mcp without credentials—this should return a 401 Unauthorized response, confirming protected endpoints are secured. Finally, test with a valid token by running curl -H "Authorization: Bearer YOUR_TOKEN" http://localhost:3000/mcp (replace YOUR_TOKEN with an actual access token from your auth provider) to confirm authenticated requests succeed and return the expected response—if all these steps work as described, your authentication implementation is functioning correctly.Terminal # Start your MCP servernpm start# Test discovery endpointcurl http://localhost:3000/.well-known/oauth-authorization-server# Test protected endpoint (should return 401)curl http://localhost:3000/mcp# Test with valid tokencurl -H "Authorization: Bearer YOUR_TOKEN" http://localhost:3000/mcpTerminal # Start your MCP serverpython server.py# Test discovery endpointcurl http://localhost:3000/.well-known/oauth-authorization-server# Test protected endpoint (should return 401)curl http://localhost:3000/mcp# Test with valid tokencurl -H "Authorization: Bearer YOUR_TOKEN" http://localhost:3000/mcpThe discovery endpoint should return OAuth configuration metadata. Protected endpoints should reject requests without valid tokens and accept requests with properly scoped access tokens.
Next steps
Section titled “Next steps”Your MCP server now has OAuth 2.1 authentication integrated. Test the implementation with your MCP host to verify the authentication flow works correctly.
Test with MCP hosts
Section titled “Test with MCP hosts”Connect your authenticated MCP server to any MCP-compatible host:
- Claude Desktop or Claude Code: Configure the MCP server connection in settings
- Cursor: Add the MCP server to your workspace configuration
- Windsurf: Register the server in your MCP settings
- Other MCP hosts: Follow your host’s documentation for connecting authenticated MCP servers
When you connect, the host authenticates using the OAuth 2.1 flow you configured. Verify that protected MCP resources require valid access tokens and that the discovery endpoint provides correct OAuth metadata.