
Create and manage roles and permissions
Set up roles and permissions to control access in your application
Before writing any code, take a moment to plan your application’s authorization model. A well-designed structure for roles and permissions is crucial for security and maintainability. Start by considering the following questions:
- What are the actions your users can perform?
- How many distinct roles does your application need?
Your application’s use cases will determine the answers. Here are a few common patterns:
-
Simple roles: Some applications, like an online whiteboarding tool, may only need a few roles with implicit permissions. For example,
Admin,Editor, andViewer. In this case, you might not even need to define granular permissions. -
Pre-defined roles and permissions: Many applications have a fixed set of roles built from specific permissions. For a project management tool, you could define permissions like
projects:createandtasks:assign, then group them into roles likeProject ManagerandTeam Member. -
Customer-defined Roles: For complex applications, you might allow organization owners to create custom roles with a specific set of permissions. These roles are specific to an organization rather than global to your application.
Scalekit provides the flexibility to build authorization for any of these use cases. Once you have a clear plan, you can start creating your permissions and roles.
Define the permissions your application needs by registering them with Scalekit. Use the resource:action format for clear, self-documenting permission names. You can skip this step, in case permissions may not fit your app’s authorization model.
-
Define the actions your users can perform as permissions
Section titled “Define the actions your users can perform as permissions”Create permissions 9 collapsed lines// Initialize Scalekit client// Use case: Register all available actions in your project management appimport { ScalekitClient } from "@scalekit-sdk/node";const scalekit = new ScalekitClient(process.env.SCALEKIT_ENVIRONMENT_URL,process.env.SCALEKIT_CLIENT_ID,process.env.SCALEKIT_CLIENT_SECRET);// Define your application's permissionsconst permissions = [{name: "projects:create",description: "Allows users to create new projects"},{name: "projects:read",description: "Allows users to view project details"},{name: "projects:update",description: "Allows users to modify existing projects"},{name: "projects:delete",description: "Allows users to remove projects"},{name: "tasks:assign",description: "Allows users to assign tasks to team members"}];// Register each permission with Scalekitfor (const permission of permissions) {await scalekit.permission.createPermission(permission);console.log(`Created permission: ${permission.name}`);}// Your application's permissions are now registered with ScalekitCreate permissions 12 collapsed lines# Initialize Scalekit client# Use case: Register all available actions in your project management appfrom scalekit import ScalekitClientscalekit_client = ScalekitClient(env_url=os.getenv("SCALEKIT_ENVIRONMENT_URL"),client_id=os.getenv("SCALEKIT_CLIENT_ID"),client_secret=os.getenv("SCALEKIT_CLIENT_SECRET"))# Define your application's permissionsfrom scalekit.v1.roles.roles_pb2 import CreatePermissionpermissions = [CreatePermission(name="projects:create",description="Allows users to create new projects"),CreatePermission(name="projects:read",description="Allows users to view project details"),CreatePermission(name="projects:update",description="Allows users to modify existing projects"),CreatePermission(name="projects:delete",description="Allows users to remove projects"),CreatePermission(name="tasks:assign",description="Allows users to assign tasks to team members")]# Register each permission with Scalekitfor permission in permissions:scalekit_client.permissions.create_permission(permission=permission)print(f"Created permission: {permission.name}")# Your application's permissions are now registered with ScalekitCreate permissions 17 collapsed lines// Initialize Scalekit client// Use case: Register all available actions in your project management apppackage mainimport ("context""log""github.com/scalekit-inc/scalekit-sdk-go")func main() {sc := scalekit.NewScalekitClient(os.Getenv("SCALEKIT_ENVIRONMENT_URL"),os.Getenv("SCALEKIT_CLIENT_ID"),os.Getenv("SCALEKIT_CLIENT_SECRET"),)// Define your application's permissionspermissions := []*scalekit.CreatePermission{{Name: "projects:create",Description: "Allows users to create new projects",},{Name: "projects:read",Description: "Allows users to view project details",},{Name: "projects:update",Description: "Allows users to modify existing projects",},{Name: "projects:delete",Description: "Allows users to remove projects",},{Name: "tasks:assign",Description: "Allows users to assign tasks to team members",},}// Register each permission with Scalekitfor _, permission := range permissions {_, err := sc.Permission().CreatePermission(ctx, permission)if err != nil {log.Printf("Failed to create permission: %s", permission.Name)continue}fmt.Printf("Created permission: %s\n", permission.Name)}// Your application's permissions are now registered with Scalekit}Create permissions 11 collapsed lines// Initialize Scalekit client// Use case: Register all available actions in your project management appimport com.scalekit.ScalekitClient;import com.scalekit.grpc.scalekit.v1.roles.*;ScalekitClient scalekitClient = new ScalekitClient(System.getenv("SCALEKIT_ENVIRONMENT_URL"),System.getenv("SCALEKIT_CLIENT_ID"),System.getenv("SCALEKIT_CLIENT_SECRET"));// Define your application's permissionsList<CreatePermission> permissions = Arrays.asList(CreatePermission.newBuilder().setName("projects:create").setDescription("Allows users to create new projects").build(),CreatePermission.newBuilder().setName("projects:read").setDescription("Allows users to view project details").build(),CreatePermission.newBuilder().setName("projects:update").setDescription("Allows users to modify existing projects").build(),CreatePermission.newBuilder().setName("projects:delete").setDescription("Allows users to remove projects").build(),CreatePermission.newBuilder().setName("tasks:assign").setDescription("Allows users to assign tasks to team members").build());// Register each permission with Scalekitfor (CreatePermission permission : permissions) {try {CreatePermissionRequest request = CreatePermissionRequest.newBuilder().setPermission(permission).build();scalekitClient.permissions().createPermission(request);System.out.println("Created permission: " + permission.getName());} catch (Exception e) {System.err.println("Error creating permission: " + e.getMessage());}}// Your application's permissions are now registered with Scalekit -
Register roles your applications will use
Section titled “Register roles your applications will use”Once you have defined permissions, group them into roles that match your application’s access patterns.
Create roles with permissions // Define roles with their associated permissions// Use case: Create standard roles for your project management applicationconst roles = [{name: 'project_admin',display_name: 'Project Administrator',description: 'Full access to manage projects and team members',permissions: ['projects:create', 'projects:read', 'projects:update', 'projects:delete','tasks:assign']},{name: 'project_manager',display_name: 'Project Manager',description: 'Can manage projects and assign tasks',permissions: ['projects:create', 'projects:read', 'projects:update','tasks:assign']},{name: 'team_member',display_name: 'Team Member',description: 'Can view projects and participate in tasks',permissions: ['projects:read']}];// Register each role with Scalekitfor (const role of roles) {await scalekit.role.createRole(role);console.log(`Created role: ${role.name}`);}// Your application's roles are now registered with ScalekitCreate roles with permissions # Define roles with their associated permissions# Use case: Create standard roles for your project management applicationfrom scalekit.v1.roles.roles_pb2 import CreateRoleroles = [CreateRole(name="project_admin",display_name="Project Administrator",description="Full access to manage projects and team members",permissions=["projects:create", "projects:read", "projects:update", "projects:delete", "tasks:assign"]),CreateRole(name="project_manager",display_name="Project Manager",description="Can manage projects and assign tasks",permissions=["projects:create", "projects:read", "projects:update", "tasks:assign"]),CreateRole(name="team_member",display_name="Team Member",description="Can view projects and participate in tasks",permissions=["projects:read"])]# Register each role with Scalekitfor role in roles:scalekit_client.roles.create_role(role=role)print(f"Created role: {role.name}")# Your application's roles are now registered with ScalekitCreate roles with permissions // Define roles with their associated permissions// Use case: Create standard roles for your project management applicationroles := []*scalekit.CreateRole{{Name: "project_admin",DisplayName: "Project Administrator",Description: "Full access to manage projects and team members",Permissions: []string{"projects:create", "projects:read", "projects:update", "projects:delete", "tasks:assign"},},{Name: "project_manager",DisplayName: "Project Manager",Description: "Can manage projects and assign tasks",Permissions: []string{"projects:create", "projects:read", "projects:update", "tasks:assign"},},{Name: "team_member",DisplayName: "Team Member",Description: "Can view projects and participate in tasks",Permissions: []string{"projects:read"},},}// Register each role with Scalekitfor _, role := range roles {_, err := sc.Role().CreateRole(ctx, role)if err != nil {log.Printf("Failed to create role: %s", role.Name)continue}fmt.Printf("Created role: %s\n", role.Name)}// Your application's roles are now registered with ScalekitCreate roles with permissions // Define roles with their associated permissions// Use case: Create standard roles for your project management applicationList<CreateRole> roles = Arrays.asList(CreateRole.newBuilder().setName("project_admin").setDisplayName("Project Administrator").setDescription("Full access to manage projects and team members").addAllPermissions(Arrays.asList("projects:create", "projects:read", "projects:update", "projects:delete", "tasks:assign")).build(),CreateRole.newBuilder().setName("project_manager").setDisplayName("Project Manager").setDescription("Can manage projects and assign tasks").addAllPermissions(Arrays.asList("projects:create", "projects:read", "projects:update", "tasks:assign")).build(),CreateRole.newBuilder().setName("team_member").setDisplayName("Team Member").setDescription("Can view projects and participate in tasks").addPermissions("projects:read").build());// Register each role with Scalekitfor (CreateRole role : roles) {try {CreateRoleRequest request = CreateRoleRequest.newBuilder().setRole(role).build();scalekitClient.roles().createRole(request);System.out.println("Created role: " + role.getName());} catch (Exception e) {System.err.println("Error creating role: " + e.getMessage());}}// Your application's roles are now registered with Scalekit
Inherit permissions through roles
Section titled “Inherit permissions through roles”Large applications with extensive feature sets require sophisticated role and permission management. Scalekit enables role inheritance, allowing you to create a hierarchical access control system. Permissions can be grouped into roles, and new roles can be derived from existing base roles, providing a flexible and scalable approach to defining user access.
Role assignment in Scalekit automatically grants a user all permissions defined within that role.
This is how you can implement use it:
- Your app defines the permissions and assigns to a role. Let’s say
viewerrole. - When creating new role called
editor, you specify that it inherits the permissions from theviewerrole. - When creating new role called
project_owner, you specify that it inherits the permissions from theeditorrole.
Take a look at our Roles and Permissions APIs.
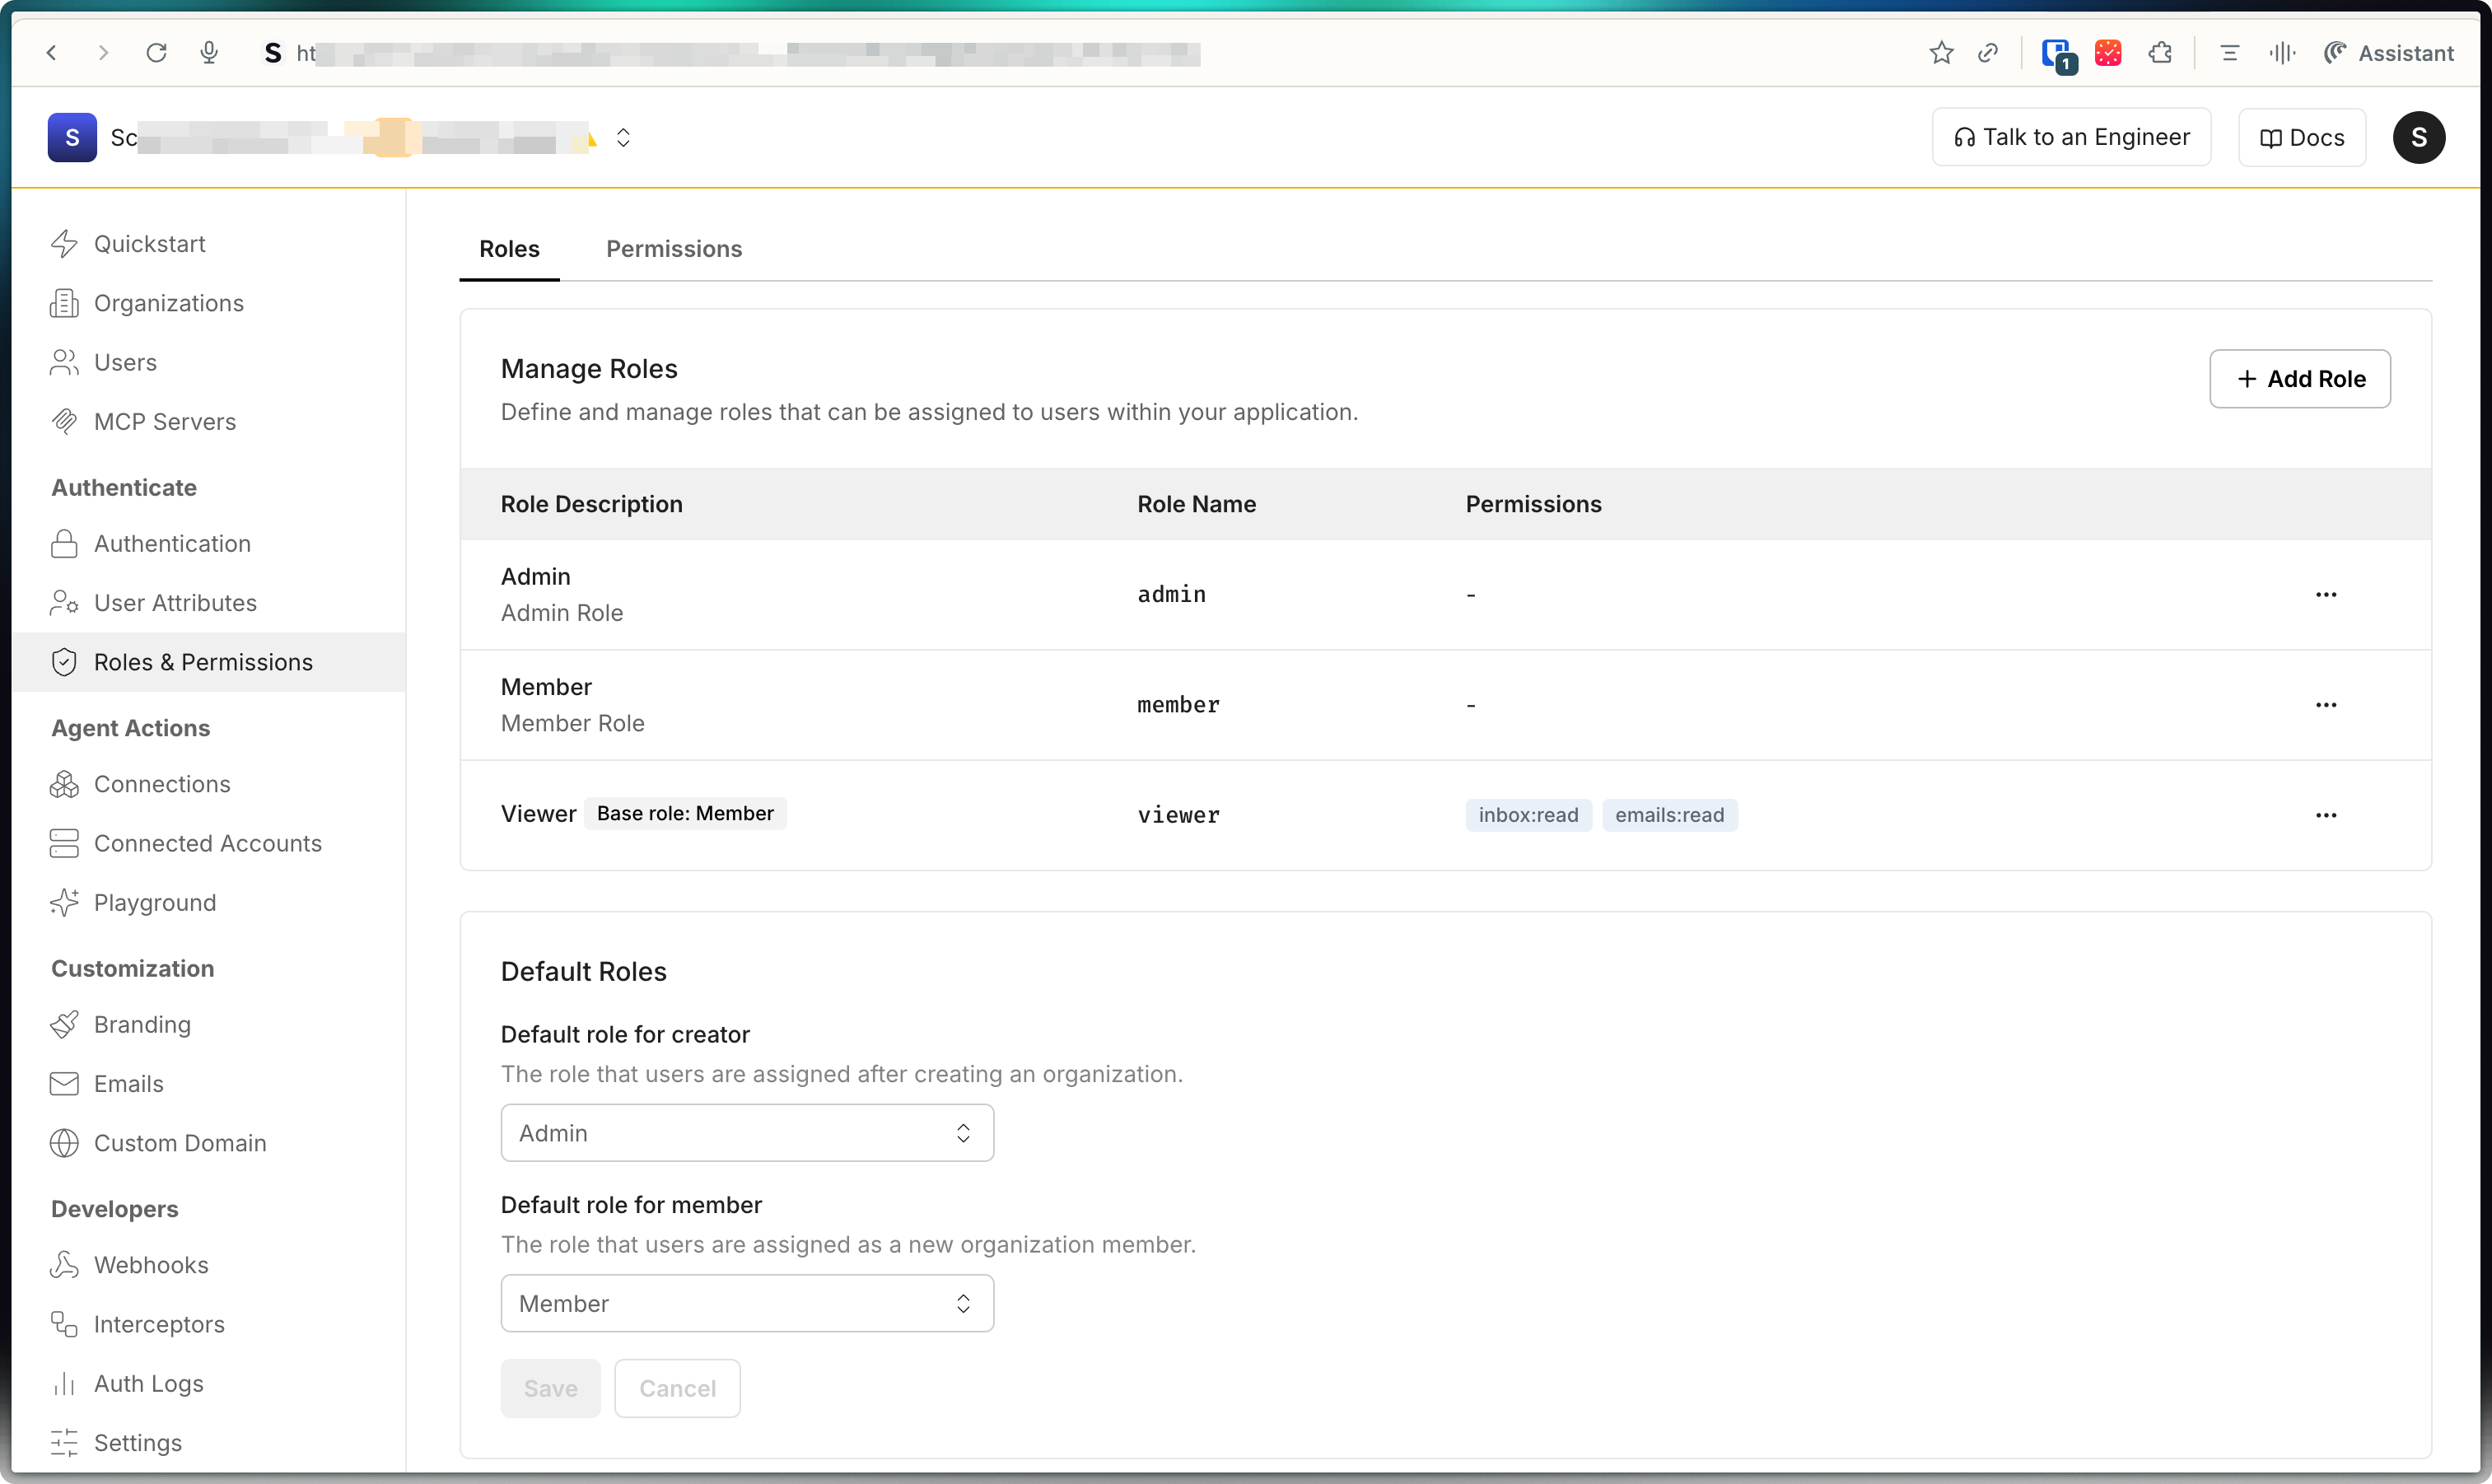
Manage roles and permissions in the dashboard
Section titled “Manage roles and permissions in the dashboard”For most applications, the simplest way to create and manage roles and permissions is through the Scalekit dashboard. This approach works well when you have a fixed set of roles and permissions that don’t need to be modified by users in your application. You can set up your authorization model once during application configuration and manage it through the dashboard going forward.
-
Navigate to Dashboard > Roles & Permissions > Permissions to create permissions:
- Click Create Permission and provide:
- Name - Machine-friendly identifier (e.g.,
projects:create) - Display Name - Human-readable label (e.g., “Create Projects”)
- Description - Clear explanation of what this permission allows
- Name - Machine-friendly identifier (e.g.,
- Click Create Permission and provide:
-
Go to Dashboard > Roles & Permissions > Roles to create roles:
- Click Create Role and provide:
- Name - Machine-friendly identifier (e.g.,
project_manager) - Display Name - Human-readable label (e.g., “Project Manager”)
- Description - Clear explanation of the role’s purpose
- Permissions - Select the permissions to include in this role
- Name - Machine-friendly identifier (e.g.,
- Click Create Role and provide:
-
Configure default roles for new users who join organizations
-
Organization administrators can create organization-specific roles by going to Dashboard > Organizations > Select organization > Roles
Now that you have created roles and permissions in Scalekit, the next step is to assign these roles to users in your application.
Configure organization specific roles
Section titled “Configure organization specific roles”Organization-level roles let organization administrators create custom roles that apply only within their specific organization. These roles are separate from any application-level roles you define.
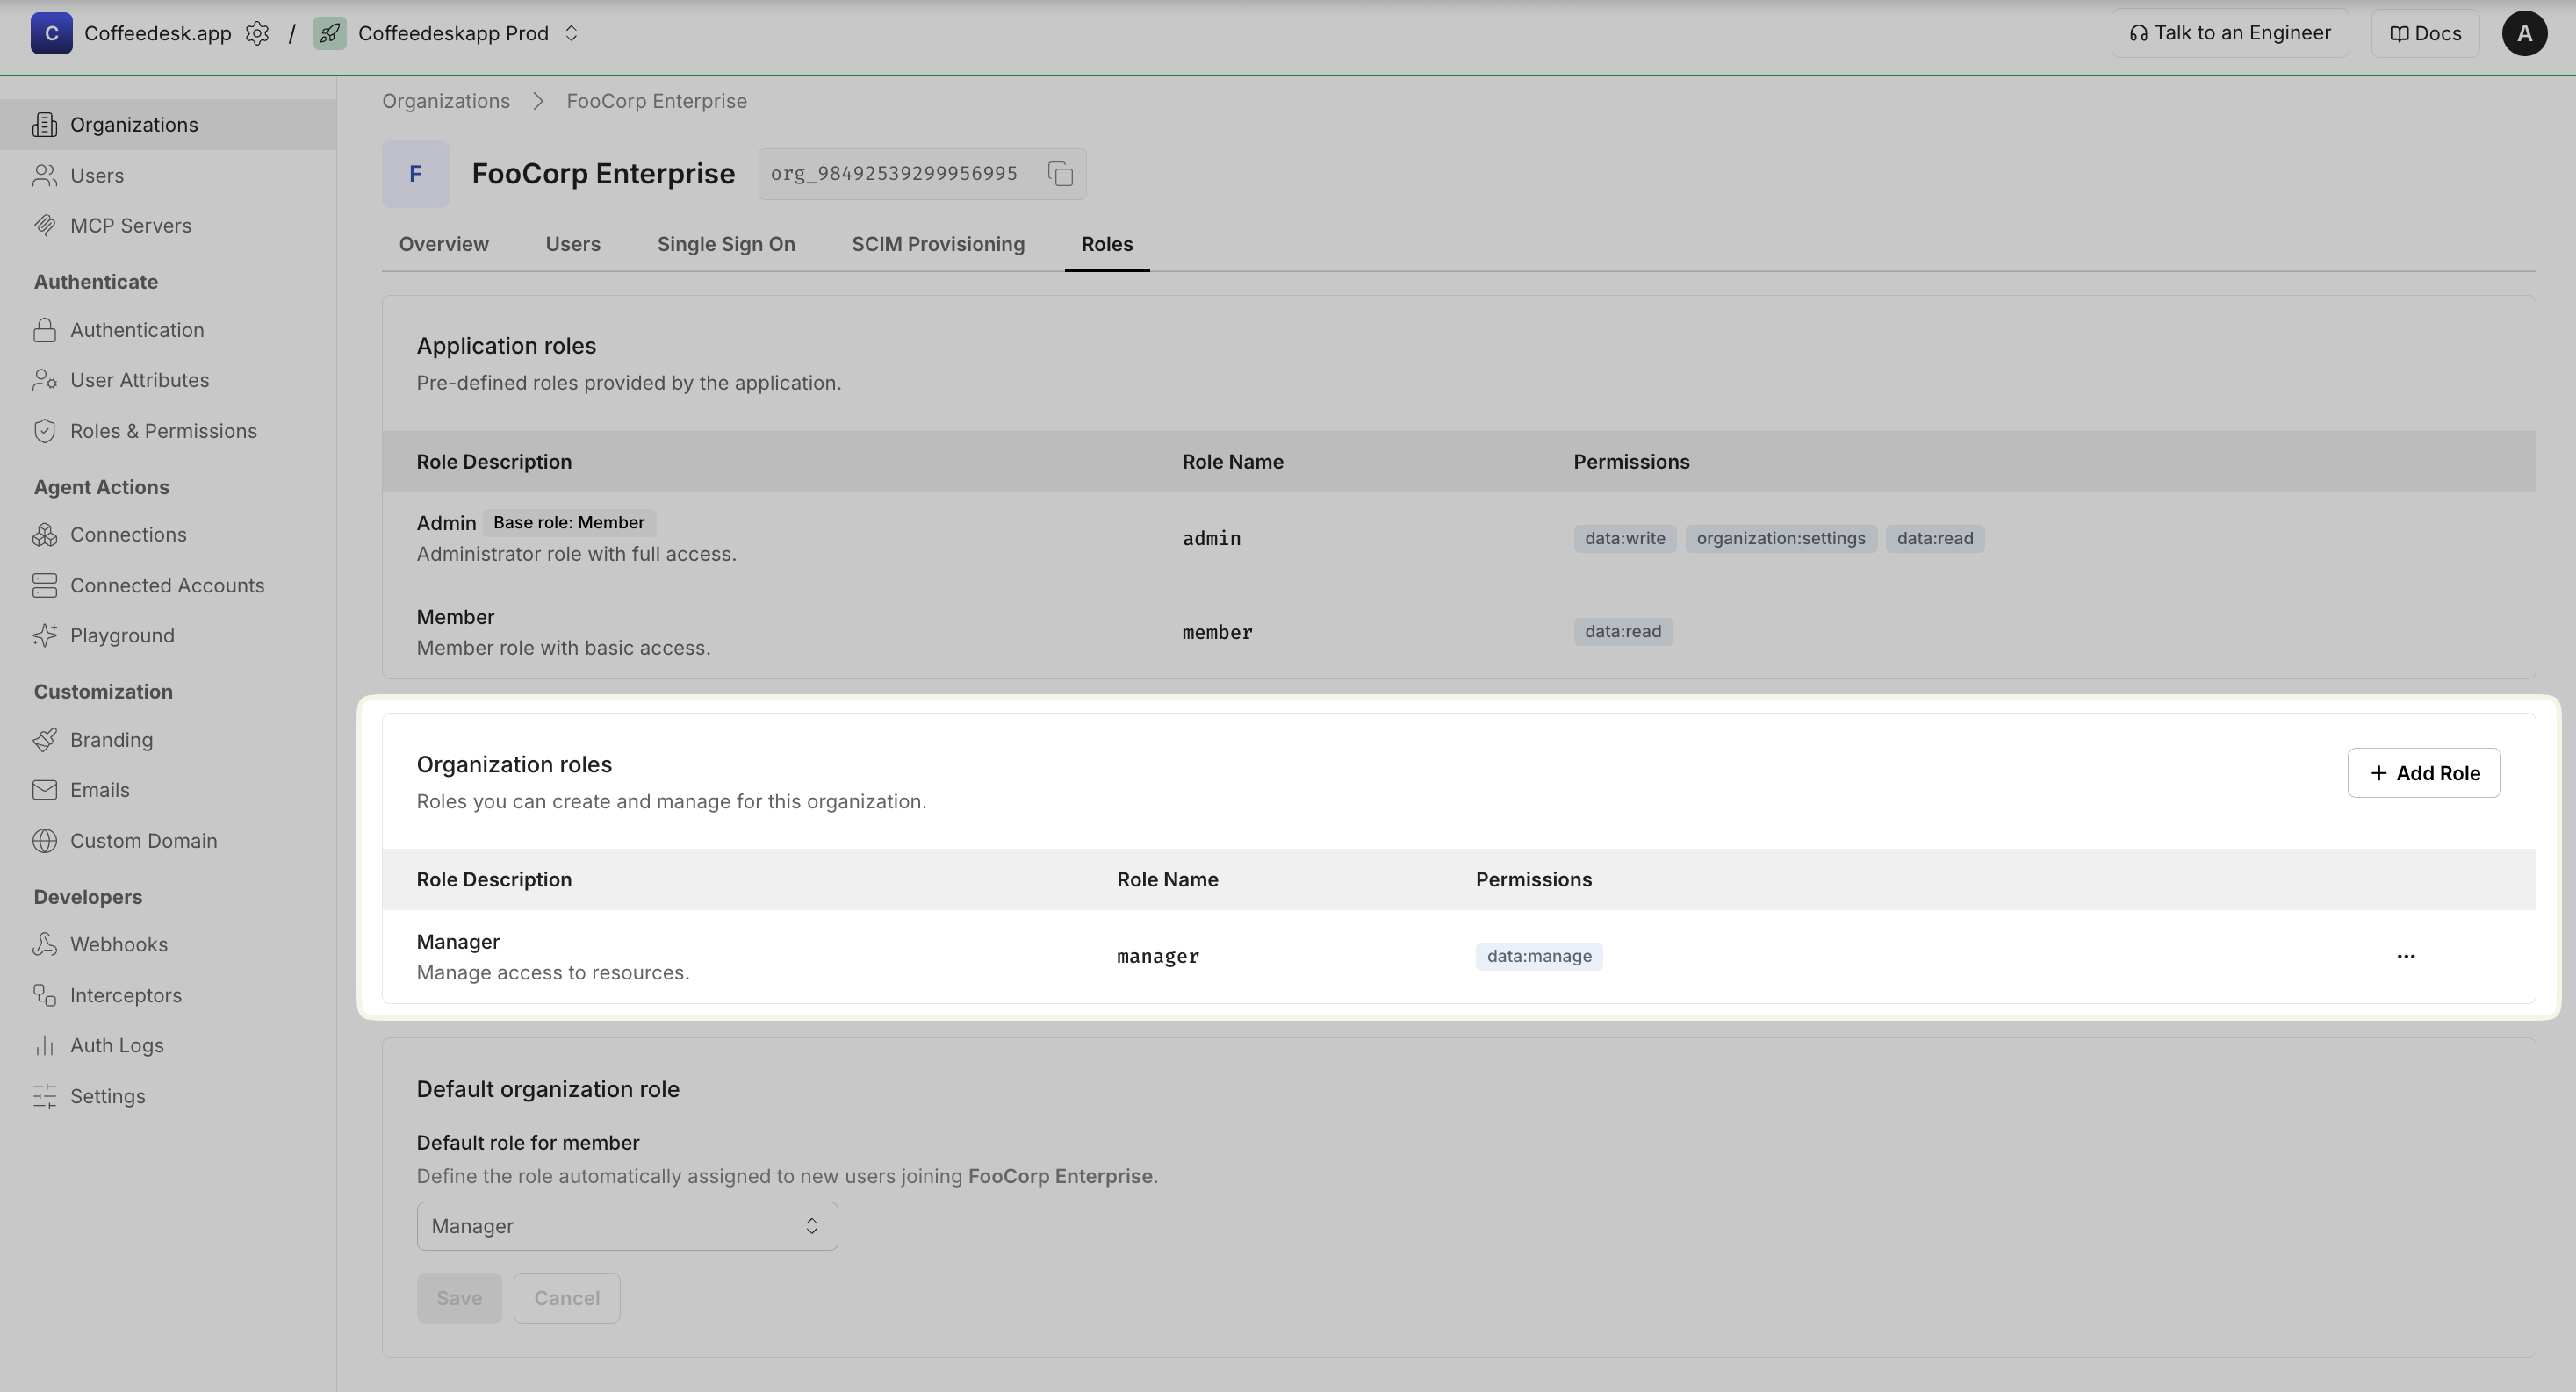
You can create organization-level roles from the Scalekit Dashboard:
- Go to Organizations → Select an organization → Roles
- In Organization roles section, Click + Add role and provide:
- Display name: Human-readable name (e.g., “Manager”)
- Name (key): Machine-friendly identifier (e.g.,
manager) - Description: Clear explanation of what users with this role can do