
Manage user sessions
Store tokens safely with proper cookie security, validate on every request, and refresh with rotation to keep sessions secure
User sessions determine how long users stay signed in to your application. After users successfully authenticate, you receive session tokens that manage their access. These tokens control session duration, multi-device access, and cross-product authentication within your company’s ecosystem.
This guide shows you how to store these tokens securely with encryption and proper cookie attributes, validate them on every request, and refresh them transparently in middleware to maintain seamless user sessions.
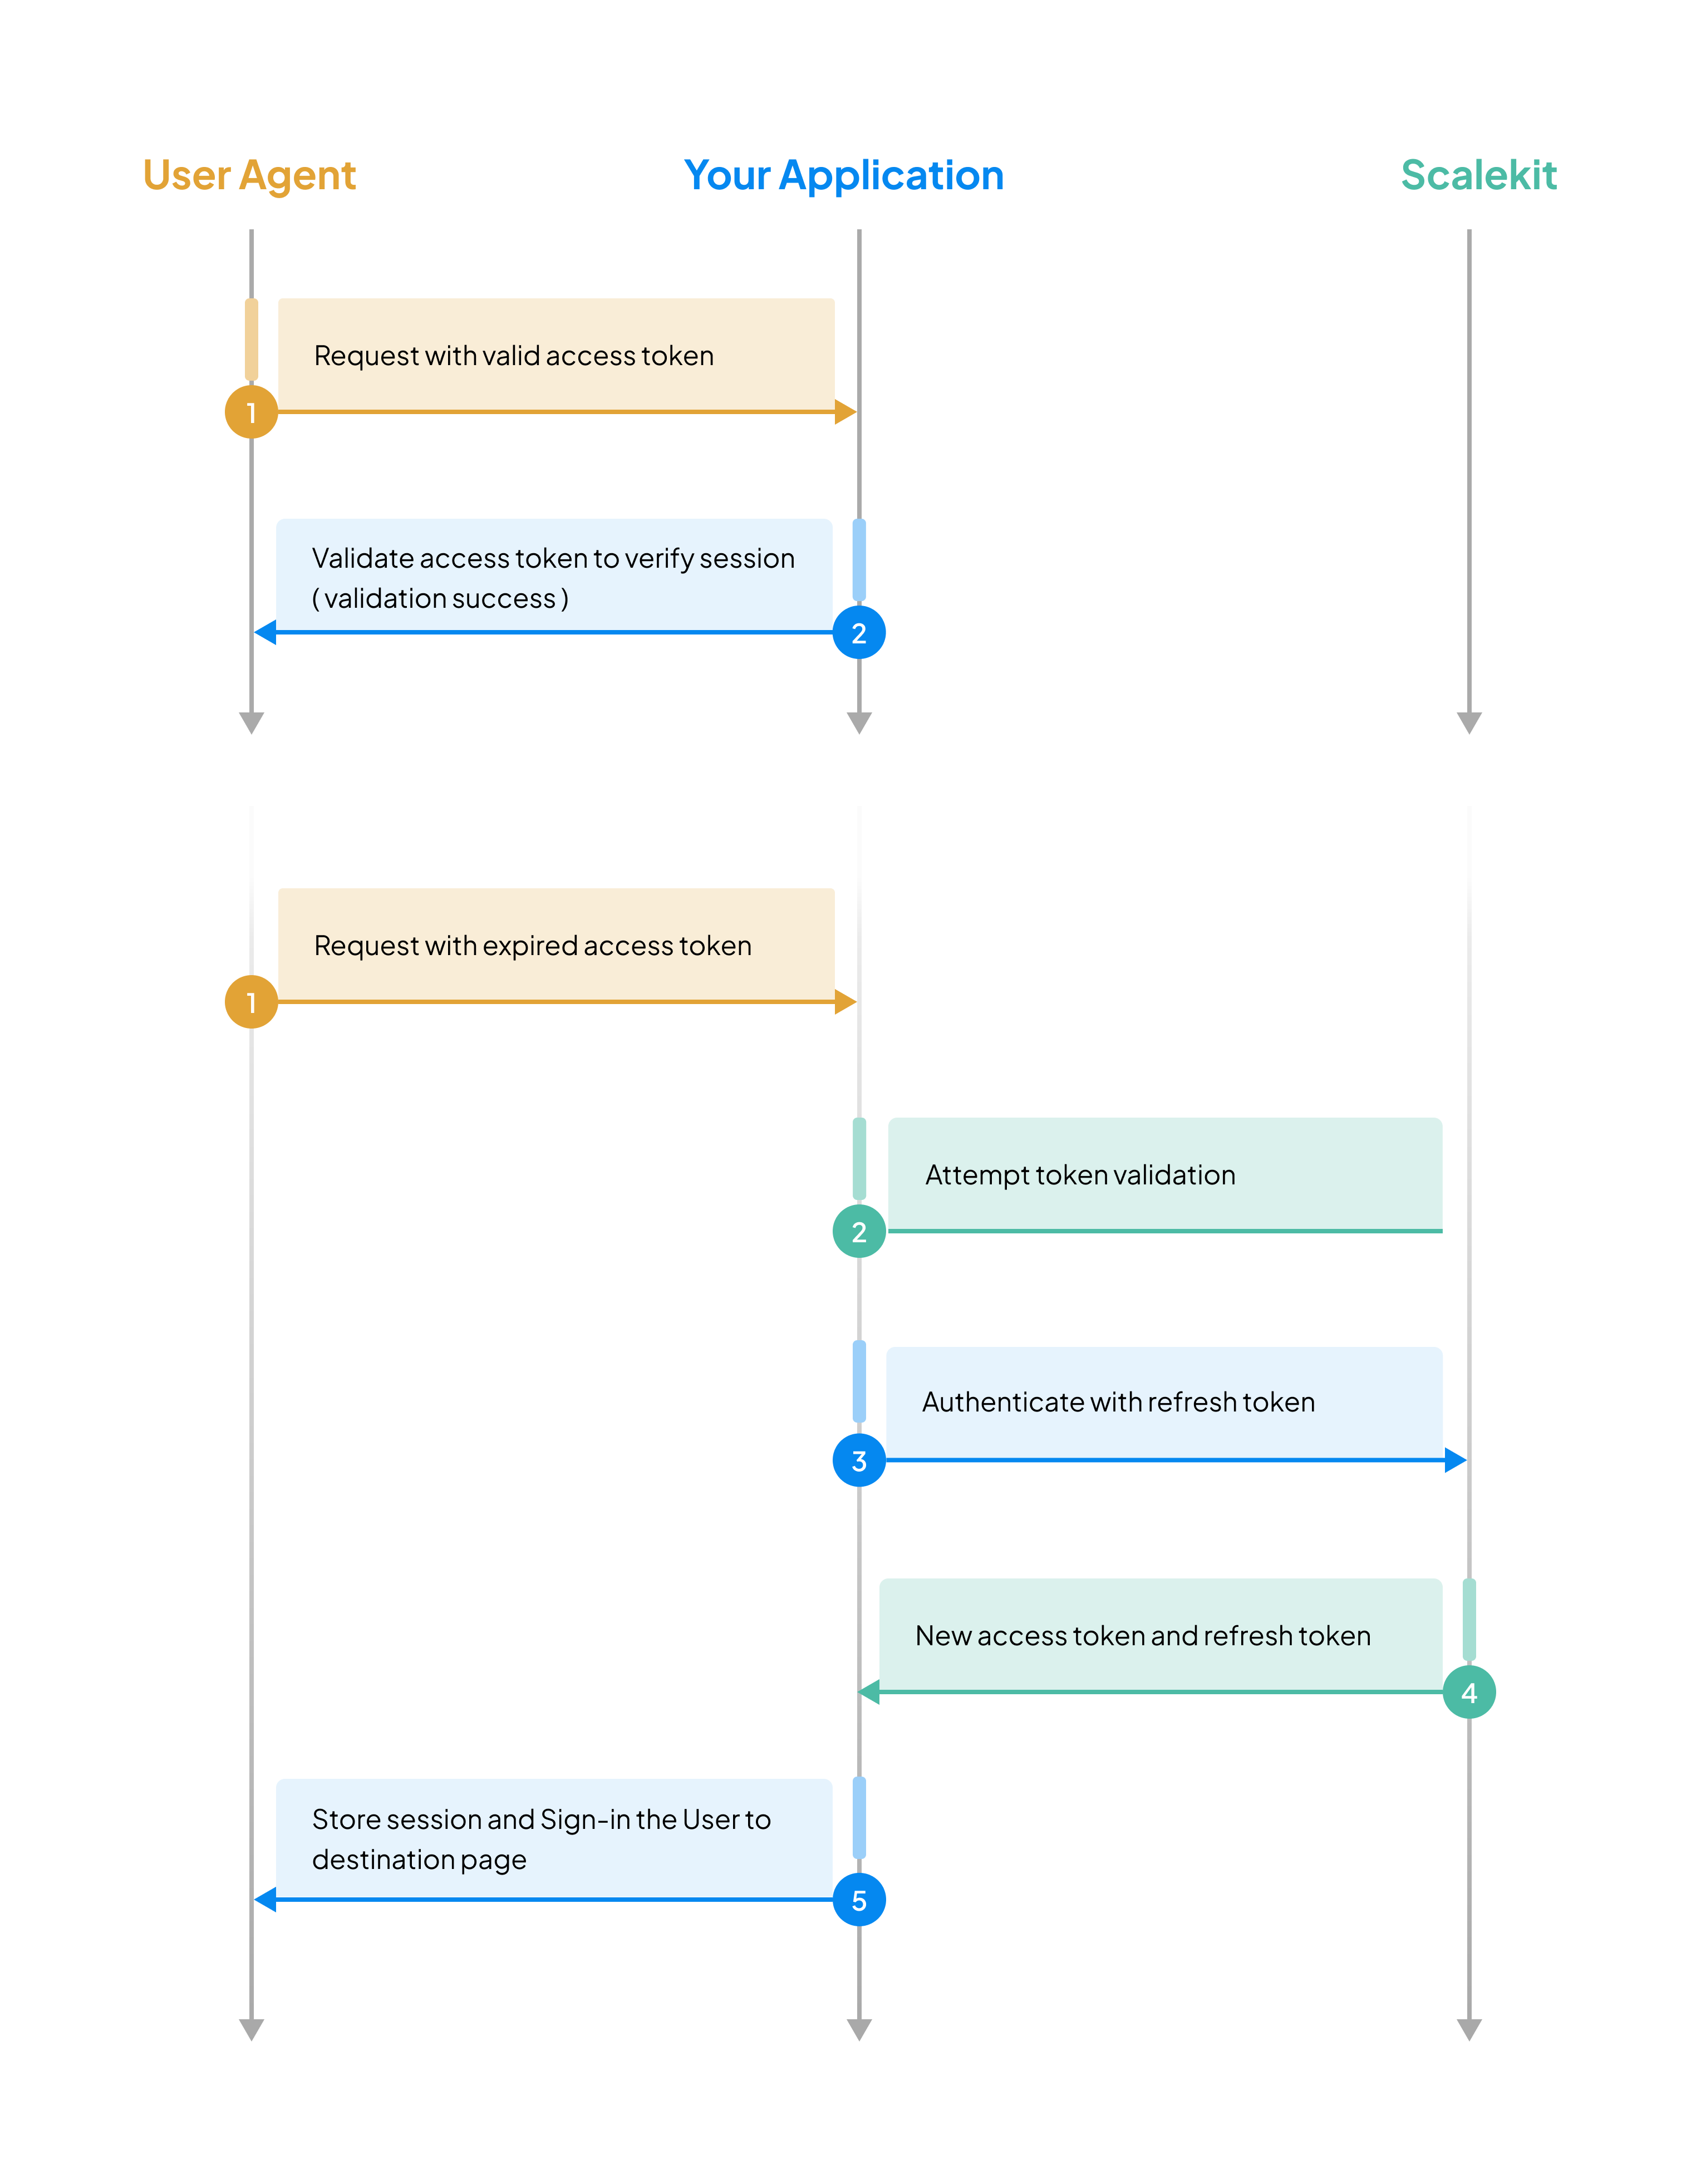
Review the session management sequence
-
Store session tokens securely
Section titled “Store session tokens securely”After successful identity verification using any of the auth methods (Magic Link & OTP, social, enterprise SSO), your application receives session tokens(access and refresh tokens) towards the end of the login.
{user: {email: "john.doe@example.com",emailVerified: true,givenName: "John",name: "John Doe",id: "usr_74599896446906854"},idToken: "eyJhbGciO..", // Decode for full user detailsaccessToken: "eyJhbGciOi..",refreshToken: "rt_8f7d6e5c4b3a2d1e0f9g8h7i6j..",expiresIn: 299 // in seconds}ID token decoded {"at_hash": "ec_jU2ZKpFelCKLTRWiRsg","aud": ["skc_58327482062864390"],"azp": "skc_58327482062864390","c_hash": "6wMreK9kWQQY6O5R0CiiYg","client_id": "skc_58327482062864390","email": "john.doe@example.com","email_verified": true,"exp": 1742975822,"family_name": "Doe","given_name": "John","iat": 1742974022,"iss": "https://scalekit-z44iroqaaada-dev.scalekit.cloud","name": "John Doe","oid": "org_59615193906282635","sid": "ses_65274187031249433","sub": "usr_63261014140912135"}Decoded access token {"aud": ["prd_skc_7848964512134X699"],"client_id": "prd_skc_7848964512134X699","exp": 1758265247,"iat": 1758264947,"iss": "https://login.devramp.ai","jti": "tkn_90928731115292X63","nbf": 1758264947,"oid": "org_89678001X21929734","permissions": ["workspace_data:write","workspace_data:read"],"roles": ["admin"],"sid": "ses_90928729571723X24","sub": "usr_8967800122X995270",// External identifiers if updated on Scalekit"xoid": "ext_org_123", // Organization ID"xuid": "ext_usr_456", // User ID}Store each token based on its security requirements. For SPAs and mobile apps, consider storing access tokens in memory and sending via
Authorization: Bearerheaders to minimize CSRF exposure. For traditional web apps, use the cookie-based approach below:- Access Token: Store in a secure, HttpOnly cookie with proper
Pathscoping (e.g.,/api) to prevent XSS attacks. This token has a short lifespan and provides access to protected resources. - Refresh Token: Store in a separate HttpOnly, Secure cookie with
Path=/auth/refreshscoping. This limits the refresh token to only be sent to your refresh endpoint, reducing exposure. Rotate the token on each use to detect theft. - ID Token: Ensure it is stored in local storage or a cookie so that it remains accessible at runtime, which is necessary for logging the user out successfully.
Express.js 4 collapsed linesimport cookieParser from 'cookie-parser';// Enable parsing of cookies from request headersapp.use(cookieParser());// Extract authentication data from the successful authentication responseconst { accessToken, expiresIn, refreshToken, user } = authResult;// Encrypt tokens before storing to add an additional security layerconst encryptedAccessToken = encrypt(accessToken);const encryptedRefreshToken = encrypt(refreshToken);// Store encrypted access token in HttpOnly cookieres.cookie('accessToken', encryptedAccessToken, {maxAge: (expiresIn - 60) * 1000, // Subtract 60s buffer for clock skew (milliseconds)httpOnly: true, // Prevents JavaScript access to mitigate XSS attackssecure: process.env.NODE_ENV === 'production', // HTTPS-only in productionsameSite: 'strict' // Prevents CSRF attacks});// Store encrypted refresh token in separate HttpOnly cookieres.cookie('refreshToken', encryptedRefreshToken, {httpOnly: true, // Prevents JavaScript access to mitigate XSS attackssecure: process.env.NODE_ENV === 'production', // HTTPS-only in productionsameSite: 'strict' // Prevents CSRF attacks});Flask 4 collapsed linesfrom flask import Flask, make_response, requestimport osapp = Flask(__name__)# Extract authentication data from the successful authentication responseaccess_token = auth_result.access_tokenexpires_in = auth_result.expires_inrefresh_token = auth_result.refresh_tokenuser = auth_result.user# Encrypt tokens before storing to add an additional security layerencrypted_access_token = encrypt(access_token)encrypted_refresh_token = encrypt(refresh_token)response = make_response()# Store encrypted access token in HttpOnly cookieresponse.set_cookie('accessToken',encrypted_access_token,max_age=expires_in - 60, # Subtract 60s buffer for clock skew (seconds in Flask)httponly=True, # Prevents JavaScript access to mitigate XSS attackssecure=os.environ.get('FLASK_ENV') == 'production', # HTTPS-only in productionsamesite='Strict' # Prevents CSRF attacks)# Store encrypted refresh token in separate HttpOnly cookieresponse.set_cookie('refreshToken',encrypted_refresh_token,httponly=True, # Prevents JavaScript access to mitigate XSS attackssecure=os.environ.get('FLASK_ENV') == 'production', # HTTPS-only in productionsamesite='Strict' # Prevents CSRF attacks)Gin 7 collapsed linesimport ("net/http""os""time""github.com/gin-gonic/gin")// Extract authentication data from the successful authentication responseaccessToken := authResult.AccessTokenexpiresIn := authResult.ExpiresInrefreshToken := authResult.RefreshTokenuser := authResult.User// Encrypt tokens before storing to add an additional security layerencryptedAccessToken := encrypt(accessToken)encryptedRefreshToken := encrypt(refreshToken)// Set SameSite mode for CSRF protectionc.SetSameSite(http.SameSiteStrictMode) // Prevents CSRF attacks// Store encrypted access token in HttpOnly cookiec.SetCookie("accessToken",encryptedAccessToken,expiresIn-60, // Subtract 60s buffer for clock skew (seconds in Gin)"/", // Available on all routes"",os.Getenv("GIN_MODE") == "release", // HTTPS-only in productiontrue, // Prevents JavaScript access to mitigate XSS attacks)// Store encrypted refresh token in separate HttpOnly cookiec.SetCookie("refreshToken",encryptedRefreshToken,0, // No expiry for refresh token cookie (session lifetime controlled server-side)"/", // Available on all routes"",os.Getenv("GIN_MODE") == "release", // HTTPS-only in productiontrue, // Prevents JavaScript access to mitigate XSS attacks)Spring 6 collapsed linesimport javax.servlet.http.Cookie;import javax.servlet.http.HttpServletResponse;import org.springframework.core.env.Environment;@Autowiredprivate Environment env;// Extract authentication data from the successful authentication responseString accessToken = authResult.getAccessToken();int expiresIn = authResult.getExpiresIn();String refreshToken = authResult.getRefreshToken();User user = authResult.getUser();// Encrypt tokens before storing to add an additional security layerString encryptedAccessToken = encrypt(accessToken);String encryptedRefreshToken = encrypt(refreshToken);// Store encrypted access token in HttpOnly cookieCookie accessTokenCookie = new Cookie("accessToken", encryptedAccessToken);accessTokenCookie.setMaxAge(expiresIn - 60); // Subtract 60s buffer for clock skew (seconds in Spring)accessTokenCookie.setHttpOnly(true); // Prevents JavaScript access to mitigate XSS attacksaccessTokenCookie.setSecure("production".equals(env.getActiveProfiles()[0])); // HTTPS-only in productionaccessTokenCookie.setPath("/"); // Available on all routesresponse.addCookie(accessTokenCookie);response.setHeader("Set-Cookie",response.getHeader("Set-Cookie") + "; SameSite=Strict"); // Prevents CSRF attacks// Store encrypted refresh token in separate HttpOnly cookieCookie refreshTokenCookie = new Cookie("refreshToken", encryptedRefreshToken);refreshTokenCookie.setHttpOnly(true); // Prevents JavaScript access to mitigate XSS attacksrefreshTokenCookie.setSecure("production".equals(env.getActiveProfiles()[0])); // HTTPS-only in productionrefreshTokenCookie.setPath("/"); // Available on all routesresponse.addCookie(refreshTokenCookie); - Access Token: Store in a secure, HttpOnly cookie with proper
-
Check the access token before handling requests
Section titled “Check the access token before handling requests”Validate every request for a valid access token in your application. Create middleware to protect your application routes. This middleware validates the access token on every request to secured endpoints. For APIs, consider reading from
Authorization: Bearerheaders instead of cookies to minimize CSRF risk.Here’s an example middleware method validating the access token and refreshing it if expired for every request.
middleware/auth.js async function verifyToken(req, res, next) {// Extract encrypted tokens from request cookiesconst { accessToken, refreshToken } = req.cookies;if (!accessToken) {return res.status(401).json({ error: 'Authentication required' });}try {// Decrypt the access token before validationconst decryptedAccessToken = decrypt(accessToken);// Verify token validity using Scalekit's validation methodconst isValid = await scalekit.validateAccessToken(decryptedAccessToken);if (!isValid && refreshToken) {// Token expired - refresh it transparentlyconst decryptedRefreshToken = decrypt(refreshToken);const authResult = await scalekit.refreshAccessToken(decryptedRefreshToken);// Encrypt and store new tokensres.cookie('accessToken', encrypt(authResult.accessToken), {maxAge: (authResult.expiresIn - 60) * 1000,httpOnly: true,secure: process.env.NODE_ENV === 'production',sameSite: 'strict'});res.cookie('refreshToken', encrypt(authResult.refreshToken), {httpOnly: true,secure: process.env.NODE_ENV === 'production',sameSite: 'strict'});return next();}if (!isValid) {return res.status(401).json({ error: 'Session expired. Please sign in again.' });}// Token is valid, proceed to the next middleware or route handlernext();} catch (error) {return res.status(401).json({ error: 'Authentication failed' });}}middleware/auth.py 2 collapsed linesfrom flask import request, jsonifyfrom functools import wrapsdef verify_token(f):@wraps(f)def decorated_function(*args, **kwargs):# Extract encrypted tokens from request cookiesaccess_token = request.cookies.get('accessToken')refresh_token = request.cookies.get('refreshToken')if not access_token:return jsonify({'error': 'Authentication required'}), 401try:# Decrypt the access token before validationdecrypted_access_token = decrypt(access_token)# Verify token validity using Scalekit's validation methodis_valid = scalekit_client.validate_access_token(decrypted_access_token)if not is_valid and refresh_token:# Token expired - refresh it transparentlydecrypted_refresh_token = decrypt(refresh_token)auth_result = scalekit_client.refresh_access_token(decrypted_refresh_token)# Encrypt and store new tokensresponse = make_response(f(*args, **kwargs))response.set_cookie('accessToken',encrypt(auth_result.access_token),max_age=auth_result.expires_in - 60,httponly=True,secure=os.environ.get('FLASK_ENV') == 'production',samesite='Strict')response.set_cookie('refreshToken',encrypt(auth_result.refresh_token),httponly=True,secure=os.environ.get('FLASK_ENV') == 'production',samesite='Strict')return responseif not is_valid:return jsonify({'error': 'Session expired. Please sign in again.'}), 401# Token is valid, proceed to the protected view functionreturn f(*args, **kwargs)except Exception:return jsonify({'error': 'Authentication failed'}), 401return decorated_functionmiddleware/auth.go 5 collapsed linesimport ("net/http""os""github.com/gin-gonic/gin")func VerifyToken() gin.HandlerFunc {return func(c *gin.Context) {// Extract encrypted tokens from request cookiesaccessToken, err := c.Cookie("accessToken")if err != nil || accessToken == "" {c.JSON(http.StatusUnauthorized, gin.H{"error": "Authentication required"})c.Abort()return}// Decrypt the access token before validationdecryptedAccessToken := decrypt(accessToken)// Verify token validity using Scalekit's validation methodisValid, err := scalekitClient.ValidateAccessToken(c.Request.Context(), decryptedAccessToken)if (err != nil || !isValid) {// Token expired - attempt transparent refreshrefreshToken, err := c.Cookie("refreshToken")if err == nil && refreshToken != "" {decryptedRefreshToken := decrypt(refreshToken)authResult, err := scalekitClient.RefreshAccessToken(c.Request.Context(), decryptedRefreshToken)if err == nil {// Encrypt and store new tokensc.SetSameSite(http.SameSiteStrictMode)c.SetCookie("accessToken",encrypt(authResult.AccessToken),authResult.ExpiresIn-60,"/","",os.Getenv("GIN_MODE") == "release",true,)c.SetCookie("refreshToken",encrypt(authResult.RefreshToken),0,"/","",os.Getenv("GIN_MODE") == "release",true,)c.Next()return}}c.JSON(http.StatusUnauthorized, gin.H{"error": "Session expired. Please sign in again."})c.Abort()return}// Token is valid, proceed to the next handler in the chainc.Next()}}middleware/AuthInterceptor.java 5 collapsed linesimport javax.servlet.http.HttpServletRequest;import javax.servlet.http.HttpServletResponse;import javax.servlet.http.Cookie;import org.springframework.web.servlet.HandlerInterceptor;import org.springframework.core.env.Environment;/*** Intercepts HTTP requests to verify authentication tokens.* Transparently refreshes expired tokens to maintain user sessions.*/@Componentpublic class AuthInterceptor implements HandlerInterceptor {@Autowiredprivate Environment env;@Overridepublic boolean preHandle(HttpServletRequest request,HttpServletResponse response,Object handler) throws Exception {7 collapsed lines// Extract encrypted tokens from cookiesString accessToken = getCookieValue(request, "accessToken");String refreshToken = getCookieValue(request, "refreshToken");if (accessToken == null) {response.setStatus(HttpServletResponse.SC_UNAUTHORIZED);response.getWriter().write("{\"error\": \"Authentication required\"}");return false;}try {// Decrypt the access token before validationString decryptedAccessToken = decrypt(accessToken);// Verify token validity using Scalekit's validation methodboolean isValid = scalekitClient.validateAccessToken(decryptedAccessToken);if (!isValid && refreshToken != null) {// Token expired - refresh it transparentlyString decryptedRefreshToken = decrypt(refreshToken);AuthResult authResult = scalekitClient.authentication().refreshToken(decryptedRefreshToken);// Encrypt and store new tokens20 collapsed linesCookie accessTokenCookie = new Cookie("accessToken", encrypt(authResult.getAccessToken()));accessTokenCookie.setMaxAge(authResult.getExpiresIn() - 60);accessTokenCookie.setHttpOnly(true);accessTokenCookie.setSecure("production".equals(env.getActiveProfiles()[0]));accessTokenCookie.setPath("/");response.addCookie(accessTokenCookie);Cookie refreshTokenCookie = new Cookie("refreshToken", encrypt(authResult.getRefreshToken()));refreshTokenCookie.setHttpOnly(true);refreshTokenCookie.setSecure("production".equals(env.getActiveProfiles()[0]));refreshTokenCookie.setPath("/");response.addCookie(refreshTokenCookie);response.setHeader("Set-Cookie", response.getHeader("Set-Cookie") + "; SameSite=Strict");return true;}if (!isValid) {response.setStatus(HttpServletResponse.SC_UNAUTHORIZED);response.getWriter().write("{\"error\": \"Session expired. Please sign in again.\"}");return false;}// Token is valid, allow request to proceedreturn true;} catch (Exception e) {response.setStatus(HttpServletResponse.SC_UNAUTHORIZED);response.getWriter().write("{\"error\": \"Authentication failed\"}");return false;}}private String getCookieValue(HttpServletRequest request, String cookieName) {Cookie[] cookies = request.getCookies();if (cookies != null) {for (Cookie cookie : cookies) {if (cookieName.equals(cookie.getName())) {return cookie.getValue();}}}return null;}}TypeScript: get typed claims from validateToken
Use a generic type parameter to get properly typed claims instead of
unknown. PassJWTPayloadfromjosefor access tokens, orIdTokenClaimfrom@scalekit-sdk/nodefor ID tokens:import type { JWTPayload } from 'jose';import type { IdTokenClaim } from '@scalekit-sdk/node';// Access token — typed as JWTPayloadconst claims = await scalekit.validateToken<JWTPayload>(accessToken);console.log(claims.sub); // user ID// ID token — typed with full user profile claimsconst idClaims = await scalekit.validateToken<IdTokenClaim>(idToken);console.log(idClaims.email); -
Configure session security and duration
Section titled “Configure session security and duration”Manage user session behavior directly from your Scalekit dashboard without modifying application code. Configure session durations and authentication frequency to balance security and user experience for your application.
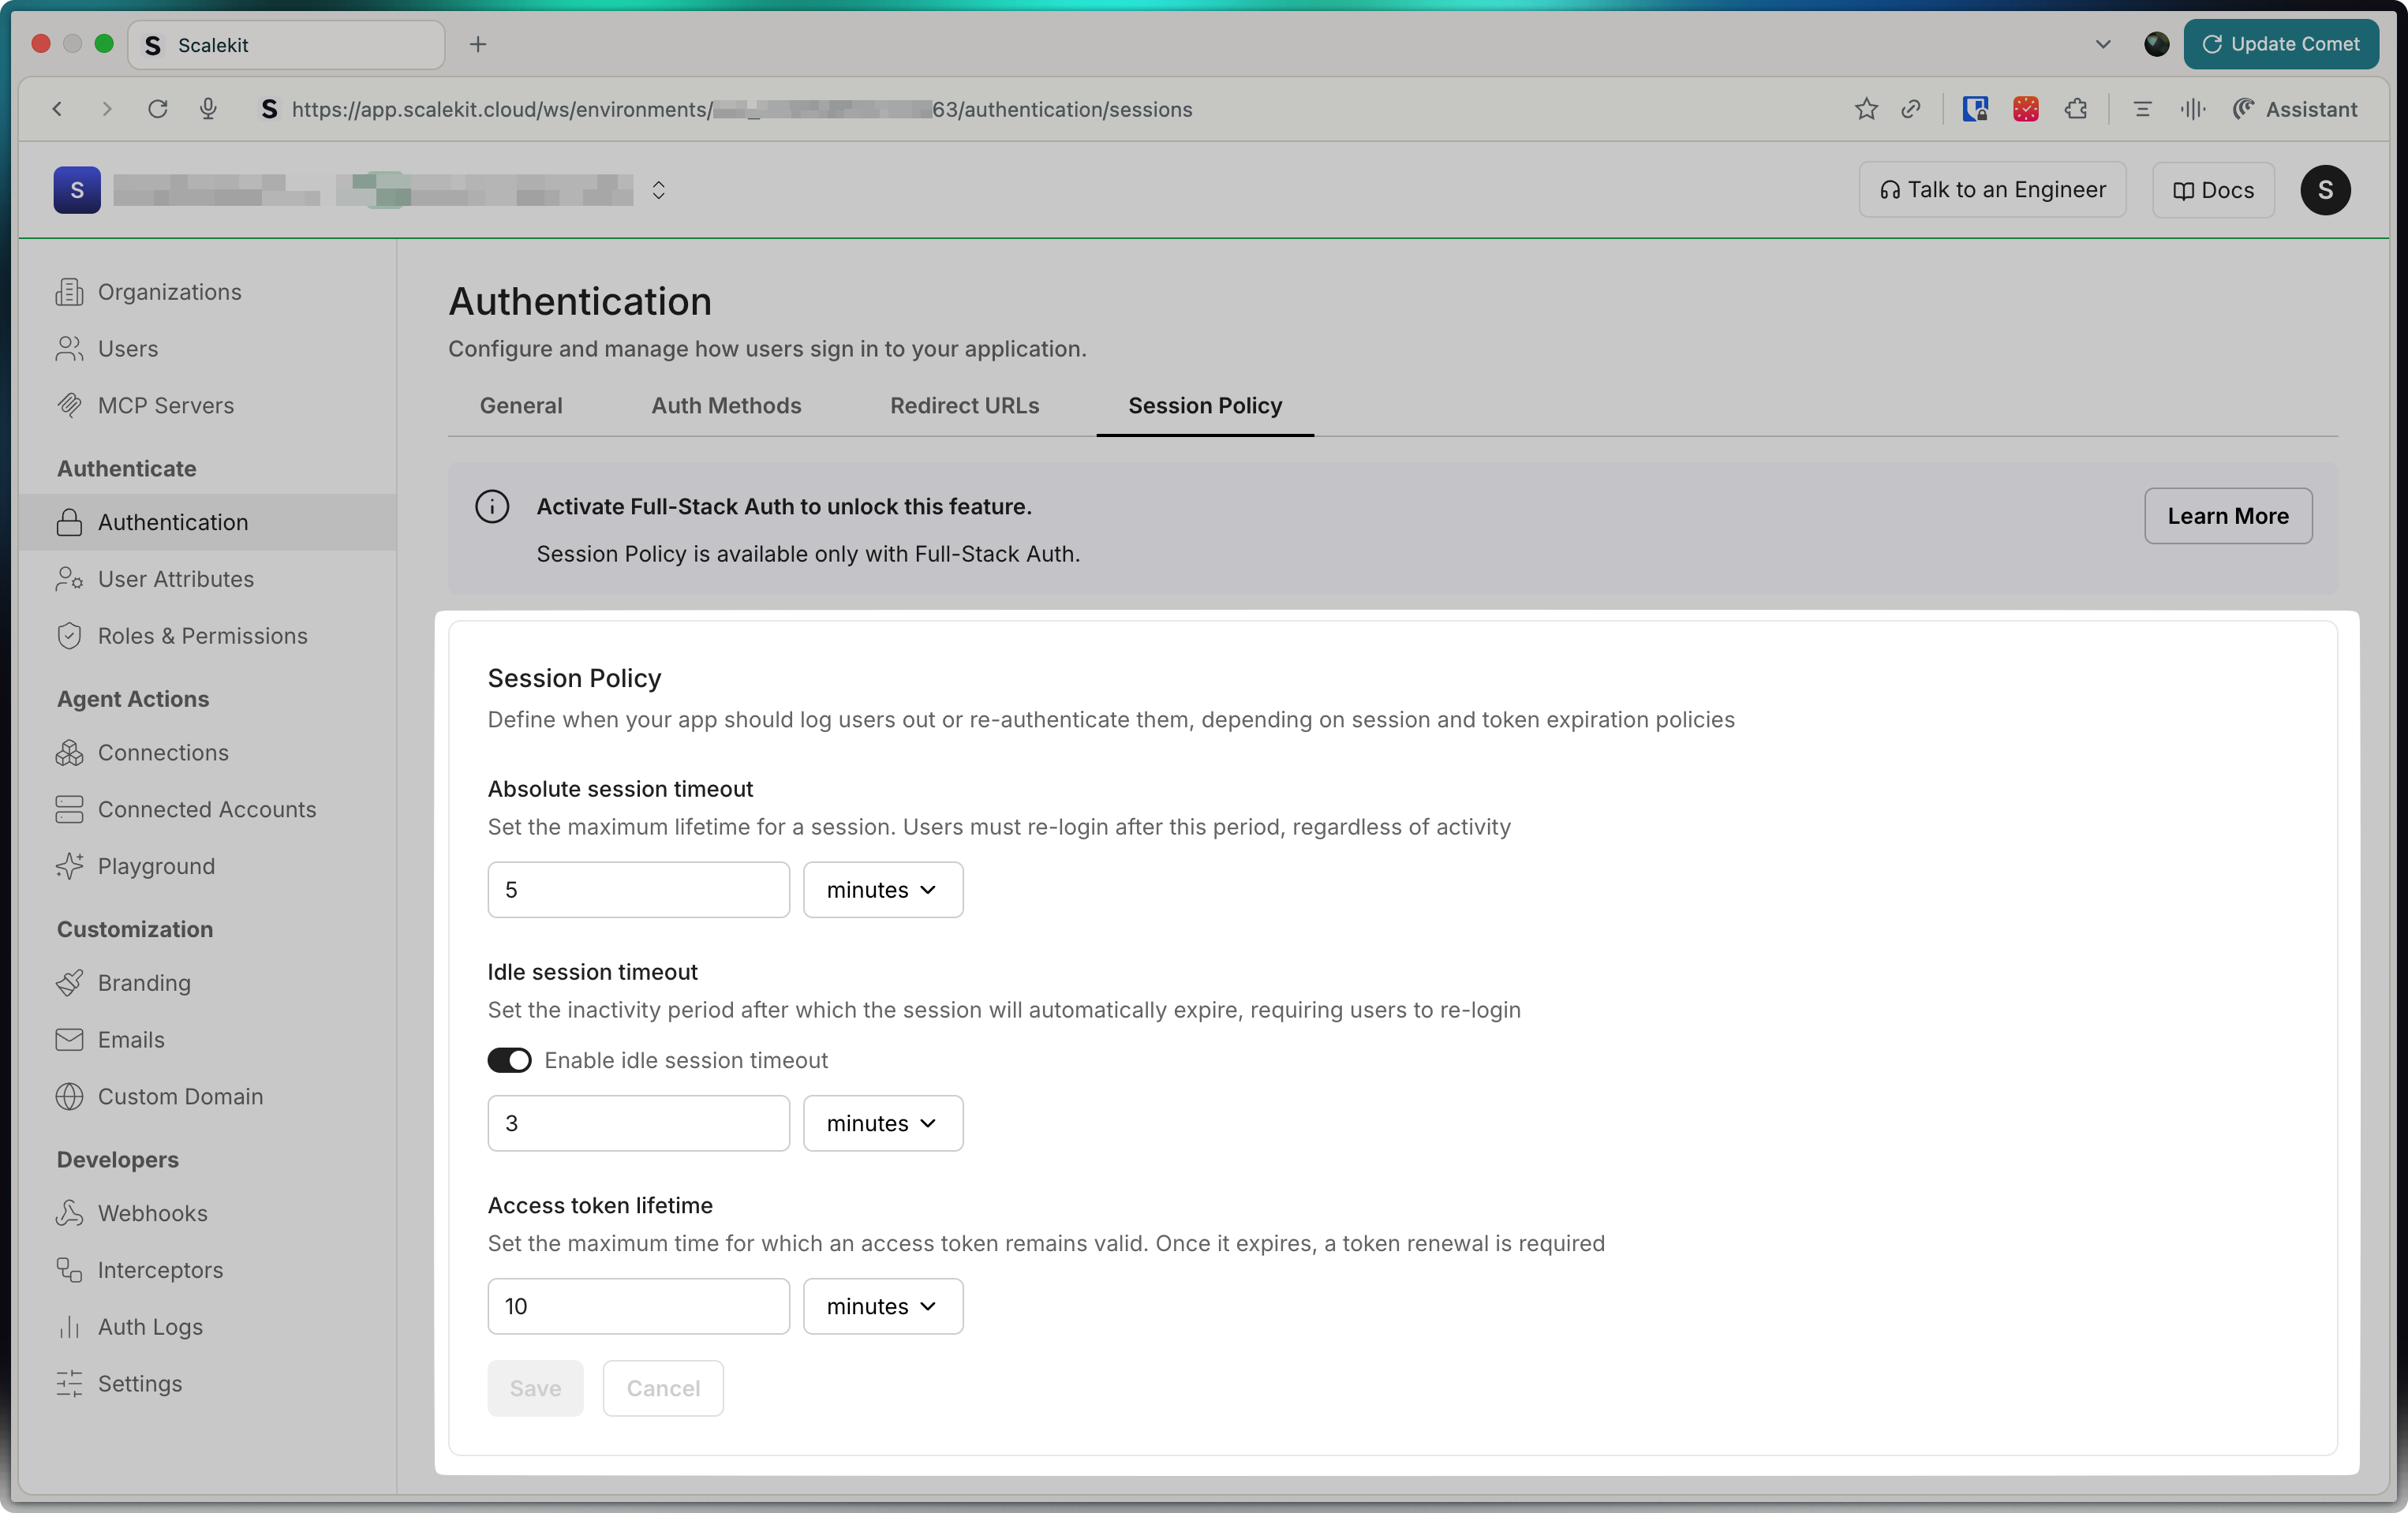
In your Scalekit dashboard, the Session settings page lets you set these options:
-
Absolute session timeout: This is the maximum time a user can stay signed in, no matter what. After this time, they must log in again. For example, if you set it to 30 minutes, users will be logged out after 30 minutes, even if they are still using your app.
-
Idle session timeout: This is the time your app waits before logging out a user who is not active. If you turn this on, the session will end if the user does nothing for the set time. For example, if you set it to 10 minutes, and the user does not click or type for 10 minutes, they will be logged out.
-
Access token lifetime: This is how long an access token is valid. When it expires, your app needs to get a new token (using the refresh token) so the user can keep using the app without logging in again. For example, if you set it to 5 minutes, your app will need to refresh the token every 5 minutes.
Shorter timeouts provide better security, while longer timeouts reduce authentication interruptions.
-
-
Manage sessions remotely API
Section titled “Manage sessions remotely ”Beyond client-side session management, Scalekit provides powerful APIs to manage user sessions remotely from your backend application. This enables you to build features like active session management in user account settings, security incident response, or administrative session control.
These APIs are particularly useful for:
- Displaying all active sessions in user account settings
- Allowing users to revoke specific sessions from unfamiliar devices
- Security incident response and suspicious session termination
Session Management SDK // Get details for a specific sessionconst sessionDetails = await scalekit.session.getSession('ses_1234567890123456');// List all sessions for a user with optional filteringconst userSessions = await scalekit.session.getUserSessions('usr_1234567890123456', {pageSize: 10,filter: {status: ['ACTIVE'], // Filter for active sessions onlystartTime: new Date('2025-01-01T00:00:00Z'),endTime: new Date('2025-12-31T23:59:59Z')}});// Revoke a specific session (useful for "Sign out this device" functionality)const revokedSession = await scalekit.session.revokeSession('ses_1234567890123456');// Revoke all sessions for a user (useful for "Sign out all devices" functionality)const revokedSessions = await scalekit.session.revokeAllUserSessions('usr_1234567890123456');console.log(`Revoked sessions for user`);Session Management SDK # Get details for a specific sessionsession_details = scalekit_client.session.get_session(session_id="ses_1234567890123456")# List all sessions for a user with optional filteringfrom google.protobuf.timestamp_pb2 import Timestampfrom datetime import datetimestart_time = Timestamp()start_time.FromDatetime(datetime(2025, 1, 1))end_time = Timestamp()end_time.FromDatetime(datetime(2025, 12, 31))filter_obj = scalekit_client.session.create_session_filter(status=["ACTIVE"], start_time=start_time, end_time=end_time)user_sessions = scalekit_client.session.get_user_sessions(user_id="usr_1234567890123456", page_size=10, filter=filter_obj)# Revoke a specific session (useful for "Sign out this device" functionality)revoked_session = scalekit_client.session.revoke_session(session_id="ses_1234567890123456")# Revoke all sessions for a user (useful for "Sign out all devices" functionality)revoked_sessions = scalekit_client.session.revoke_all_user_sessions(user_id="usr_1234567890123456")print(f"Revoked sessions for user")Session Management SDK // Get details for a specific sessionsessionDetails, err := scalekitClient.Session().GetSession(ctx, "ses_1234567890123456")if err != nil {log.Fatal(err)}// List all sessions for a user with optional filtering// import "time", sessionsv1 "...", "google.golang.org/protobuf/types/known/timestamppb"startTime, _ := time.Parse(time.RFC3339, "2025-01-01T00:00:00Z")endTime, _ := time.Parse(time.RFC3339, "2025-12-31T23:59:59Z")filter := &sessionsv1.UserSessionFilter{Status: []string{"ACTIVE"}, // Filter for active sessions onlyStartTime: timestamppb.New(startTime),EndTime: timestamppb.New(endTime),}userSessions, err := scalekitClient.Session().GetUserSessions(ctx, "usr_1234567890123456", 10, "", filter)if err != nil {log.Fatal(err)}// Revoke a specific session (useful for "Sign out this device" functionality)revokedSession, err := scalekitClient.Session().RevokeSession(ctx, "ses_1234567890123456")if err != nil {log.Fatal(err)}// Revoke all sessions for a user (useful for "Sign out all devices" functionality)revokedSessions, err := scalekitClient.Session().RevokeAllUserSessions(ctx, "usr_1234567890123456")if err != nil {log.Fatal(err)}fmt.Printf("Revoked sessions for user")Session Management SDK // Get details for a specific sessionSessionDetails sessionDetails = scalekitClient.sessions().getSession("ses_1234567890123456");// List all sessions for a user with optional filtering// import UserSessionFilter, Timestamp, InstantUserSessionFilter filter = UserSessionFilter.newBuilder().addStatus("ACTIVE").setStartTime(Timestamp.newBuilder().setSeconds(Instant.parse("2025-01-01T00:00:00Z").getEpochSecond()).build()).setEndTime(Timestamp.newBuilder().setSeconds(Instant.parse("2025-12-31T23:59:59Z").getEpochSecond()).build()).build();UserSessionDetails userSessions = scalekitClient.sessions().getUserSessions("usr_1234567890123456", 10, "", filter);// Revoke a specific session (useful for "Sign out this device" functionality)RevokeSessionResponse revokedSession = scalekitClient.sessions().revokeSession("ses_1234567890123456");// Revoke all sessions for a user (useful for "Sign out all devices" functionality)RevokeAllUserSessionsResponse revokedSessions = scalekitClient.sessions().revokeAllUserSessions("usr_1234567890123456");System.out.println("Revoked sessions for user");
Your application continuously validates the access token for each incoming request. When the token is valid, the user’s session remains active. If the access token expires, your middleware transparently refreshes it using the stored refresh token—users never notice this happening. If the refresh token itself expires or becomes invalid, users are prompted to sign in again.