The Zendesk (OAuth) connector lets your AI agent act in each user's Zendesk (OAuth) account. Each user signs in to Zendesk (OAuth) once, and Scalekit stores and refreshes their tokens, so your agent never handles credentials. It comes with 137 tools.
- Tools
- 137
- What they doRead · write · destructive
- 84 · 39 · 1484 read39 write14 destructive
- Users sign in with
- OAuth
- OAuth app
- Your own Zendesk app
What you can do
- Manage tickets: create, update, merge, and delete support tickets, and change status, priority, assignee, and tags
- Reply and search tickets: add public replies or internal notes and find tickets with Zendesk search syntax
- Manage users and organizations: create, update, search, and delete end users, agents, and organizations and their memberships
- Manage Help Center articles: create, update, search, and archive articles, sections, and article comments
- Automate workflows: create and edit macros, triggers, automations, views, and webhooks that act on tickets
- Track support performance: read satisfaction ratings, ticket metrics, SLA policies, and Talk call activity
Setup
Install the SDK
Terminal window npm install @scalekit-sdk/node dotenvTerminal window pip install scalekit-sdk-python python-dotenvSet your credentials
Add your Scalekit credentials to your
.envfile. Find values in app.scalekit.com > Developers > API Credentials..env SCALEKIT_ENVIRONMENT_URL=<your-environment-url>SCALEKIT_CLIENT_ID=<your-client-id>SCALEKIT_CLIENT_SECRET=<your-client-secret>Create the Zendesk (OAuth) connection
In AgentKit > Connections, create a Zendesk (OAuth) connection and copy its redirect URI. The name you give it is the
connection_nameyour code passes. See Configure connections.Register an OAuth app
Zendesk connections use your own OAuth app. Register one with Zendesk and add the redirect URI you copied.
Then enter the app's Client ID and Client Secret on the Zendesk (OAuth) connection.
Console steps with screenshots
Register your Scalekit environment with Zendesk so Scalekit can handle the OAuth flow and token lifecycle for your users.
-
Copy the redirect URI from Scalekit
- In the Scalekit dashboard, go to AgentKit > Connections > Create Connection.
- Search for Zendesk (OAUTH) and click Create.
- Copy the Redirect URI from the connection details panel. It looks like:
https://<YOUR_ENV>.scalekit.cloud/sso/v1/oauth/conn_<ID>/callback
-
Create an OAuth client in Zendesk
- Sign in to your Zendesk account and open Admin Center.
- In the left sidebar, go to Apps and integrations > APIs > OAuth clients.
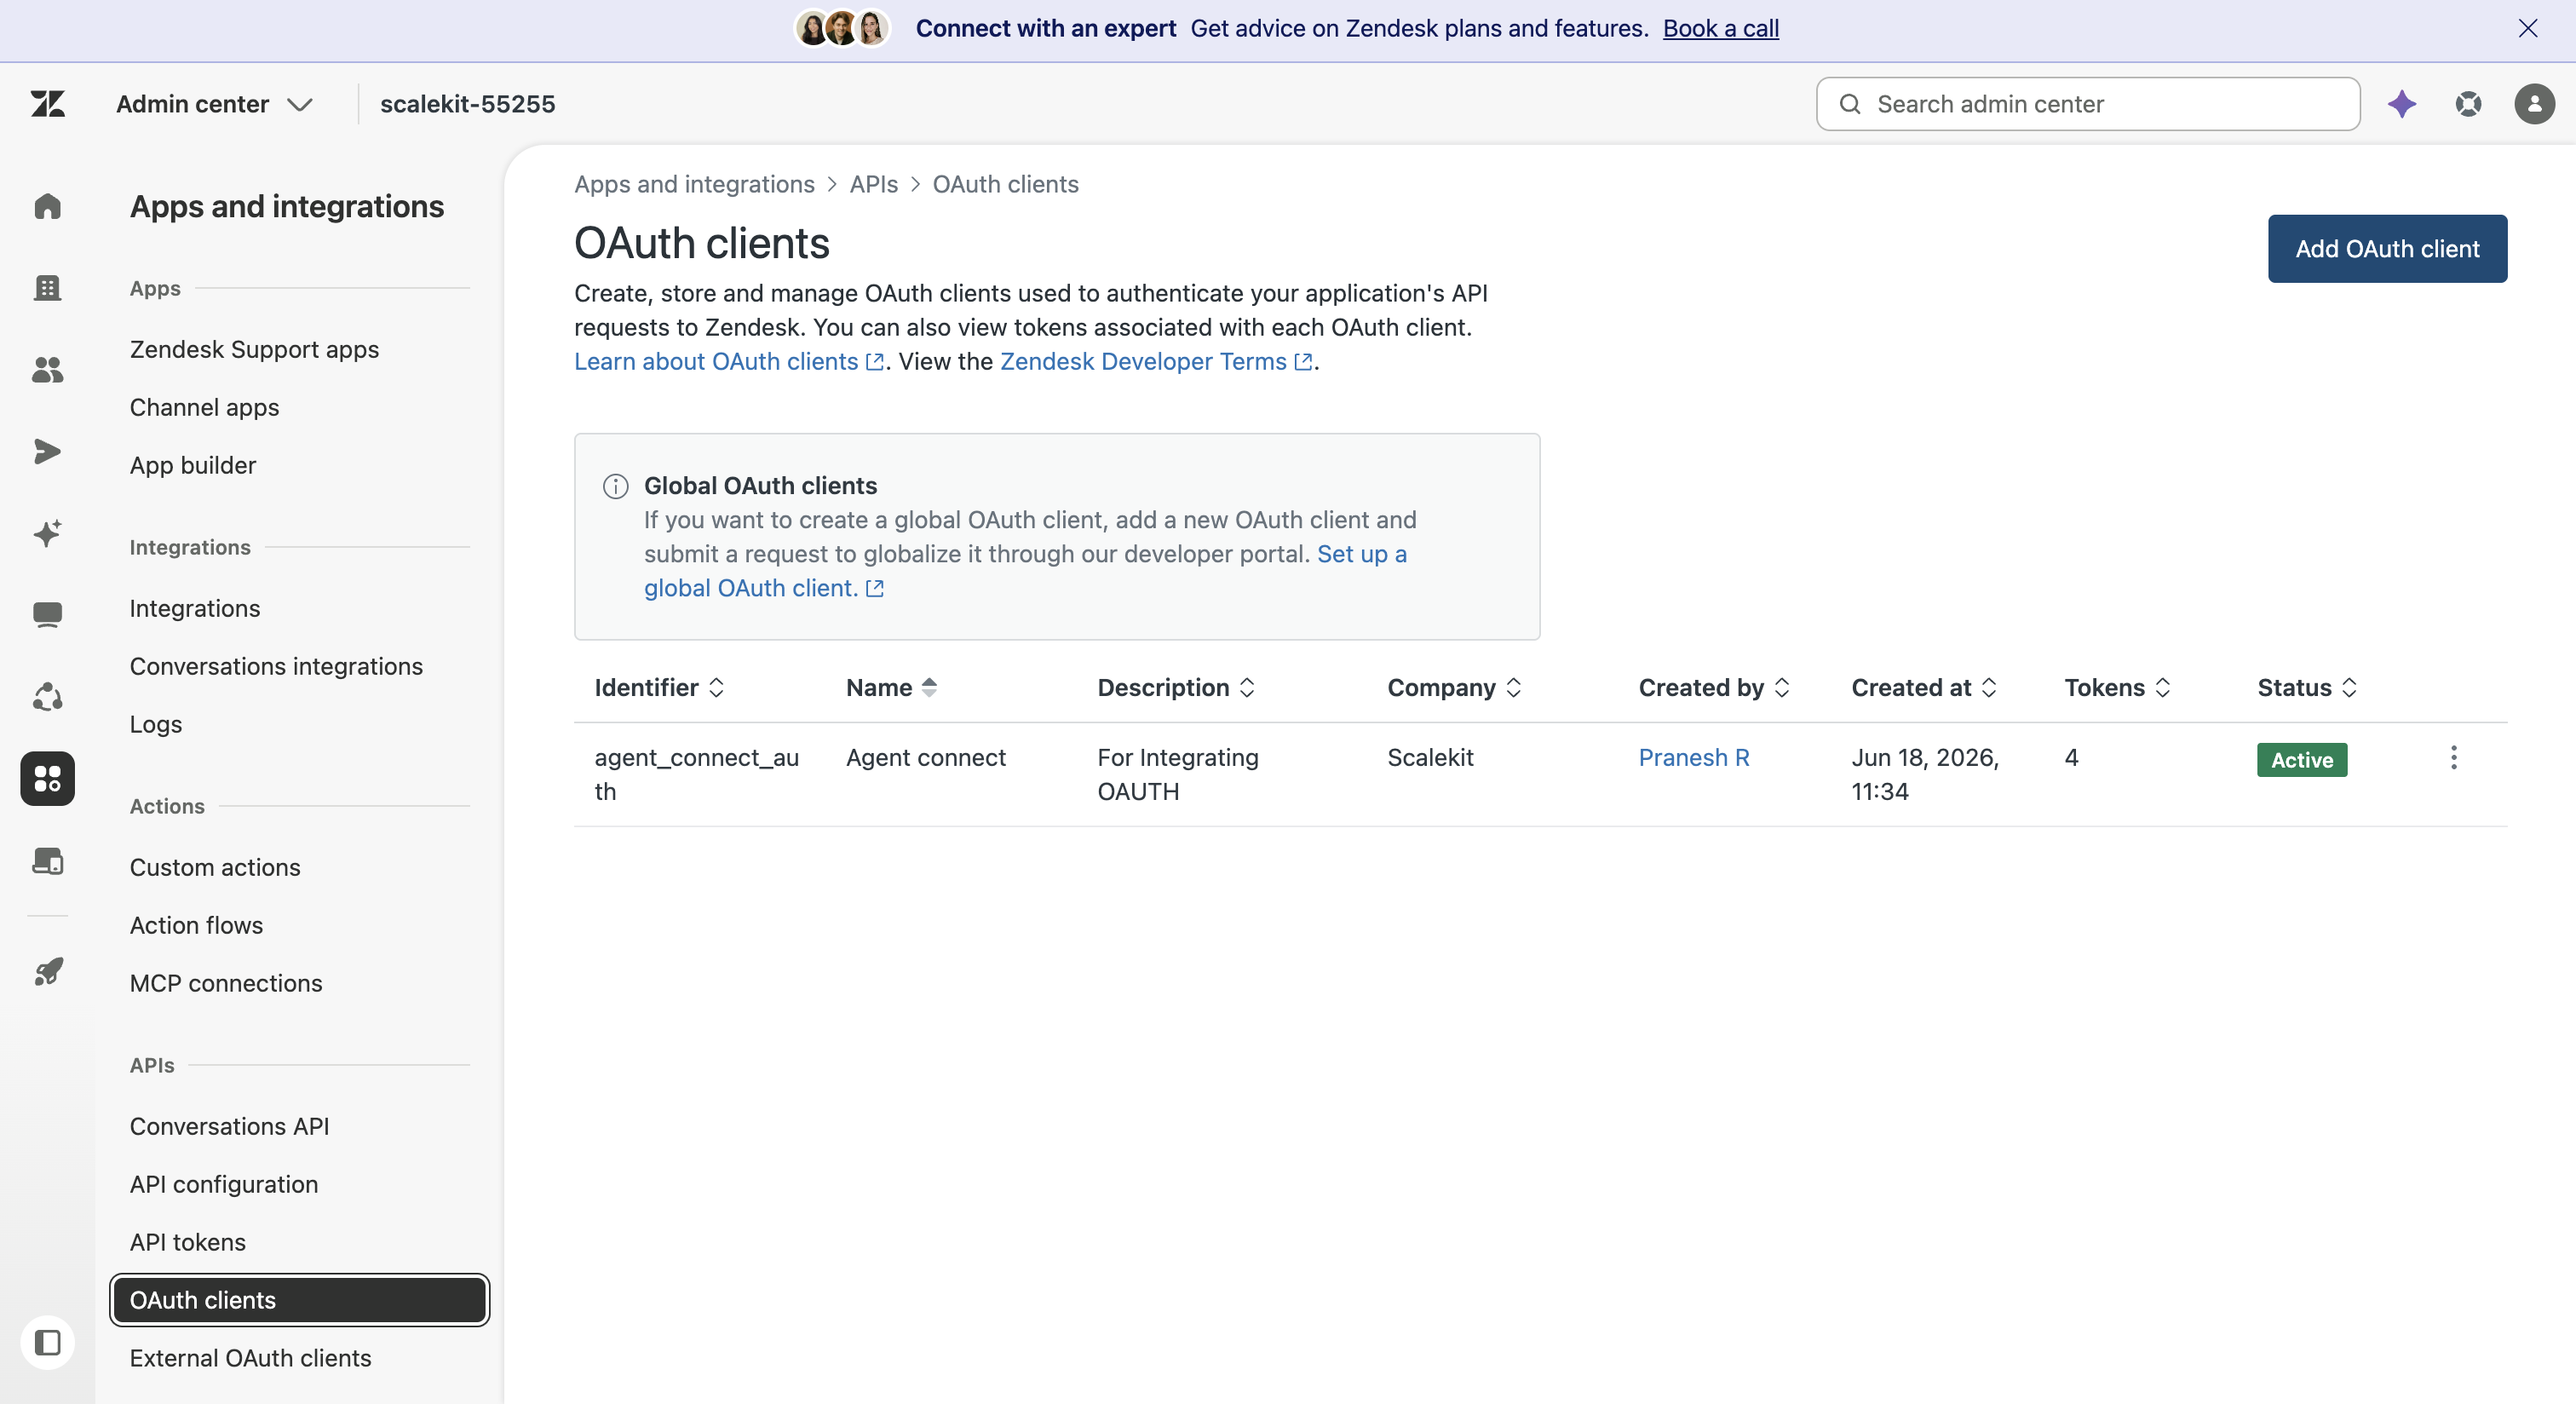
- Click Add OAuth client (top right).
-
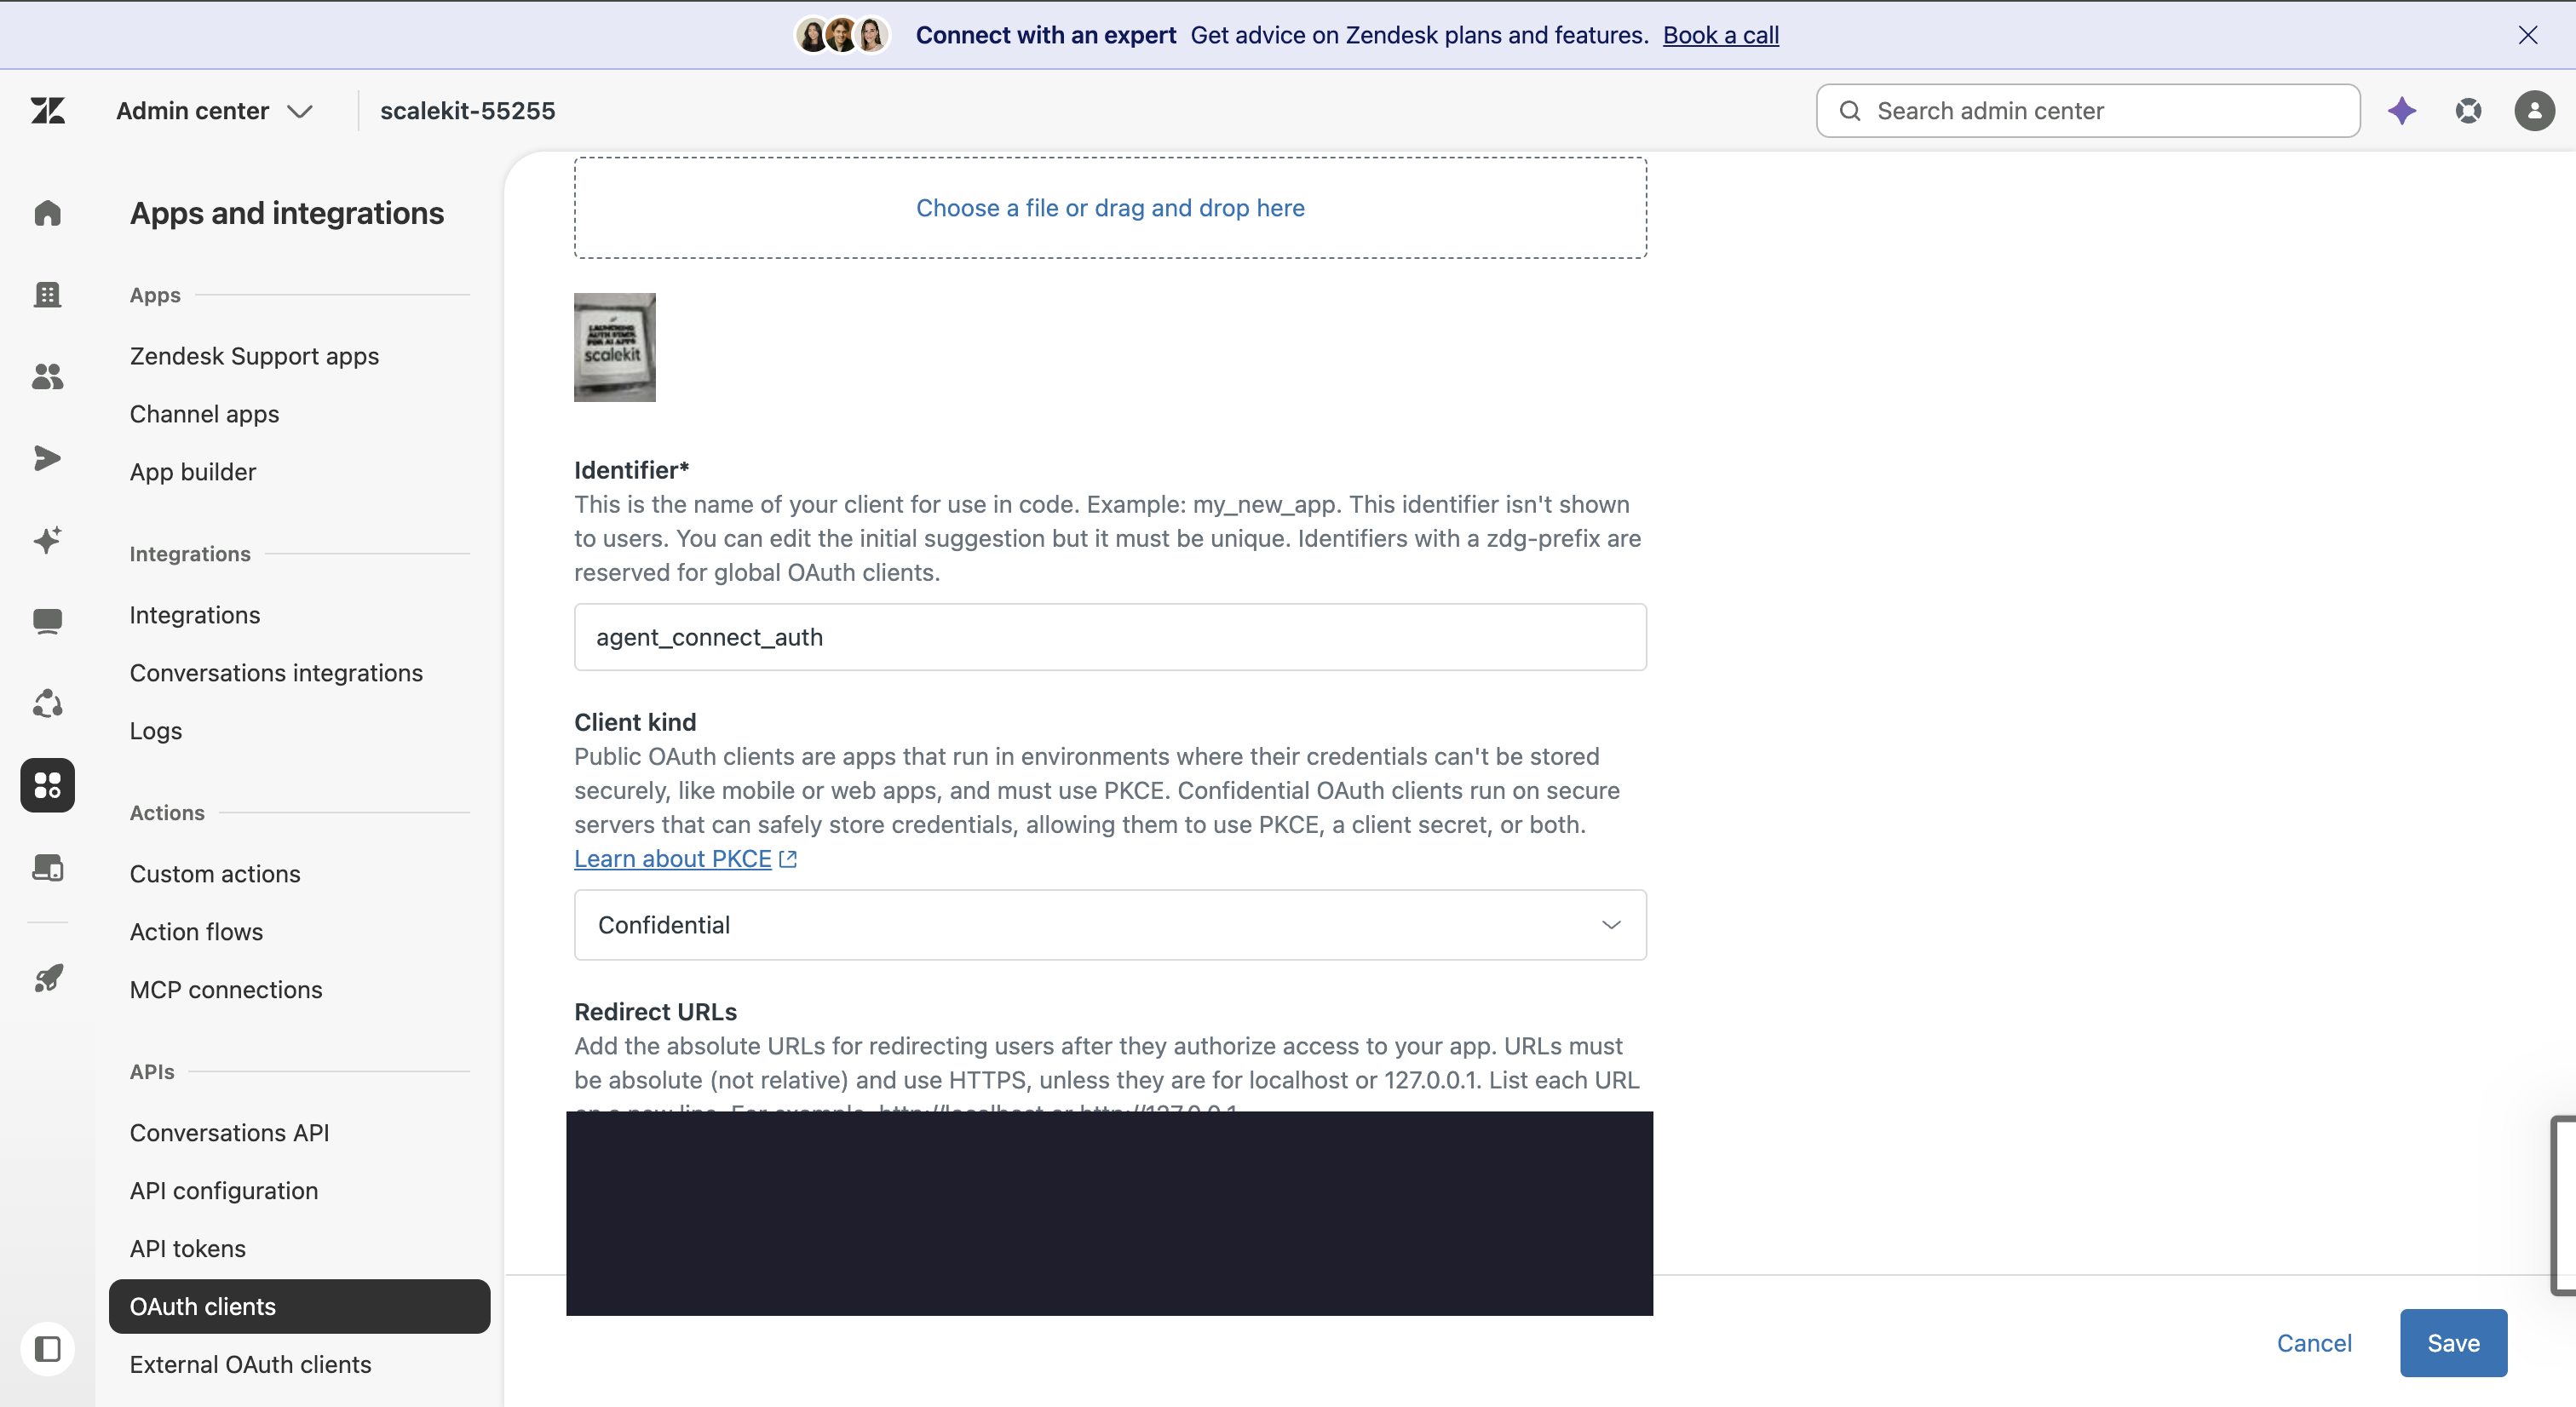
Fill in the client details
- Enter a Name (shown to users during authorization, for example
Agent Connect) and a unique Identifier (used in code — for example,agent_connect_auth).
- Set Client kind to Confidential — this allows Zendesk to issue a client secret.
- Under Redirect URLs, paste the Scalekit redirect URI you copied in step 1. Add one URL per line.
- Enter a Name (shown to users during authorization, for example
-
Save and copy your credentials
- Click Save. Zendesk displays the full Secret immediately after saving.
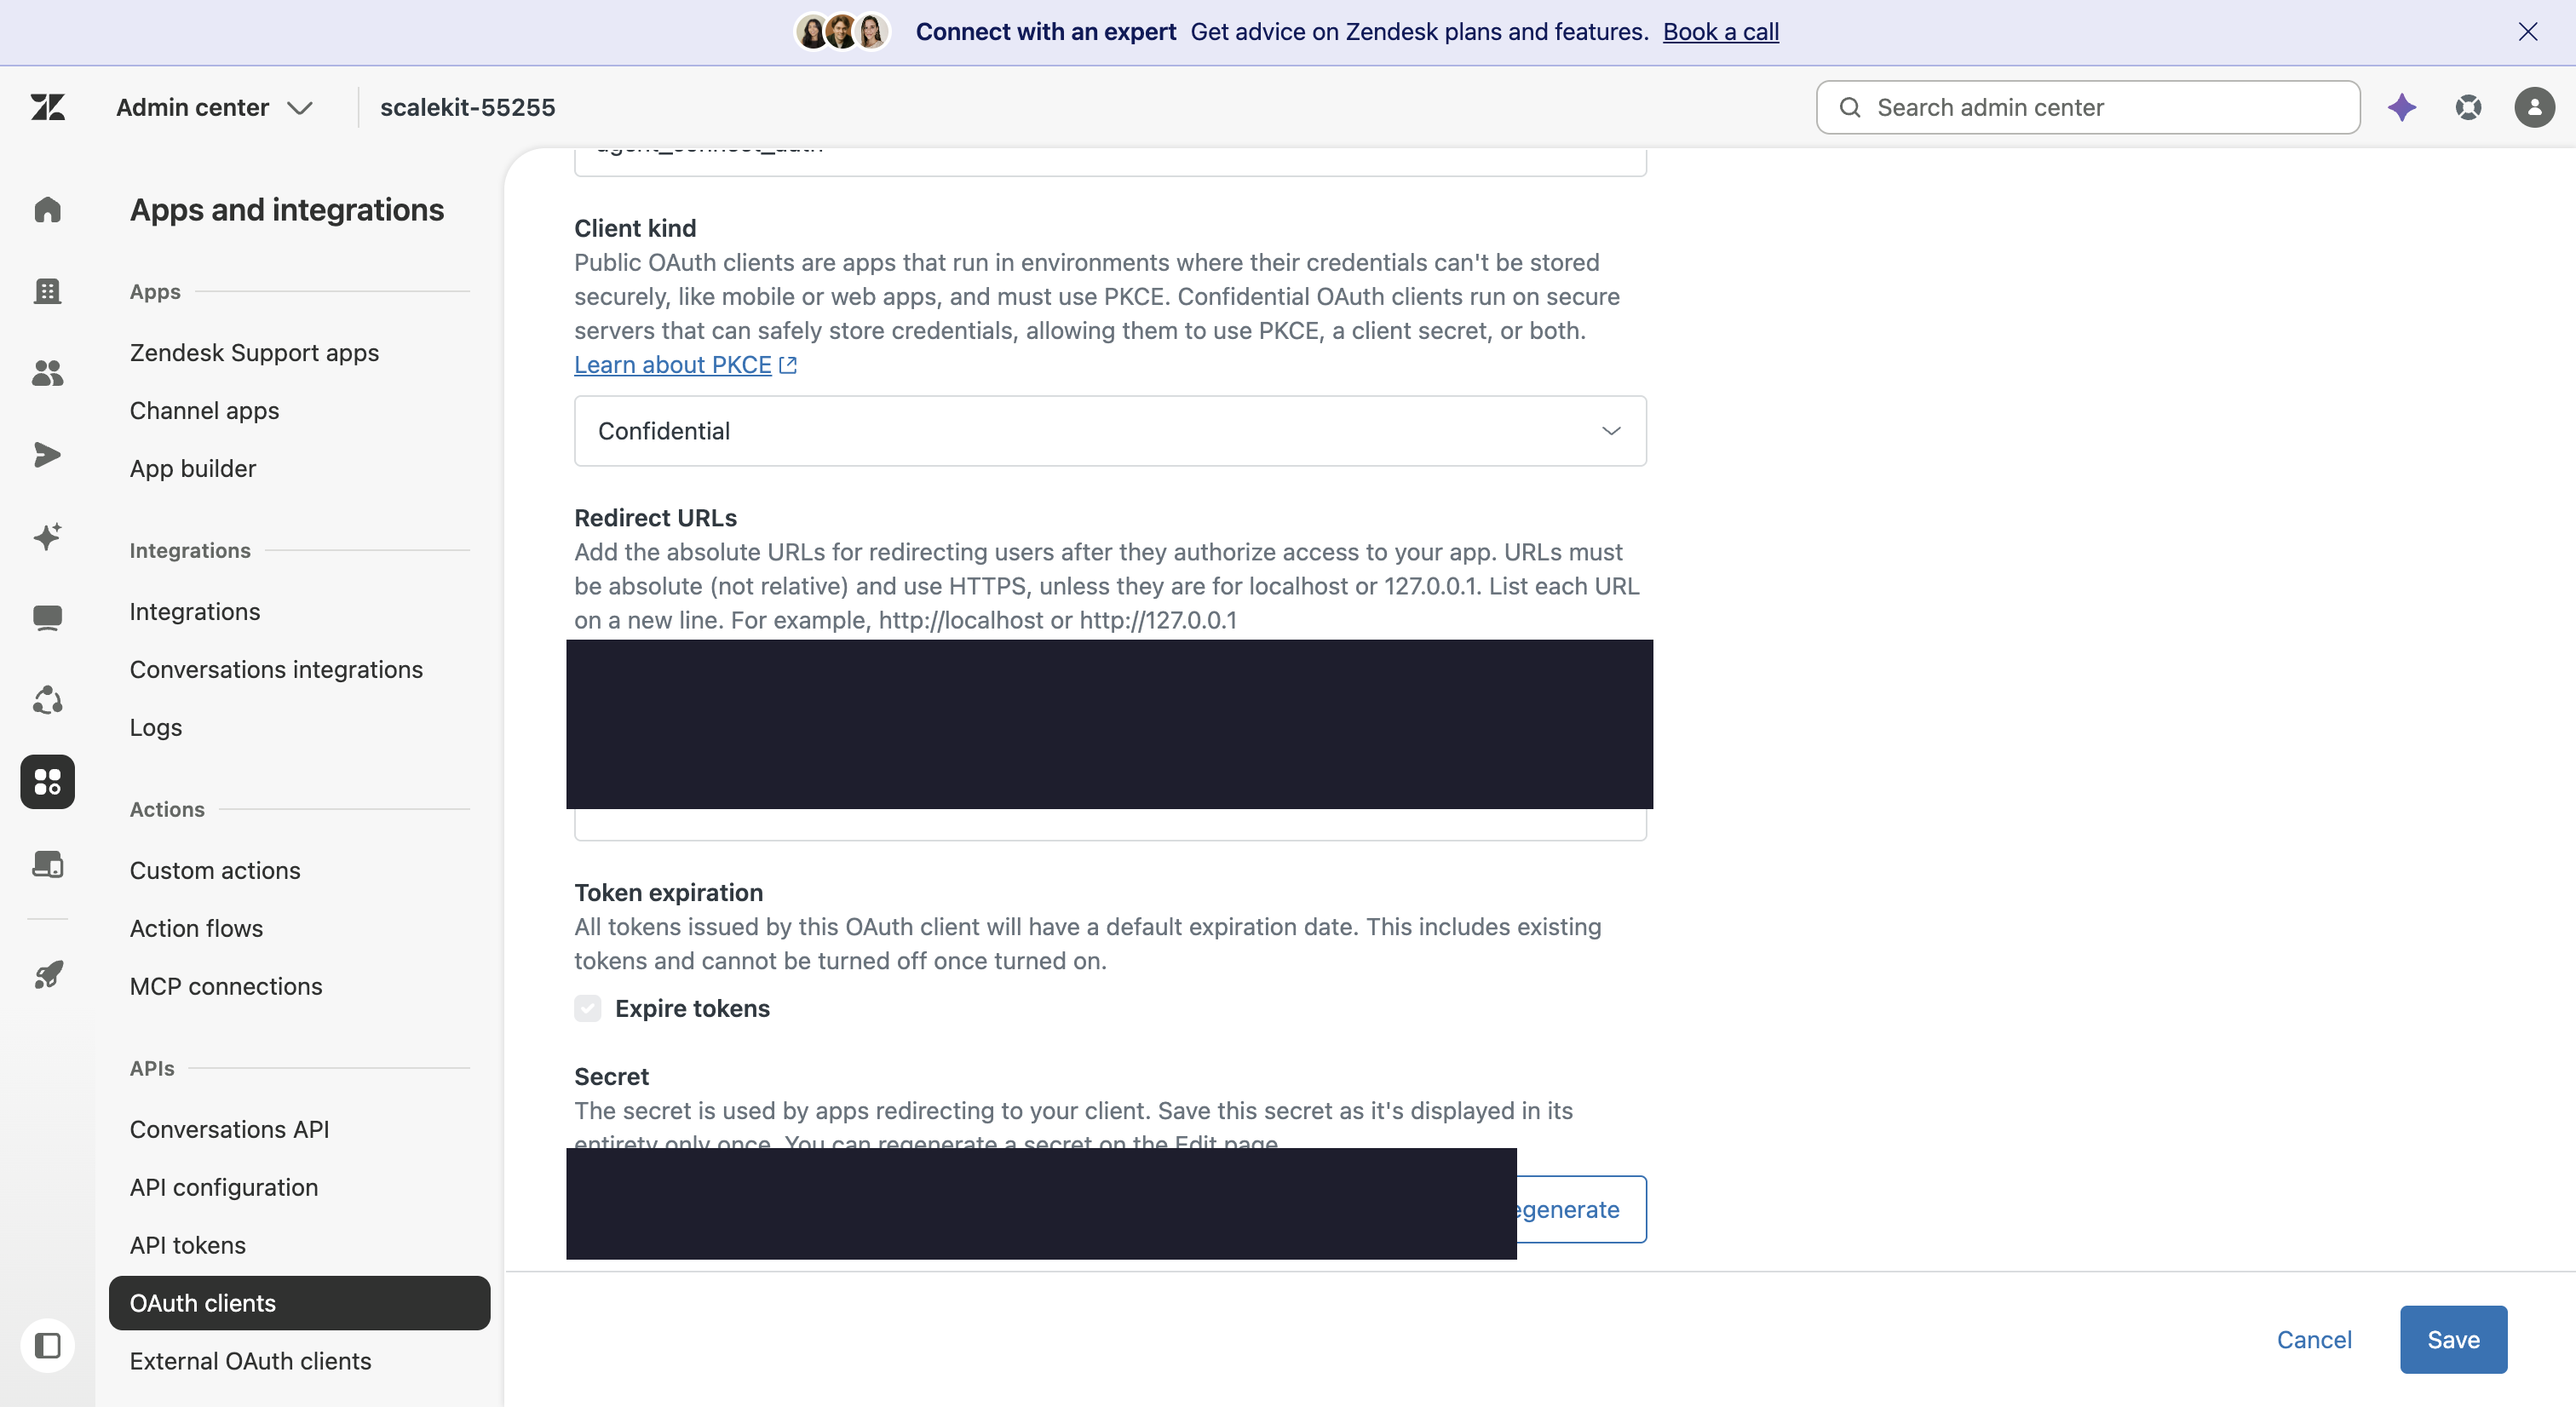
Note both values:
- Client ID — the Identifier you entered (for example,
agent_connect_auth) - Client Secret — the value shown in the Secret field
-
Add credentials in Scalekit
- Return to Scalekit dashboard and open the Zendesk (OAUTH) connection you created.
- Enter:
- Client ID — the Identifier from your Zendesk OAuth client
- Client Secret — the Secret shown after saving
- Click Save.
-
Authorize a user and make your first call
quickstart.mts import { ScalekitClient } from '@scalekit-sdk/node'import 'dotenv/config'import { createInterface } from 'node:readline/promises'const scalekit = new ScalekitClient(process.env.SCALEKIT_ENVIRONMENT_URL,process.env.SCALEKIT_CLIENT_ID,process.env.SCALEKIT_CLIENT_SECRET,)const actions = scalekit.actionsconst connector = 'zendeskoauth'const identifier = 'user_123'// Generate an authorization link for the userconst { link } = await actions.getAuthorizationLink({ connectionName: connector, identifier })console.log('Authorize Zendesk (OAuth):', link)const rl = createInterface({ input: process.stdin, output: process.stdout })await rl.question('Press Enter after authorizing...')rl.close()// Make your first callconst result = await actions.executeTool({connector,identifier,toolName: 'zendeskoauth_automations_list',toolInput: {},})console.log(result)Terminal window npx tsx quickstart.mtsquickstart.py import osfrom scalekit import ScalekitClientfrom dotenv import load_dotenvload_dotenv()scalekit_client = ScalekitClient(env_url=os.getenv("SCALEKIT_ENVIRONMENT_URL"),client_id=os.getenv("SCALEKIT_CLIENT_ID"),client_secret=os.getenv("SCALEKIT_CLIENT_SECRET"),)actions = scalekit_client.actionsconnection_name = "zendeskoauth"identifier = "user_123"# Generate an authorization link for the userlink_response = actions.get_authorization_link(connection_name=connection_name,identifier=identifier,)print("Authorize Zendesk (OAuth):", link_response.link)input("Press Enter after authorizing...")# Make your first callresult = actions.execute_tool(tool_input={},tool_name="zendeskoauth_automations_list",connection_name=connection_name,identifier=identifier,)print(result)Terminal window python quickstart.pyEach user signs in once. See Authorize a user for the full flow and statuses.
Tools
Pass the exact name toexecute_toolzendeskoauth_attachment_getRetrieve attachment details by ID.Read-onlyGet Attachment
Retrieve attachment details by ID. Obtain the attachment_id from a ticket comment's attachments list.
Inputs
attachment_idnumberrequired- The unique numeric identifier of the attachment
zendeskoauth_automation_getRetrieve a single automation by ID, including its conditions and actions.Read-onlyGet Automation
Retrieve a single automation by ID, including its conditions and actions.
Inputs
automation_idnumberrequired- The unique numeric identifier of the automation
zendeskoauth_automations_listList the automations configured for the account.Read-onlyList Automations
List the automations configured for the account. Automations run business rules on a recurring schedule based on time-based conditions.
Inputs
activeboolean- Filter by active (true) or inactive (false) automations
pagenumber- Page number to retrieve
per_pagenumber- Results per page (max 100)
zendeskoauth_brand_getRetrieve a single brand by ID.Read-onlyGet Brand
Retrieve a single brand by ID.
Inputs
brand_idnumberrequired- The unique numeric identifier of the brand
zendeskoauth_brands_listList the brands configured for the account, sorted by name.Read-onlyList Brands
List the brands configured for the account, sorted by name.
Inputs
include_deletedboolean- When true, includes soft-deleted brands in the response
zendeskoauth_business_hours_schedules_listList all business hours schedules defined in Zendesk.Read-onlyList Business Hours Schedules
List all business hours schedules defined in Zendesk. Each schedule includes the configured shift windows (days and hours) your support team operates. Use this to retrieve 24/7 coverage windows and shift data without requiring a Zendesk WFM (Tymeshift) subscription.
Inputs
This tool takes no inputs.
zendeskoauth_group_getRetrieve a single group by ID.Read-onlyGet Group
Retrieve a single group by ID.
Inputs
group_idnumberrequired- The unique numeric identifier of the group
includestring- Comma-separated sideloads to include, e.g. users
zendeskoauth_group_memberships_listList agent-to-group membership assignments across the account.Read-onlyList Group Memberships
List agent-to-group membership assignments across the account.
Inputs
includestring- Comma-separated sideloads: users, groups
pagenumber- Page number to retrieve
per_pagenumber- Results per page (max 100)
zendeskoauth_groups_listList all groups in Zendesk.Read-onlyList Groups
List all groups in Zendesk. Groups are used to organize agents and route tickets.
Inputs
pagenumber- Page number for pagination
per_pagenumber- Number of groups per page (max 100)
zendeskoauth_guide_searchSearch across Help Center articles, community posts, and external records in a single query.Read-onlyUnified Search
Search across Help Center articles, community posts, and external records in a single query. Requires authentication. The filter[locales] parameter is mandatory.
Inputs
filter_localesstringrequired- Comma-separated locales to scope the search. At least one valid locale is required.
filter_brand_idsstring- Comma-separated brand IDs to limit search scope. Returns results across all brands if omitted.
filter_category_idsstring- Comma-separated category IDs to limit search to specific Help Center categories.
filter_content_typesstring- Comma-separated content types to limit results to: ARTICLE or POST. External records cannot be specified here; use filter_external_source_ids instead.
filter_external_source_idsstring- Comma-separated external source IDs to scope results to specific external sources.
filter_section_idsstring- Comma-separated section IDs to limit search to specific Help Center sections.
filter_topic_idsstring- Comma-separated topic IDs to limit search to specific community topics.
page_afterstring- Cursor string from the previous response to fetch the next page.
page_sizeinteger- Maximum number of results per page. Default is 10, maximum is 50.
querystring- The search text to match. If omitted, results are sorted by internal ordering instead of relevance.
zendeskoauth_help_center_article_comments_listList all comments on a Help Center article.Read-onlyList Help Center Article Comments
List all comments on a Help Center article.
Inputs
article_idnumberrequired- The ID of the article whose comments to list.
includestring- Comma-separated sideloads: users (authors), articles.
pageinteger- Page number for offset pagination.
per_pageinteger- Number of results per page (max 100).
sort_orderstring- Sort direction: asc or desc. Default: desc.
zendeskoauth_help_center_article_getRetrieve a single Help Center article by its ID.Read-onlyGet Help Center Article
Retrieve a single Help Center article by its ID.
Inputs
article_idnumberrequired- The ID of the article to retrieve.
includestring- Comma-separated sideloads: users, sections, categories, translations.
zendeskoauth_help_center_article_labels_listList all labels attached to a specific Help Center article.Read-onlyList Article Labels
List all labels attached to a specific Help Center article.
Inputs
article_idstringrequired- The ID of the article to retrieve labels for.
pageinteger- Page number for offset pagination.
per_pageinteger- Number of results per page (max 100).
zendeskoauth_help_center_articles_listList Help Center articles.Read-onlyList Help Center Articles
List Help Center articles. Filter by section or category, sort, and paginate results.
Inputs
includestring- Comma-separated sideloads: users, sections, categories, translations.
label_namesstring- Comma-separated list of labels to filter articles by.
pageinteger- Page number for offset pagination.
per_pageinteger- Number of results per page (max 100).
sort_bystring- Field to sort by: position, title, created_at, updated_at, or edited_at.
sort_orderstring- Sort direction: asc or desc.
start_timeinteger- Unix epoch timestamp to fetch only articles updated after this time (for incremental sync).
zendeskoauth_help_center_articles_searchSearch Help Center articles by keyword.Read-onlySearch Help Center Articles
Search Help Center articles by keyword. Filter by category, section, locale, labels, and date range.
Inputs
brand_idinteger- Scope the search to a specific brand ID.
categorynumber- Filter results to a specific category ID.
created_afterstring- Limit results to articles created after this date (YYYY-MM-DD).
created_atstring- Limit results to articles created on this date (YYYY-MM-DD).
created_beforestring- Limit results to articles created before this date (YYYY-MM-DD).
label_namesstring- Comma-separated list of labels to filter by.
localestring- Filter results to a specific locale.
multibrandboolean- Search across all brands when true. Defaults to false.
pageinteger- Page number for offset pagination.
per_pageinteger- Number of results per page (max 100).
querystring- Full-text search query.
sectionnumber- Filter results to a specific section ID.
sort_bystring- Sort by relevance, created_at, or updated_at.
sort_orderstring- Sort direction: asc or desc.
updated_afterstring- Limit results to articles updated after this date (YYYY-MM-DD).
updated_atstring- Limit results to articles updated on this date (YYYY-MM-DD).
updated_beforestring- Limit results to articles updated before this date (YYYY-MM-DD).
zendeskoauth_help_center_categories_listList all Help Center categories in your Zendesk account.Read-onlyList Help Center Categories
List all Help Center categories in your Zendesk account. Returns categories with IDs, names, and positions.
Inputs
includestring- Sideload related data. Use 'translations' to include category translations.
pageinteger- Page number for offset pagination.
per_pageinteger- Number of results per page (max 100).
sort_bystring- Field to sort by: position, created_at, or updated_at.
sort_orderstring- Sort direction: asc or desc.
zendeskoauth_help_center_category_getRetrieve a single Help Center category by its ID.Read-onlyGet Help Center Category
Retrieve a single Help Center category by its ID.
Inputs
category_idnumberrequired- The ID of the category to retrieve.
includestring- Sideload related data. Use 'translations' to include category translations.
zendeskoauth_help_center_labels_listList all Help Center labels in the account.Read-onlyList HC Labels
List all Help Center labels in the account. Returns label names and article counts. Supports pagination.
Inputs
pageinteger- Page number for offset pagination.
per_pageinteger- Number of results per page (max 100).
zendeskoauth_help_center_section_getRetrieve a single Help Center section by its ID.Read-onlyGet Help Center Section
Retrieve a single Help Center section by its ID.
Inputs
section_idnumberrequired- The ID of the section to retrieve.
includestring- Comma-separated sideloads: 'categories' to include the parent category, 'translations' to include translations.
zendeskoauth_help_center_sections_listList all Help Center sections.Read-onlyList Help Center Sections
List all Help Center sections. Filter by category to narrow results.
Inputs
includestring- Comma-separated sideloads: 'categories' to include the parent category, 'translations' to include translations.
pageinteger- Page number for offset pagination.
per_pageinteger- Number of results per page (max 100).
sort_bystring- Field to sort by: position, created_at, or updated_at.
sort_orderstring- Sort direction: asc or desc.
zendeskoauth_macro_applyPreview the changes a macro would make without actually applying them.Read-onlyPreview Macro Changes
Preview the changes a macro would make without actually applying them. Optionally apply to a specific ticket to preview against its current state.
Inputs
macro_idnumberrequired- The unique numeric identifier of the macro
normalize_commentboolean- If true, normalizes the macro comment's newline formatting to match the ticket comment editor
zendeskoauth_macro_getRetrieve a single macro by ID, including its list of actions.Read-onlyGet Macro
Retrieve a single macro by ID, including its list of actions.
Inputs
macro_idnumberrequired- The unique numeric identifier of the macro
zendeskoauth_macros_listList the shared and personal macros (canned response/action templates) available to the current user.Read-onlyList Macros
List the shared and personal macros (canned response/action templates) available to the current user.
Inputs
accessstring- Filter by access levelone of
personalagentssharedaccount activeboolean- Filter by active (true) or inactive (false) macros
categorynumber- Filter macros by category ID
group_idnumber- Filter macros by group ID
only_viewableboolean- If true, returns only macros that can be applied to tickets
pagenumber- Page number to retrieve
per_pagenumber- Results per page (max 100)
sort_bystring- Field to sort byone of
alphabeticalcreated_atupdated_atusage_1husage_24husage_7dusage_30d sort_orderstring- asc or descone of
ascdesc
zendeskoauth_omnichannel_agent_statuses_listGet the current Talk availability status for a specific agent.Read-onlyGet Agent Availability
Get the current Talk availability status for a specific agent. Returns agent state (online, away, offline, transfers_only), call status (on_call, wrap_up), and channel (client or phone). Useful for monitoring individual agent occupancy.
Inputs
agent_idnumberrequired- The ID of the agent whose availability to retrieve
zendeskoauth_omnichannel_agents_listList the current availability status for all agents across all channels (voice, chat, email, messaging).Read-onlyList Agent Availabilities
List the current availability status for all agents across all channels (voice, chat, email, messaging). Returns each agent's channel capacity, remaining capacity, and current status. Supports filtering by group, skill, channel status (e.g. voice:online), and remaining capacity.
Inputs
filter_agent_idstring- Comma-separated agent IDs to filter by
filter_agent_status_namestring- Filter agents by their unified status name (e.g. Online, Offline, Away)
filter_channel_statusstring- Filter agents by their status on a specific channel. Format: channel:status (e.g. voice:online, messaging:away)
filter_group_idstring- Comma-separated group IDs to filter agents by
page_afterstring- Cursor for fetching the next page of results
page_sizenumber- Maximum number of agents to return per page
select_channelstring- Limit availability data to a single channel (e.g. voice, messaging, email)
zendeskoauth_organization_getRetrieve details of a specific Zendesk organization by ID.Read-onlyGet Organization
Retrieve details of a specific Zendesk organization by ID. Returns organization name, domain names, tags, notes, shared ticket settings, and custom fields.
Inputs
organization_idnumberrequired- The ID of the organization to retrieve
includestring- Additional related data to include (e.g., lookup_relationship_fields)
zendeskoauth_organization_memberships_listList user-to-organization membership assignments across the account.Read-onlyList Organization Memberships
List user-to-organization membership assignments across the account.
Inputs
includestring- Comma-separated sideloads: users, organizations
pagenumber- Page number to retrieve
per_pagenumber- Results per page (max 100)
zendeskoauth_organization_tickets_listList the tickets belonging to a specific Zendesk organization.Read-onlyList Organization Tickets
List the tickets belonging to a specific Zendesk organization.
Inputs
organization_idnumberrequired- The unique numeric identifier of the organization
pagenumber- Page number to retrieve
per_pagenumber- Results per page (default: 100, max: 100)
zendeskoauth_organizations_autocompleteReturn organizations whose name starts with the given substring.Read-onlyAutocomplete Organizations
Return organizations whose name starts with the given substring.
Inputs
namestringrequired- Substring to match against the start of an organization's name
zendeskoauth_organizations_listList all organizations in Zendesk with pagination support.Read-onlyList Organizations
List all organizations in Zendesk with pagination support.
Inputs
pagenumber- Page number for pagination
per_pagenumber- Number of organizations per page (max 100)
zendeskoauth_organizations_searchSearch for an organization by its exact external_id or name (not both at once).Read-onlySearch Organizations
Search for an organization by its exact external_id or name (not both at once).
Inputs
external_idstring- The external_id of the organization to find
namestring- The exact name of the organization to find
zendeskoauth_problems_listList tickets of type 'problem'.Read-onlyList Ticket Problems
List tickets of type 'problem'. Problem tickets group together incident tickets that share the same root cause.
Inputs
This tool takes no inputs.
zendeskoauth_request_getRetrieve a single request (the customer-facing view of a ticket) by ID.Read-onlyGet Request
Retrieve a single request (the customer-facing view of a ticket) by ID.
Inputs
request_idnumberrequired- The unique numeric identifier of the request (same as the underlying ticket ID)
zendeskoauth_requests_listList the requester's own tickets (requests).Read-onlyList Requests
List the requester's own tickets (requests). End users see only their own requests; agents/admins can use this to review the customer-facing view of a ticket.
Inputs
pagenumber- Page number to retrieve
per_pagenumber- Results per page (max 100)
sort_bystring- updated_at or created_atone of
updated_atcreated_at sort_orderstring- asc or descone of
ascdesc
zendeskoauth_requests_searchSearch requests by keyword and filters such as organization or status.Read-onlySearch Requests
Search requests by keyword and filters such as organization or status. Example: query=printer&status=hold,open.
Inputs
organization_idnumber- Restrict results to requests from this organization
querystring- Search text; combine with other filters as query string values
statusstring- Comma-separated list of statuses to filter by, e.g. hold,open
zendeskoauth_satisfaction_ratings_listList CSAT satisfaction ratings with optional filters.Read-onlyList Satisfaction Ratings
List CSAT satisfaction ratings with optional filters. Returns score (good/bad), comment, reason, ticket ID, and timestamps for each rating.
Inputs
end_timenumber- Unix timestamp to filter ratings created before this time
pagenumber- Page number for pagination
per_pagenumber- Number of results per page
scorestring- Filter by satisfaction score
start_timenumber- Unix timestamp to filter ratings created after this time
Also accepts
schema_versionandtool_versionto pin a version.zendeskoauth_satisfaction_reasons_listList all satisfaction reasons configured for negative (bad) CSAT ratings.Read-onlyList Satisfaction Reasons
List all satisfaction reasons configured for negative (bad) CSAT ratings. Used to analyze why customers rate support interactions poorly.
Inputs
This tool takes no inputs.
Also accepts
schema_versionandtool_versionto pin a version.zendeskoauth_search_ticketsSearch Zendesk tickets using a query string.Read-onlySearch Tickets
Search Zendesk tickets using a query string. Supports Zendesk's search syntax (e.g., 'type:ticket status:open'). Zendesk limits search results to 1,000 total — the maximum valid page is floor(1000 / per_page) (e.g., per_page=100 → max page 10, per_page=25 → max page 40). Stop paginating when next_page is null or you reach the max page; requesting beyond the limit returns a 400 error.
Inputs
querystringrequired- Search query string using Zendesk search syntax (e.g., 'type:ticket status:open assignee:me')
includestring- Comma-separated list of additional data to sideload with results. Supported values: users, groups, organizations, tickets.
pagenumber- Page number for pagination. Max valid page = floor(1000 / per_page). Do not exceed this — Zendesk returns a 400 error beyond the 1,000 result limit.
per_pagenumber- Number of results per page (max 100). Determines the max page ceiling: floor(1000 / per_page). Higher values mean fewer pages but a lower max page number.
sort_bystring- Field to sort results by (updated_at, created_at, priority, status, ticket_type)one of
updated_atcreated_atprioritystatusticket_type sort_orderstring- Sort direction: asc or desc (default: desc)one of
ascdesc
zendeskoauth_side_conversation_getRetrieve a specific side conversation on a Zendesk ticket by its ID.Read-onlyGet Side Conversation
Retrieve a specific side conversation on a Zendesk ticket by its ID. Returns the side conversation's state, subject, participants, preview text, and timestamps. Requires the Collaboration add-on.
Inputs
side_conversation_idstringrequired- The ID of the side conversation to retrieve
ticket_idnumberrequired- The ID of the parent ticket
includestring- Sideloads to include alongside the response. Use 'side_conversation_events' to include the full event history of the side conversation.
zendeskoauth_side_conversations_listList all side conversations on a Zendesk ticket.Read-onlyList Side Conversations
List all side conversations on a Zendesk ticket. Returns side conversations including their state, subject, participants, and preview text. Requires the Collaboration add-on.
Inputs
ticket_idnumberrequired- The ID of the ticket whose side conversations to list
includestring- Sideloads to include alongside the response. Use 'side_conversation_events' to include the full event history for each side conversation.
zendeskoauth_sla_policies_listList all SLA policy definitions including policy name, conditions, and filter criteria.Read-onlyList SLA Policies
List all SLA policy definitions including policy name, conditions, and filter criteria. Requires Professional or Enterprise plan.
Inputs
This tool takes no inputs.
Also accepts
schema_versionandtool_versionto pin a version.zendeskoauth_sla_policy_getRetrieve a single SLA policy by ID, including its filter conditions and per-metric targets.Read-onlyGet SLA Policy
Retrieve a single SLA policy by ID, including its filter conditions and per-metric targets. Requires Professional or Enterprise plan.
Inputs
sla_policy_idnumberrequired- The unique numeric identifier of the SLA policy
zendeskoauth_support_addresses_listList the support (recipient) email addresses configured for the account.Read-onlyList Support Addresses
List the support (recipient) email addresses configured for the account.
Inputs
pagenumber- Page number to retrieve
per_pagenumber- Results per page (max 100)
zendeskoauth_suspended_tickets_listList tickets that Zendesk has flagged as spam or otherwise suspended before they became real tickets.Read-onlyList Suspended Tickets
List tickets that Zendesk has flagged as spam or otherwise suspended before they became real tickets.
Inputs
pagenumber- Page number to retrieve
per_pagenumber- Results per page (max 100)
sort_bystring- author_email, cause, created_at, or subjectone of
author_emailcausecreated_atsubject sort_orderstring- asc or descone of
ascdesc
zendeskoauth_talk_account_overviewGet a high-level overview of Talk voice call activity for the current day.Read-onlyGet Talk Account Overview
Get a high-level overview of Talk voice call activity for the current day. Returns total inbound calls, total outbound calls, and other account-wide call metrics. Data covers midnight to now in your account's timezone. Filter by phone number IDs to scope to specific lines.
Inputs
phone_number_idsstring- Comma-separated list of phone number IDs to filter results by (up to 100 IDs)
zendeskoauth_talk_agents_activityGet current-day Talk voice call activity broken down per agent.Read-onlyGet Talk Agents Activity
Get current-day Talk voice call activity broken down per agent. Returns calls accepted, calls missed, calls denied, talk time, and other live metrics for each agent. Data reflects the current day from midnight in your account timezone. Filter by group to narrow results.
Inputs
group_idsstring- Comma-separated list of group IDs to filter agents by (up to 100 IDs)
zendeskoauth_talk_agents_overviewGet aggregated Talk performance metrics for all agents for the current day.Read-onlyGet Talk Agents Overview
Get aggregated Talk performance metrics for all agents for the current day. Returns per-agent counts of accepted, missed, and declined calls, average handle time, and talk time. Data covers midnight to now in the account timezone. Use this to assess agent-level call performance without requiring Talk Professional/Enterprise.
Inputs
This tool takes no inputs.
zendeskoauth_talk_call_legs_listList individual call legs from Zendesk Talk.Read-onlyList Talk Call Legs
List individual call legs from Zendesk Talk. Each call can have multiple legs (e.g., the customer leg and the agent leg). Returns leg status (accepted, missed, declined), duration, agent, and timestamps.
Inputs
start_timenumberrequired- Unix timestamp (seconds since epoch) to start the incremental query from. Required by Zendesk — the incremental legs endpoint will reject requests without this field.
agent_idnumber- Filter call legs by a specific agent ID
end_timenumber- Unix timestamp (seconds since epoch) to end the incremental query at.
pagenumber- Page number for pagination
per_pagenumber- Number of call legs to return per page (max 100)
statusstring- Filter by leg status: accepted, missed, or declined
zendeskoauth_talk_calls_listList voice calls from Zendesk Talk.Read-onlyList Talk Calls
List voice calls from Zendesk Talk. Returns inbound and outbound call records with details such as duration, status, agent, phone number, and timestamps. Use filters to narrow by direction, date range, or agent.
Inputs
agent_idnumber- Filter calls by a specific agent ID
directionstring- Filter by call direction: inbound or outbound
end_timestring- Filter calls that ended before this ISO 8601 timestamp
pagenumber- Page number for pagination
per_pagenumber- Number of calls to return per page (max 100)
start_timestring- Filter calls that started after this ISO 8601 timestamp
zendeskoauth_theme_getRetrieve a single Guide theme by its ID.Read-onlyGet Theme
Retrieve a single Guide theme by its ID. Returns the theme's id, name, author, version, live status, and created/updated timestamps. Use this once you have a theme_id from zendeskoauth_themes_list to check a specific theme's details or live status.
Inputs
theme_idstringrequired- The unique ID of the Guide theme to retrieve. Get this from zendeskoauth_themes_list. Example: 01ecd35c-fe4f-11ea-adc1-0242ac120002.
zendeskoauth_themes_listList the Guide themes installed on the account, optionally filtered by brand.Read-onlyList Themes
List the Guide themes installed on the account, optionally filtered by brand. Returns each theme's id, name, author, version, live status, and created/updated timestamps. Use this to browse all themes and find a theme's ID. Use zendeskoauth_theme_get to fetch full details for one theme by ID.
Inputs
brand_idnumber- Numeric ID of the brand to filter themes by. Only themes installed for this brand are returned. Leave blank to list themes across all brands. Example: 360000123.
zendeskoauth_ticket_audits_getRetrieve the full audit trail for a specific ticket including all field changes, status transitions, comments, and timestamps.Read-onlyGet Ticket Audits
Retrieve the full audit trail for a specific ticket including all field changes, status transitions, comments, and timestamps.
Inputs
ticket_idnumberrequired- The ID of the ticket to retrieve audits for
page_afterstring- Cursor for next page.
page_sizeinteger- Number of records per page. Maximum 100.
sort_orderstring- Sort order for audit events.
Also accepts
schema_versionandtool_versionto pin a version.zendeskoauth_ticket_audits_listList audit trail events across all tickets including field changes, status transitions, assignment changes, and timestamps.Read-onlyList Ticket Audits
List audit trail events across all tickets including field changes, status transitions, assignment changes, and timestamps. Useful for tracking time-in-status and escalation paths.
Inputs
page_afterstring- Cursor for next page (cursor-based pagination).
page_beforestring- Cursor for previous page (cursor-based pagination).
page_sizeinteger- Number of records per page. Maximum 100.
Also accepts
schema_versionandtool_versionto pin a version.zendeskoauth_ticket_collaborators_listList the users who are CC'd as collaborators on a Zendesk ticket.Read-onlyList Ticket Collaborators
List the users who are CC'd as collaborators on a Zendesk ticket. Requires the CCs and Followers feature to be enabled.
Inputs
ticket_idnumberrequired- The unique numeric identifier of the ticket
zendeskoauth_ticket_comments_listRetrieve all comments (public replies and internal notes) for a specific Zendesk ticket.Read-onlyList Ticket Comments
Retrieve all comments (public replies and internal notes) for a specific Zendesk ticket. Returns comment body, author, timestamps, and attachments.
Inputs
ticket_idnumberrequired- The ID of the ticket whose comments to list
includestring- Sideloads to include. Accepts 'users' to list email CCs.
include_inline_imagesboolean- When true, inline images are listed as attachments (default: false)
sort_orderstring- Sort direction for comments: asc or desc (default: asc)
zendeskoauth_ticket_field_getRetrieve a single ticket field by ID, including its type, title, and (for dropdown/multiselect fields) its options.Read-onlyGet Ticket Field
Retrieve a single ticket field by ID, including its type, title, and (for dropdown/multiselect fields) its options.
Inputs
ticket_field_idnumberrequired- The unique numeric identifier of the ticket field
creatorboolean- If true, includes creator_user_id and creator_app_name on app-created fields
zendeskoauth_ticket_fields_listList all system and custom ticket fields defined in the Zendesk account.Read-onlyList Ticket Fields
List all system and custom ticket fields defined in the Zendesk account.
Inputs
creatorboolean- If true, includes creator_user_id and creator_app_name on app-created fields
localestring- Return title_in_portal as a dynamic content variant for this locale
zendeskoauth_ticket_followers_listList the agents who follow a Zendesk ticket and receive updates about it.Read-onlyList Ticket Followers
List the agents who follow a Zendesk ticket and receive updates about it. Requires the CCs and Followers feature to be enabled.
Inputs
ticket_idnumberrequired- The unique numeric identifier of the ticket
zendeskoauth_ticket_form_getRetrieve a single ticket form by ID, including the ordered list of ticket field IDs it contains.Read-onlyGet Ticket Form
Retrieve a single ticket form by ID, including the ordered list of ticket field IDs it contains.
Inputs
ticket_form_idnumberrequired- The unique numeric identifier of the ticket form
zendeskoauth_ticket_forms_listList the ticket forms configured for the Zendesk account.Read-onlyList Ticket Forms
List the ticket forms configured for the Zendesk account. End users only see forms with end_user_visible set to true.
Inputs
activeboolean- true returns only active forms, false returns only inactive forms
end_user_visibleboolean- true returns only end-user-visible forms, false returns only hidden forms
pagenumber- Page number to retrieve
per_pagenumber- Results per page
zendeskoauth_ticket_getRetrieve details of a specific Zendesk ticket by ID.Read-onlyGet Ticket
Retrieve details of a specific Zendesk ticket by ID. Returns ticket properties including status, priority, subject, requester, assignee, and timestamps.
Inputs
ticket_idnumberrequired- The ID of the ticket to retrieve
includestring- Comma-separated list of sideloads to include (e.g., users, groups, organizations)
zendeskoauth_ticket_metric_eventsIncrementally export ticket metric events (reply times, agent work times, requester wait times) for time-series analysis.Read-onlyList Ticket Metric Events
Incrementally export ticket metric events (reply times, agent work times, requester wait times) for time-series analysis. Returns event-level granularity for SLA compliance tracking.
Inputs
start_timenumberrequired- Unix timestamp to start incremental export from
exclude_deletedboolean- When true, removes metric events tied to deleted tickets.
include_changesboolean- When true, includes additional change data for more accurate incremental results.
per_pagenumber- Number of results per page
Also accepts
schema_versionandtool_versionto pin a version.zendeskoauth_ticket_metrics_getRetrieve ticket metrics for a specific ticket including reply time, resolution time, wait times, reopen count, and assignee/group station counts.Read-onlyGet Ticket Metrics
Retrieve ticket metrics for a specific ticket including reply time, resolution time, wait times, reopen count, and assignee/group station counts.
Inputs
ticket_idnumberrequired- The ID of the ticket to retrieve metrics for
Also accepts
schema_versionandtool_versionto pin a version.zendeskoauth_ticket_metrics_listList ticket metrics for all tickets in the Zendesk account.Read-onlyList Ticket Metrics
List ticket metrics for all tickets in the Zendesk account. Returns first reply time, resolution time, agent wait time, requester wait time, reply count, and reopen count.
Inputs
pagenumber- Page number for pagination
per_pagenumber- Number of results per page
Also accepts
schema_versionandtool_versionto pin a version.zendeskoauth_tickets_countReturn an approximate count of tickets in the account.Read-onlyCount Tickets
Return an approximate count of tickets in the account. If the count exceeds 100,000 it refreshes only once every 24 hours.
Inputs
This tool takes no inputs.
zendeskoauth_tickets_listList tickets in Zendesk with sorting and pagination.Read-onlyList Tickets
List tickets in Zendesk with sorting and pagination. Returns tickets for the authenticated agent's account.
Inputs
pagenumber- Page number for pagination
per_pagenumber- Number of tickets per page (max 100)
sort_bystring- Field to sort by: created_at, updated_at, priority, status, ticket_type
sort_orderstring- Sort direction: asc or desc (default: desc)
zendeskoauth_trigger_getRetrieve a single ticket trigger by ID, including its conditions and actions.Read-onlyGet Trigger
Retrieve a single ticket trigger by ID, including its conditions and actions.
Inputs
trigger_idnumberrequired- The unique numeric identifier of the trigger
zendeskoauth_triggers_listList the ticket triggers configured for the account.Read-onlyList Triggers
List the ticket triggers configured for the account. Triggers run business rules automatically when a ticket is created or updated.
Inputs
activeboolean- Filter by active (true) or inactive (false) triggers
category_idstring- Filter triggers by category ID
pagenumber- Page number to retrieve
per_pagenumber- Results per page (max 100)
sort_bystring- alphabetical, created_at, updated_at, usage_1h, usage_24h, or usage_7d
sort_orderstring- asc or descone of
ascdesc
zendeskoauth_user_getRetrieve details of a specific Zendesk user by ID.Read-onlyGet User
Retrieve details of a specific Zendesk user by ID. Returns user profile including name, email, role, organization, and account status.
Inputs
user_idnumberrequired- The ID of the user to retrieve
includestring- Comma-separated list of sideloads to include
zendeskoauth_user_identities_listList the identities (email addresses, phone numbers, social logins) associated with a user.Read-onlyList User Identities
List the identities (email addresses, phone numbers, social logins) associated with a user.
Inputs
user_idnumberrequired- The unique numeric identifier of the user
zendeskoauth_users_autocompleteReturn users whose name starts with the given substring, or that match a phone number.Read-onlyAutocomplete Users
Return users whose name starts with the given substring, or that match a phone number. Only returns users with no foreign identities.
Inputs
filterstring- Restrict results to assignable or requester usersone of
assignablerequester namestring- Name substring to search for. Specify name or phone.
per_pagenumber- Number of results to return
phonestring- Phone number to search for. Specify name or phone.
zendeskoauth_users_listList users in Zendesk.Read-onlyList Users
List users in Zendesk. Filter by role (end-user, agent, admin) with pagination support.
Inputs
pagenumber- Page number for pagination
per_pagenumber- Number of users per page (max 100)
rolestring- Filter by role: end-user, agent, or admin
sortstring- Field to sort by. Prefix with - for descending (e.g. -created_at)
zendeskoauth_users_searchSearch for users matching a query string or an exact external_id.Read-onlySearch Users
Search for users matching a query string or an exact external_id.
Inputs
external_idstring- Exact external_id to match (does not support search syntax)
pagenumber- Page number to retrieve
per_pagenumber- Results per page (max 100)
querystring- Zendesk search syntax; can match a partial or full value of any user property
zendeskoauth_view_count_getReturn the approximate ticket count for a single view.Read-onlyCount Tickets in View
Return the approximate ticket count for a single view. Rate limited to 5 requests per minute per view per agent.
Inputs
view_idstringrequired- The numeric view ID, or one of the aliases 'incoming', 'my', 'my_groups'
zendeskoauth_view_executeExecute a view and return its column titles and ticket rows, as they would render in the Zendesk agent UI.Read-onlyExecute View
Execute a view and return its column titles and ticket rows, as they would render in the Zendesk agent UI.
Inputs
view_idstringrequired- The numeric view ID, or one of the aliases 'incoming', 'my', 'my_groups'
group_bystring- The ticket field title or custom field ID used for grouping
sort_bystring- The ticket field title or custom field ID used for sorting
sort_orderstring- asc or descone of
ascdesc
zendeskoauth_view_getRetrieve a single view by ID.Read-onlyGet View
Retrieve a single view by ID. Also accepts the string aliases 'incoming', 'my', or 'my_groups' for built-in views.
Inputs
view_idstringrequired- The numeric view ID, or one of the aliases 'incoming', 'my', 'my_groups'
zendeskoauth_view_tickets_listList the tickets that currently match a view's conditions.Read-onlyList Tickets From a View
List the tickets that currently match a view's conditions.
Inputs
view_idstringrequired- The numeric view ID, or one of the aliases 'incoming', 'my', 'my_groups'
sort_bystring- A view column to sort or group by (subject and submitter are not supported)
sort_orderstring- asc or descone of
ascdesc
zendeskoauth_views_listList ticket views in Zendesk.Read-onlyList Views
List ticket views in Zendesk. Views are saved filters for organizing tickets by status, assignee, tags, and more.
Inputs
accessstring- Filter by access level: personal, shared, or account
pagenumber- Page number for pagination
per_pagenumber- Number of views per page (max 100)
sort_bystring- Field to sort by: title, updated_at, created_at, or position
sort_orderstring- Sort direction: asc or desc
zendeskoauth_webhook_getRetrieve a single webhook by ID, including its endpoint, HTTP method, request format, and status.Read-onlyGet Webhook
Retrieve a single webhook by ID, including its endpoint, HTTP method, request format, and status.
Inputs
webhook_idstringrequired- The unique identifier of the webhook
zendeskoauth_webhooks_listList all webhooks configured for the Zendesk account.Read-onlyList Webhooks
List all webhooks configured for the Zendesk account. Supports filtering by name or status, sorting, and cursor-based pagination.
Inputs
name_containsstring- Only return webhooks whose name contains this substring
page_afterstring- Cursor for the next page of results
page_beforestring- Cursor for the previous page of results
page_sizeinteger- Number of webhooks to return per page (max 100)
sortstring- Field and direction to sort results by
statusstring- Filter webhooks by statusone of
activeinactive
zendeskoauth_automation_createCreate a new automation (time-based business rule).WriteCreate Automation
Create a new automation (time-based business rule). Automations run once per day against tickets matching their conditions, which must include at least one time-based condition.
Inputs
actionsarrayrequired- Actions this automation performs when its conditions are met, as a JSON array of {field, value} action objects.
conditionsobjectrequired- Conditions that determine when this automation runs, as a JSON object with 'all' and/or 'any' arrays of {field, operator, value} condition objects. Automations require at least one time-based condition (e.g. hours_since_created_at).
titlestringrequired- The title of the automation
activeboolean- Whether the automation is active
zendeskoauth_automation_updateUpdate an existing automation's conditions and actions.WriteUpdate Automation
Update an existing automation's conditions and actions. Only the fields provided are changed.
- Idempotent
Inputs
automation_idnumberrequired- The unique numeric identifier of the automation to update
actionsarray- Actions this automation performs when its conditions are met, as a JSON array of {field, value} action objects.
activeboolean- Whether the automation is active
conditionsobject- Conditions that determine when this automation runs, as a JSON object with 'all' and/or 'any' arrays of {field, operator, value} condition objects. Automations require at least one time-based condition (e.g. hours_since_created_at).
titlestring- The title of the automation
zendeskoauth_group_createCreate a new agent group used to organize agents and route tickets.WriteCreate Group
Create a new agent group used to organize agents and route tickets.
Inputs
namestringrequired- The name of the group
descriptionstring- The description of the group
is_publicboolean- If true the group is public; if false it is private. Cannot change a private group to public later.
zendeskoauth_group_membership_createAssign an agent to a group.WriteCreate Group Membership
Assign an agent to a group. Fails with a 422 error if the agent is already a member of the group.
Inputs
group_idnumberrequired- The ID of the group to assign the agent to
user_idnumberrequired- The ID of the agent to assign
defaultboolean- If true, tickets assigned directly to the agent assume this membership's group
zendeskoauth_group_updateUpdate an existing group's name, description, or visibility.WriteUpdate Group
Update an existing group's name, description, or visibility.
- Idempotent
Inputs
group_idnumberrequired- The unique numeric identifier of the group
descriptionstring- The description of the group
is_publicboolean- If true the group is public; if false it is private
namestring- The name of the group
zendeskoauth_help_center_article_comment_createAdd a comment to a Help Center article.WriteCreate Help Center Article Comment
Add a comment to a Help Center article. Requires article ID, comment body, and locale.
Inputs
article_idnumberrequired- The ID of the article to comment on.
bodystringrequired- HTML body of the comment.
localestringrequired- Locale for the comment (e.g., en-us).
author_idnumber- User ID of the comment author (Help Center managers only).
notify_subscribersboolean- Whether to notify article subscribers of the new comment. Default: true.
zendeskoauth_help_center_article_createCreate a new Help Center article in a section.WriteCreate Help Center Article
Create a new Help Center article in a section. Requires a title, locale, and section ID.
Inputs
localestringrequired- Locale for the article (e.g., en-us).
section_idnumberrequired- The ID of the section to create the article in.
titlestringrequired- The title of the article.
author_idnumber- User ID of the article author.
bodystring- HTML body content of the article.
comments_disabledboolean- Whether to disable comments on this article.
content_tag_idsarray- IDs of existing content tags to attach to the article.
draftboolean- If true, the article is saved as a draft and not published.
notify_subscribersboolean- Set to false to suppress email notifications to article subscribers on creation. Default: true.
permission_group_idnumber- The permission group that determines who can view this article.
promotedboolean- Whether to pin this article to the top of its section.
user_segment_idnumber- The user segment that can view this article. Omit for a public article.
zendeskoauth_help_center_article_translation_updateUpdate a Help Center article translation's title, body, draft status, or outdated flag for a given locale.WriteUpdate Help Center Article Translation
Update a Help Center article translation's title, body, draft status, or outdated flag for a given locale. This is the only way to edit article content — the article-level update endpoint does not accept title or body.
- Idempotent
Inputs
article_idnumberrequired- The unique ID of the article whose translation to update.
localestringrequired- The locale of the translation to update.
bodystring- New HTML body content for the translation.
draftboolean- If true, saves the translation as a draft and unpublishes it.
outdatedboolean- If true, marks the translation as outdated.
titlestring- New title for the translation.
zendeskoauth_help_center_article_updateUpdate article-level metadata: promoted status, position, comments setting, labels, and content tags.WriteUpdate Help Center Article
Update article-level metadata: promoted status, position, comments setting, labels, and content tags. Does not update title or body — use the Translations API for those.
- Idempotent
Inputs
article_idnumberrequired- The ID of the article to update.
comments_disabledboolean- Whether to disable comments on this article.
content_tag_idsarray- IDs of content tags to attach to the article.
label_namesarray- Labels to assign to the article.
positioninteger- Position of the article within its section.
promotedboolean- Whether to pin this article to the top of its section.
zendeskoauth_help_center_section_createCreate a section under a Help Center category.WriteCreate Help Center Section
Create a section under a Help Center category. Supply name and locale for a single-locale section, or a translations array for multi-locale (the two patterns are mutually exclusive). Nesting under parent_section_id requires a Guide plan that supports nested sections.
Inputs
category_idnumberrequired- The unique ID of the category to create the section in.
descriptionstring- An optional description of the section.
localestring- The locale for the section. Required when not using translations.
manageable_bystring- Who can manage this section.
namestring- The name of the section. Required when not using translations.
parent_section_idnumber- ID of a parent section to nest this section under. Requires a Guide plan that supports nested sections.
positioninteger- Position of the section within its category for manual ordering.
sortingstring- Sort order for articles within this section.
theme_templatestring- The template this section uses in the Help Center theme.
translationsarray- Additional locale translations for the section. Each item must have a locale, title, and optional body.
user_segment_idnumber- The user segment that can view this section. Omit for a public section.
zendeskoauth_macro_createCreate a new macro.WriteCreate Macro
Create a new macro. Actions is a JSON array of {field, value} objects describing what the macro changes on a ticket, e.g. [{"field":"status","value":"solved"},{"field":"comment_value","value":"Thanks for reaching out!"}].
Inputs
actionsstringrequired- JSON array of {field, value} action objects the macro applies to a ticket
titlestringrequired- The title of the macro
activeboolean- Whether the macro is available for use
descriptionstring- A description of what the macro does
zendeskoauth_macro_updateUpdate an existing macro's title, description, active state, or actions.WriteUpdate Macro
Update an existing macro's title, description, active state, or actions.
- Idempotent
Inputs
macro_idnumberrequired- The unique numeric identifier of the macro
actionsstring- JSON array of {field, value} action objects the macro applies to a ticket
activeboolean- Whether the macro is available for use
descriptionstring- A description of what the macro does
titlestring- The title of the macro
zendeskoauth_organization_createCreate a new organization.WriteCreate Organization
Create a new organization. Names must be unique within the account.
Inputs
namestringrequired- A unique name for the organization
detailsstring- Any details about the organization, such as its address
domain_namesarray- Domain names associated with this organization; users signing up with a matching email domain are auto-added
group_idnumber- New tickets from users in this organization are automatically put in this group
notesstring- Any notes you have about the organization
shared_commentsboolean- If true, end users in the organization can comment on each other's tickets
shared_ticketsboolean- If true, end users in the organization can see each other's tickets
tagsarray- Tags applied to the organization
zendeskoauth_organization_membership_createAssign a user to an organization.WriteCreate Organization Membership
Assign a user to an organization. Fails with a 422 error if the user is already assigned to the organization.
Inputs
organization_idnumberrequired- The ID of the organization to assign the user to
user_idnumberrequired- The ID of the user to assign
defaultboolean- If true, this becomes the user's default organization
zendeskoauth_organization_updateUpdate an existing organization.WriteUpdate Organization
Update an existing organization. Agents without unrestricted permissions can only update the notes field.
- Idempotent
Inputs
organization_idnumberrequired- The unique numeric identifier of the organization
detailsstring- Any details about the organization, such as its address
domain_namesarray- Domain names for this organization. Overwrites all existing values -- submit the complete list.
group_idnumber- New tickets from users in this organization are automatically put in this group
namestring- A unique name for the organization
notesstring- Any notes you have about the organization
tagsarray- Tags applied to the organization
zendeskoauth_request_createCreate a new request (ticket) from the requester's point of view.WriteCreate Request
Create a new request (ticket) from the requester's point of view. Requires a subject and an initial comment describing the issue.
Inputs
comment_bodystringrequired- Describes the problem, incident, question, or task
subjectstringrequired- The subject/title of the request
collaboratorsarray- Email addresses to CC on the request
prioritystring- urgent, high, normal, or lowone of
urgenthighnormallow ticket_form_idnumber- ID of the ticket form to use (Enterprise accounts only)
typestring- question, incident, problem, or taskone of
questionincidentproblemtask
zendeskoauth_request_updateAdd a comment to a request, mark it solved, or add collaborators.WriteUpdate Request
Add a comment to a request, mark it solved, or add collaborators. This endpoint cannot change other request attributes such as subject or priority.
- Idempotent
Inputs
request_idnumberrequired- The unique numeric identifier of the request
additional_collaboratorsarray- Email addresses to add as collaborators on the request
comment_bodystring- A comment/reply to add to the request
solvedboolean- Mark the request as solved. Only allowed when the request's can_be_solved_by_me property is true.
zendeskoauth_suspended_ticket_recoverRecover a suspended ticket into a real ticket.WriteRecover Suspended Ticket
Recover a suspended ticket into a real ticket. The requester is set to the authenticated agent rather than the original requester.
Inputs
idnumberrequired- The unique numeric identifier of the suspended ticket
zendeskoauth_theme_publishPublish a Guide theme, making it the live theme shown to end users in the Help Center.WritePublish Theme
Publish a Guide theme, making it the live theme shown to end users in the Help Center. Returns the updated theme with its live status. Use this once you have a theme_id from zendeskoauth_themes_list to switch which theme is live; use zendeskoauth_theme_get to check a theme's current live status first.
- Idempotent
Inputs
theme_idstringrequired- The unique ID of the Guide theme to publish and make live. Get this from zendeskoauth_themes_list. Example: 01ecd35c-fe4f-11ea-adc1-0242ac120002.
zendeskoauth_ticket_createCreate a new support ticket in Zendesk.WriteCreate Ticket
Create a new support ticket in Zendesk. Requires a comment/description and optionally a subject, priority, assignee, and tags.
Inputs
comment_bodystringrequired- The description or first comment of the ticket
assignee_emailstring- Email of the agent to assign the ticket to
prioritystring- Ticket priority: urgent, high, normal, or low
statusstring- Ticket status: new, open, pending, hold, solved, or closed
subjectstring- The subject/title of the ticket
tagsarray- List of tags to apply to the ticket
typestring- Ticket type: problem, incident, question, or task
zendeskoauth_ticket_field_createCreate a new custom ticket field.WriteCreate Ticket Field
Create a new custom ticket field. For 'multiselect' or 'tagger' fields, supply custom_field_options as a JSON array of {name, value} objects.
Inputs
titlestringrequired- The title of the ticket field
activeboolean- Whether this field is available
custom_field_optionsstring- JSON array of options for 'tagger'/'multiselect' fields, e.g. [{"name":"Small","value":"small"}]
descriptionstring- Describes the purpose of the field to end users
positionnumber- The relative position of the field among other ticket fields
requiredboolean- Whether agents must enter a value for this field to change a ticket's status to solved
tagstring- For checkbox fields, the tag applied to tickets when the checkbox is checked
typestring- The type of ticket field. Defaults to text when not specified.one of
checkboxdatedecimalintegerregexptexttextareataggermultiselectpartialcreditcardlookupmulti_lookup visible_in_portalboolean- Whether this field is visible to end users in the help center
zendeskoauth_ticket_field_updateUpdate an existing custom ticket field.WriteUpdate Ticket Field
Update an existing custom ticket field. The field's type cannot be changed after creation. For dropdown/multiselect fields, custom_field_options must list every option you want to keep -- omitted options are removed.
- Idempotent
Inputs
ticket_field_idnumberrequired- The unique numeric identifier of the ticket field
activeboolean- Whether this field is available
custom_field_optionsstring- JSON array of every option to keep for 'tagger'/'multiselect' fields, e.g. [{"id":123,"name":"Small","value":"small"}]
descriptionstring- Describes the purpose of the field to end users
positionnumber- The relative position of the field among other ticket fields
requiredboolean- Whether agents must enter a value for this field to change a ticket's status to solved
titlestring- The title of the ticket field
visible_in_portalboolean- Whether this field is visible to end users in the help center
zendeskoauth_ticket_form_createCreate a new ticket form made up of an ordered set of ticket fields.WriteCreate Ticket Form
Create a new ticket form made up of an ordered set of ticket fields.
Inputs
namestringrequired- The internal name of the ticket form
activeboolean- Whether the form is active
display_namestring- The name shown to end users. Defaults to name if omitted.
end_user_visibleboolean- Whether the form is visible to end users
positionnumber- The position of this form relative to other forms
ticket_field_idsarray- Ordered array of ticket field IDs to include on this form
zendeskoauth_ticket_form_updateUpdate an existing ticket form's name, visibility, or the ticket fields it contains.WriteUpdate Ticket Form
Update an existing ticket form's name, visibility, or the ticket fields it contains.
- Idempotent
Inputs
ticket_form_idnumberrequired- The unique numeric identifier of the ticket form
activeboolean- Whether the form is active
display_namestring- The name shown to end users
end_user_visibleboolean- Whether the form is visible to end users
namestring- The internal name of the ticket form
positionnumber- The position of this form relative to other forms
ticket_field_idsarray- Ordered array of ticket field IDs to include on this form
zendeskoauth_ticket_mergeMerge one or more source tickets into a target ticket.WriteMerge Tickets
Merge one or more source tickets into a target ticket. Comments from the source tickets are copied into the target ticket and any attachments are copied over. Queues a background job; poll the returned job_status URL to confirm completion.
Inputs
ticket_idnumberrequired- The ID of the ticket that other tickets will be merged into
ticket_idsarrayrequired- Array of ticket IDs to merge into the target ticket
source_commentstring- Comment added to the source ticket(s) explaining the merge
source_comment_is_publicboolean- Whether the comment on the source ticket(s) is public
target_commentstring- Comment added to the target ticket explaining the merge
target_comment_is_publicboolean- Whether the comment on the target ticket is public
zendeskoauth_ticket_replyAdd a public reply or internal note to a Zendesk ticket.WriteReply to Ticket
Add a public reply or internal note to a Zendesk ticket. Set public to false for internal notes visible only to agents.
Inputs
bodystringrequired- The reply message content (plain text, markdown supported)
ticket_idnumberrequired- The ID of the ticket to reply to
publicboolean- Whether the comment is public (true) or an internal note (false). Defaults to true.
zendeskoauth_ticket_updateUpdate an existing Zendesk ticket.WriteUpdate Ticket
Update an existing Zendesk ticket. Change status, priority, assignee, subject, tags, or any other writable ticket field.
- Idempotent
Inputs
ticket_idnumberrequired- The ID of the ticket to update
assignee_emailstring- Email of the agent to assign the ticket to
assignee_idnumber- ID of the agent to assign the ticket to
group_idnumber- ID of the group to assign the ticket to
prioritystring- Ticket priority: urgent, high, normal, or low
statusstring- Ticket status: new, open, pending, hold, solved, or closed
subjectstring- New subject/title for the ticket
tagsarray- List of tags to set on the ticket (replaces existing tags)
typestring- Ticket type: problem, incident, question, or task
zendeskoauth_trigger_createCreate a new ticket trigger (event-based business rule) with conditions and actions.WriteCreate Trigger
Create a new ticket trigger (event-based business rule) with conditions and actions. Triggers run immediately when a ticket is created or updated and its conditions match.
Inputs
actionsarrayrequired- Actions this trigger performs when its conditions are met, as a JSON array of {field, value} action objects.
conditionsobjectrequired- Conditions that determine when this trigger fires, as a JSON object with 'all' and/or 'any' arrays of {field, operator, value} condition objects.
titlestringrequired- The title of the trigger
activeboolean- Whether the trigger is active
category_idstring- ID of the trigger category to group this trigger under
descriptionstring- A description of what the trigger does
zendeskoauth_trigger_updateUpdate an existing ticket trigger's conditions and actions.WriteUpdate Trigger
Update an existing ticket trigger's conditions and actions. Only the fields provided are changed.
- Idempotent
Inputs
trigger_idnumberrequired- The unique numeric identifier of the trigger to update
actionsarray- Actions this trigger performs when its conditions are met, as a JSON array of {field, value} action objects.
activeboolean- Whether the trigger is active
category_idstring- ID of the trigger category to group this trigger under
conditionsobject- Conditions that determine when this trigger fires, as a JSON object with 'all' and/or 'any' arrays of {field, operator, value} condition objects.
descriptionstring- A description of what the trigger does
titlestring- The title of the trigger
zendeskoauth_user_createCreate a new user in Zendesk.WriteCreate User
Create a new user in Zendesk. Can create end-users (customers), agents, or admins. Email is required for end-users.
Inputs
namestringrequired- Full name of the user
emailstring- Primary email address of the user
organization_idnumber- ID of the organization to associate the user with
phonestring- Primary phone number (E.164 format, e.g. +15551234567)
rolestring- User role: end-user, agent, or admin. Defaults to end-user.
verifiedboolean- Whether the user's identity is verified. Defaults to false.
zendeskoauth_user_identity_createAdd a new identity (email, phone number, or social login) to a user's profile.WriteCreate User Identity
Add a new identity (email, phone number, or social login) to a user's profile.
Inputs
typestringrequired- The kind of identity to addone of
emailphone_numbertwitterfacebookgoogleagent_forwarding user_idnumberrequired- The unique numeric identifier of the user
valuestringrequired- The identity value, e.g. an email address or phone number
skip_verify_emailboolean- If true, does not send a verification email for the new identity
zendeskoauth_user_updateUpdate an existing Zendesk user's profile, role, or moderation state.WriteUpdate User
Update an existing Zendesk user's profile, role, or moderation state.
- Idempotent
Inputs
user_idnumberrequired- The unique numeric identifier of the user
emailstring- The user's primary email address
external_idstring- A unique identifier from another system
namestring- The user's full name
notesstring- Any notes you want to store about the user
organization_idnumber- ID of the organization to associate the user with
phonestring- The user's primary phone number in E.164 format
rolestring- end-user, agent, or adminone of
end-useragentadmin suspendedboolean- If true, the user is suspended and cannot sign in or submit tickets
tagsarray- The user's tags
verifiedboolean- Whether the user's identity is verified
zendeskoauth_view_createCreate a new ticket view (saved filter).WriteCreate View
Create a new ticket view (saved filter).
Inputs
conditionsobjectrequired- Conditions that determine which tickets appear in this view, as a JSON object with 'all' and/or 'any' arrays of {field, operator, value} condition objects.
titlestringrequired- The title of the view
activeboolean- Whether the view is active
executionobject- Optional display configuration for the view's results: columns, grouping, and sorting.
zendeskoauth_view_updateUpdate an existing view's conditions.WriteUpdate View
Update an existing view's conditions. Only the fields provided are changed.
- Idempotent
Inputs
view_idstringrequired- The unique numeric identifier of the view to update
activeboolean- Whether the view is active
conditionsobject- Conditions that determine which tickets appear in this view, as a JSON object with 'all' and/or 'any' arrays of {field, operator, value} condition objects.
executionobject- Optional display configuration for the view's results: columns, grouping, and sorting.
titlestring- The title of the view
zendeskoauth_webhook_createCreate a new webhook to receive Zendesk event notifications at a callback URL.WriteCreate Webhook
Create a new webhook to receive Zendesk event notifications at a callback URL. The webhook can be invoked directly from a trigger/automation action, or automatically via subscriptions.
Inputs
endpointstringrequired- The destination URL the webhook sends requests to
http_methodstringrequired- The HTTP method used to call the endpointone of
GETPOSTPUTPATCHDELETE namestringrequired- A display name for the webhook
request_formatstringrequired- The format of the request body sent to the endpointone of
jsonxmlform_encoded authenticationobject- Authentication Zendesk should use when calling the endpoint
custom_headersobject- Additional custom HTTP headers to send with every webhook request
descriptionstring- A description of what the webhook is for
statusstring- Whether the webhook is active or inactiveone of
activeinactive subscriptionsarray- System event types this webhook should be automatically invoked for, if any
zendeskoauth_webhook_updateUpdate an existing webhook's configuration.WriteUpdate Webhook
Update an existing webhook's configuration. Only the fields provided are changed.
- Idempotent
Inputs
webhook_idstringrequired- The unique identifier of the webhook to update
authenticationobject- Authentication Zendesk should use when calling the endpoint
custom_headersobject- Additional custom HTTP headers to send with every webhook request
descriptionstring- A description of what the webhook is for
endpointstring- The destination URL the webhook sends requests to
http_methodstring- The HTTP method used to call the endpointone of
GETPOSTPUTPATCHDELETE namestring- A display name for the webhook
request_formatstring- The format of the request body sent to the endpointone of
jsonxmlform_encoded statusstring- Whether the webhook is active or inactiveone of
activeinactive subscriptionsarray- System event types this webhook should be automatically invoked for, if any
zendeskoauth_attachment_deletePermanently delete an attachment.DestructiveDelete Attachment
Permanently delete an attachment.
- Idempotent
Inputs
attachment_idnumberrequired- The unique numeric identifier of the attachment
zendeskoauth_automation_deleteDelete an automation.DestructiveDelete Automation
Delete an automation.
- Idempotent
Inputs
automation_idnumberrequired- The unique numeric identifier of the automation to delete
zendeskoauth_group_deletePermanently delete an agent group.DestructiveDelete Group
Permanently delete an agent group.
- Idempotent
Inputs
group_idnumberrequired- The unique numeric identifier of the group
zendeskoauth_group_membership_deleteRemove an agent from a group.DestructiveDelete Group Membership
Remove an agent from a group. Also schedules a background job to unassign the agent's open tickets in that group.
- Idempotent
Inputs
group_membership_idnumberrequired- The unique numeric identifier of the group membership
zendeskoauth_help_center_article_archiveArchive (delete) a Help Center article by ID.DestructiveArchive Help Center Article
Archive (delete) a Help Center article by ID. The article can be restored from the Zendesk Help Center UI.
- Idempotent
Inputs
article_idnumberrequired- The ID of the article to archive.
zendeskoauth_macro_deletePermanently delete a macro.DestructiveDelete Macro
Permanently delete a macro.
- Idempotent
Inputs
macro_idnumberrequired- The unique numeric identifier of the macro
zendeskoauth_organization_deletePermanently delete an organization.DestructiveDelete Organization
Permanently delete an organization.
- Idempotent
Inputs
organization_idnumberrequired- The unique numeric identifier of the organization
zendeskoauth_organization_membership_deleteRemove a user from an organization.DestructiveDelete Organization Membership
Remove a user from an organization. Schedules a background job to clear the organization_id on the user's currently assigned tickets.
- Idempotent
Inputs
organization_membership_idnumberrequired- The unique numeric identifier of the organization membership
zendeskoauth_theme_deleteDelete a Guide theme by its ID.DestructiveDelete Theme
Delete a Guide theme by its ID. Cannot delete the account's currently live theme. Returns no content on success. Use this to remove an unused theme once you have its ID from zendeskoauth_themes_list; publish a different theme first with zendeskoauth_theme_publish if this one is currently live.
- Idempotent
Inputs
theme_idstringrequired- The unique ID of the Guide theme to delete. Get this from zendeskoauth_themes_list. The account's currently live theme cannot be deleted. Example: 01ecd35c-fe4f-11ea-adc1-0242ac120002.
zendeskoauth_ticket_deletePermanently delete a Zendesk ticket.DestructiveDelete Ticket
Permanently delete a Zendesk ticket. This moves the ticket to the deleted tickets queue; agents with permission can restore it before it is purged. This action cannot be undone through this tool.
- Idempotent
Inputs
ticket_idnumberrequired- The unique numeric identifier of the ticket
zendeskoauth_trigger_deleteDelete a ticket trigger.DestructiveDelete Trigger
Delete a ticket trigger.
- Idempotent
Inputs
trigger_idnumberrequired- The unique numeric identifier of the trigger to delete
zendeskoauth_user_deleteSoft-delete a user and their associated records.DestructiveDelete User
Soft-delete a user and their associated records. Deleted users are not recoverable through the API; a further permanent-delete step is needed for GDPR compliance.
- Idempotent
Inputs
user_idnumberrequired- The unique numeric identifier of the user
zendeskoauth_view_deleteDelete a view.DestructiveDelete View
Delete a view.
- Idempotent
Inputs
view_idstringrequired- The unique numeric identifier of the view to delete
zendeskoauth_webhook_deletePermanently delete a webhook.DestructiveDelete Webhook
Permanently delete a webhook.
- Idempotent
Inputs
webhook_idstringrequired- The unique identifier of the webhook to delete
No tools match.