Intercom connector
OAuth 2.0Customer SupportCommunicationConnect to Intercom. Send messages, manage conversations, and interact with users and contacts.
Intercom connector
-
Install the SDK
Section titled “Install the SDK”Terminal window npm install @scalekit-sdk/nodeTerminal window pip install scalekit -
Set your credentials
Section titled “Set your credentials”Add your Scalekit credentials to your
.envfile. Find values in app.scalekit.com > Developers > API Credentials..env SCALEKIT_ENVIRONMENT_URL=<your-environment-url>SCALEKIT_CLIENT_ID=<your-client-id>SCALEKIT_CLIENT_SECRET=<your-client-secret> -
Set up the connector
Section titled “Set up the connector”Register your Intercom credentials with Scalekit so it handles the token lifecycle. You do this once per environment.
Dashboard setup steps
Register your Scalekit environment with the Intercom connector so Scalekit handles the authentication flow and token lifecycle for you. The connection name you create will be used to identify and invoke the connection programmatically. You’ll need your app credentials from the Intercom Developer Hub.
-
Set up auth redirects
-
In Scalekit dashboard, go to AgentKit > Connections > Create Connection.
-
Find Intercom from the list of providers and click Create. Copy the redirect URI. It looks like
https://<SCALEKIT_ENVIRONMENT_URL>/sso/v1/oauth/<CONNECTION_ID>/callback.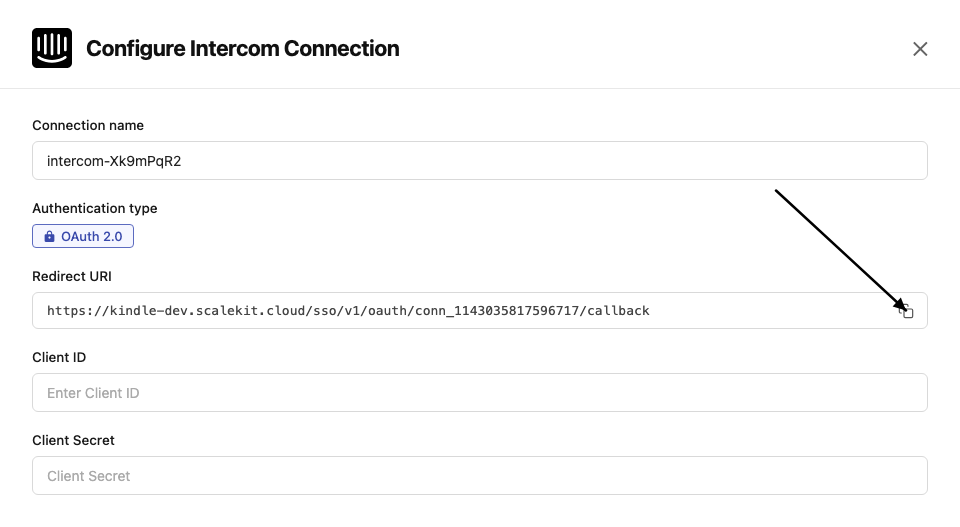
-
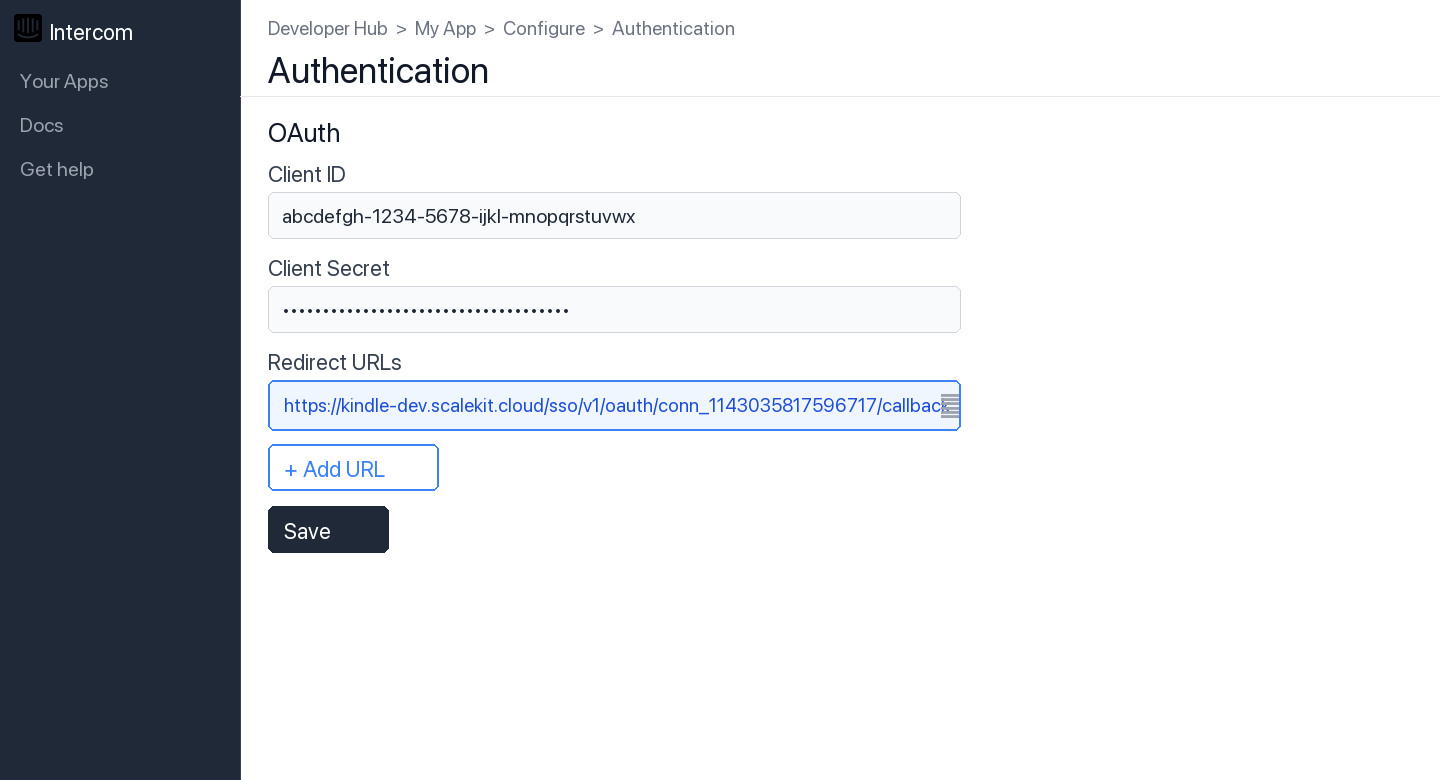
In the Intercom Developer Hub, open your app and go to Configure → Authentication.
-
Click Edit, paste the copied URI into the Redirect URLs field, and click Save.
-
-
Get client credentials
- In the Intercom Developer Hub, open your app and go to Configure → Basic Information:
- Client ID — listed under Client ID
- Client Secret — listed under Client Secret
- In the Intercom Developer Hub, open your app and go to Configure → Basic Information:
-
Add credentials in Scalekit
-
In Scalekit dashboard, go to AgentKit > Connections and open the connection you created.
-
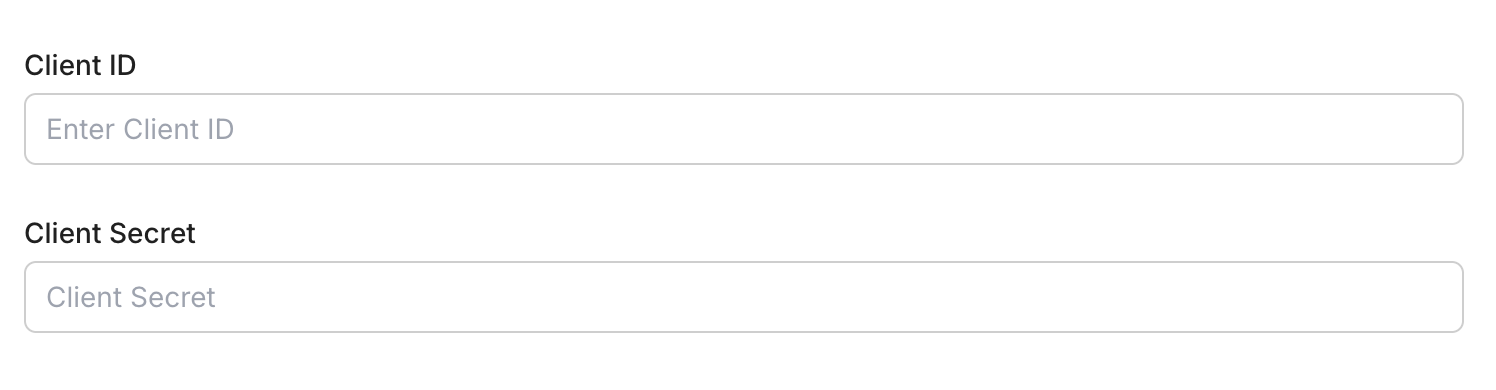
Enter your credentials:
- Client ID (from your Intercom app)
- Client Secret (from your Intercom app)
-
Click Save.
-
-
-
Authorize and make your first call
Section titled “Authorize and make your first call”quickstart.ts import { ScalekitClient } from '@scalekit-sdk/node'import 'dotenv/config'const scalekit = new ScalekitClient(process.env.SCALEKIT_ENV_URL,process.env.SCALEKIT_CLIENT_ID,process.env.SCALEKIT_CLIENT_SECRET,)const actions = scalekit.actionsconst connector = 'intercom'const identifier = 'user_123'// Generate an authorization link for the userconst { link } = await actions.getAuthorizationLink({ connectionName: connector, identifier })console.log('Authorize Intercom:', link)process.stdout.write('Press Enter after authorizing...')await new Promise(r => process.stdin.once('data', r))// Make your first callconst result = await actions.executeTool({connector,identifier,toolName: 'intercom_list_admins',toolInput: {},})console.log(result)quickstart.py import osfrom scalekit.client import ScalekitClientfrom dotenv import load_dotenvload_dotenv()scalekit_client = ScalekitClient(env_url=os.getenv("SCALEKIT_ENV_URL"),client_id=os.getenv("SCALEKIT_CLIENT_ID"),client_secret=os.getenv("SCALEKIT_CLIENT_SECRET"),)actions = scalekit_client.actionsconnection_name = "intercom"identifier = "user_123"# Generate an authorization link for the userlink_response = actions.get_authorization_link(connection_name=connection_name,identifier=identifier,)print("Authorize Intercom:", link_response.link)input("Press Enter after authorizing...")# Make your first callresult = actions.execute_tool(tool_input={},tool_name="intercom_list_admins",connection_name=connection_name,identifier=identifier,)print(result)
What you can do
Section titled “What you can do”Connect this agent connector to let your agent:
- Update visitor, ticket type attribute, ticket type — Update a visitor’s attributes
- Contact unarchive, retrieve, detach tag from — Unarchive a previously archived contact to make them visible in the workspace again
- Admin set away, retrieve, identify — Set an admin’s status to away or active, and optionally reassign new conversations to the default inbox
- Search tickets, conversations, contacts — Search for tickets using filter queries
- Visitor retrieve, convert — Retrieve a visitor by their user_id
- Type retrieve ticket — Retrieve a ticket type by its Intercom ID
Common workflows
Section titled “Common workflows”Proxy API call
// Make a request via Scalekit proxyconst result = await actions.request({ connectionName: 'intercom', identifier: 'user_123', path: '/me', method: 'GET',});console.log(result);# Make a request via Scalekit proxyresult = actions.request( connection_name='intercom', identifier='user_123', path="/me", method="GET")print(result)Tool list
Section titled “Tool list”Use the exact tool names from the Tool list below when you call execute_tool. If you’re not sure which name to use, list the tools available for the current user first.
intercom_archive_contact#Archive a contact to hide them from the workspace without permanently deleting them.3 params
Archive a contact to hide them from the workspace without permanently deleting them.
contact_idstringrequiredThe unique Intercom identifier for the contact to archive.schema_versionstringoptionalSchema versiontool_versionstringoptionalTool versionintercom_attach_contact_to_company#Associate a contact with a company using the company's Intercom ID.4 params
Associate a contact with a company using the company's Intercom ID.
contact_idstringrequiredThe unique Intercom identifier for the contact.idstringrequiredThe Intercom ID of the company to attach.schema_versionstringoptionalSchema versiontool_versionstringoptionalTool versionintercom_attach_contact_to_conversation#Add a contact as a participant to an existing conversation.5 params
Add a contact as a participant to an existing conversation.
conversation_idstringrequiredThe Intercom ID of the conversation.customerobjectrequiredCustomer object identifying the contact to add. E.g. {"intercom_user_id": "contact_id"} or {"email": "user@example.com"}.admin_idstringoptionalThe admin performing the action.schema_versionstringoptionalSchema versiontool_versionstringoptionalTool versionintercom_attach_subscription_to_contact#Add an email subscription type to a contact with opt-in or opt-out consent.5 params
Add an email subscription type to a contact with opt-in or opt-out consent.
consent_typestringrequiredConsent type: 'opt_in' or 'opt_out'.contact_idstringrequiredThe unique Intercom identifier for the contact.idstringrequiredThe Intercom ID of the subscription type.schema_versionstringoptionalSchema versiontool_versionstringoptionalTool versionintercom_attach_tag_to_contact#Add a tag to a contact.4 params
Add a tag to a contact.
contact_idstringrequiredThe Intercom ID of the contact.idstringrequiredThe Intercom ID of the tag to attach.schema_versionstringoptionalSchema versiontool_versionstringoptionalTool versionintercom_attach_tag_to_conversation#Add a tag to a conversation.5 params
Add a tag to a conversation.
admin_idstringrequiredThe Intercom ID of the admin performing the action.conversation_idstringrequiredThe Intercom ID of the conversation.idstringrequiredThe Intercom ID of the tag to attach.schema_versionstringoptionalSchema versiontool_versionstringoptionalTool versionintercom_attach_tag_to_ticket#Add a tag to a ticket.5 params
Add a tag to a ticket.
admin_idstringrequiredThe Intercom ID of the admin performing the action.idstringrequiredThe Intercom ID of the tag to attach.ticket_idstringrequiredThe Intercom ID of the ticket.schema_versionstringoptionalSchema versiontool_versionstringoptionalTool versionintercom_auto_assign_conversation#Run the workspace's assignment rules on a conversation to automatically assign it.3 params
Run the workspace's assignment rules on a conversation to automatically assign it.
conversation_idstringrequiredThe Intercom ID of the conversation to auto-assign.schema_versionstringoptionalSchema versiontool_versionstringoptionalTool versionintercom_convert_conversation_to_ticket#Convert an existing conversation into a ticket.4 params
Convert an existing conversation into a ticket.
conversation_idstringrequiredThe Intercom ID of the conversation to convert.ticket_type_idstringrequiredThe ID of the ticket type to use for the new ticket.schema_versionstringoptionalSchema versiontool_versionstringoptionalTool versionintercom_convert_visitor#Convert a visitor into a contact (lead or user).5 params
Convert a visitor into a contact (lead or user).
typestringrequiredThe type to convert the visitor to: 'lead' or 'user'.visitorobjectrequiredThe visitor to convert. Object with 'id' or 'user_id' field.schema_versionstringoptionalSchema versiontool_versionstringoptionalTool versionuserobjectoptionalThe user to merge the visitor into. Object with 'id', 'user_id', or 'email' field.intercom_create_article#Create a new Help Center article. Articles are published or saved as drafts.9 params
Create a new Help Center article. Articles are published or saved as drafts.
author_idintegerrequiredThe Intercom ID of the admin authoring the article.titlestringrequiredTitle of the article.bodystringoptionalThe HTML content body of the article.descriptionstringoptionalShort description or summary of the article.parent_idintegeroptionalID of the parent collection or section.parent_typestringoptionalType of parent: 'collection' or 'section'.schema_versionstringoptionalSchema versionstatestringoptionalPublication state: 'published' or 'draft' (default: draft).tool_versionstringoptionalTool versionintercom_create_contact#Create a new contact (user or lead) in Intercom.12 params
Create a new contact (user or lead) in Intercom.
avatarstringoptionalURL of the contact's avatar image.emailstringoptionalEmail address of the contact.external_idstringoptionalYour unique identifier for the contact.last_seen_atintegeroptionalUnix timestamp of when the contact was last seen.namestringoptionalFull name of the contact.owner_idintegeroptionalID of the admin who owns this contact.phonestringoptionalPhone number of the contact.rolestringoptionalRole of the contact: 'user' or 'lead'.schema_versionstringoptionalSchema versionsigned_up_atintegeroptionalUnix timestamp of when the contact signed up.tool_versionstringoptionalTool versionunsubscribed_from_emailsbooleanoptionalSet to true to unsubscribe the contact from emails.intercom_create_contact_note#Create a note on a contact. Notes are visible to admins in the Intercom inbox.5 params
Create a note on a contact. Notes are visible to admins in the Intercom inbox.
bodystringrequiredThe text content of the note.contact_idstringrequiredThe unique Intercom identifier for the contact.admin_idstringoptionalThe ID of the admin authoring the note.schema_versionstringoptionalSchema versiontool_versionstringoptionalTool versionintercom_create_conversation#Create a new conversation initiated from an admin to a contact.6 params
Create a new conversation initiated from an admin to a contact.
bodystringrequiredPlain text message body. HTML is not supported.fromobjectrequiredThe sender object. For admin-initiated conversations: {"type": "admin", "id": "admin_id"}.created_atintegeroptionalUnix timestamp to backdate the conversation.schema_versionstringoptionalSchema versionsubjectstringoptionalSubject line for email conversations.tool_versionstringoptionalTool versionintercom_create_data_attribute#Create a new custom data attribute for contacts, companies, or conversations.8 params
Create a new custom data attribute for contacts, companies, or conversations.
data_typestringrequiredData type: 'string', 'integer', 'float', 'boolean', 'date', or 'list'.modelstringrequiredThe model this attribute belongs to: 'contact', 'company', or 'conversation'.namestringrequiredThe name of the attribute.descriptionstringoptionalDescription of the attribute.messenger_writablebooleanoptionalWhether the attribute can be set through the Messenger.optionsarrayoptionalList of allowed values for list-type attributes.schema_versionstringoptionalSchema versiontool_versionstringoptionalTool versionintercom_create_data_event#Submit a data event to track a user action. Events appear in the contact's activity feed in Intercom.8 params
Submit a data event to track a user action. Events appear in the contact's activity feed in Intercom.
created_atintegerrequiredUnix timestamp (UTC) of when the event occurred.event_namestringrequiredName of the event as shown in the Intercom UI.emailstringoptionalEmail address of the contact.idstringoptionalThe Intercom contact ID.metadataobjectoptionalCustom key-value pairs about the event.schema_versionstringoptionalSchema versiontool_versionstringoptionalTool versionuser_idstringoptionalYour unique identifier for the contact.intercom_create_help_center_collection#Create a new Help Center collection to organize articles.6 params
Create a new Help Center collection to organize articles.
namestringrequiredThe name of the collection.descriptionstringoptionalShort description of the collection.help_center_idintegeroptionalThe ID of the Help Center to create the collection in.parent_idstringoptionalID of a parent collection (for nested collections).schema_versionstringoptionalSchema versiontool_versionstringoptionalTool versionintercom_create_message#Send an outbound message (in-app or email) from an admin to a contact.9 params
Send an outbound message (in-app or email) from an admin to a contact.
bodystringrequiredThe message body. HTML and plaintext supported.fromobjectrequiredThe sender admin object: {"type": "admin", "id": "admin_id"}.toobjectrequiredThe recipient contact object: {"type": "user", "id": "contact_id"} or {"type": "user", "email": "email"}.create_conversation_without_contact_replybooleanoptionalSet to true to create a conversation even if the contact does not reply.message_typestringoptionalMessage channel: 'in_app' or 'email'.schema_versionstringoptionalSchema versionsubjectstringoptionalEmail subject (required for email message_type).templatestringoptionalEmail template style: 'plain' or 'personal'.tool_versionstringoptionalTool versionintercom_create_news_item#Create a new news item for the workspace.8 params
Create a new news item for the workspace.
sender_idintegerrequiredThe Intercom ID of the admin sender.titlestringrequiredTitle of the news item.bodystringoptionalHTML content of the news item.deliver_silentlybooleanoptionalIf true, the news item will not send notifications.labelsarrayoptionalLabels to add to the news item.schema_versionstringoptionalSchema versionstatestringoptionalState of the news item: 'draft' or 'live'.tool_versionstringoptionalTool versionintercom_create_or_update_company#Create a new company or update an existing one. Uses company_id to identify existing companies.10 params
Create a new company or update an existing one. Uses company_id to identify existing companies.
company_idstringoptionalYour unique identifier for the company. Used to identify existing companies for updates. Cannot be updated once set.industrystringoptionalThe industry the company operates in.monthly_spendintegeroptionalMonthly revenue from the company.namestringoptionalThe name of the company.planstringoptionalThe company's subscription plan name.remote_created_atintegeroptionalUnix timestamp of when the company was created in your system.schema_versionstringoptionalSchema versionsizeintegeroptionalNumber of employees at the company.tool_versionstringoptionalTool versionwebsitestringoptionalThe company's website URL.intercom_create_or_update_tag#Create a new tag or update an existing tag's name. To tag companies or contacts in bulk, include a 'companies' or 'users' array.4 params
Create a new tag or update an existing tag's name. To tag companies or contacts in bulk, include a 'companies' or 'users' array.
namestringrequiredThe name of the tag.idstringoptionalThe Intercom ID of the tag (required for updates).schema_versionstringoptionalSchema versiontool_versionstringoptionalTool versionintercom_create_ticket#Create a new ticket in Intercom. Requires a ticket type and at least one contact.7 params
Create a new ticket in Intercom. Requires a ticket type and at least one contact.
contactsarrayrequiredArray of contact identifier objects, e.g. [{"id": "contact_id"}] or [{"email": "user@example.com"}].ticket_type_idstringrequiredThe ID of the ticket type to create.company_idstringoptionalThe Intercom ID of the company associated with this ticket.created_atintegeroptionalUnix timestamp to backdate the ticket creation.schema_versionstringoptionalSchema versionticket_attributesobjectoptionalTicket attribute key-value pairs. Include 'title' and 'description' for default attributes.tool_versionstringoptionalTool versionintercom_create_ticket_type#Create a new ticket type for the workspace.7 params
Create a new ticket type for the workspace.
namestringrequiredThe name of the ticket type.categorystringoptionalCategory of the ticket type: 'Customer', 'Back-office', or 'Tracker'.descriptionstringoptionalDescription of the ticket type.iconstringoptionalEmoji icon for the ticket type.is_internalbooleanoptionalWhether this ticket type is for internal use only.schema_versionstringoptionalSchema versiontool_versionstringoptionalTool versionintercom_create_ticket_type_attribute#Create a new attribute for a ticket type.10 params
Create a new attribute for a ticket type.
data_typestringrequiredData type of the attribute: 'string', 'list', 'integer', 'decimal', 'boolean', 'datetime', 'files'.descriptionstringrequiredDescription of the attribute.namestringrequiredThe name of the attribute.ticket_type_idstringrequiredThe Intercom ID of the ticket type.required_to_createbooleanoptionalWhether this attribute is required when creating a ticket.required_to_create_for_contactsbooleanoptionalWhether this attribute is required for contacts when creating a ticket.schema_versionstringoptionalSchema versiontool_versionstringoptionalTool versionvisible_on_createbooleanoptionalWhether this attribute is visible when creating a ticket.visible_to_contactsbooleanoptionalWhether this attribute is visible to contacts.intercom_delete_article#Permanently delete a Help Center article.3 params
Permanently delete a Help Center article.
article_idstringrequiredThe Intercom ID of the article to delete.schema_versionstringoptionalSchema versiontool_versionstringoptionalTool versionintercom_delete_company#Permanently delete a company by its Intercom ID.3 params
Permanently delete a company by its Intercom ID.
company_idstringrequiredThe Intercom ID of the company to delete.schema_versionstringoptionalSchema versiontool_versionstringoptionalTool versionintercom_delete_contact#Permanently delete a contact by their Intercom ID.3 params
Permanently delete a contact by their Intercom ID.
contact_idstringrequiredThe unique Intercom identifier for the contact to delete.schema_versionstringoptionalSchema versiontool_versionstringoptionalTool versionintercom_delete_help_center_collection#Permanently delete a Help Center collection.3 params
Permanently delete a Help Center collection.
collection_idstringrequiredThe Intercom ID of the collection to delete.schema_versionstringoptionalSchema versiontool_versionstringoptionalTool versionintercom_delete_news_item#Delete a news item by its Intercom ID.3 params
Delete a news item by its Intercom ID.
news_item_idstringrequiredThe Intercom ID of the news item to delete.schema_versionstringoptionalSchema versiontool_versionstringoptionalTool versionintercom_delete_tag#Permanently delete a tag from the Intercom workspace.3 params
Permanently delete a tag from the Intercom workspace.
tag_idstringrequiredThe Intercom ID of the tag to delete.schema_versionstringoptionalSchema versiontool_versionstringoptionalTool versionintercom_detach_contact_from_company#Remove the association between a contact and a company.4 params
Remove the association between a contact and a company.
company_idstringrequiredThe Intercom ID of the company to detach from the contact.contact_idstringrequiredThe unique Intercom identifier for the contact.schema_versionstringoptionalSchema versiontool_versionstringoptionalTool versionintercom_detach_contact_from_conversation#Remove a contact as a participant from a conversation.4 params
Remove a contact as a participant from a conversation.
contact_idstringrequiredThe Intercom ID of the contact to remove from the conversation.conversation_idstringrequiredThe Intercom ID of the conversation.schema_versionstringoptionalSchema versiontool_versionstringoptionalTool versionintercom_detach_subscription_from_contact#Remove an email subscription type from a contact.4 params
Remove an email subscription type from a contact.
contact_idstringrequiredThe unique Intercom identifier for the contact.subscription_idstringrequiredThe Intercom ID of the subscription type to remove.schema_versionstringoptionalSchema versiontool_versionstringoptionalTool versionintercom_detach_tag_from_contact#Remove a tag from a contact.4 params
Remove a tag from a contact.
contact_idstringrequiredThe Intercom ID of the contact.tag_idstringrequiredThe Intercom ID of the tag to remove.schema_versionstringoptionalSchema versiontool_versionstringoptionalTool versionintercom_detach_tag_from_conversation#Remove a tag from a conversation.5 params
Remove a tag from a conversation.
admin_idstringrequiredThe Intercom ID of the admin performing the action.conversation_idstringrequiredThe Intercom ID of the conversation.tag_idstringrequiredThe Intercom ID of the tag to remove.schema_versionstringoptionalSchema versiontool_versionstringoptionalTool versionintercom_detach_tag_from_ticket#Remove a tag from a ticket.5 params
Remove a tag from a ticket.
admin_idstringrequiredThe Intercom ID of the admin performing the action.tag_idstringrequiredThe Intercom ID of the tag to remove.ticket_idstringrequiredThe Intercom ID of the ticket.schema_versionstringoptionalSchema versiontool_versionstringoptionalTool versionintercom_identify_admin#Retrieve the currently authenticated admin's details.2 params
Retrieve the currently authenticated admin's details.
schema_versionstringoptionalSchema versiontool_versionstringoptionalTool versionintercom_list_activity_logs#List all admin activity logs within a date range. Dates must be Unix timestamps.4 params
List all admin activity logs within a date range. Dates must be Unix timestamps.
created_at_afterstringrequiredStart date as a Unix timestamp. Only logs after this date are returned.created_at_beforestringoptionalEnd date as a Unix timestamp. Only logs before this date are returned.schema_versionstringoptionalSchema versiontool_versionstringoptionalTool versionintercom_list_admins#List all admins in the Intercom workspace.3 params
List all admins in the Intercom workspace.
display_avatarbooleanoptionalIf true, includes the admin's avatar image URL in the response.schema_versionstringoptionalSchema versiontool_versionstringoptionalTool versionintercom_list_articles#List all Help Center articles in the Intercom workspace.4 params
List all Help Center articles in the Intercom workspace.
pageintegeroptionalPage number of results to return.per_pageintegeroptionalNumber of articles per page (default: 15).schema_versionstringoptionalSchema versiontool_versionstringoptionalTool versionintercom_list_companies#Retrieve companies filtered by name, company_id, tag_id, or segment_id.8 params
Retrieve companies filtered by name, company_id, tag_id, or segment_id.
company_idstringoptionalFilter by your system's company identifier.namestringoptionalFilter companies by name.pageintegeroptionalPage number of results to return.per_pageintegeroptionalNumber of results per page.schema_versionstringoptionalSchema versionsegment_idstringoptionalFilter companies by a segment's Intercom ID.tag_idstringoptionalFilter companies by a tag's Intercom ID.tool_versionstringoptionalTool versionintercom_list_company_contacts#List all contacts associated with a company.3 params
List all contacts associated with a company.
company_idstringrequiredThe Intercom ID of the company.schema_versionstringoptionalSchema versiontool_versionstringoptionalTool versionintercom_list_company_segments#List all segments that a company belongs to.3 params
List all segments that a company belongs to.
company_idstringrequiredThe Intercom ID of the company.schema_versionstringoptionalSchema versiontool_versionstringoptionalTool versionintercom_list_contact_companies#List all companies that a contact is attached to.3 params
List all companies that a contact is attached to.
contact_idstringrequiredThe unique Intercom identifier for the contact.schema_versionstringoptionalSchema versiontool_versionstringoptionalTool versionintercom_list_contact_notes#List all notes associated with a contact.5 params
List all notes associated with a contact.
contact_idstringrequiredThe unique Intercom identifier for the contact.pageintegeroptionalPage number of results to return.per_pageintegeroptionalNumber of notes to return per page.schema_versionstringoptionalSchema versiontool_versionstringoptionalTool versionintercom_list_contact_segments#List all segments that a contact belongs to.3 params
List all segments that a contact belongs to.
contact_idstringrequiredThe unique Intercom identifier for the contact.schema_versionstringoptionalSchema versiontool_versionstringoptionalTool versionintercom_list_contact_subscriptions#List all email subscription types for a contact.3 params
List all email subscription types for a contact.
contact_idstringrequiredThe unique Intercom identifier for the contact.schema_versionstringoptionalSchema versiontool_versionstringoptionalTool versionintercom_list_contacts#List all contacts (users and leads) in the Intercom workspace with optional pagination.5 params
List all contacts (users and leads) in the Intercom workspace with optional pagination.
pageintegeroptionalPage number of results to return.per_pageintegeroptionalNumber of results per page.schema_versionstringoptionalSchema versionstarting_afterstringoptionalCursor for pagination. Use the value from the previous response to get the next page.tool_versionstringoptionalTool versionintercom_list_conversations#List all conversations in the Intercom workspace with optional pagination.4 params
List all conversations in the Intercom workspace with optional pagination.
per_pageintegeroptionalNumber of conversations to return per page.schema_versionstringoptionalSchema versionstarting_afterstringoptionalPagination cursor from a previous response.tool_versionstringoptionalTool versionintercom_list_data_attributes#List all data attributes (custom attributes) for contacts, companies, or conversations.4 params
List all data attributes (custom attributes) for contacts, companies, or conversations.
include_archivedbooleanoptionalSet to true to include archived attributes.modelstringoptionalFilter by model type: 'contact', 'company', or 'conversation'.schema_versionstringoptionalSchema versiontool_versionstringoptionalTool versionintercom_list_data_events#List data events for a specific contact. Requires a filter with the contact's user_id or email.7 params
List data events for a specific contact. Requires a filter with the contact's user_id or email.
typestringrequiredMust be 'user' to list events for a contact.intercom_user_idstringoptionalThe Intercom ID of the contact.per_pageintegeroptionalNumber of events to return per page.schema_versionstringoptionalSchema versionsummarybooleanoptionalSet to true to return a summary of events grouped by name.tool_versionstringoptionalTool versionuser_idstringoptionalYour unique identifier for the contact to list events for.intercom_list_help_center_collections#List all Help Center collections in the Intercom workspace.2 params
List all Help Center collections in the Intercom workspace.
schema_versionstringoptionalSchema versiontool_versionstringoptionalTool versionintercom_list_help_centers#List all Help Centers in the Intercom workspace.2 params
List all Help Centers in the Intercom workspace.
schema_versionstringoptionalSchema versiontool_versionstringoptionalTool versionintercom_list_news_items#List all news items in the workspace.2 params
List all news items in the workspace.
schema_versionstringoptionalSchema versiontool_versionstringoptionalTool versionintercom_list_newsfeed_items#List all news items in a newsfeed.3 params
List all news items in a newsfeed.
newsfeed_idstringrequiredThe Intercom ID of the newsfeed.schema_versionstringoptionalSchema versiontool_versionstringoptionalTool versionintercom_list_newsfeeds#List all newsfeeds in the workspace.2 params
List all newsfeeds in the workspace.
schema_versionstringoptionalSchema versiontool_versionstringoptionalTool versionintercom_list_segments#List all segments in the Intercom workspace. Optionally include contact count.3 params
List all segments in the Intercom workspace. Optionally include contact count.
include_countbooleanoptionalSet to true to include the count of contacts in each segment.schema_versionstringoptionalSchema versiontool_versionstringoptionalTool versionintercom_list_subscription_types#List all email subscription types configured in the Intercom workspace.2 params
List all email subscription types configured in the Intercom workspace.
schema_versionstringoptionalSchema versiontool_versionstringoptionalTool versionintercom_list_tags#List all tags in the Intercom workspace.2 params
List all tags in the Intercom workspace.
schema_versionstringoptionalSchema versiontool_versionstringoptionalTool versionintercom_list_teams#List all teams in the Intercom workspace.2 params
List all teams in the Intercom workspace.
schema_versionstringoptionalSchema versiontool_versionstringoptionalTool versionintercom_list_ticket_types#List all ticket types for the workspace.2 params
List all ticket types for the workspace.
schema_versionstringoptionalSchema versiontool_versionstringoptionalTool versionintercom_manage_conversation#Manage a conversation by assigning it, closing it, opening it, or snoozing it. Use message_type to specify the action: 'assignment', 'close', 'open', or 'snoozed'.9 params
Manage a conversation by assigning it, closing it, opening it, or snoozing it. Use message_type to specify the action: 'assignment', 'close', 'open', or 'snoozed'.
admin_idstringrequiredThe Intercom ID of the admin performing the action.conversation_idstringrequiredThe Intercom ID of the conversation to manage.message_typestringrequiredThe action to take: 'assignment', 'close', 'open', or 'snoozed'.typestringrequiredSender type: 'admin'.assignee_idstringoptionalAdmin or team ID to assign the conversation to (required for assignment).bodystringoptionalOptional message to send with the assignment.schema_versionstringoptionalSchema versionsnoozed_untilintegeroptionalUnix timestamp until which to snooze the conversation (required for snoozed action).tool_versionstringoptionalTool versionintercom_merge_contacts#Merge a lead contact into a user contact. The lead contact is deleted and its data is merged into the user.4 params
Merge a lead contact into a user contact. The lead contact is deleted and its data is merged into the user.
fromstringrequiredThe Intercom ID of the lead contact to merge away (will be deleted).intostringrequiredThe Intercom ID of the user contact to merge the lead into.schema_versionstringoptionalSchema versiontool_versionstringoptionalTool versionintercom_redact_conversation#Redact a conversation part or the source of a conversation to permanently remove its content.5 params
Redact a conversation part or the source of a conversation to permanently remove its content.
conversation_idstringrequiredThe Intercom ID of the conversation.typestringrequiredType of content to redact: 'conversation_part' or 'source'.conversation_part_idstringoptionalThe Intercom ID of the conversation part to redact (required if type is conversation_part).schema_versionstringoptionalSchema versiontool_versionstringoptionalTool versionintercom_reply_to_conversation#Reply to a conversation as an admin. Supports user and admin reply types.8 params
Reply to a conversation as an admin. Supports user and admin reply types.
admin_idstringrequiredThe Intercom ID of the admin sending the reply.conversation_idstringrequiredThe Intercom ID of the conversation to reply to.message_typestringrequiredType of reply: 'comment' or 'note'.typestringrequiredSender type: 'admin' or 'user'.bodystringoptionalThe reply message text. Notes support some HTML.created_atintegeroptionalUnix timestamp to backdate the reply.schema_versionstringoptionalSchema versiontool_versionstringoptionalTool versionintercom_reply_to_ticket#Reply to a ticket as an admin.7 params
Reply to a ticket as an admin.
admin_idstringrequiredThe Intercom ID of the admin sending the reply.message_typestringrequiredType of reply: 'comment' or 'note'.ticket_idstringrequiredThe Intercom ID of the ticket to reply to.typestringrequiredSender type: 'admin'.bodystringoptionalThe reply message text.schema_versionstringoptionalSchema versiontool_versionstringoptionalTool versionintercom_retrieve_admin#Retrieve details for a specific admin by their ID.3 params
Retrieve details for a specific admin by their ID.
admin_idstringrequiredThe unique identifier of the admin.schema_versionstringoptionalSchema versiontool_versionstringoptionalTool versionintercom_retrieve_article#Retrieve a Help Center article by its Intercom ID.3 params
Retrieve a Help Center article by its Intercom ID.
article_idstringrequiredThe Intercom ID of the article.schema_versionstringoptionalSchema versiontool_versionstringoptionalTool versionintercom_retrieve_company#Retrieve a company by its Intercom ID.3 params
Retrieve a company by its Intercom ID.
company_idstringrequiredThe Intercom ID of the company.schema_versionstringoptionalSchema versiontool_versionstringoptionalTool versionintercom_retrieve_contact#Retrieve a contact by their Intercom ID.3 params
Retrieve a contact by their Intercom ID.
contact_idstringrequiredThe unique Intercom identifier for the contact.schema_versionstringoptionalSchema versiontool_versionstringoptionalTool versionintercom_retrieve_conversation#Retrieve a conversation by its Intercom ID. Optionally return the body in plaintext format.4 params
Retrieve a conversation by its Intercom ID. Optionally return the body in plaintext format.
conversation_idstringrequiredThe Intercom ID of the conversation.display_asstringoptionalSet to 'plaintext' to return conversation parts as plain text instead of HTML.schema_versionstringoptionalSchema versiontool_versionstringoptionalTool versionintercom_retrieve_help_center#Retrieve a specific Help Center by its Intercom ID.3 params
Retrieve a specific Help Center by its Intercom ID.
help_center_idstringrequiredThe Intercom ID of the Help Center.schema_versionstringoptionalSchema versiontool_versionstringoptionalTool versionintercom_retrieve_help_center_collection#Retrieve a Help Center collection by its Intercom ID.3 params
Retrieve a Help Center collection by its Intercom ID.
collection_idstringrequiredThe Intercom ID of the collection.schema_versionstringoptionalSchema versiontool_versionstringoptionalTool versionintercom_retrieve_news_item#Retrieve a news item by its Intercom ID.3 params
Retrieve a news item by its Intercom ID.
news_item_idstringrequiredThe Intercom ID of the news item.schema_versionstringoptionalSchema versiontool_versionstringoptionalTool versionintercom_retrieve_newsfeed#Retrieve a newsfeed by its Intercom ID.3 params
Retrieve a newsfeed by its Intercom ID.
newsfeed_idstringrequiredThe Intercom ID of the newsfeed.schema_versionstringoptionalSchema versiontool_versionstringoptionalTool versionintercom_retrieve_note#Retrieve a specific note by its Intercom ID.3 params
Retrieve a specific note by its Intercom ID.
note_idstringrequiredThe unique Intercom identifier for the note.schema_versionstringoptionalSchema versiontool_versionstringoptionalTool versionintercom_retrieve_segment#Retrieve a specific segment by its Intercom ID.3 params
Retrieve a specific segment by its Intercom ID.
segment_idstringrequiredThe Intercom ID of the segment.schema_versionstringoptionalSchema versiontool_versionstringoptionalTool versionintercom_retrieve_tag#Retrieve a specific tag by its Intercom ID.3 params
Retrieve a specific tag by its Intercom ID.
tag_idstringrequiredThe Intercom ID of the tag.schema_versionstringoptionalSchema versiontool_versionstringoptionalTool versionintercom_retrieve_team#Retrieve a specific team by its Intercom ID.3 params
Retrieve a specific team by its Intercom ID.
team_idstringrequiredThe Intercom ID of the team.schema_versionstringoptionalSchema versiontool_versionstringoptionalTool versionintercom_retrieve_ticket#Retrieve a ticket by its Intercom ID.3 params
Retrieve a ticket by its Intercom ID.
ticket_idstringrequiredThe Intercom ID of the ticket.schema_versionstringoptionalSchema versiontool_versionstringoptionalTool versionintercom_retrieve_ticket_type#Retrieve a ticket type by its Intercom ID.3 params
Retrieve a ticket type by its Intercom ID.
ticket_type_idstringrequiredThe Intercom ID of the ticket type.schema_versionstringoptionalSchema versiontool_versionstringoptionalTool versionintercom_retrieve_visitor#Retrieve a visitor by their user_id.3 params
Retrieve a visitor by their user_id.
user_idstringrequiredThe user_id of the visitor to retrieve.schema_versionstringoptionalSchema versiontool_versionstringoptionalTool versionintercom_search_articles#Search Help Center articles by phrase, state, or help center ID.6 params
Search Help Center articles by phrase, state, or help center ID.
help_center_idintegeroptionalFilter articles by a specific Help Center ID.highlightbooleanoptionalSet to true to return highlighted matching content.phrasestringoptionalThe search phrase to find in articles.schema_versionstringoptionalSchema versionstatestringoptionalFilter by state: 'published', 'draft', or 'all'.tool_versionstringoptionalTool versionintercom_search_contacts#Search for contacts using filter queries. Supports complex filters by email, name, role, external_id, custom attributes, and more.4 params
Search for contacts using filter queries. Supports complex filters by email, name, role, external_id, custom attributes, and more.
queryobjectrequiredFilter query object to search contacts. Example: {"field": "email", "operator": "=", "value": "user@example.com"}paginationobjectoptionalPagination object with optional 'per_page' and 'starting_after' cursor.schema_versionstringoptionalSchema versiontool_versionstringoptionalTool versionintercom_search_conversations#Search for conversations using filter queries.4 params
Search for conversations using filter queries.
queryobjectrequiredFilter query object for searching conversations.paginationobjectoptionalPagination object with optional per_page and starting_after.schema_versionstringoptionalSchema versiontool_versionstringoptionalTool versionintercom_search_tickets#Search for tickets using filter queries.4 params
Search for tickets using filter queries.
queryobjectrequiredFilter query object for searching tickets.paginationobjectoptionalPagination object with optional per_page and starting_after.schema_versionstringoptionalSchema versiontool_versionstringoptionalTool versionintercom_set_away_admin#Set an admin's status to away or active, and optionally reassign new conversations to the default inbox.5 params
Set an admin's status to away or active, and optionally reassign new conversations to the default inbox.
admin_idstringrequiredThe unique identifier of the admin.away_mode_enabledbooleanrequiredSet to true to mark the admin as away, false to set them as active.away_mode_reassignbooleanrequiredSet to true to reassign new conversation replies to the default inbox when away.schema_versionstringoptionalSchema versiontool_versionstringoptionalTool versionintercom_unarchive_contact#Unarchive a previously archived contact to make them visible in the workspace again.3 params
Unarchive a previously archived contact to make them visible in the workspace again.
contact_idstringrequiredThe unique Intercom identifier for the contact to unarchive.schema_versionstringoptionalSchema versiontool_versionstringoptionalTool versionintercom_update_article#Update an existing Help Center article.8 params
Update an existing Help Center article.
article_idstringrequiredThe Intercom ID of the article to update.author_idintegeroptionalUpdated author admin ID.bodystringoptionalUpdated HTML content body.descriptionstringoptionalUpdated description.schema_versionstringoptionalSchema versionstatestringoptionalUpdated publication state: 'published' or 'draft'.titlestringoptionalUpdated title of the article.tool_versionstringoptionalTool versionintercom_update_contact#Update an existing contact's details by their Intercom ID.10 params
Update an existing contact's details by their Intercom ID.
contact_idstringrequiredThe unique Intercom identifier for the contact to update.emailstringoptionalEmail address of the contact.external_idstringoptionalYour unique identifier for the contact.namestringoptionalFull name of the contact.owner_idintegeroptionalID of the admin who owns this contact.phonestringoptionalPhone number of the contact.rolestringoptionalRole of the contact: 'user' or 'lead'.schema_versionstringoptionalSchema versiontool_versionstringoptionalTool versionunsubscribed_from_emailsbooleanoptionalSet to true to unsubscribe the contact from emails.intercom_update_conversation#Update a conversation's read status or custom attributes.5 params
Update a conversation's read status or custom attributes.
conversation_idstringrequiredThe Intercom ID of the conversation to update.custom_attributesobjectoptionalObject of custom attribute key-value pairs to update.readbooleanoptionalSet to true to mark the conversation as read.schema_versionstringoptionalSchema versiontool_versionstringoptionalTool versionintercom_update_data_attribute#Update an existing data attribute. Custom attributes cannot be deleted, only archived.7 params
Update an existing data attribute. Custom attributes cannot be deleted, only archived.
data_attribute_idstringrequiredThe Intercom ID of the data attribute to update.archivedbooleanoptionalSet to true to archive this attribute.descriptionstringoptionalUpdated description of the attribute.messenger_writablebooleanoptionalWhether the attribute can be set through the Messenger.optionsarrayoptionalUpdated list of allowed values for list-type attributes.schema_versionstringoptionalSchema versiontool_versionstringoptionalTool versionintercom_update_help_center_collection#Update a Help Center collection's name or description.5 params
Update a Help Center collection's name or description.
collection_idstringrequiredThe Intercom ID of the collection to update.descriptionstringoptionalUpdated description of the collection.namestringoptionalUpdated name of the collection.schema_versionstringoptionalSchema versiontool_versionstringoptionalTool versionintercom_update_news_item#Update an existing news item.9 params
Update an existing news item.
news_item_idstringrequiredThe Intercom ID of the news item to update.bodystringoptionalUpdated HTML content of the news item.deliver_silentlybooleanoptionalIf true, the news item will not send notifications.labelsarrayoptionalLabels for the news item.schema_versionstringoptionalSchema versionsender_idintegeroptionalUpdated sender admin ID.statestringoptionalUpdated state: 'draft' or 'live'.titlestringoptionalUpdated title of the news item.tool_versionstringoptionalTool versionintercom_update_ticket#Update a ticket's attributes, state, or assignment.9 params
Update a ticket's attributes, state, or assignment.
ticket_idstringrequiredThe Intercom ID of the ticket to update.assignmentobjectoptionalAssignment object: {"admin_id": "1234567"} or {"team_id": "1234567"}.is_sharedbooleanoptionalSet to true to make the ticket visible to users.openbooleanoptionalSet to false to close the ticket.schema_versionstringoptionalSchema versionsnoozed_untilintegeroptionalUnix timestamp to snooze the ticket until.statestringoptionalUpdated ticket state: 'in_progress', 'waiting_on_customer', 'resolved'.ticket_attributesobjectoptionalUpdated ticket attribute key-value pairs.tool_versionstringoptionalTool versionintercom_update_ticket_type#Update an existing ticket type.9 params
Update an existing ticket type.
ticket_type_idstringrequiredThe Intercom ID of the ticket type to update.archivedbooleanoptionalSet to true to archive the ticket type.categorystringoptionalUpdated category: 'Customer', 'Back-office', or 'Tracker'.descriptionstringoptionalUpdated description of the ticket type.iconstringoptionalUpdated emoji icon for the ticket type.is_internalbooleanoptionalWhether this ticket type is for internal use only.namestringoptionalUpdated name of the ticket type.schema_versionstringoptionalSchema versiontool_versionstringoptionalTool versionintercom_update_ticket_type_attribute#Update an attribute on a ticket type.11 params
Update an attribute on a ticket type.
attribute_idstringrequiredThe Intercom ID of the attribute to update.ticket_type_idstringrequiredThe Intercom ID of the ticket type.archivedbooleanoptionalSet to true to archive the attribute.descriptionstringoptionalUpdated description of the attribute.namestringoptionalUpdated name of the attribute.required_to_createbooleanoptionalWhether this attribute is required when creating a ticket.required_to_create_for_contactsbooleanoptionalWhether this attribute is required for contacts when creating a ticket.schema_versionstringoptionalSchema versiontool_versionstringoptionalTool versionvisible_on_createbooleanoptionalWhether this attribute is visible when creating a ticket.visible_to_contactsbooleanoptionalWhether this attribute is visible to contacts.intercom_update_visitor#Update a visitor's attributes.6 params
Update a visitor's attributes.
idstringrequiredThe Intercom ID of the visitor.custom_attributesobjectoptionalCustom attributes to update on the visitor.namestringoptionalUpdated name for the visitor.schema_versionstringoptionalSchema versiontool_versionstringoptionalTool versionuser_idstringoptionalThe user_id of the visitor.