
Assign roles to users
Learn how to assign roles to users in your application using to dashboard, SDK, or automated provisioning
After registering roles and permissions for your application, Scalekit provides multiple ways to assign roles to users. These roles allow your app to make the access control decisions as scalekit sends them to your app in the access token.
Auto assign roles as users join organizations
Section titled “Auto assign roles as users join organizations”By default, the organization creator automatically receives the admin role, while users who join later receive the member role. You can customize these defaults to match your application’s security requirements. For instance, in a CRM system, you may want to set the default role for new members to a read-only role like viewer to prevent accidental data modifications.
- Go to Dashboard > Roles & Permissions > Roles tab
- Select the roles available and choose defaults for organization creator and member
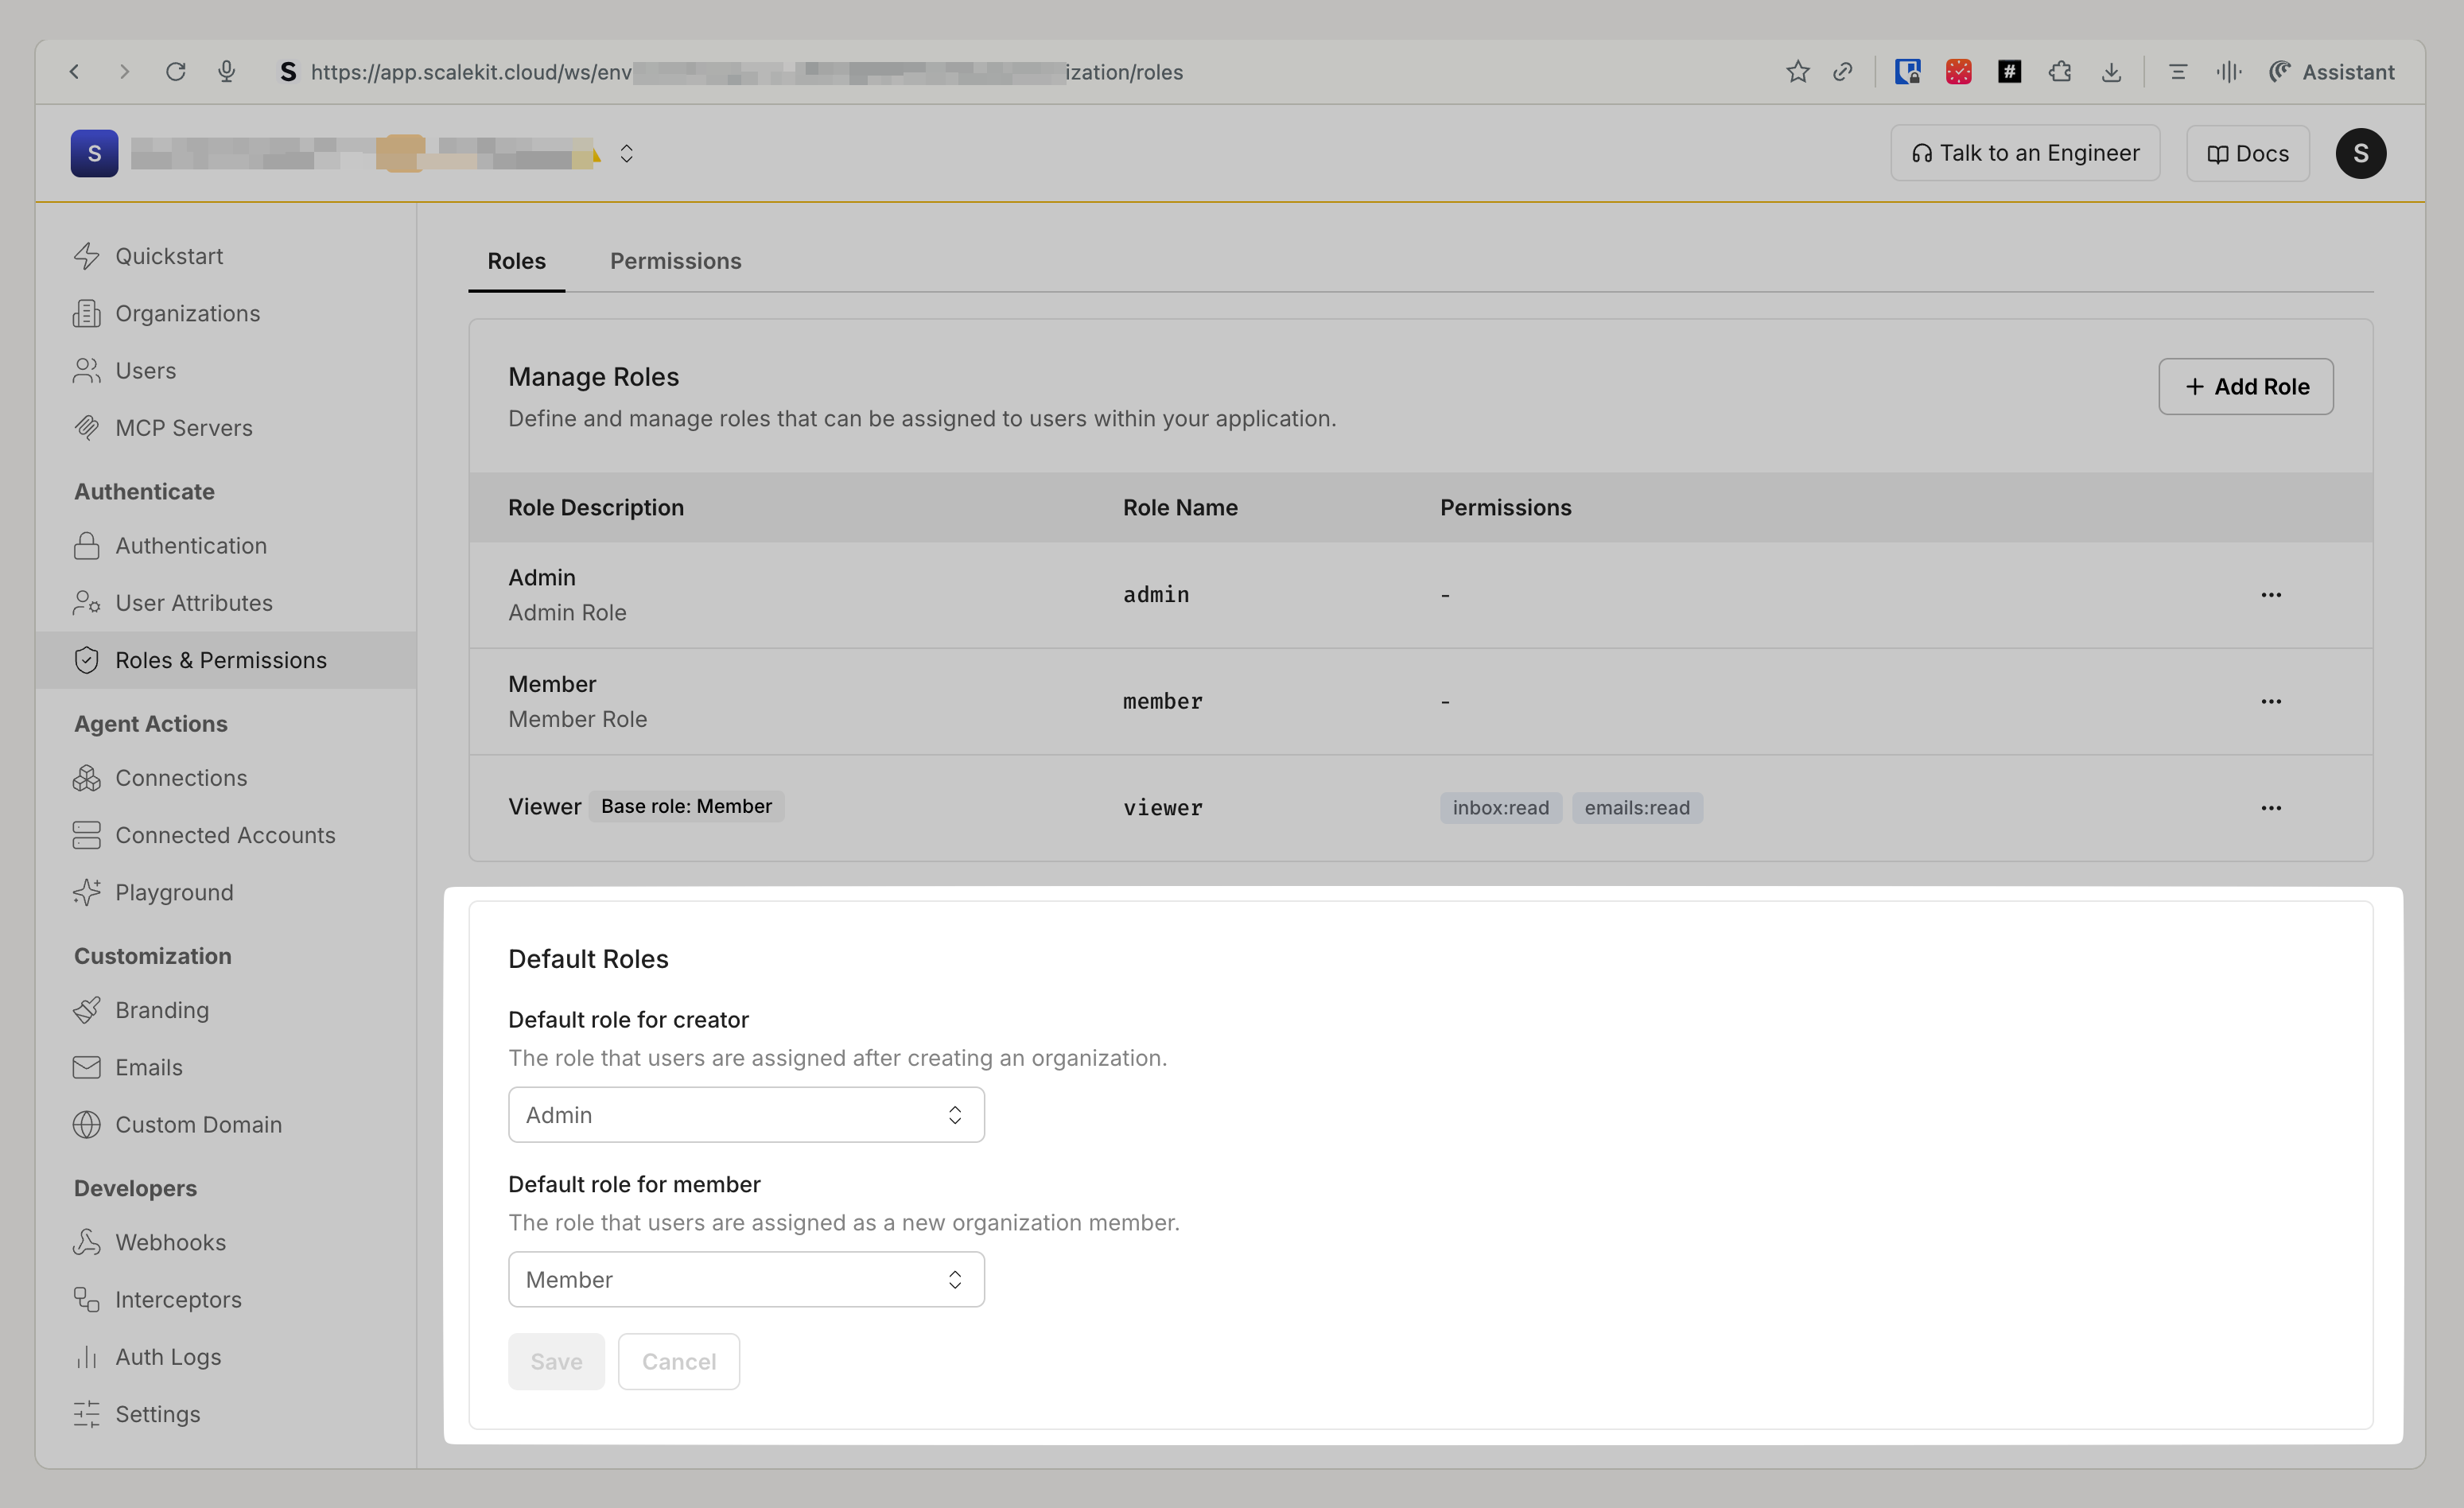
This automatically assigns these roles to every users who joins any organization in your Scalekit environment.
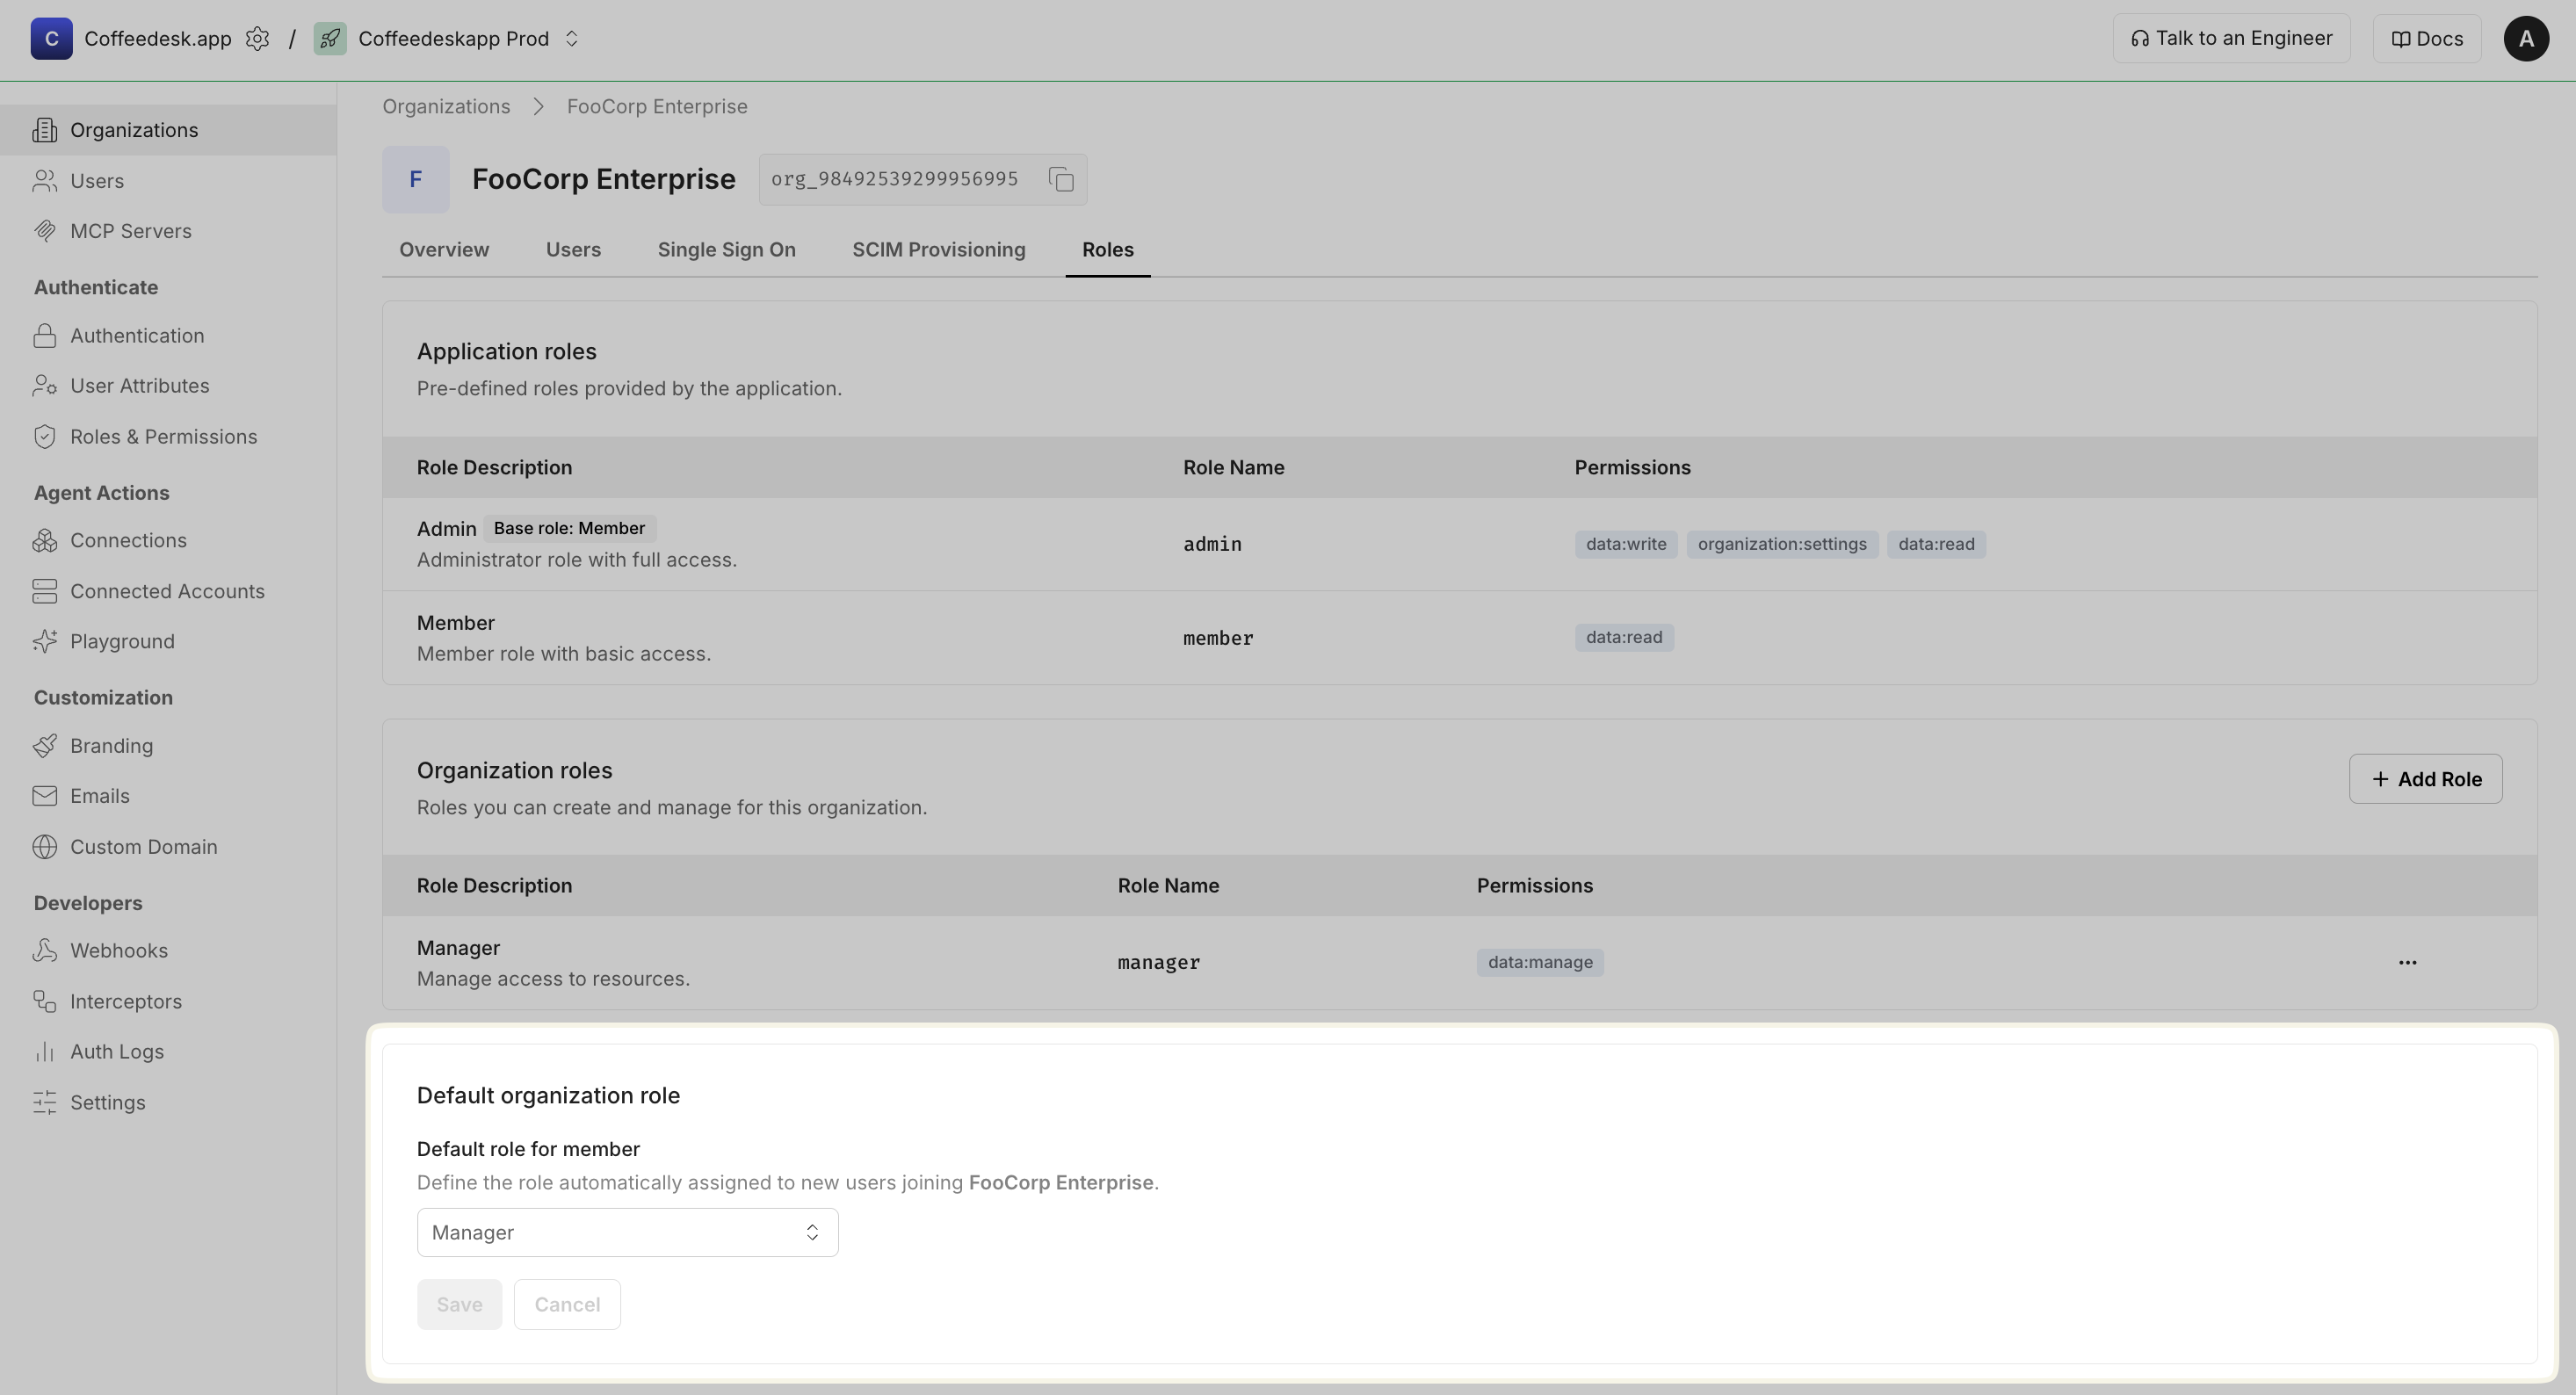
Set a default role for new organization members
Section titled “Set a default role for new organization members”You can also configure a default role that is automatically assigned to users who join a specific organization. This organization-level setting overrides the application-level default role described above, allowing finer-grained control per organization.
Let users assign roles to others API
Section titled “Let users assign roles to others ”Enable organization administrators to manage user roles directly within your application. By building features like “Change role” or “Assign permissions” into your app, you can provide a management experience without requiring administrators to leave your app.
To implement role assignment functionality, follow these essential prerequisites:
-
Verify administrator permissions: Ensure the user performing the role assignment has the
adminrole or an equivalent role with the necessary permissions. Check thepermissionsproperty in their access token to confirm they have role management capabilities.Verify permissions // Decode JWT and check admin permissionsconst decodedToken = decodeJWT(adminAccessToken);// Check if user has admin role or required permissionsconst isAdmin = decodedToken.roles.includes('admin');const hasPermission = decodedToken.permissions?.includes('users.write') ||decodedToken.permissions?.includes('roles.assign');if (!isAdmin && !hasPermission) {throw new Error('Insufficient permissions to assign roles');}Verify permissions # Decode JWT and check admin permissionsdecoded_token = decode_jwt(access_token)# Check if user has admin role or required permissionsis_admin = 'admin' in decoded_token.get('roles', [])has_permission = any(perm in decoded_token.get('permissions', [])for perm in ['users.write', 'roles.assign'])if not is_admin and not has_permission:raise PermissionError("Insufficient permissions to assign roles")Verify permissions // Decode JWT and check admin permissionsdecodedToken, err := decodeJWT(accessToken)if err != nil {return ValidationResult{Success: false, Error: "Invalid token"}}// Check if user has admin role or required permissionsroles := decodedToken["roles"].([]interface{})permissions := decodedToken["permissions"].([]interface{})isAdmin := falsehasPermission := falsefor _, role := range roles {if role == "admin" {isAdmin = truebreak}}for _, perm := range permissions {if perm == "users.write" || perm == "roles.assign" {hasPermission = truebreak}}if !isAdmin && !hasPermission {return ValidationResult{Success: false, Error: "Insufficient permissions"}}Verify permissions // Decode JWT and check admin permissionsClaims decodedToken = decodeJWT(accessToken);@SuppressWarnings("unchecked")List<String> userRoles = (List<String>) decodedToken.get("roles");@SuppressWarnings("unchecked")List<String> permissions = (List<String>) decodedToken.get("permissions");// Check if user has admin role or required permissionsboolean isAdmin = userRoles != null && userRoles.contains("admin");boolean hasPermission = permissions != null &&(permissions.contains("users.write") || permissions.contains("roles.assign"));if (!isAdmin && !hasPermission) {throw new SecurityException("Insufficient permissions to assign roles");} -
Collect required identifiers: Gather the necessary parameters for the API call:
user_id: The unique identifier of the user whose role you’re changingorganization_id: The organization where the role assignment appliesroles: An array of role names to assign to the user
Collect and validate identifiers // Structure and validate role assignment dataconst roleAssignmentData = {user_id: targetUserId,organization_id: targetOrgId,roles: newRoles,// Additional metadata for auditingperformed_by: decodedToken.sub,timestamp: new Date().toISOString()};// Validate required fieldsif (!roleAssignmentData.user_id || !roleAssignmentData.organization_id || !roleAssignmentData.roles) {throw new Error('Missing required identifiers for role assignment');}Collect and validate identifiers # Structure and validate role assignment datarole_assignment_data = {'user_id': target_user_id,'organization_id': target_org_id,'roles': new_roles,# Additional metadata for auditing'performed_by': decoded_token.get('sub'),'timestamp': datetime.utcnow().isoformat()}# Validate required fieldsif not all([role_assignment_data['user_id'],role_assignment_data['organization_id'],role_assignment_data['roles']]):raise ValueError("Missing required identifiers for role assignment")Collect and validate identifiers // Structure and validate role assignment dataroleAssignmentData := map[string]interface{}{"user_id": req.UserID,"organization_id": req.OrganizationID,"roles": req.Roles,// Additional metadata for auditing"performed_by": decodedToken["sub"],"timestamp": time.Now().UTC().Format(time.RFC3339),}// Validate required fieldsif req.UserID == "" || req.OrganizationID == "" || len(req.Roles) == 0 {return ValidationResult{Success: false, Error: "Missing required identifiers"}}Collect and validate identifiers // Structure and validate role assignment dataMap<String, Object> roleAssignmentData = new HashMap<>();roleAssignmentData.put("user_id", request.userId);roleAssignmentData.put("organization_id", request.organizationId);roleAssignmentData.put("roles", request.roles);// Additional metadata for auditingroleAssignmentData.put("performed_by", decodedToken.getSubject());roleAssignmentData.put("timestamp", Instant.now().toString());// Validate required fieldsif (request.userId == null || request.organizationId == null || request.roles == null) {throw new IllegalArgumentException("Missing required identifiers for role assignment");} -
Call Scalekit SDK to update user role: Use the validated data to make the API call that assigns the new roles to the user through the Scalekit membership update endpoint.
Update user role with Scalekit SDK // Use case: Update user membership after validationconst validationResult = await prepareRoleAssignment(adminAccessToken,targetUserId,targetOrgId,newRoles);if (!validationResult.success) {return res.status(403).json({ error: validationResult.error });}// Initialize Scalekit client (reference installation guide for setup)const scalekit = new ScalekitClient(process.env.SCALEKIT_ENVIRONMENT_URL,process.env.SCALEKIT_CLIENT_ID,process.env.SCALEKIT_CLIENT_SECRET);// Make the API call to update user rolestry {const result = await scalekit.user.updateMembership({user_id: validationResult.data.user_id,organization_id: validationResult.data.organization_id,roles: validationResult.data.roles});console.log(`Role assigned successfully:`, result);return res.json({success: true,message: "Role updated successfully",data: result});} catch (error) {console.error(`Failed to assign role: ${error.message}`);return res.status(500).json({error: "Failed to update role",details: error.message});}Update user role with Scalekit SDK # Use case: Update user membership after validationvalidation_result = prepare_role_assignment(access_token,target_user_id,target_org_id,new_roles)if not validation_result['success']:return jsonify({'error': validation_result['error']}), 403# Initialize Scalekit client (reference installation guide for setup)scalekit_client = ScalekitClient(env_url=os.getenv("SCALEKIT_ENVIRONMENT_URL"),client_id=os.getenv("SCALEKIT_CLIENT_ID"),client_secret=os.getenv("SCALEKIT_CLIENT_SECRET"))# Make the API call to update user rolestry:from scalekit.v1.users.users_pb2 import UpdateMembershipRequestrequest = UpdateMembershipRequest(user_id=validation_result['data']['user_id'],organization_id=validation_result['data']['organization_id'],roles=validation_result['data']['roles'])result = scalekit_client.users.update_membership(request=request)print(f"Role assigned successfully: {result}")return jsonify({'success': True,'message': 'Role updated successfully','data': str(result)})except Exception as error:print(f"Failed to assign role: {error}")return jsonify({'error': 'Failed to update role','details': str(error)}), 500Update user role with Scalekit SDK // Use case: Update user membership after validationvalidationResult := prepareRoleAssignment(ctx, accessToken, req)if !validationResult.Success {http.Error(w, validationResult.Error, http.StatusForbidden)return}// Initialize Scalekit client (reference installation guide for setup)scalekitClient := scalekit.NewScalekitClient(os.Getenv("SCALEKIT_ENVIRONMENT_URL"),os.Getenv("SCALEKIT_CLIENT_ID"),os.Getenv("SCALEKIT_CLIENT_SECRET"),)// Make the API call to update user rolesdata := validationResult.Data.(map[string]interface{})updateRequest := &scalekit.UpdateMembershipRequest{UserId: data["user_id"].(string),OrganizationId: data["organization_id"].(string),Roles: data["roles"].([]string),}result, err := scalekitClient.Membership().UpdateMembership(ctx, updateRequest)if err != nil {log.Printf("Failed to assign role: %v", err)http.Error(w, "Failed to update role", http.StatusInternalServerError)return}log.Printf("Role assigned successfully: %+v", result)json.NewEncoder(w).Encode(map[string]interface{}{"success": true,"message": "Role updated successfully","data": result,})Update user role with Scalekit SDK // Use case: Update user membership after validationValidationResult validationResult = prepareRoleAssignment(accessToken, request);if (!validationResult.success) {return ResponseEntity.status(403).body(Map.of("error", validationResult.error));}// Initialize Scalekit client (reference installation guide for setup)ScalekitClient scalekitClient = new ScalekitClient(System.getenv("SCALEKIT_ENVIRONMENT_URL"),System.getenv("SCALEKIT_CLIENT_ID"),System.getenv("SCALEKIT_CLIENT_SECRET"));// Make the API call to update user rolestry {@SuppressWarnings("unchecked")Map<String, Object> data = (Map<String, Object>) validationResult.data;UpdateMembershipRequest updateRequest = UpdateMembershipRequest.newBuilder().setUserId((String) data.get("user_id")).setOrganizationId((String) data.get("organization_id")).addAllRoles((List<String>) data.get("roles")).build();UpdateMembershipResponse response = scalekitClient.users().updateMembership(updateRequest);System.out.println("Role assigned successfully: " + response);return ResponseEntity.ok(Map.of("success", true,"message", "Role updated successfully","data", response.toString()));} catch (Exception e) {System.err.println("Failed to assign role: " + e.getMessage());return ResponseEntity.status(500).body(Map.of("error", "Failed to update role","details", e.getMessage()));} -
Handle response and provide feedback: Return appropriate success/error responses to the administrator and update your application’s UI accordingly.
Handle API response // Success response handlingif (result.success) {// Update UI to reflect role changeawait updateUserInterface(targetUserId, newRoles);// Send notification to user (optional)await notifyUserOfRoleChange(targetUserId, newRoles);// Log the action for audit purposesawait logRoleChange({performed_by: decodedToken.sub,target_user: targetUserId,organization: targetOrgId,old_roles: previousRoles,new_roles: newRoles,timestamp: new Date().toISOString()});}Handle API response # Success response handlingif result.get('success'):# Update UI to reflect role changeawait update_user_interface(target_user_id, new_roles)# Send notification to user (optional)await notify_user_of_role_change(target_user_id, new_roles)# Log the action for audit purposesawait log_role_change({'performed_by': decoded_token.get('sub'),'target_user': target_user_id,'organization': target_org_id,'old_roles': previous_roles,'new_roles': new_roles,'timestamp': datetime.utcnow().isoformat()})Handle API response // Success response handlingif success {// Update UI to reflect role changeupdateUserInterface(targetUserID, newRoles)// Send notification to user (optional)notifyUserOfRoleChange(targetUserID, newRoles)// Log the action for audit purposeslogRoleChange(map[string]interface{}{"performed_by": decodedToken["sub"],"target_user": targetUserID,"organization": targetOrgID,"old_roles": previousRoles,"new_roles": newRoles,"timestamp": time.Now().UTC().Format(time.RFC3339),})}Handle API response // Success response handlingif (response.getBody().containsKey("success") &&Boolean.TRUE.equals(response.getBody().get("success"))) {// Update UI to reflect role changeupdateUserInterface(targetUserId, newRoles);// Send notification to user (optional)notifyUserOfRoleChange(targetUserId, newRoles);// Log the action for audit purposeslogRoleChange(Map.of("performed_by", decodedToken.getSubject(),"target_user", targetUserId,"organization", targetOrgId,"old_roles", previousRoles,"new_roles", newRoles,"timestamp", Instant.now().toString()));}