

Intercept authentication flows
Run your own checks during sign-up, login, invitations and token issuance, and allow, deny, choose the organization or add claims
Interceptors let your app take part in Scalekit’s authentication flows. When a user signs up or logs in, when someone is invited, or when a service requests a machine-to-machine token, Scalekit calls an endpoint in your app and waits for its decision. Your endpoint can allow or deny the step and, at some trigger points, choose the user’s organization or add claims to their tokens.
A sales CRM, for example, uses interceptors to log a consultant straight in to the customer workspace they opened, and to add a new sales rep to their company’s existing workspace instead of creating a duplicate.
This page covers the points you can intercept, how to build and register the endpoint, and what each trigger point sends and accepts.
Choose a trigger point
Section titled “Choose a trigger point”A trigger point is a step in a Scalekit flow where your interceptor runs, and each interceptor you register listens on one trigger point. Trigger points labeled Authentication flow run while a user signs up or logs in. The names match the ones the dashboard shows.
| Trigger point | When it runs | Your response can |
|---|---|---|
| Post-user authentication Authentication flow | After the user proves their identity, before Scalekit provisions them or shows the organization switcher | Deny the login, or choose the organization the user logs in to |
| Pre-signup Authentication flow | When a user signs up and would create a new organization | Deny the sign-up, or add the user to an existing organization instead |
| Pre-session creation Authentication flow | At the end of every login, before session tokens are issued | Deny the login, or add custom claims to the access token |
| Pre-user invitation | Before a user is added to an organization from the dashboard or the API | Deny the invitation |
| Pre-M2M token creation | Before a machine-to-machine access token is issued | Deny the token, or add custom claims to it |
The authentication flow trigger points run when users sign in on Scalekit’s hosted login page in an environment with Full Stack Auth, whatever the method: magic link or OTP, passkey, social login or enterprise SSO. They also run for MCP servers whose users sign in on that page. They do not run for Modular SSO integrations, or for MCP servers that send users to your own login service (custom auth), because Scalekit does not run its login steps there.
During one login they run in this order:

Build the endpoint
Section titled “Build the endpoint”Whichever trigger point you pick, your endpoint follows the same contract. Scalekit sends a JSON body and three headers: interceptor-id, interceptor-timestamp and interceptor-signature. Your endpoint verifies the signature, makes its decision and replies with HTTP 200 and a JSON body.
The request body has the same four top-level fields at every trigger point:
| Field | What it holds |
|---|---|
display_name | The name you gave the interceptor |
trigger_point | The trigger point, for example POST_USER_AUTHENTICATION |
interceptor_context | Who and where: environment, user ID and email, organization, connection, IP address, device and the authorization request |
data | The objects the decision is about: the user and their memberships, the organization, or the M2M token claims |
Each trigger point below shows its full request.
Verify the request
Section titled “Verify the request”The signature covers the raw request body, so verify before you parse the JSON. Copy the signing secret from the Interceptors page in the dashboard and keep it in an environment variable.
import express from 'express';import { ScalekitClient } from '@scalekit-sdk/node';
const app = express();const scalekit = new ScalekitClient( process.env.SCALEKIT_ENVIRONMENT_URL, process.env.SCALEKIT_CLIENT_ID, process.env.SCALEKIT_CLIENT_SECRET);
// Verify every interceptor route against the raw body, then hand handlers the parsed JSONfunction verifyInterceptor(req, res, next) { const rawBody = req.body.toString('utf8'); try { scalekit.verifyInterceptorPayload(process.env.SCALEKIT_INTERCEPTOR_SECRET, req.headers, rawBody); } catch (error) { console.error('Interceptor verification failed:', error); return res.json({ decision: 'DENY', error: { message: 'Unable to process request.' } }); } req.body = JSON.parse(rawBody); next();}
app.use('/auth/interceptors', express.raw({ type: 'application/json' }), verifyInterceptor);import osfrom flask import Flask, requestfrom scalekit import ScalekitClient
app = Flask(__name__)scalekit_client = ScalekitClient( env_url=os.getenv('SCALEKIT_ENVIRONMENT_URL'), client_id=os.getenv('SCALEKIT_CLIENT_ID'), client_secret=os.getenv('SCALEKIT_CLIENT_SECRET'),)
def verified_body(): """Returns the parsed body, or None when the signature is invalid.""" headers = { 'interceptor-id': request.headers.get('interceptor-id'), 'interceptor-signature': request.headers.get('interceptor-signature'), 'interceptor-timestamp': request.headers.get('interceptor-timestamp'), } try: if not scalekit_client.verify_interceptor_payload( secret=os.getenv('SCALEKIT_INTERCEPTOR_SECRET'), headers=headers, payload=request.get_data(), ): return None except Exception as error: print(f'Interceptor verification failed: {error}') return None return request.get_json()
DENY_UNVERIFIED = {'decision': 'DENY', 'error': {'message': 'Unable to process request.'}}package main
import ( "io" "log" "os"
"github.com/gin-gonic/gin" "github.com/scalekit-inc/scalekit-sdk-go/v2")
var scalekitClient = scalekit.NewScalekitClient( os.Getenv("SCALEKIT_ENVIRONMENT_URL"), os.Getenv("SCALEKIT_CLIENT_ID"), os.Getenv("SCALEKIT_CLIENT_SECRET"),)
// verifiedBody returns the raw body once the signature checks outfunc verifiedBody(c *gin.Context) ([]byte, bool) { body, err := io.ReadAll(c.Request.Body) if err != nil { return nil, false } headers := map[string]string{ "interceptor-id": c.GetHeader("interceptor-id"), "interceptor-signature": c.GetHeader("interceptor-signature"), "interceptor-timestamp": c.GetHeader("interceptor-timestamp"), } if _, err := scalekitClient.VerifyInterceptorPayload(os.Getenv("SCALEKIT_INTERCEPTOR_SECRET"), headers, body); err != nil { log.Printf("Interceptor verification failed: %v", err) return nil, false } return body, true}import com.scalekit.webhooks.ScalekitInterceptor;import java.nio.charset.StandardCharsets;import java.util.Map;
@RestController@RequestMapping("/auth/interceptors")public class InterceptorController {
private final ScalekitInterceptor interceptor = new ScalekitInterceptor();
// Returns true once the signature over the raw body checks out private boolean isVerified(String body, Map<String, String> headers) { try { return interceptor.verifyInterceptorPayload( System.getenv("SCALEKIT_INTERCEPTOR_SECRET"), headers, body.getBytes(StandardCharsets.UTF_8)); } catch (Exception error) { System.err.println("Interceptor verification failed: " + error.getMessage()); return false; } }}Send the decision
Section titled “Send the decision”| Field | Required | What it does |
|---|---|---|
decision | Yes | ALLOW continues the flow. DENY stops it. |
error.message | No | With DENY, the message the user sees. Without it, Scalekit shows a generic message. |
response | No | With ALLOW, the change the trigger point allows: the organization, or the claims. Each trigger point below lists its fields. |
Reply with HTTP 200 even when you deny. Scalekit treats any other status, or no reply within the timeout, as a failure, not as a decision.
Register and test the interceptor
Section titled “Register and test the interceptor”Once the endpoint runs, register it in the dashboard and send it a test request.
-
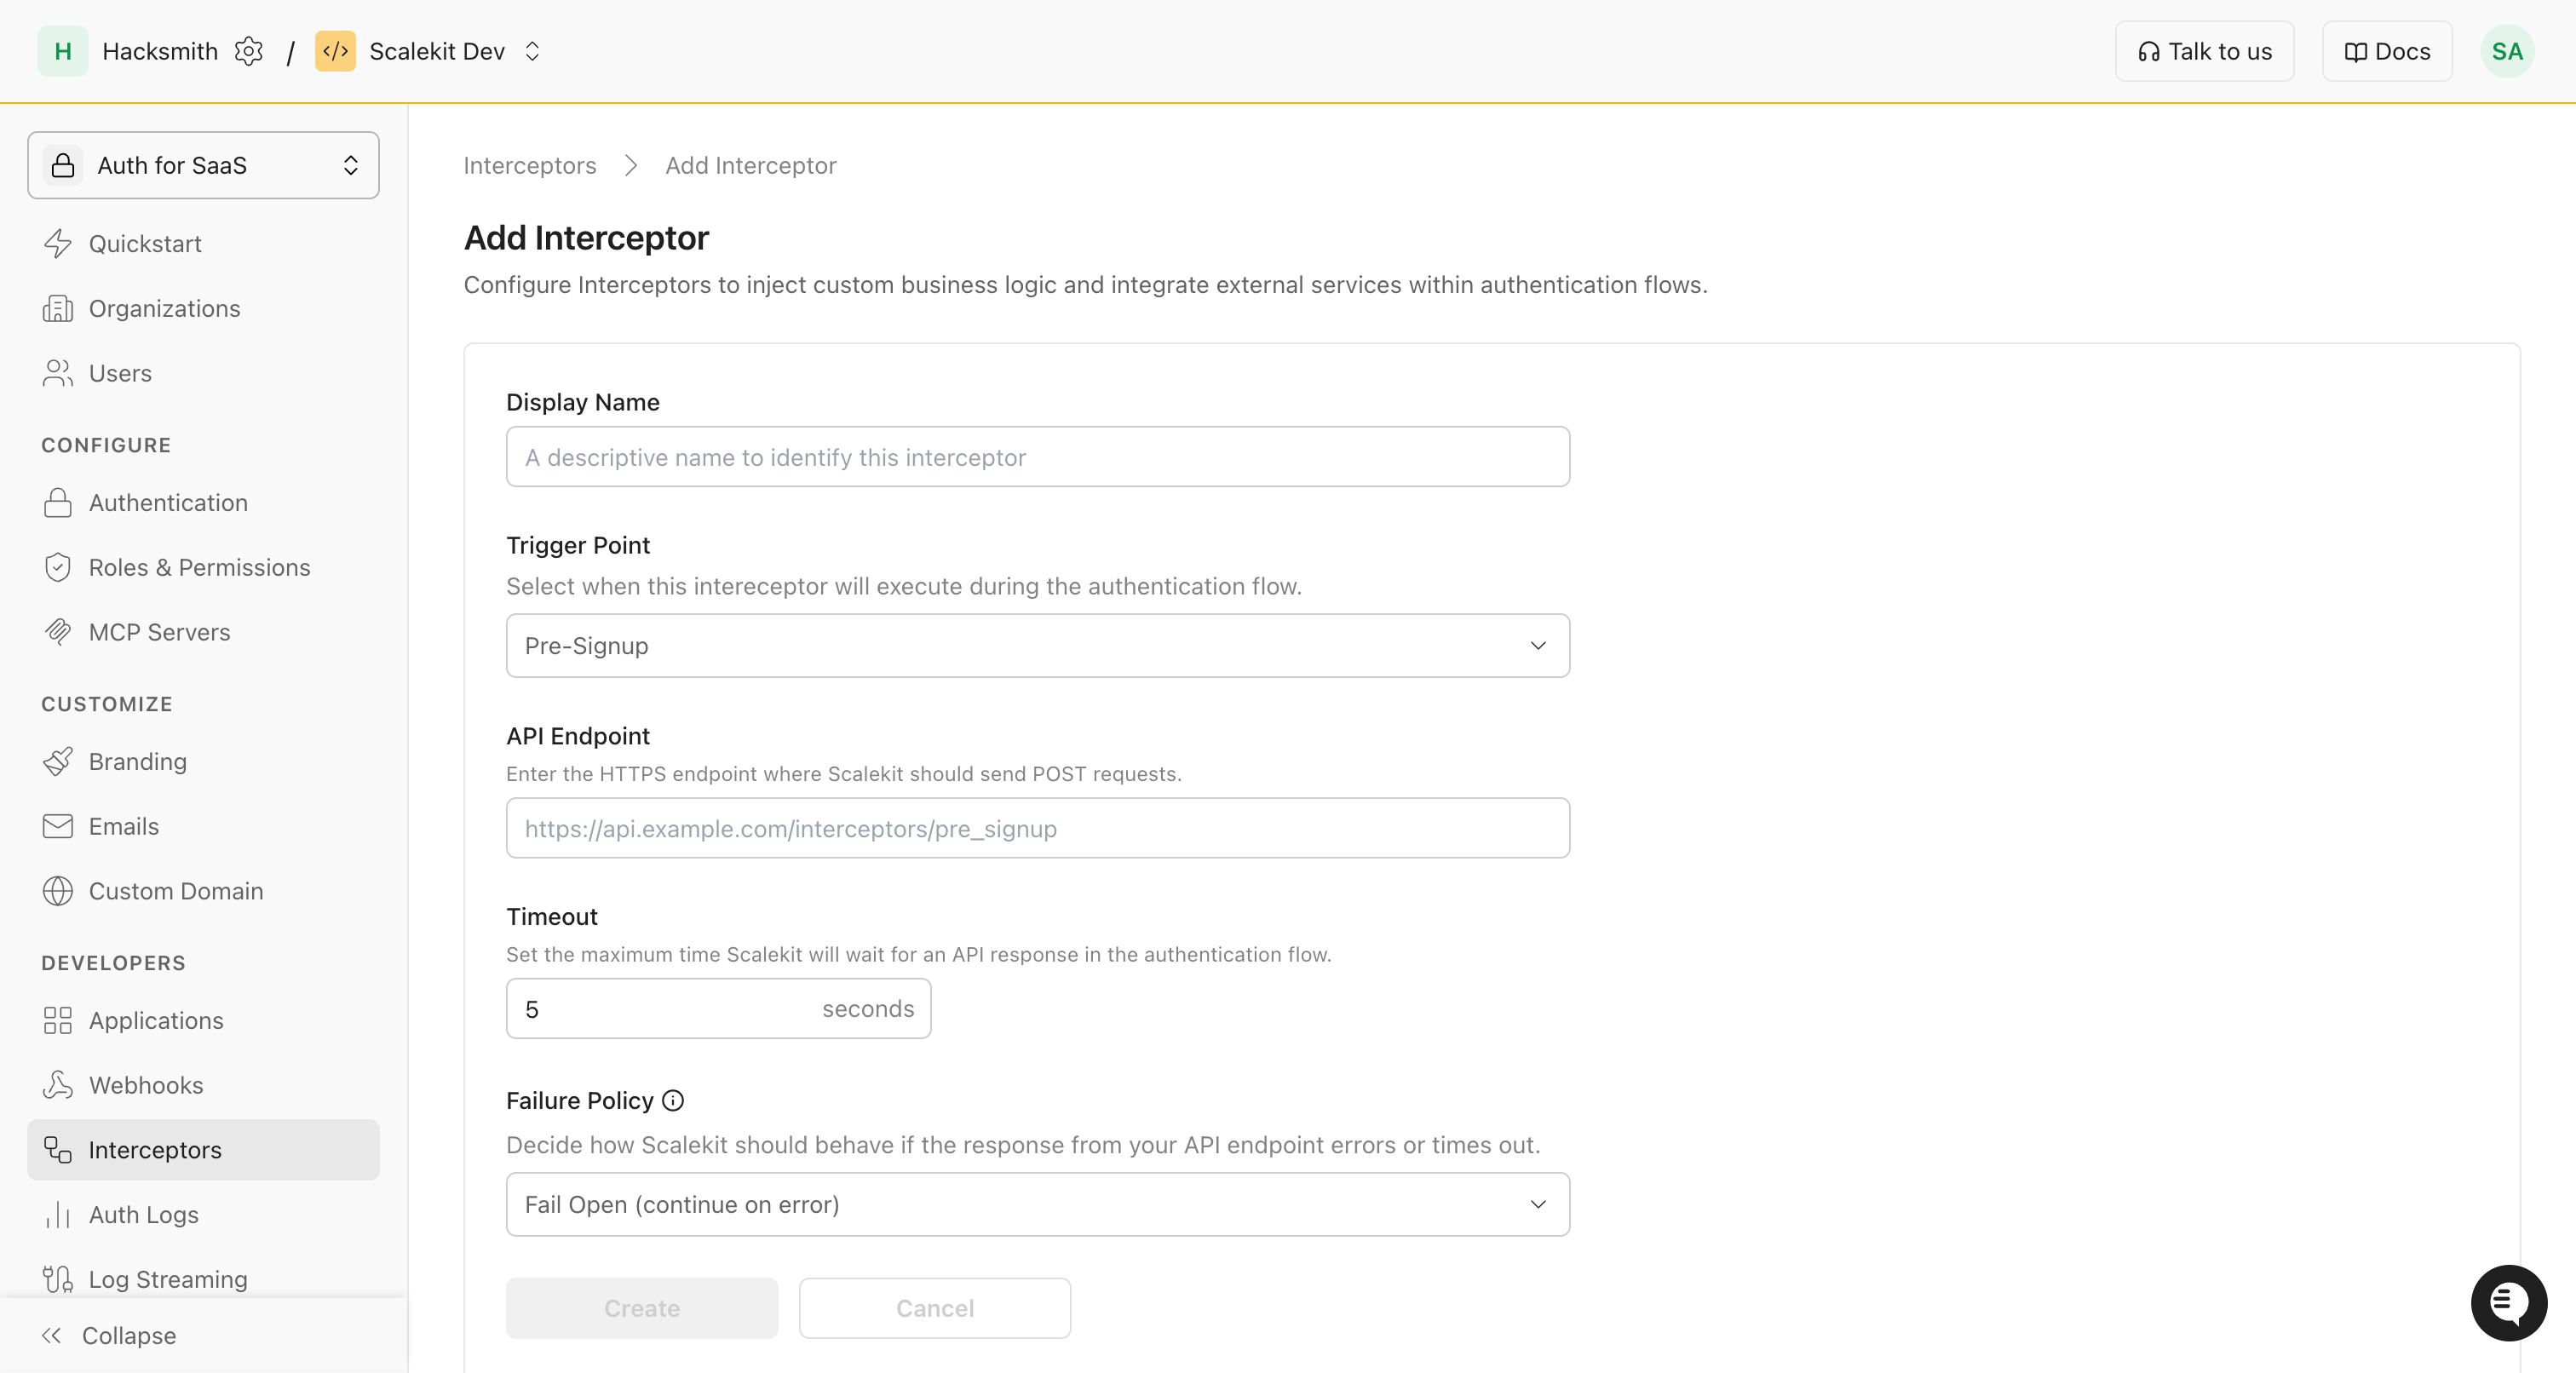
In the Scalekit dashboard, go to Interceptors and add an interceptor. Enter a name, pick the trigger point, and enter your endpoint’s HTTPS URL.
-
Set the timeout, from 1 to 30 seconds (5 by default), and the failure policy: Fail open continues the flow when your endpoint fails, Fail closed stops it.
-
Click Create, then turn on Enable.
-
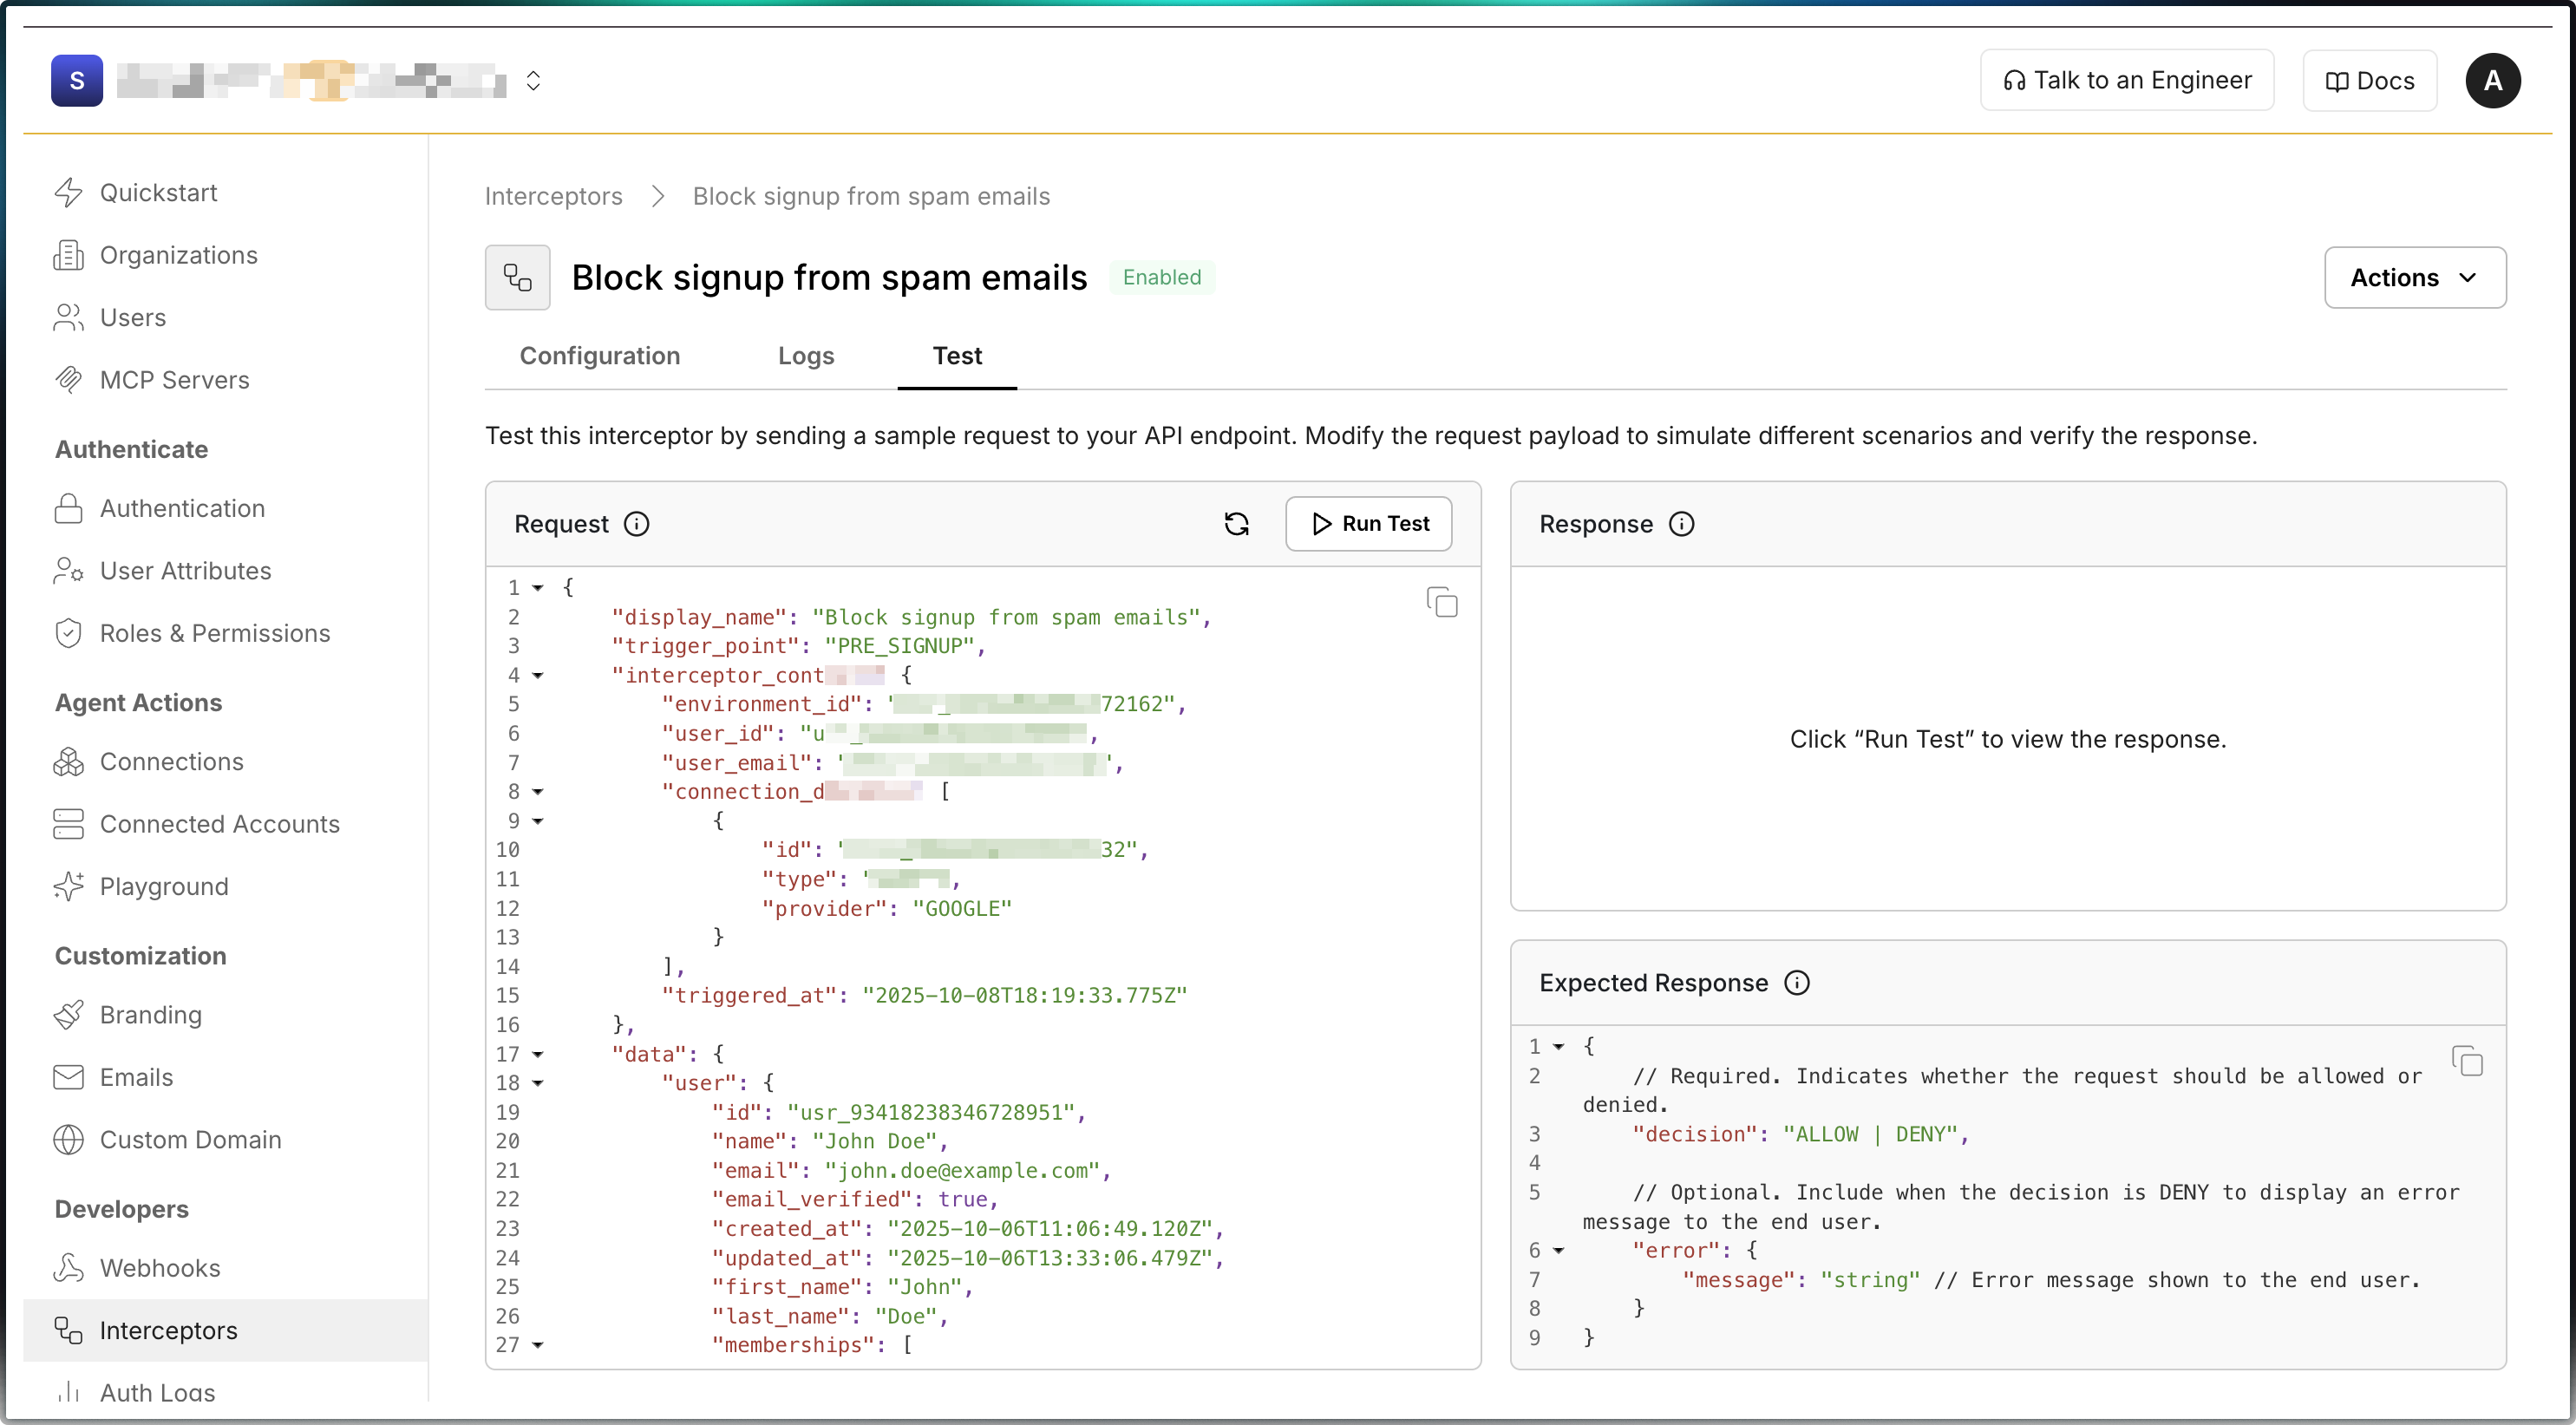
Open the Test tab and click Send request. Scalekit sends a sample request for the trigger point to your endpoint and shows your response next to it.
-
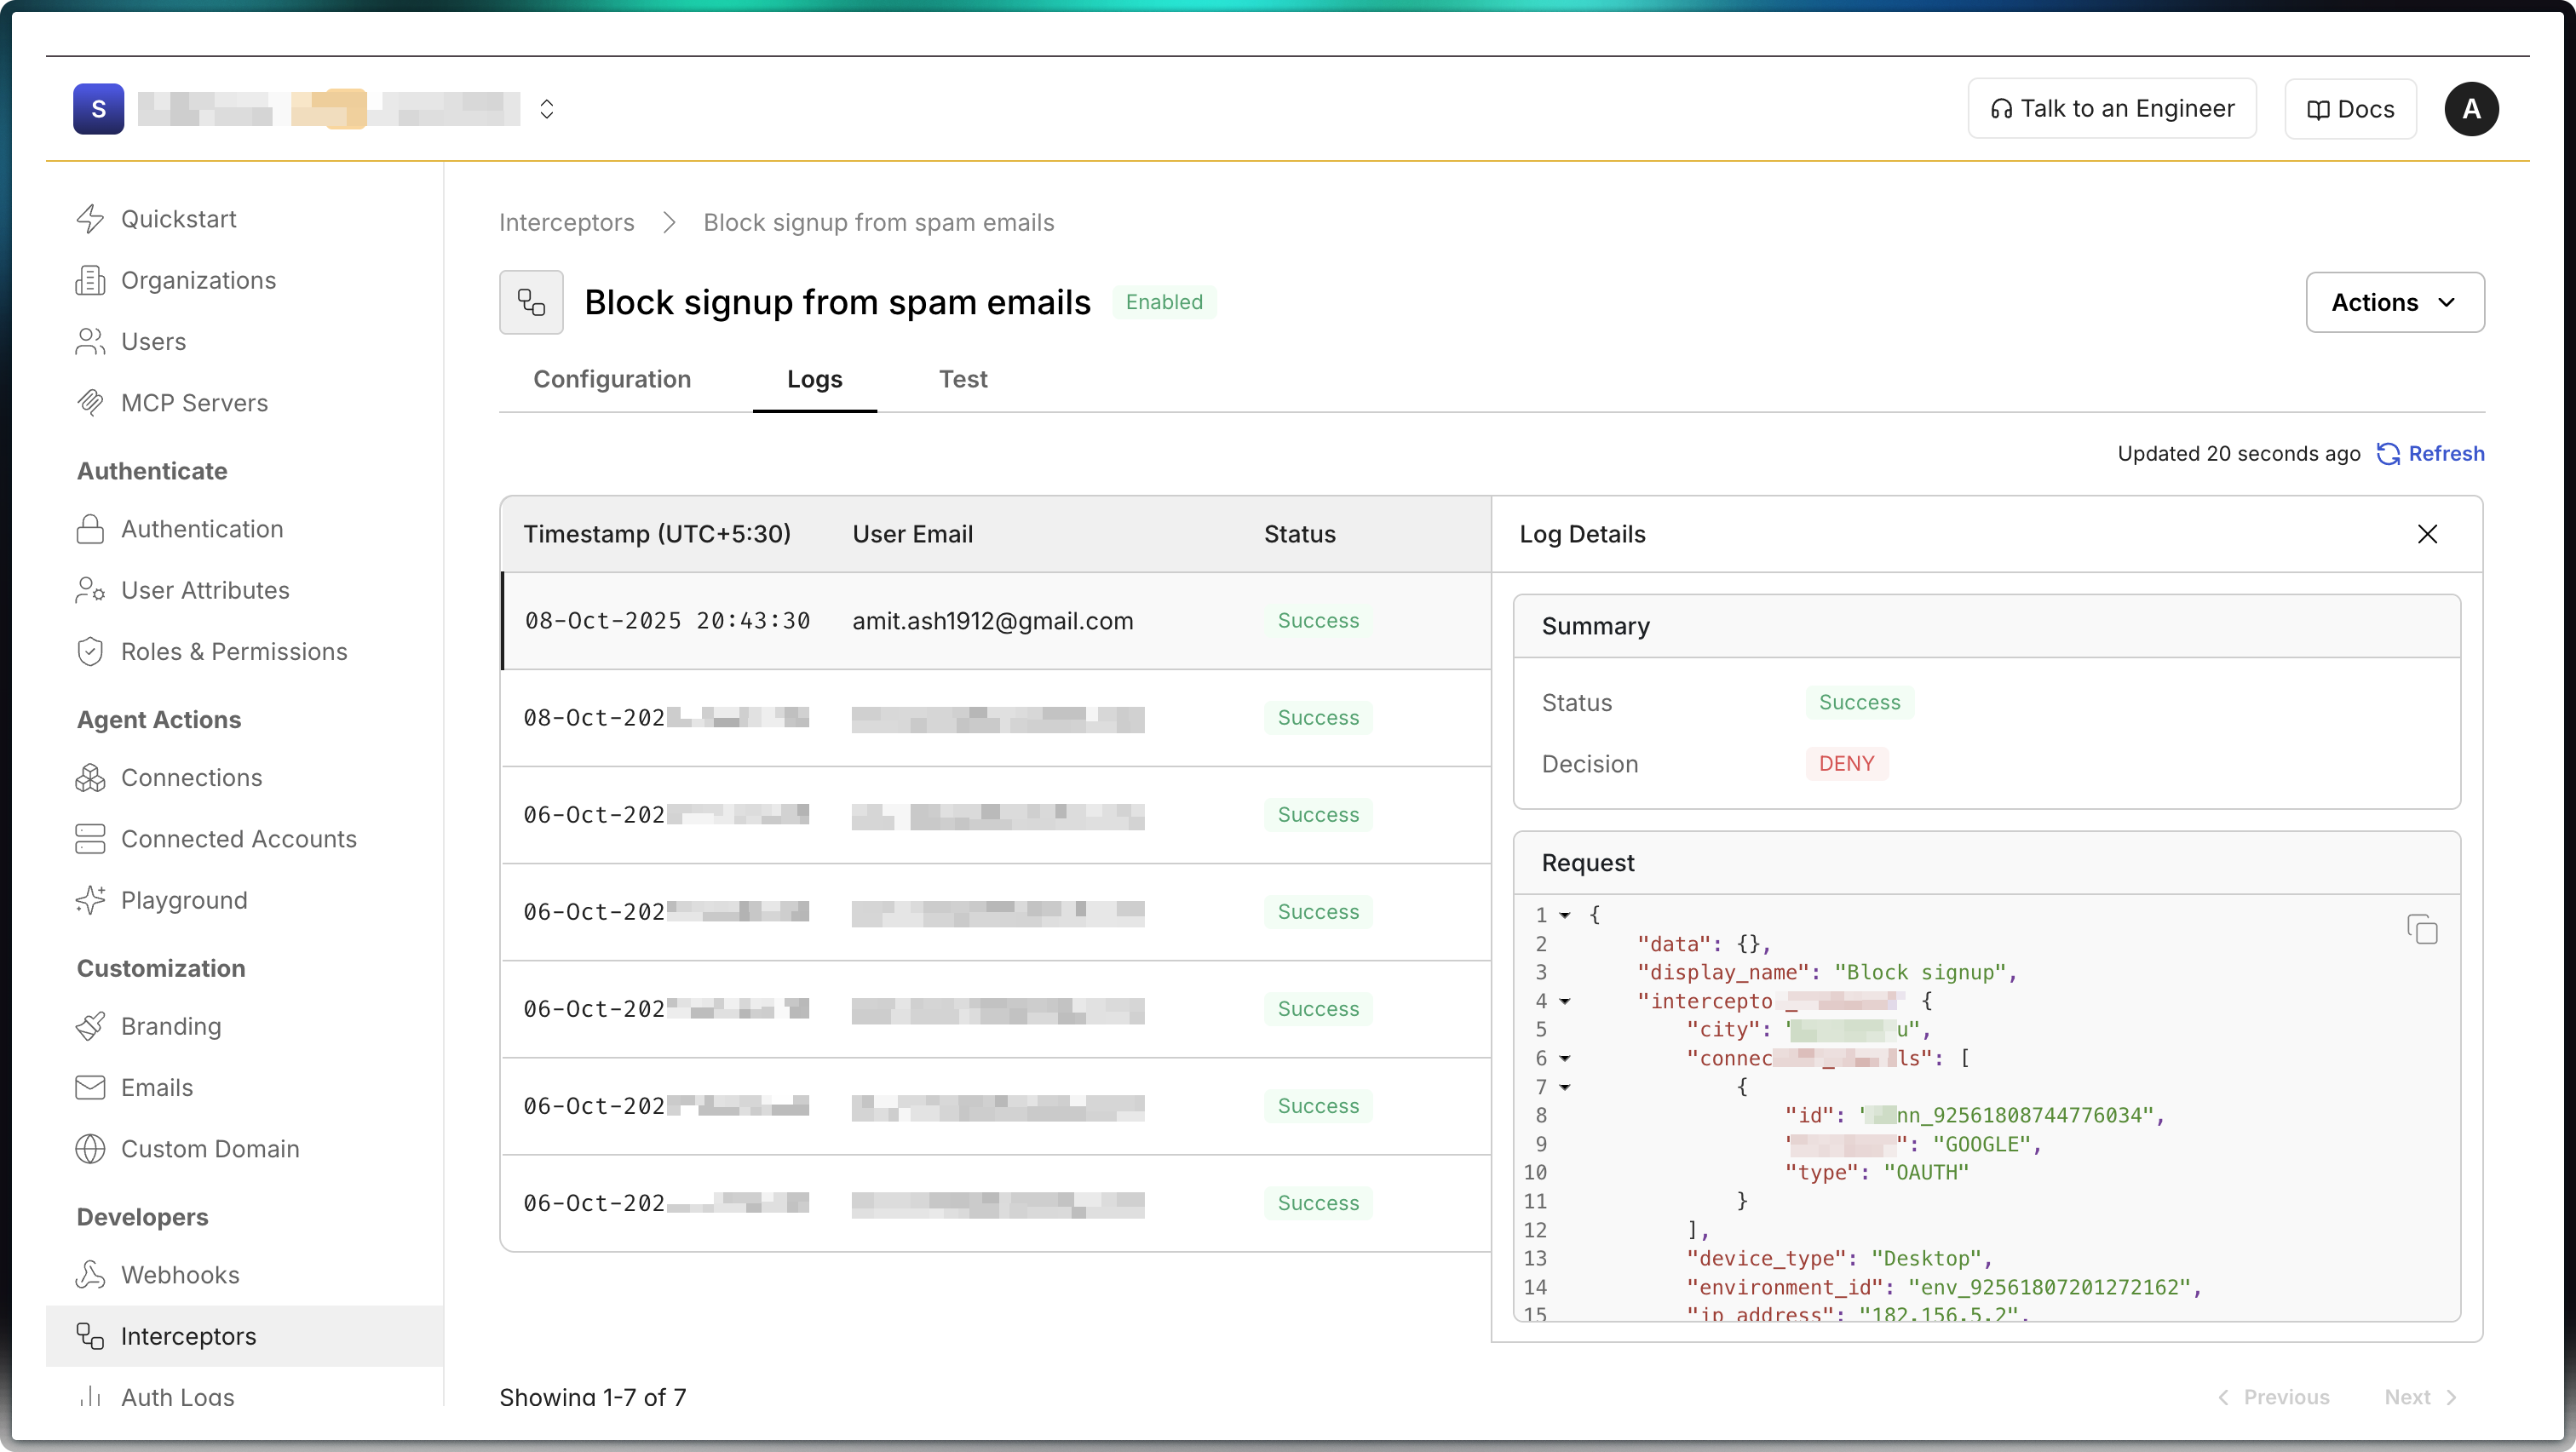
Open the logs to see each request Scalekit sent and the response or error it got back. Requests from the Test tab appear there too.
When your endpoint fails
Section titled “When your endpoint fails”Your endpoint fails when it returns a status other than 2xx, or does not reply within the timeout. The failure policy decides what happens next:
| Policy | What Scalekit does |
|---|---|
| Fail open | Continues as if you had returned ALLOW with no response. The Test tab still shows the failure. |
| Fail closed | Stops the flow and shows the generic message. |
The generic message is “The request could not be completed due to a policy restriction. Please contact support for assistance.” When the environment has a support email, the message names it: “Please contact support@yourapp.com for assistance.” Scalekit also shows it when you deny without an error.message.
Trigger points
Section titled “Trigger points”Each trigger point below covers when it runs, what Scalekit sends, what your endpoint can return, and an example.
Post-user authentication
Section titled “Post-user authentication”Post-user authentication runs once per login, after the user proves their identity and before Scalekit provisions them or shows the organization switcher. It runs for new users too: the request then has no user_id and no data.user.
Use it to block a login, or to choose the organization the user logs in to. The fields that drive that choice:
| Field | What it holds |
|---|---|
interceptor_context.auth_request | Parameters from the authorization URL: client_id, plus organization_id, connection_id, domain and login_hint when your app or the login page set them |
data.user.memberships | Each organization the user belongs to, with its status and roles |
interceptor_context.connection_details | The method the user signed in with |
{ "display_name": "Route users to their workspace", "trigger_point": "POST_USER_AUTHENTICATION", "interceptor_context": { "environment_id": "env_92561807201272162", "user_id": "usr_93418238346728951", // Only when the user already exists "user_email": "john.doe@example.com", "auth_request": { "client_id": "skc_92561807201272100", "organization_id": "org_93418204671239865", // Only when your app passed it "connection_id": "conn_92561808744978132", "login_hint": "john.doe@example.com", "state": "xsrPHl7k7ARgdhC6" },9 collapsed lines
"connection_details": [ { "id": "conn_92561808744978132", "type": "PASSWORDLESS", "provider": "SCALEKIT" } ], "device_type": "Desktop", "ip_address": "203.0.113.24", "region": "US", "city": "San Francisco", "user_agent": "Mozilla/5.0 (Macintosh; Intel Mac OS X 10_15_7) AppleWebKit/537.36...", "triggered_at": "2026-10-13T09:48:02.875Z" }, "data": { "user": { // Only when the user already exists "id": "usr_93418238346728951", "email": "john.doe@example.com", "memberships": [ { "organization_id": "org_93418204671239864", "organization_name": "Northwind", "status": "ACTIVE", "roles": ["admin"] }, { "organization_id": "org_93418204671239865", "organization_name": "Globex", "status": "ACTIVE", "roles": ["member"] } ],6 collapsed lines
"name": "John Doe", "given_name": "John", "family_name": "Doe", "email_verified": true, "created_at": "2025-10-06T11:06:49.120Z", "updated_at": "2025-10-06T13:33:06.479Z" } }}Choose the organization
Section titled “Choose the organization”Return ALLOW with no response to continue as usual: a user with several organizations sees the organization switcher. To choose the organization yourself, send one of these two fields. Either one skips the switcher.
| Field | What Scalekit does |
|---|---|
select_organization | Logs the user in to an organization they already belong to, including one whose invitation is pending or has expired. |
create_organization_membership | Adds the user to the organization, then logs them in. Creates the user first if they are new, uses an active or pending membership if one exists, and re-activates an inactive, deleted or expired one. |
organization_id | Scalekit’s ID for the organization, such as org_93418204671239865. Send this or external_organization_id in either object. If you send both, Scalekit uses organization_id. |
external_organization_id | Your own ID for the organization, the external ID you set on it in Scalekit. Scalekit uses it only when organization_id is absent. |
create_organization_membership.roles | Optional role names for a new membership. An existing or re-activated membership keeps its roles, and names that match no role are ignored. |
Each response this trigger point accepts:
{ "decision": "ALLOW"}{ "decision": "ALLOW", "response": { "select_organization": { "organization_id": "org_93418204671239865", // Scalekit's organization ID "external_organization_id": "your_external_org_id" // Or your own ID for the organization; used only when organization_id is absent } }}{ "decision": "ALLOW", "response": { "create_organization_membership": { "organization_id": "org_93418204671239865", // Scalekit's organization ID "external_organization_id": "your_external_org_id", // Or your own ID for the organization; used only when organization_id is absent "roles": ["member"] // Optional: roles for a new membership; an existing one keeps its roles } }}{ "decision": "DENY", "error": { "message": "Your account is suspended. Contact your administrator." }}create_organization_membership skips the organization’s allowed email domains, so your endpoint alone decides who joins. If the chosen organization requires SSO, Scalekit sends the user to its identity provider before finishing the login.
A worked example
Section titled “A worked example”John belongs to Northwind and Globex. He opens globex.yourcrm.com, and your app starts the login with Globex’s organization ID in the authorization URL (organization_id=org_93418204671239865).
- John signs in with a magic link.
- Scalekit calls your endpoint.
auth_request.organization_idis Globex, anddata.user.membershipshas an active Globex membership. - Your endpoint returns
select_organizationwith Globex. - Scalekit skips the switcher, runs Pre-session creation, and returns John to the CRM logged in to Globex.
If John had no active Globex membership, the endpoint below returns plain ALLOW and John picks from the switcher.
app.post('/auth/interceptors/post-user-authentication', (req, res) => { const { interceptor_context, data } = req.body; const workspaceOrgId = interceptor_context.auth_request?.organization_id; const memberships = data.user?.memberships ?? [];
const isActiveMember = memberships.some( (m) => m.organization_id === workspaceOrgId && m.status === 'ACTIVE' ); if (!workspaceOrgId || !isActiveMember) { return res.json({ decision: 'ALLOW' }); // The user picks an organization }
return res.json({ decision: 'ALLOW', response: { select_organization: { organization_id: workspaceOrgId } } });});@app.post('/auth/interceptors/post-user-authentication')def post_user_authentication(): body = verified_body() if body is None: return DENY_UNVERIFIED
workspace_org_id = (body['interceptor_context'].get('auth_request') or {}).get('organization_id') memberships = (body['data'].get('user') or {}).get('memberships', [])
is_active_member = any( m['organization_id'] == workspace_org_id and m['status'] == 'ACTIVE' for m in memberships ) if not workspace_org_id or not is_active_member: return {'decision': 'ALLOW'} # The user picks an organization
return { 'decision': 'ALLOW', 'response': {'select_organization': {'organization_id': workspace_org_id}}, }Errors the user sees
Section titled “Errors the user sees”The login stops with an error in these cases:
| Cause | Error |
|---|---|
decision is DENY | user_auth_not_allowed, with your error.message or the generic message |
| Both organization fields in one response, or one with neither ID | user_auth_failed |
external_organization_id matches no organization in the environment | invalid_organization_id |
select_organization names an organization the user doesn’t belong to | membership_not_found |
select_organization names an inactive or deleted membership | access_denied |
create_organization_membership targets an organization at its user limit | access_denied |
Pre-signup
Section titled “Pre-signup”Pre-signup runs when a user signs up and would create a new organization. It does not run when the user joins an existing organization, for example through Post-user authentication or an invitation.
Use it to block sign-ups, or to add the user to an existing organization instead. A first-time user arrives with data empty ({}). A user who already belongs to another organization arrives with user_id and data.user, as in this request:
{ "display_name": "Add new users to their company's workspace", "trigger_point": "PRE_SIGNUP", "interceptor_context": { "environment_id": "env_92561807201272162", "user_id": "usr_93418238346728951", // Only when the user already exists "user_email": "jane.smith@initech.com",9 collapsed lines
"auth_request": { "client_id": "skc_92561807201272100", "connection_id": "conn_81665025441299343", "login_hint": "jane.smith@initech.com", "state": "xsrPHl7k7ARgdhC6" }, "connection_details": [ { "id": "conn_92561808744978132", "type": "OAUTH", "provider": "GOOGLE" } ], "device_type": "Desktop", "ip_address": "203.0.113.24", "region": "US", "city": "San Francisco", "user_agent": "Mozilla/5.0 (Macintosh; Intel Mac OS X 10_15_7) AppleWebKit/537.36...", "triggered_at": "2026-10-13T09:48:02.875Z" }, "data": { "user": { // Only when the user already exists "id": "usr_93418238346728951", "email": "jane.smith@initech.com", "memberships": [ { "organization_id": "org_93418204671239864", "organization_name": "Northwind", "status": "ACTIVE", "roles": ["member"] } ],6 collapsed lines
"name": "Jane Smith", "given_name": "Jane", "family_name": "Smith", "email_verified": true, "created_at": "2025-10-06T11:06:49.120Z", "updated_at": "2025-10-06T13:33:06.479Z" } }}Return ALLOW with no response to let the user create a new organization. To block the sign-up, return DENY. The user sees signup_not_allowed with your error.message. To add the user to an existing organization, return create_organization_membership with organization_id or external_organization_id (organization_id wins if you send both) and optional roles.
Each response this trigger point accepts:
{ "decision": "ALLOW"}{ "decision": "ALLOW", "response": { "create_organization_membership": { "organization_id": "org_93731871904672153", // Scalekit's organization ID "external_organization_id": "your_external_org_id", // Or your own ID for the organization; used only when organization_id is absent "roles": ["member"] // Optional: roles for the new membership } }}{ "decision": "DENY", "error": { "message": "Sign up with your work email address." }}A worked example
Section titled “A worked example”Jane joins Initech’s sales team and signs up with her @initech.com address. Initech already has a workspace, so your endpoint maps the email domain to Initech’s external ID and adds her there. An address from any other domain gets plain ALLOW, and the user creates a new workspace as usual.
// Email domain → your external ID for the organizationconst domainToOrg = { 'northwind.com': 'northwind', 'globex.com': 'globex', 'initech.com': 'initech'};
app.post('/auth/interceptors/pre-signup', (req, res) => { const email = req.body.interceptor_context.user_email; const externalOrgId = domainToOrg[email.split('@')[1]?.toLowerCase()];
if (!externalOrgId) { return res.json({ decision: 'ALLOW' }); // Creates a new organization } return res.json({ decision: 'ALLOW', response: { create_organization_membership: { external_organization_id: externalOrgId, roles: ['member'] } } });});# Email domain → your external ID for the organizationDOMAIN_TO_ORG = { 'northwind.com': 'northwind', 'globex.com': 'globex', 'initech.com': 'initech',}
@app.post('/auth/interceptors/pre-signup')def pre_signup(): body = verified_body() if body is None: return DENY_UNVERIFIED
email = body['interceptor_context']['user_email'] external_org_id = DOMAIN_TO_ORG.get(email.split('@')[-1].lower())
if not external_org_id: return {'decision': 'ALLOW'} # Creates a new organization return { 'decision': 'ALLOW', 'response': { 'create_organization_membership': { 'external_organization_id': external_org_id, 'roles': ['member'], } }, }The request also carries ip_address and region, so the same endpoint can deny sign-ups from addresses or countries you block.
Pre-session creation
Section titled “Pre-session creation”Pre-session creation runs at the end of every login, before Scalekit issues the session tokens, however the user signed in. That includes an invitee’s first login from the invitation email and a switch to another organization. By now Scalekit knows the organization, so the request carries organization_id, and data.user.current_membership when Scalekit finds the user’s membership in it. Check that the field is present before you read its roles.
Use it to deny a login, or to add claims to the access token. Scalekit puts the claims you return under custom_claims, saves them on the session, and keeps them on every refreshed access token. A change in your systems therefore shows up at the user’s next login. To compute claims each time a token is issued, refresh included, use session token claims instead.
{ "display_name": "Add plan claims", "trigger_point": "PRE_SESSION_CREATION", "interceptor_context": { "environment_id": "env_92561807204567213", "user_id": "usr_93418238346728951", "user_email": "john.doe@example.com", "organization_id": "org_93418204671239865", // The organization the user is logging in to12 collapsed lines
"auth_request": { "client_id": "skc_92561807201272100", "connection_id": "conn_92561808744978132", "organization_id": "org_93418204671239865", "state": "xsrPHl7k7ARgdhC6" }, "connection_details": [ { "id": "conn_92561808744978132", "type": "OAUTH", "provider": "GOOGLE" } ], "device_type": "Desktop", "ip_address": "203.0.113.24", "user_agent": "Mozilla/5.0 (Macintosh; Intel Mac OS X 10_15_7) AppleWebKit/537.36...", "triggered_at": "2026-10-13T15:22:42.381Z" }, "data": { "user": { "id": "usr_93418238346728951", "current_membership": { // When Scalekit finds the membership for organization_id "organization_id": "org_93418204671239865", "organization_name": "Globex", "status": "ACTIVE", "roles": ["member"] }, "memberships": [ { "organization_id": "org_93418204671239864", "organization_name": "Northwind", "status": "ACTIVE", "roles": ["admin"] }, { "organization_id": "org_93418204671239865", "organization_name": "Globex", "status": "ACTIVE", "roles": ["member"] } ],7 collapsed lines
"email": "john.doe@example.com", "name": "John Doe", "given_name": "John", "family_name": "Doe", "email_verified": true, "created_at": "2025-10-06T11:06:49.120Z", "updated_at": "2025-10-06T13:33:06.479Z" } }}Return ALLOW with no response to issue the tokens unchanged. To deny the login, return DENY. The user sees user_auth_not_allowed with your error.message. To add claims, return them in response.claims.
Each response this trigger point accepts:
{ "decision": "ALLOW"}{ "decision": "ALLOW", "response": { "claims": { "plan": "pro", "features": ["forecasting", "api_access"] } }}{ "decision": "DENY", "error": { "message": "Your trial has ended. Contact sales to continue." }}An endpoint that adds the user’s plan from your own records:
app.post('/auth/interceptors/pre-session-creation', async (req, res) => {  const { user_id, organization_id } = req.body.interceptor_context;
  // Look up what your app knows about this user in this organization  const account = await getAccount(user_id, organization_id);
return res.json({ decision: 'ALLOW', response: { claims: { plan: account.plan, features: account.features } } });});@app.post('/auth/interceptors/pre-session-creation')def pre_session_creation(): body = verified_body() if body is None: return DENY_UNVERIFIED
context = body['interceptor_context'] # Look up what your app knows about this user in this organization account = get_account(context['user_id'], context['organization_id'])
return { 'decision': 'ALLOW', 'response': {'claims': {'plan': account['plan'], 'features': account['features']}}, }The access token then carries them:
{ "sub": "usr_93418238346728951", "oid": "org_93418204671239865", "custom_claims": { "plan": "pro", "features": ["forecasting", "api_access"] }, "roles": ["member"], "sid": "ses_107201917586768386", "iss": "https://yourapp.scalekit.dev", "exp": 1767964824}Keep claims small, since the token travels with each request to your API. Custom claims never appear in the scope claim; for scopes your resource server checks, use custom scopes and permissions.
Pre-user invitation
Section titled “Pre-user invitation”Outside the login flow, Pre-user invitation runs before a user is added to an organization from the dashboard or the API (Add users to organizations), whether the user is new or already belongs to another organization. Use it to enforce who may be invited, such as allowed email domains or seat limits you track yourself.
{ "display_name": "Allow company addresses only", "trigger_point": "PRE_USER_INVITATION", "interceptor_context": { "environment_id": "env_92561807201272162", "user_id": "usr_93418238346728951", // Only when the invitee already exists "user_email": "sarah.johnson@contractor.com", // The invitee "organization_id": "org_93731871904672153", "ip_address": "203.0.113.24", // The person sending the invitation "device_type": "Desktop", "user_agent": "Mozilla/5.0 (Macintosh; Intel Mac OS X 10_15_7) AppleWebKit/537.36...", "triggered_at": "2026-10-13T12:50:41.803Z" }, "data": { "organization": { "id": "org_93731871904672153", "name": "Initech", "external_id": "initech" // Only when the organization has one } }}The response takes only decision and error.message. A DENY fails the invitation request with HTTP 400 and code USER_INVITE_NOT_ALLOWED, carrying your message. Under Fail closed, an endpoint failure returns HTTP 400 with USER_INVITE_VALIDATION_FAILED and the generic message.
Each response this trigger point accepts:
{ "decision": "ALLOW"}{ "decision": "DENY", "error": { "message": "Invite people with an @initech.com address." }}Pre-M2M token creation
Section titled “Pre-M2M token creation”Pre-M2M token creation runs before Scalekit issues a machine-to-machine access token to an M2M client. data.m2m_token_claims.claims holds the claims Scalekit puts in the token.
{ "display_name": "Add sync service claims", "trigger_point": "PRE_M2M_TOKEN_CREATION", "interceptor_context": { "environment_id": "env_17002334043308132", "client_id": "m2morg_93710427703245914", "user_agent": "crm-sync-service/2.1.0", "device_type": "Unknown", "triggered_at": "2026-10-13T21:22:20.173Z" }, "data": { "m2m_token_claims": { "client_id": "m2morg_93710427703245914", "claims": { "oid": "org_89669394174574792", "scope": "contacts:read deals:write", "scopes": ["contacts:read", "deals:write"], "custom_claims": { "service_name": "warehouse-sync" } // From the client's configuration } } }}DENY fails the token request. With ALLOW, Scalekit merges response.claims into the token’s custom_claims, and a key you return replaces the same key from the client’s configuration. You cannot change scope, aud or any other top-level claim this way: a scope you return lands at custom_claims.scope.
Each response this trigger point accepts:
{ "decision": "ALLOW"}{ "decision": "ALLOW", "response": { "claims": { "rate_limit": 1000 } }}{ "decision": "DENY", "error": { "message": "This client is disabled." }}