Co-exist with Firebase
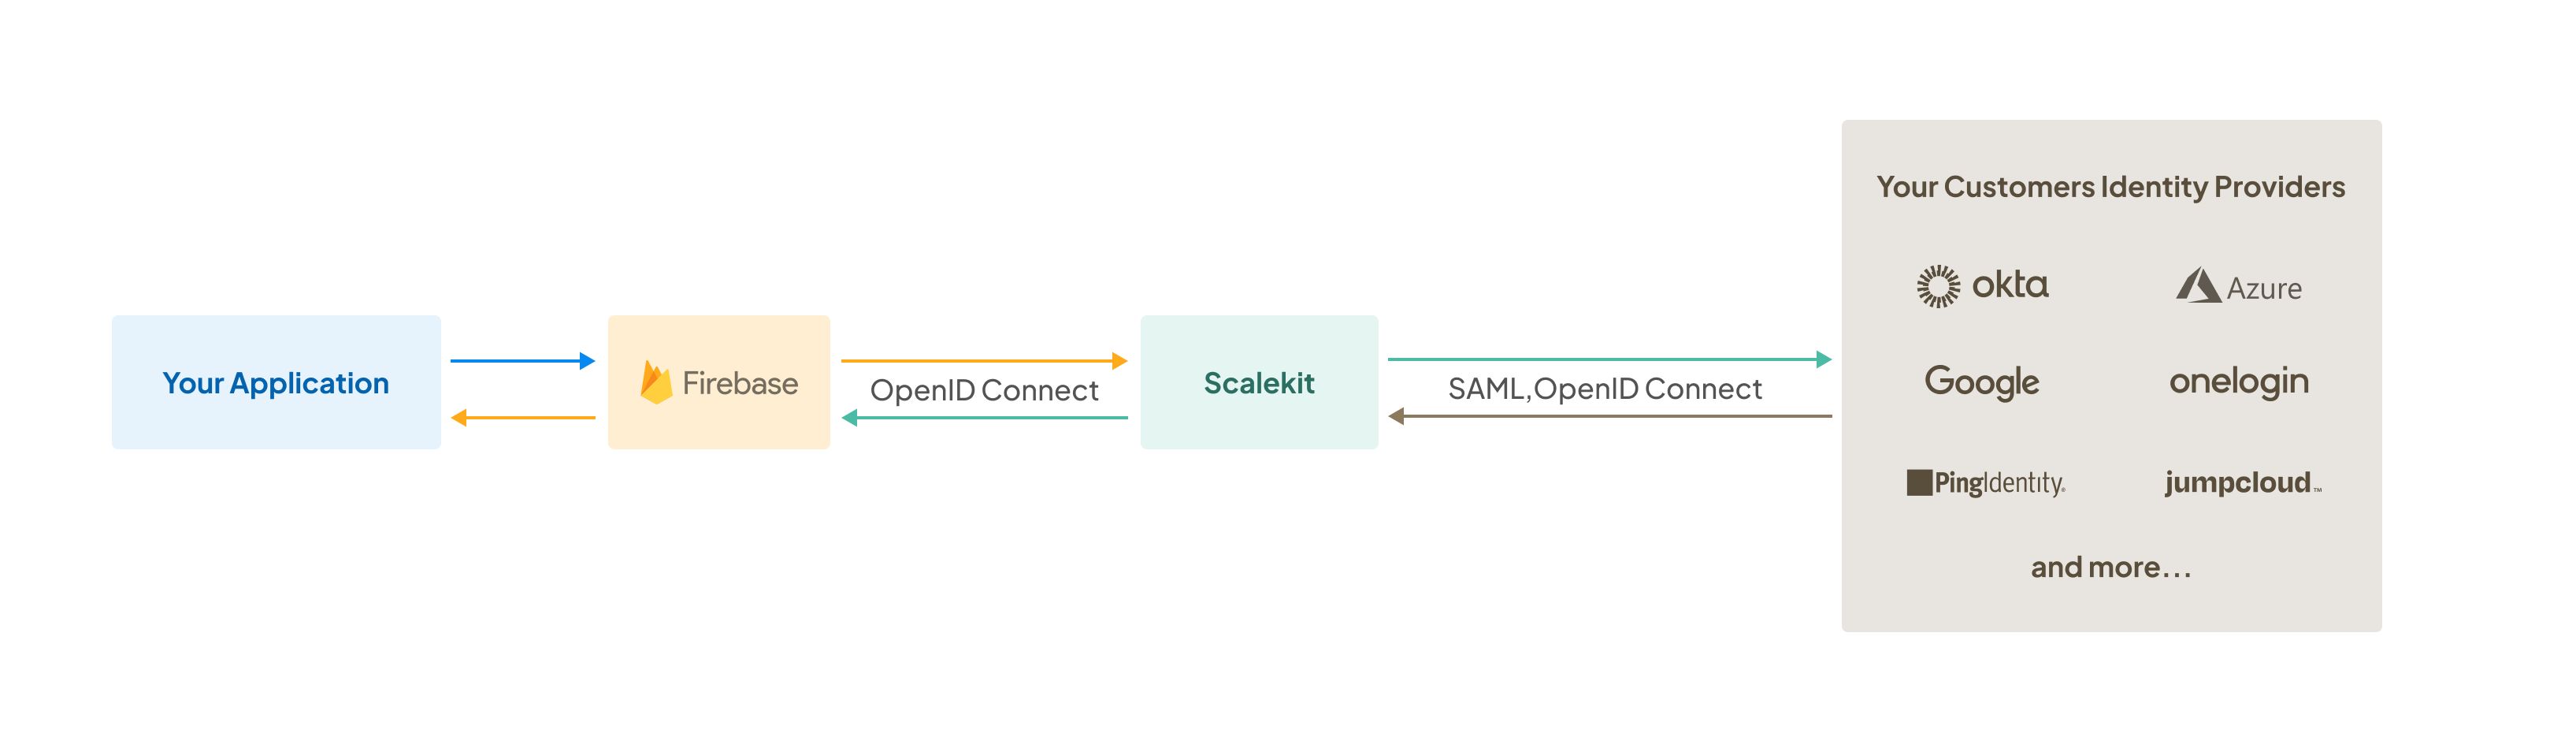
Learn how to integrate Scalekit with Firebase for enterprise SSO, using either Firebase's OIDC provider or direct SSO with custom tokens.
This guide explains how to integrate Scalekit with Firebase applications for enterprise Single Sign-On (SSO) authentication. You’ll learn two distinct approaches based on your Firebase Authentication setup.
Before you begin
Section titled “Before you begin”Review your Firebase Authentication setup to determine which integration approach suits your application:
- Option 1: Requires Firebase Authentication with Identity Platform (paid tier)
- Option 2: Works with Legacy Firebase Authentication (free tier)
You also need:
- Access to a Scalekit account
- Firebase project with Authentication enabled
- Basic understanding of Firebase Admin SDK (for Option 2)
Checkout our Firebase integration example for a complete implementation.
Option 1: Configure Scalekit as an OIDC Provider
Section titled “Option 1: Configure Scalekit as an OIDC Provider”Use this approach if you have Firebase Authentication with Identity Platform. Firebase acts as an OpenID Connect (OIDC) relying party that integrates directly with Scalekit.
Firebase handles the OAuth 2.0 flow automatically using its built-in OIDC provider support.
-
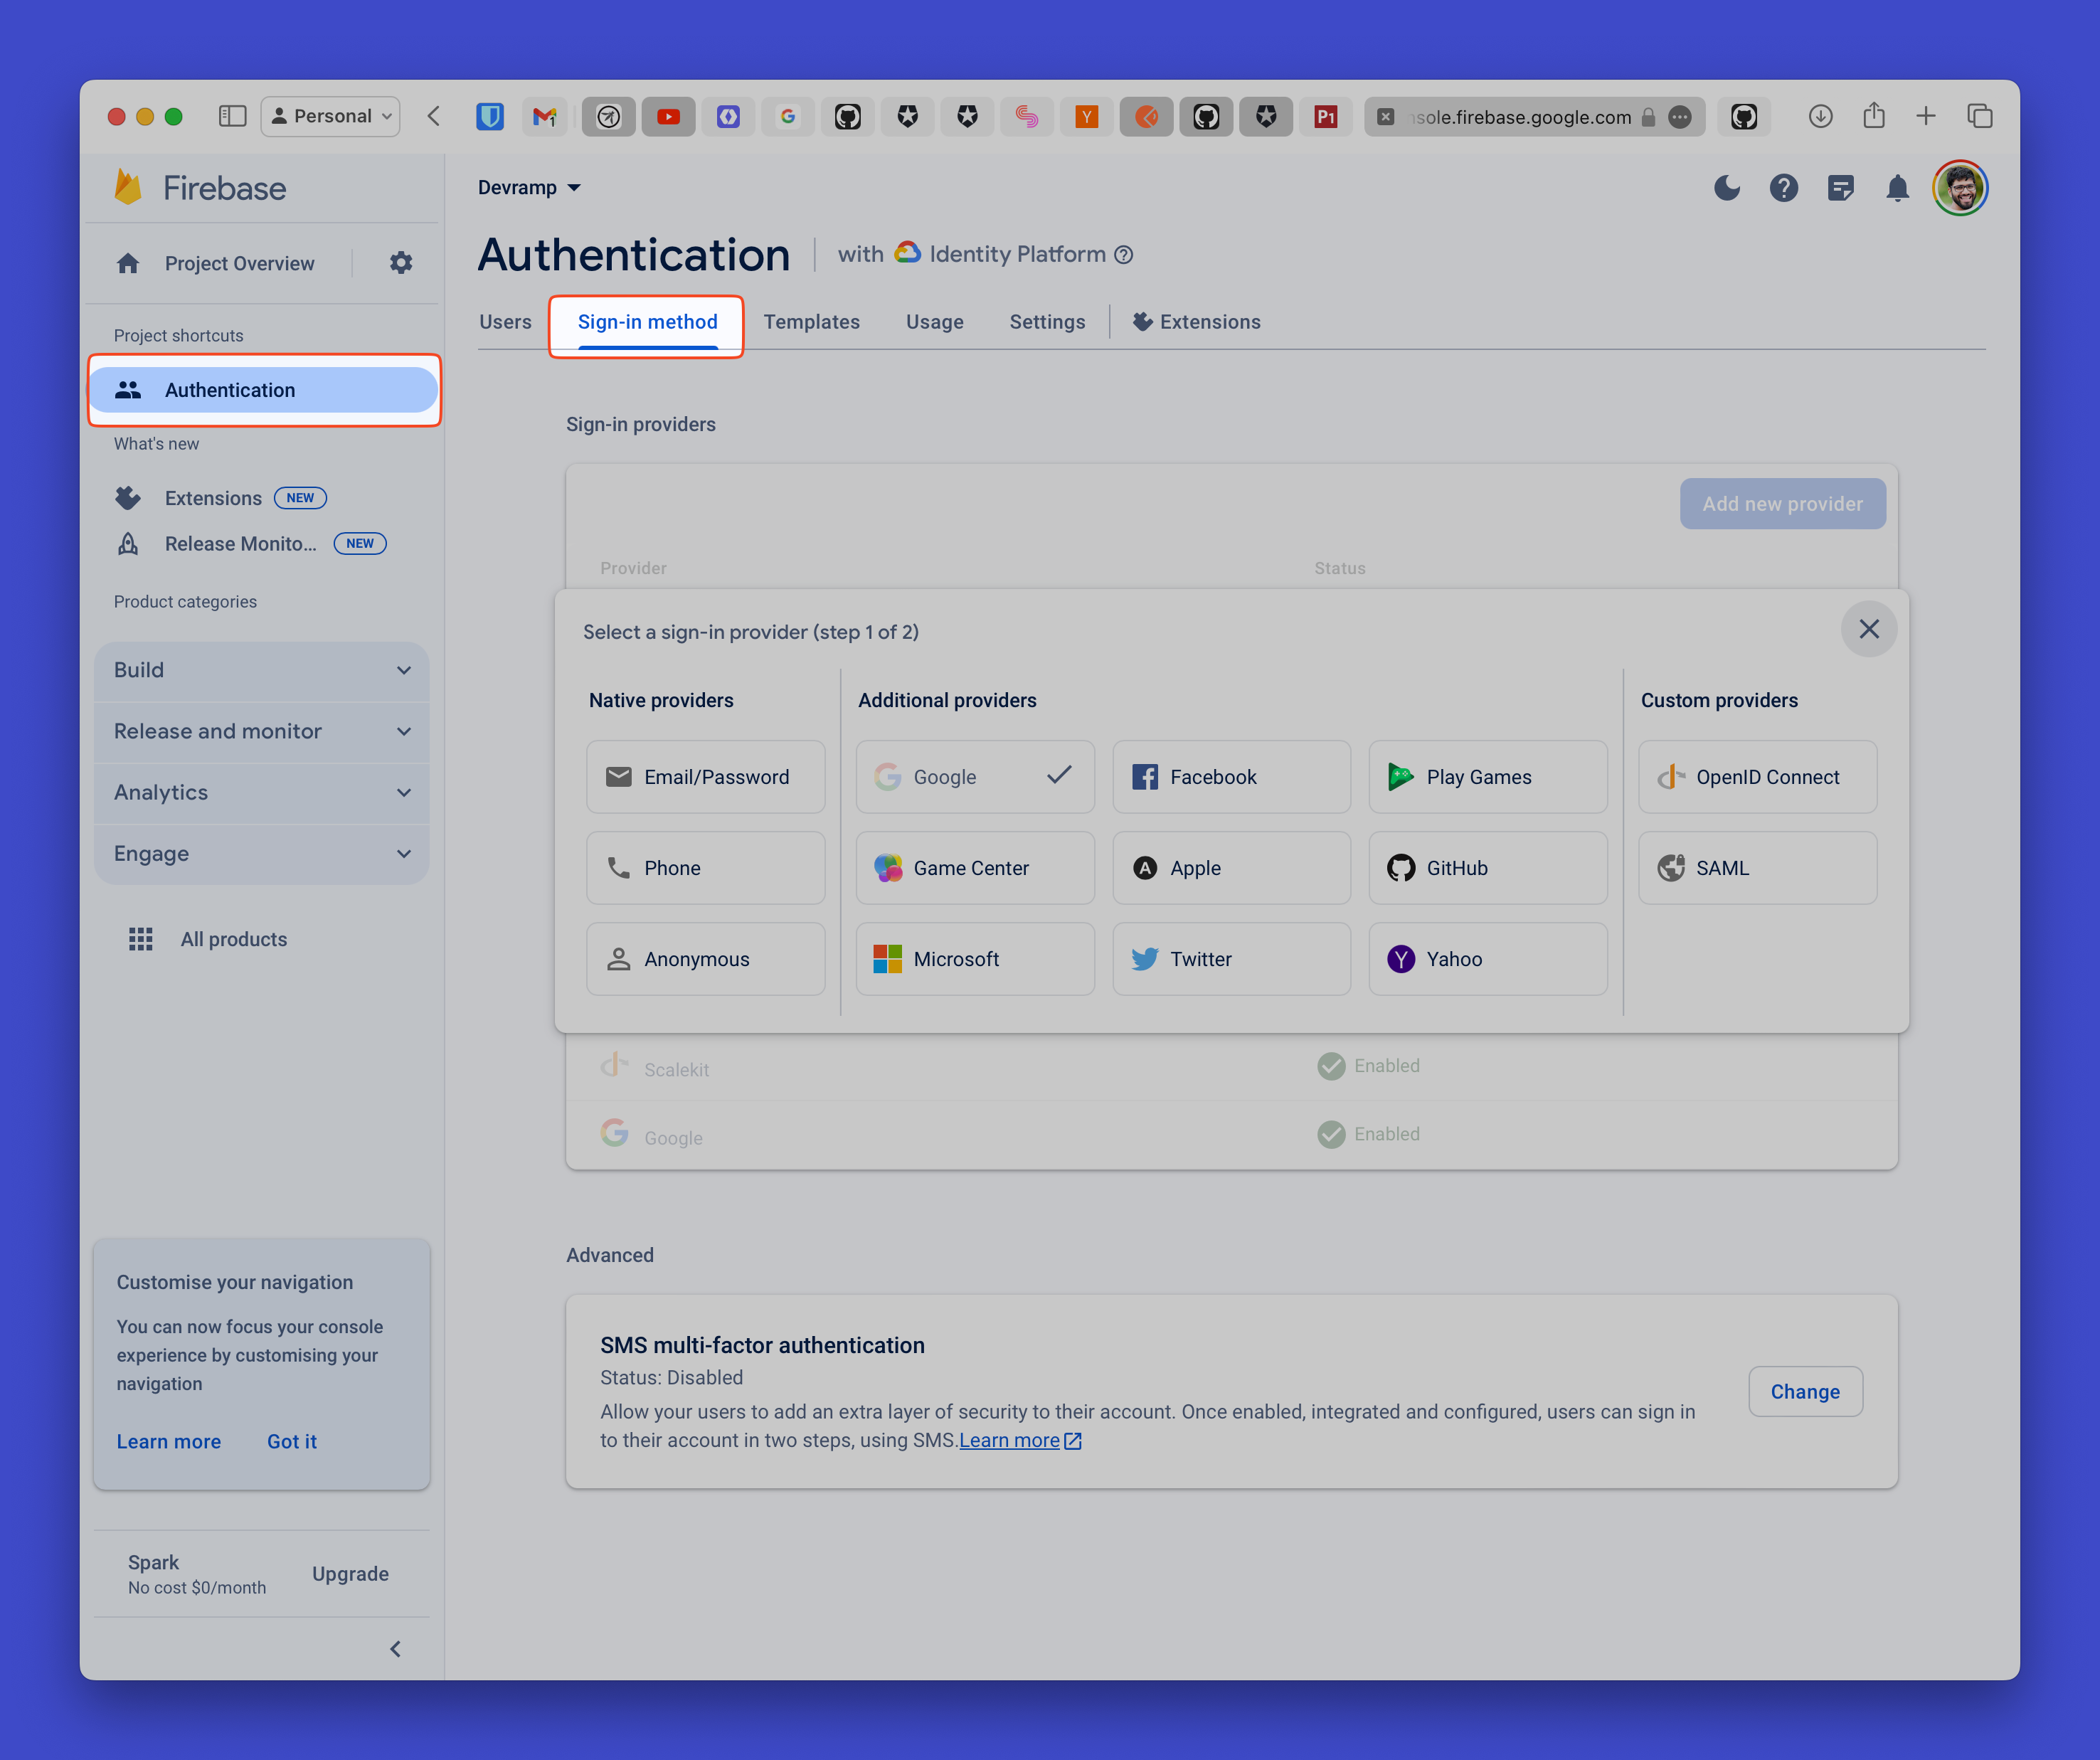
Configure Firebase to accept Scalekit as an identity provider
Section titled “Configure Firebase to accept Scalekit as an identity provider”Log in to the Firebase Console and navigate to your project.
- Go to Authentication > Sign-in method
- Click Add new provider and select OpenID Connect
- Set the Name to “Scalekit”
- Choose Code flow for the Grant Type
-
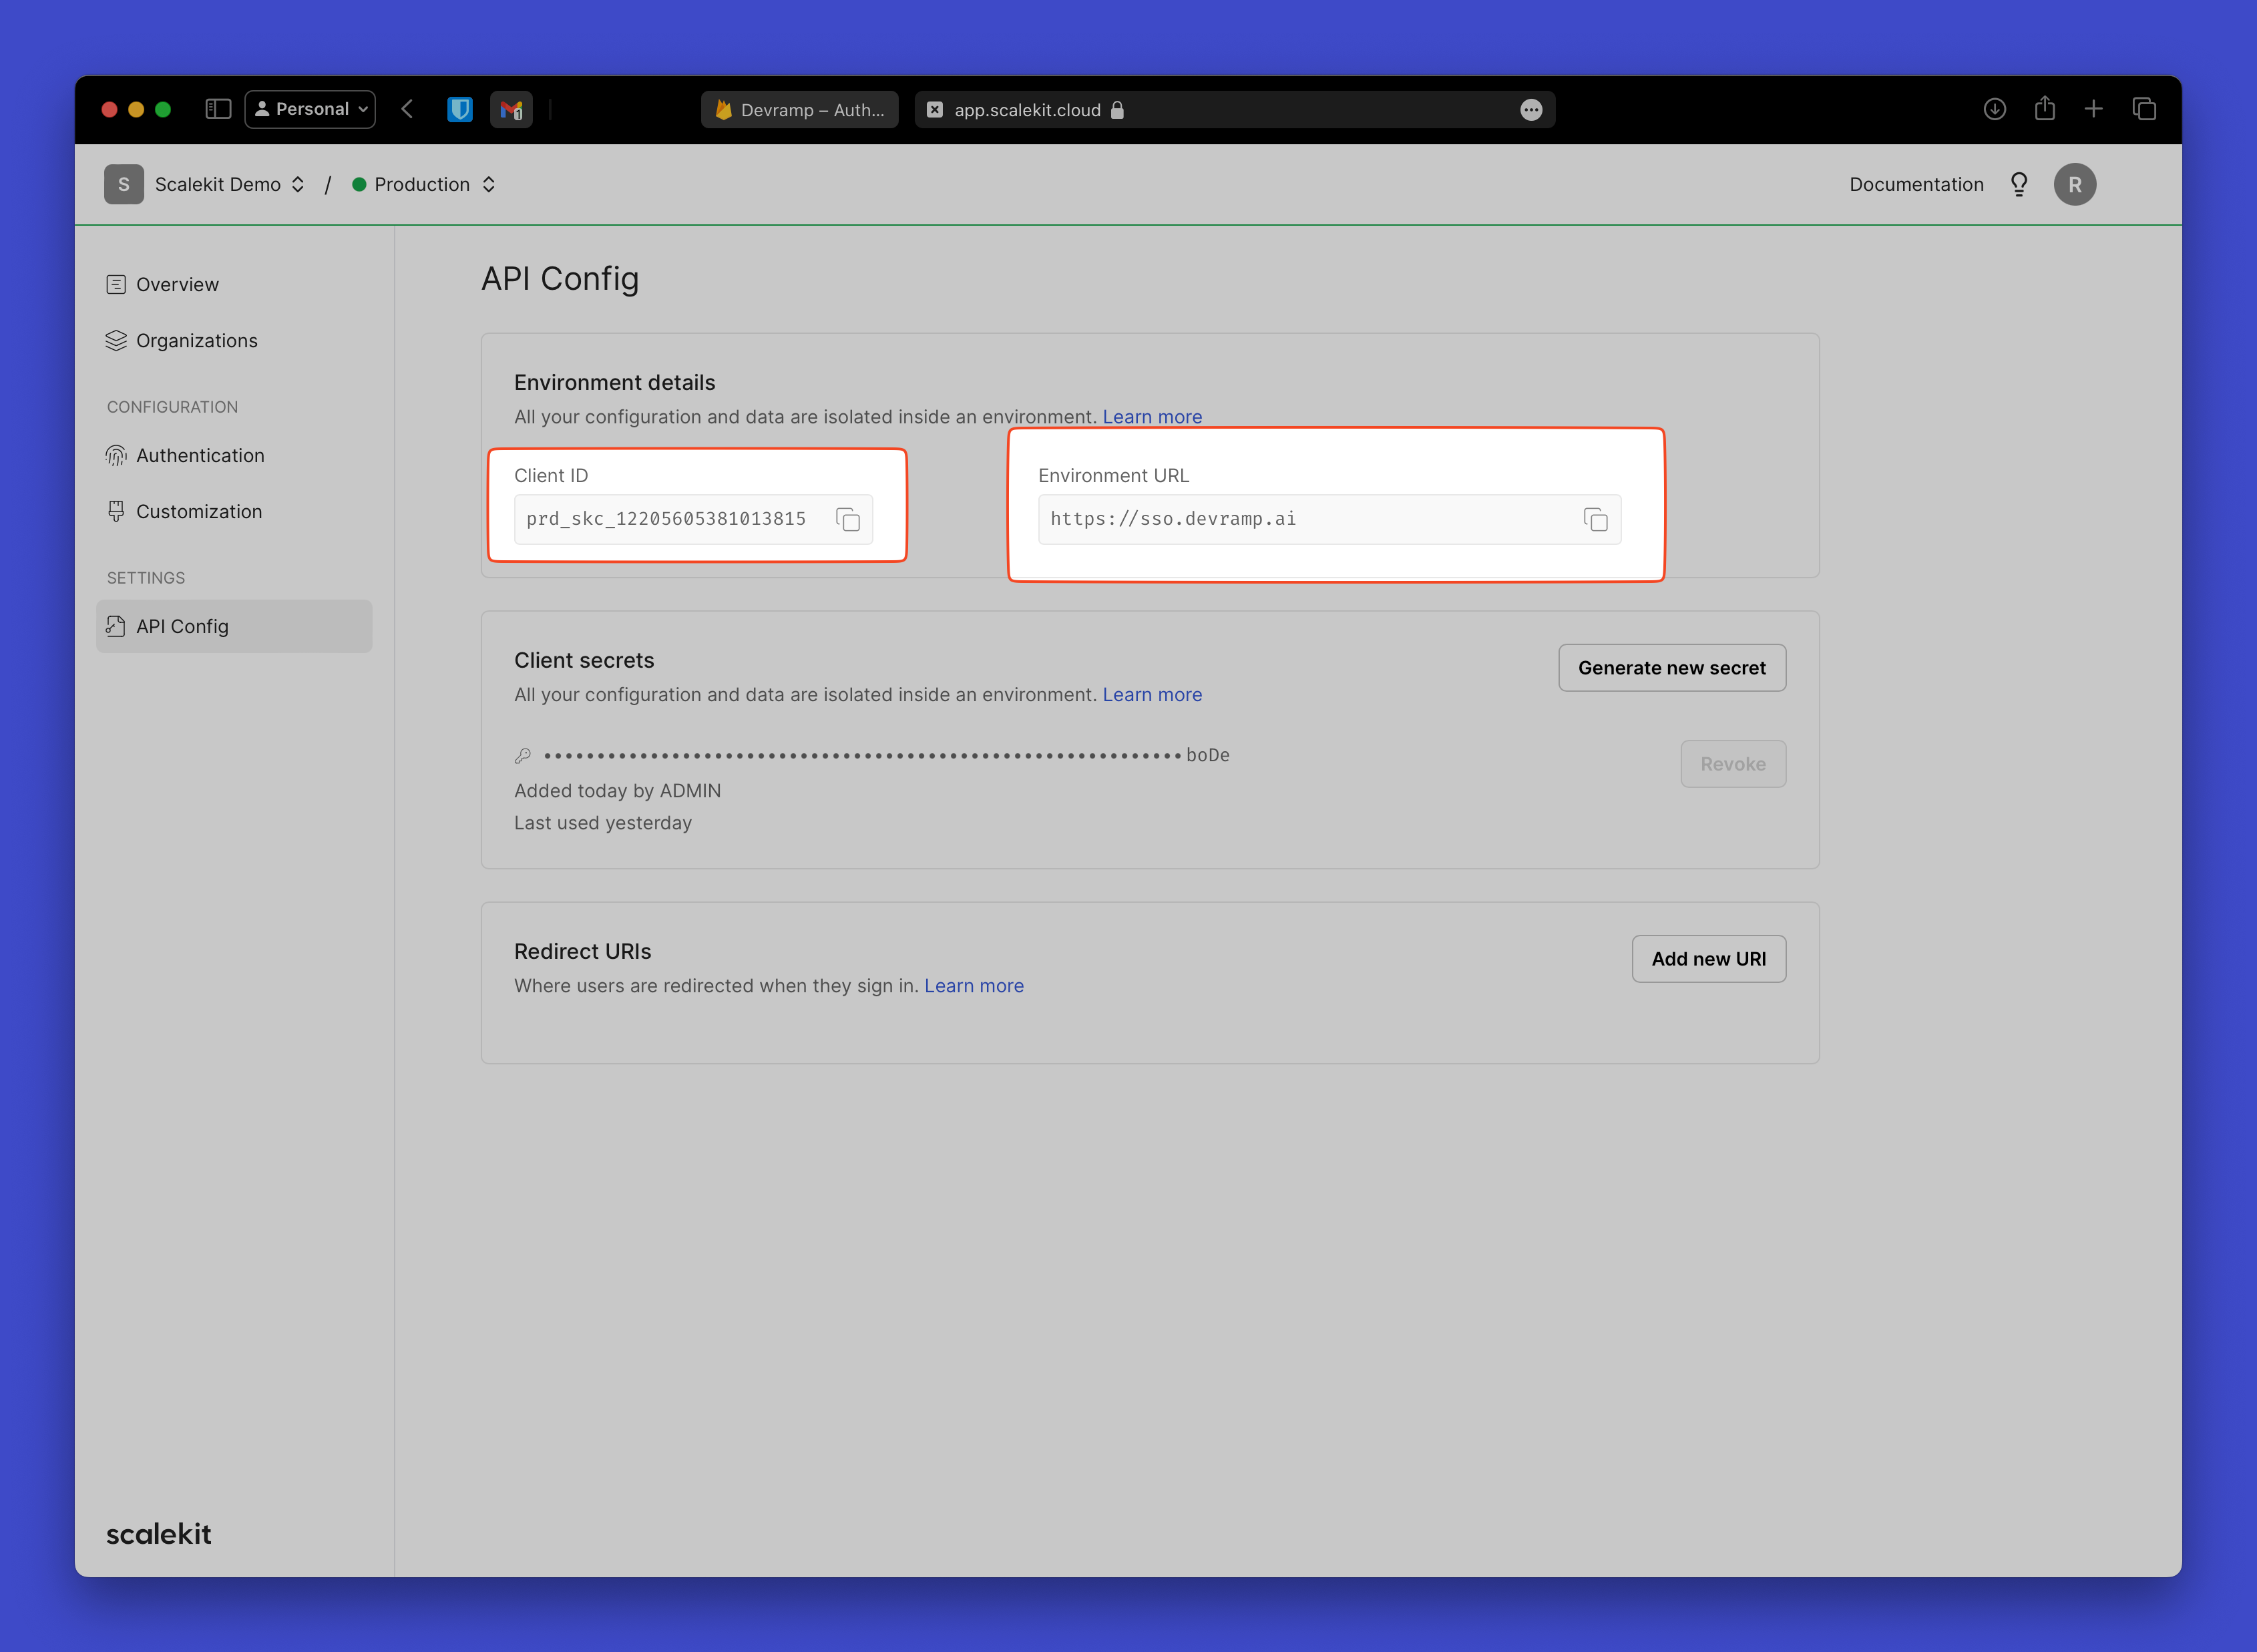
Copy your Scalekit API credentials
Section titled “Copy your Scalekit API credentials”In your Scalekit Dashboard, navigate to Settings > API Config and copy these values:
- Client ID: Your Scalekit application identifier
- Environment URL: Your Scalekit environment (e.g.,
https://your-subdomain.scalekit.dev) - Client Secret: Generate a new secret if needed
-
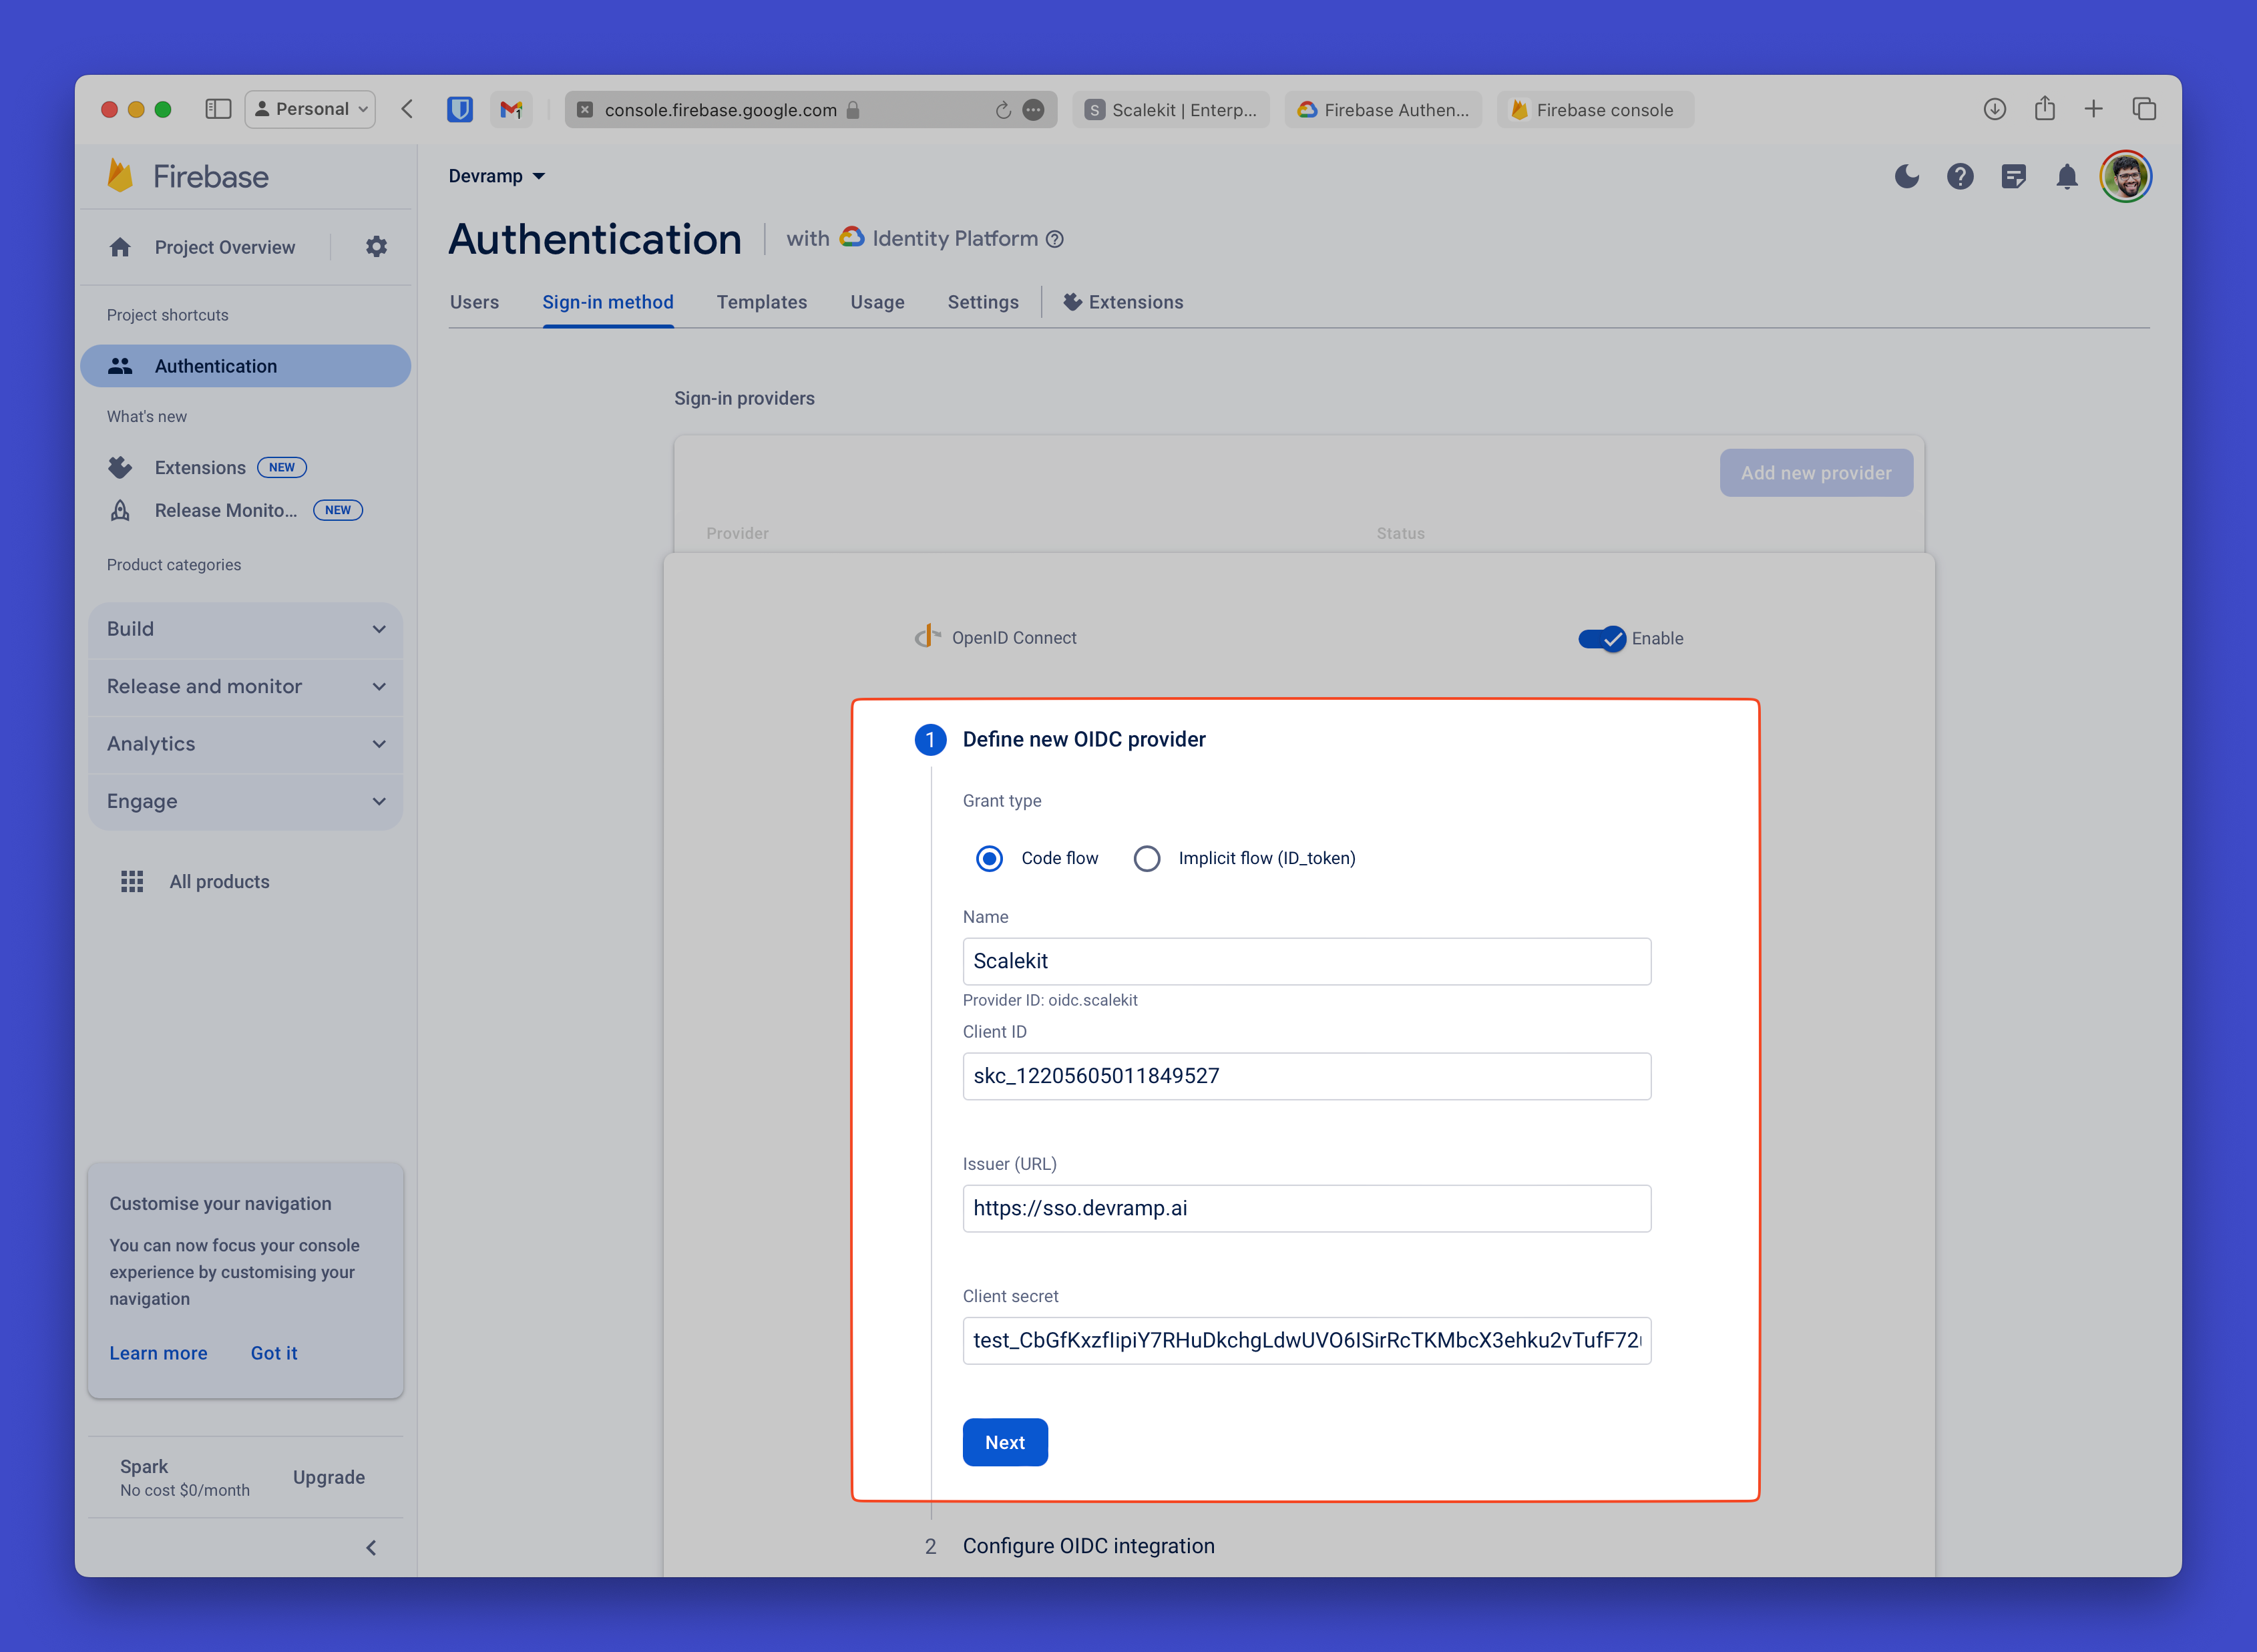
Connect Firebase to Scalekit using your API credentials
Section titled “Connect Firebase to Scalekit using your API credentials”In Firebase Console, paste the Scalekit values into the corresponding fields:
- Client ID: Paste your Scalekit Client ID
- Issuer URL: Paste your Scalekit Environment URL
- Client Secret: Paste your Scalekit Client Secret
-
Allow Firebase to redirect users back to your app
Section titled “Allow Firebase to redirect users back to your app”Copy the Callback URL from your Firebase OIDC Integration settings.

Add this URL as a Allowed Callback URI in your Scalekit Authentication > Redirects section.

-
Configure allowed callback URIs in Scalekit
Section titled “Configure allowed callback URIs in Scalekit”In your Scalekit Dashboard, navigate to Authentication > Redirects > Allowed Callback URIs.
Add your Firebase callback URL to the allowed callback URIs list:
- For development:
https://your-firebase-domain.com/__/auth/handler - For production:
https://your-domain.com/__/auth/handler
- For development:
-
Add SSO login to your frontend code
Section titled “Add SSO login to your frontend code”Use Firebase’s standard OIDC authentication in your frontend:
Login Implementation import { getAuth, OAuthProvider, signInWithPopup } from 'firebase/auth';const auth = getAuth();// Initialize Scalekit as an OIDC providerconst scalekitProvider = new OAuthProvider('oidc.scalekit');// Set SSO parametersscalekitProvider.setCustomParameters({domain: 'customer@company.com', // or organization_id, connection_id});// Handle SSO loginconst loginButton = document.getElementById('sso-login');loginButton.onclick = async () => {try {const result = await signInWithPopup(auth, scalekitProvider);const user = result.user;console.log('Authenticated user:', user.email);// User is now signed in to Firebase} catch (error) {console.error('Authentication failed:', error);}};
Option 2: Direct SSO with Custom Tokens
Section titled “Option 2: Direct SSO with Custom Tokens”Use this approach if you have Legacy Firebase Authentication or need full control over the authentication flow. Your backend integrates directly with Scalekit and creates custom Firebase tokens.
View authentication flow summary
Your backend handles SSO authentication and creates custom tokens for Firebase.
-
Install Scalekit and Firebase Admin SDKs
Section titled “Install Scalekit and Firebase Admin SDKs”Install the Scalekit SDK and configure your backend server with Firebase Admin SDK:
Terminal window npm install @scalekit-sdk/node firebase-adminbackend/server.js import { ScalekitClient } from '@scalekit-sdk/node';import admin from 'firebase-admin';// Initialize Scalekitconst scalekit = new ScalekitClient(process.env.SCALEKIT_ENVIRONMENT_URL,process.env.SCALEKIT_CLIENT_ID,process.env.SCALEKIT_CLIENT_SECRET);// Initialize Firebase Admin -
Handle SSO callback and create Firebase tokens
Section titled “Handle SSO callback and create Firebase tokens”Implement the SSO callback handler that exchanges the authorization code for user details and creates custom Firebase tokens:
SSO Callback Handler app.get('/auth/callback', async (req, res) => {const { code, error, error_description } = req.query;if (error) {return res.status(400).json({error: 'Authentication failed',details: error_description});}try {// Exchange code for user profileconst result = await scalekit.authenticateWithCode(code,'https://your-app.com/auth/callback');const user = result.user;// Create custom Firebase tokenconst customToken = await admin.auth().createCustomToken(user.id, {email: user.email,name: `${user.givenName} ${user.familyName}`,organizationId: user.organizationId,});res.json({customToken,user: {email: user.email,name: `${user.givenName} ${user.familyName}`,}});} catch (error) {console.error('SSO authentication failed:', error);res.status(500).json({ error: 'Internal server error' });}}); -
Generate authorization URL to initiate SSO
Section titled “Generate authorization URL to initiate SSO”Create an endpoint to generate Scalekit authorization URLs:
Authorization URL Endpoint app.post('/auth/start-sso', async (req, res) => {const { organizationId, domain, connectionId } = req.body;try {const options = {};if (organizationId) options.organizationId = organizationId;if (domain) options.domain = domain;if (connectionId) options.connectionId = connectionId;const authorizationUrl = scalekit.getAuthorizationUrl('https://your-app.com/auth/callback',options);res.json({ authorizationUrl });} catch (error) {console.error('Failed to generate authorization URL:', error);res.status(500).json({ error: 'Internal server error' });}});Authorization URL Endpoint @app.route('/auth/start-sso', methods=['POST'])def start_sso():data = request.get_json()organization_id = data.get('organizationId')domain = data.get('domain')connection_id = data.get('connectionId')try:options = {}if organization_id:options['organization_id'] = organization_idif domain:options['domain'] = domainif connection_id:options['connection_id'] = connection_idauthorization_url = scalekit.get_authorization_url('https://your-app.com/auth/callback',options)return jsonify({'authorizationUrl': authorization_url})except Exception as e:print(f'Failed to generate authorization URL: {e}')return jsonify({'error': 'Internal server error'}), 500Authorization URL Endpoint func startSSOHandler(w http.ResponseWriter, r *http.Request) {var requestData struct {OrganizationID string `json:"organizationId"`Domain string `json:"domain"`ConnectionID string `json:"connectionId"`}if err := json.NewDecoder(r.Body).Decode(&requestData); err != nil {http.Error(w, "Invalid request body", http.StatusBadRequest)return}options := scalekit.AuthorizationUrlOptions{}if requestData.OrganizationID != "" {options.OrganizationId = requestData.OrganizationID}if requestData.Domain != "" {options.Domain = requestData.Domain}if requestData.ConnectionID != "" {options.ConnectionId = requestData.ConnectionID}authorizationURL := scalekitClient.GetAuthorizationUrl("https://your-app.com/auth/callback",options,)response := map[string]string{"authorizationUrl": authorizationURL,}w.Header().Set("Content-Type", "application/json")json.NewEncoder(w).Encode(response)}Authorization URL Endpoint @PostMapping("/auth/start-sso")public ResponseEntity<?> startSSO(@RequestBody Map<String, String> request) {String organizationId = request.get("organizationId");String domain = request.get("domain");String connectionId = request.get("connectionId");try {AuthorizationUrlOptions options = new AuthorizationUrlOptions();if (organizationId != null) options.setOrganizationId(organizationId);if (domain != null) options.setDomain(domain);if (connectionId != null) options.setConnectionId(connectionId);String authorizationUrl = scalekitClient.authentication().getAuthorizationUrl("https://your-app.com/auth/callback", options).toString();return ResponseEntity.ok(Map.of("authorizationUrl", authorizationUrl));} catch (Exception e) {System.err.println("Failed to generate authorization URL: " + e.getMessage());return ResponseEntity.status(500).body(Map.of("error", "Internal server error"));}} -
Build frontend SSO flow with custom tokens
Section titled “Build frontend SSO flow with custom tokens”Create the frontend flow that initiates SSO and handles the custom token:
Frontend SSO Implementation import { getAuth, signInWithCustomToken } from 'firebase/auth';const auth = getAuth();// Initiate SSO flowconst initiateSSO = async () => {try {// Get authorization URL from your backendconst response = await fetch('/auth/start-sso', {method: 'POST',headers: { 'Content-Type': 'application/json' },body: JSON.stringify({organizationId: 'org_123456789', // or domain, connectionId}),});const { authorizationUrl } = await response.json();// Redirect to SSOwindow.location.href = authorizationUrl;} catch (error) {console.error('Failed to initiate SSO:', error);}};// Handle SSO callback (call this on your callback page)const handleSSOCallback = async () => {const urlParams = new URLSearchParams(window.location.search);const code = urlParams.get('code');const error = urlParams.get('error');if (error) {console.error('SSO failed:', error);return;}try {// Exchange code for custom tokenconst response = await fetch(`/auth/callback?code=${code}`);const { customToken, user } = await response.json();// Sign in to Firebase with custom tokenconst userCredential = await signInWithCustomToken(auth, customToken);const firebaseUser = userCredential.user;console.log('Successfully authenticated:', firebaseUser);// Redirect to your appwindow.location.href = '/dashboard';} catch (error) {console.error('Authentication failed:', error);}};
Handle identity provider-initiated SSO
Section titled “Handle identity provider-initiated SSO”Both approaches support IdP-initiated SSO, where users access your application directly from their identity provider portal. Create a dedicated endpoint to handle these requests.
For detailed implementation instructions, refer to the IdP-Initiated SSO guide.
Both approaches provide secure, enterprise-grade SSO authentication while maintaining compatibility with Firebase’s ecosystem and features.