
Auth0
Learn how to integrate Scalekit with Auth0 for seamless Single Sign-On (SSO) authentication, allowing enterprise users to log in via Scalekit.
This guide is designed to provide you a walkthrough of integrating Scalekit with Auth0, thereby facilitating seamless Single Sign-on (SSO) authentication for your application’s users. We demonstrate how to configure Scalekit so that Auth0 can allow some of your enterprise users to login via Scalekit and still continue to act as the identity management solution for your users and manage the login, session management functionality.
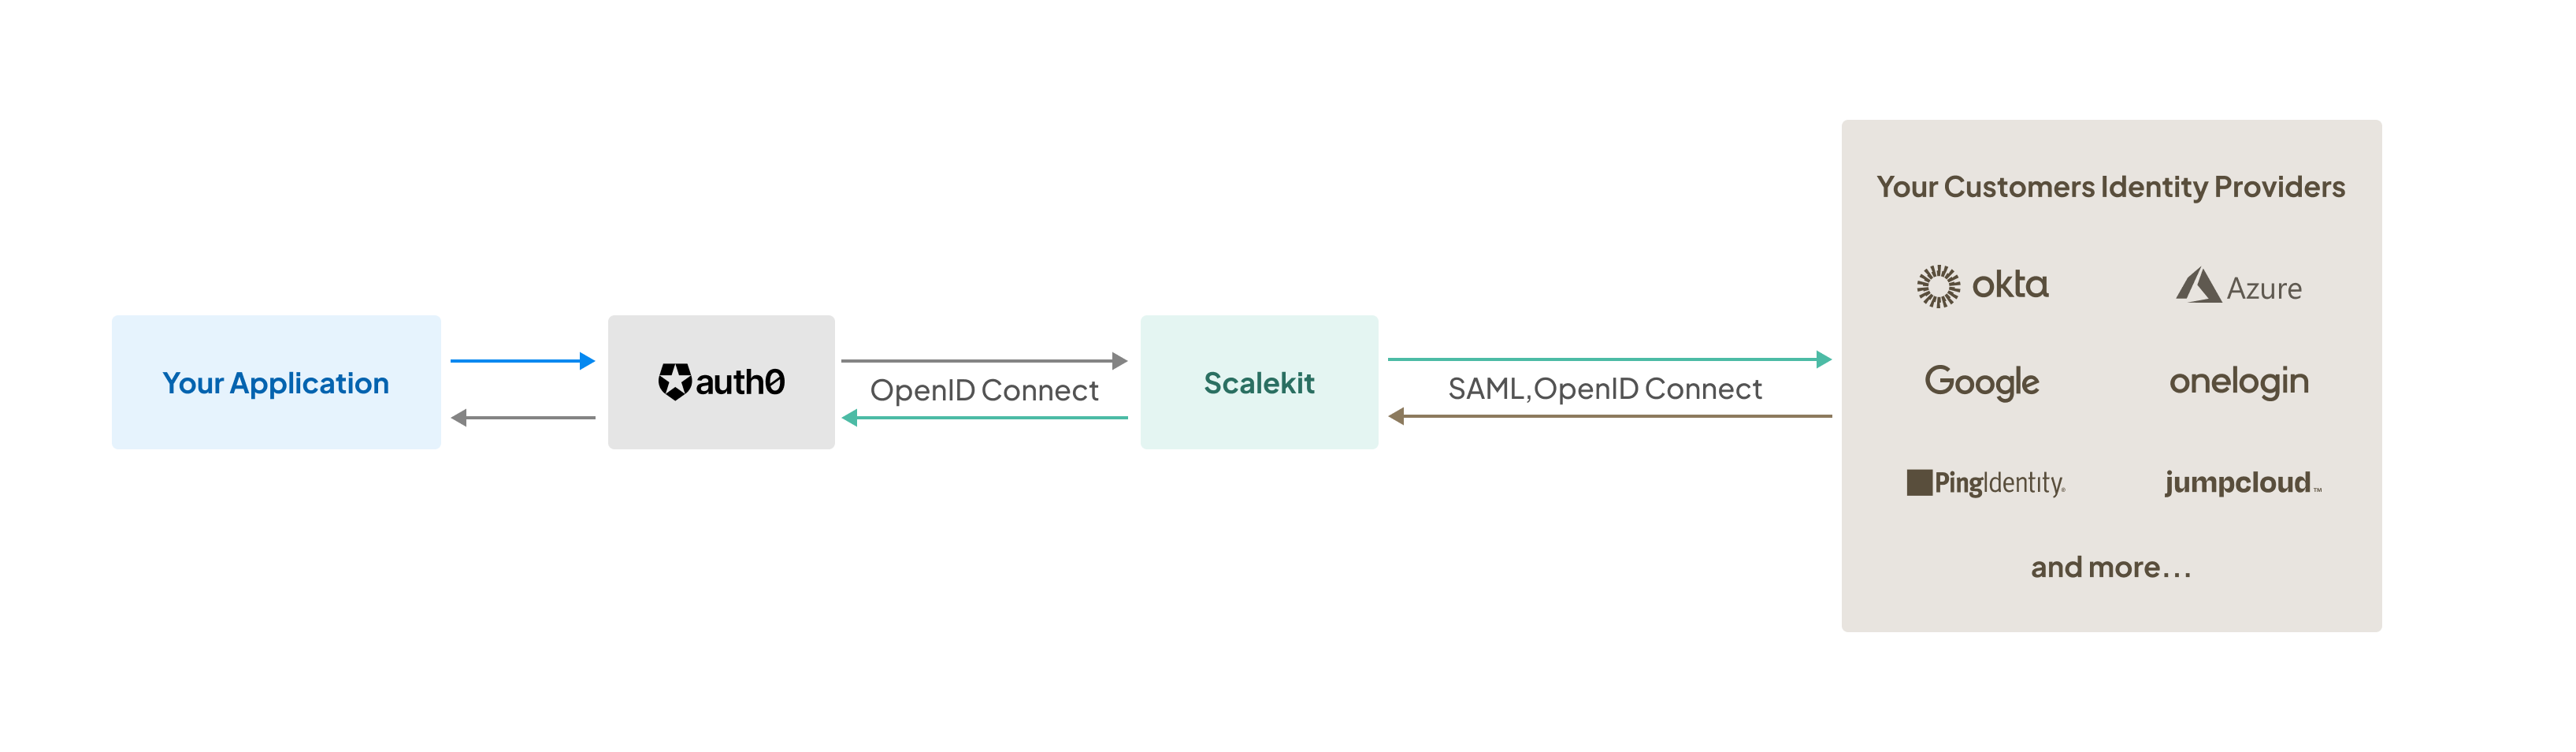
Scalekit is designed as a fully compatible OpenID Connect (OIDC) provider, thus streamlining the integration. As Auth0 continues to act as your identity management system, you’ll be able to seamlessly integrate Single Sign-on into your application without having to write code.
Ensure you have:
- Access to Auth0’s Authenticate dashboard. You need to have a role as an ‘Admin’ or ‘Editor - Connections’ to create and edit OIDC connections on Auth0
- Access to your Scalekit dashboard
Add Scalekit as OIDC connection
Section titled “Add Scalekit as OIDC connection”Use Auth0 Connections API to create Scalekit as a OpenID connection for your tenant. Sample curl command below:
curl --request POST \ --url 'https://<AUTH0_TENANT_DOMAIN>.us.auth0.com/api/v2/connections' \ -H 'Content-Type: application/json' \ -H 'Accept: application/json' \ --header 'authorization: Bearer <API_TOKEN>' \ --data-raw '{ "strategy": "oidc", "name": "Scalekit", "options": { "type": "back_channel", "discovery_url": "<SCALEKIT_ENVIRONMENT_URL>/.well-known/openid-configuration", "client_secret" : "<SCALEKIT_CLIENT_SECRET>", "client_id" : "<SCALEKIT_CLIENT_ID>", "scopes": "openid profile email" } }'| Parameter | Description |
|---|---|
AUTH0_TENANT_DOMAIN | This is your Auth0 tenant url. Typically, looks like https://yourapp.us.auth0.com |
API_TOKEN | Generate an API token from your Auth0 dashboard and use it to authenticate your Auth0 API calls |
SCALEKIT_ENVIRONMENT_URL | Find this in your API config section of Scalekit Dashboard. For development use https://{your-subdomain}.scalekit.dev, for production use https://{your-subdomain}.scalekit.com |
SCALEKIT_CLIENT_SECRET | Generate a new client secret in your API config section of Scalekit Dashboard and use that here |
SCALEKIT_CLIENT_ID | Find this in your API config section of Scalekit Dashboard |
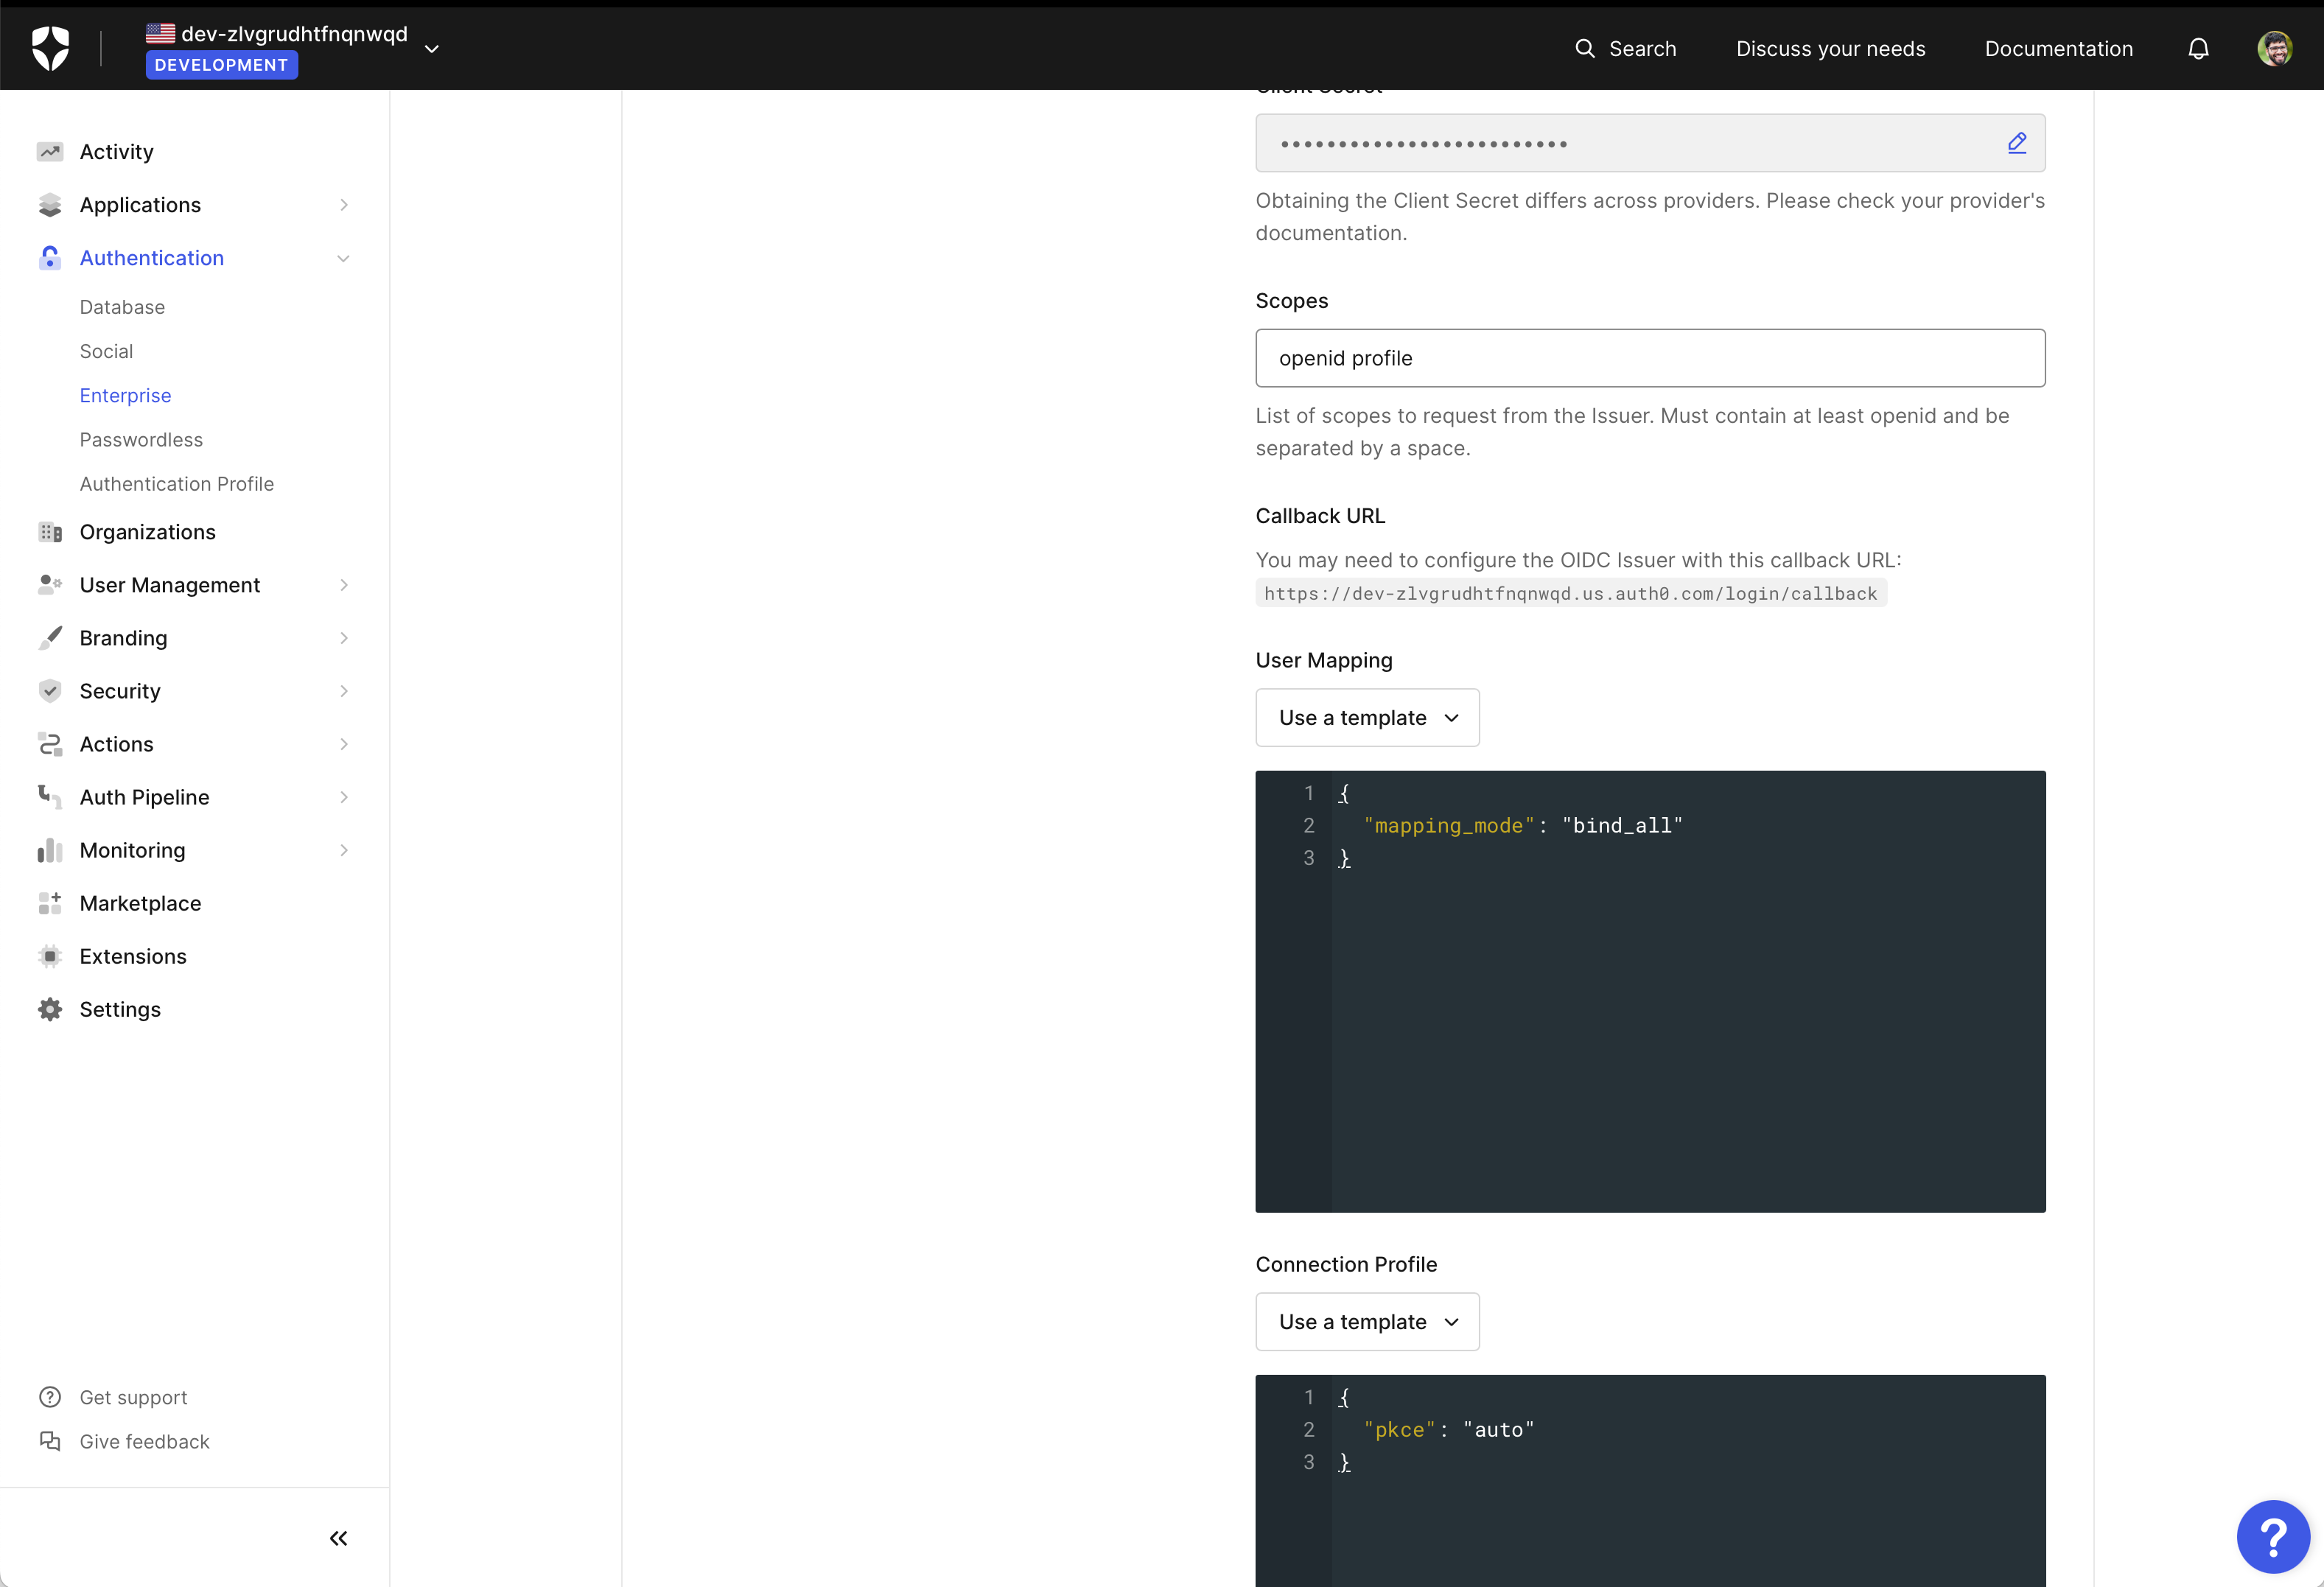
After the successful execution of the above API call, you will see a new OpenID connection created in your Auth0 tenant. To confirm this, you can navigate to Enterprise Connections in your Auth0 dashboard.
Register redirect URI in Scalekit
Section titled “Register redirect URI in Scalekit”After creating Scalekit as a new OIDC connection, you need to:
- Copy the Callback URL from your Auth0 Dashboard
- Add it as a new Allowed Callback URI in your Scalekit Authentication > Redirects section
Copy callback URL from Auth0
Section titled “Copy callback URL from Auth0”In your Auth0 dashboard, go to Authentication > Enterprise > OpenID Connect > Scalekit > Settings. Copy the “Callback URL” that’s available in the General section of settings.
Set redirect URI in Scalekit API config
Section titled “Set redirect URI in Scalekit API config”Go to your Scalekit dashboard. Select environment as Development or Production. Navigate to Authentication > Redirects > Allowed Callback URIs. In the Allowed Callback URIs section, select Add new URI. Paste the Callback URL that you copied from Auth0 dashboard. Click on Add button.

Onboard Single Sign-on customers in Scalekit
Section titled “Onboard Single Sign-on customers in Scalekit”To onboard new enterprise customers using Single Sign-on login, you need to:
- Create an Organization in Scalekit
- Generate Admin Portal link to allow your customers configure SSO settings
- Configure Domain in the Scalekit dashboard for that Organization
- Update Home Realm Discovery settings in your Auth0 tenant with this Organization’s domain
Update home realm discovery in Auth0
Section titled “Update home realm discovery in Auth0”In step 2, you have successfully configured Scalekit as an OIDC connection in your Auth0 tenant. It’s time to enable Home Realm Discovery for your enterprise customers in Auth0. This configuration will help Auth0 determine which users to be routed to login via Single Sign-on.
In your Auth0 dashboard, go to Authentication > Enterprise > OpenID Connect > Scalekit > Login Experience. Navigate to “Home Realm Discovery” in the Login Experience Customization section.
In the Identity Provider domains, add the comma separated list of domains that need to be authenticated with Single Sign-on via Scalekit. Auth0 uses this configuration to compare the users email domain at the time of login:
- If there is a match in the configured domains, users will be redirected to the Scalekit’s Single Sign-on
- If there is no match, users will be prompted to login via other authentication methods like password or Magic Link & OTP based on your Auth0 configuration
For example, if you would like users from three Organizations (FooCorp, BarCorp, AcmeCorp) to access your application using their respective identity providers, you need to add them as a comma separated list foocorp.com, barcorp.com, acmecorp.com. Screenshot below for reference

Save the Home Realm Discovery settings.
You have now successfully integrated Scalekit with Auth0, thereby facilitating seamless SSO authentication for your application’s users.