
AWS Cognito
Learn how to integrate Scalekit with AWS Cognito as an OIDC provider for seamless enterprise Single Sign-On (SSO) authentication.
Expand your existing AWS Cognito authentication system by integrating Scalekit as an OpenID Connect (OIDC) provider. This integration enables enterprise users to log into your application seamlessly using Single Sign-On (SSO).
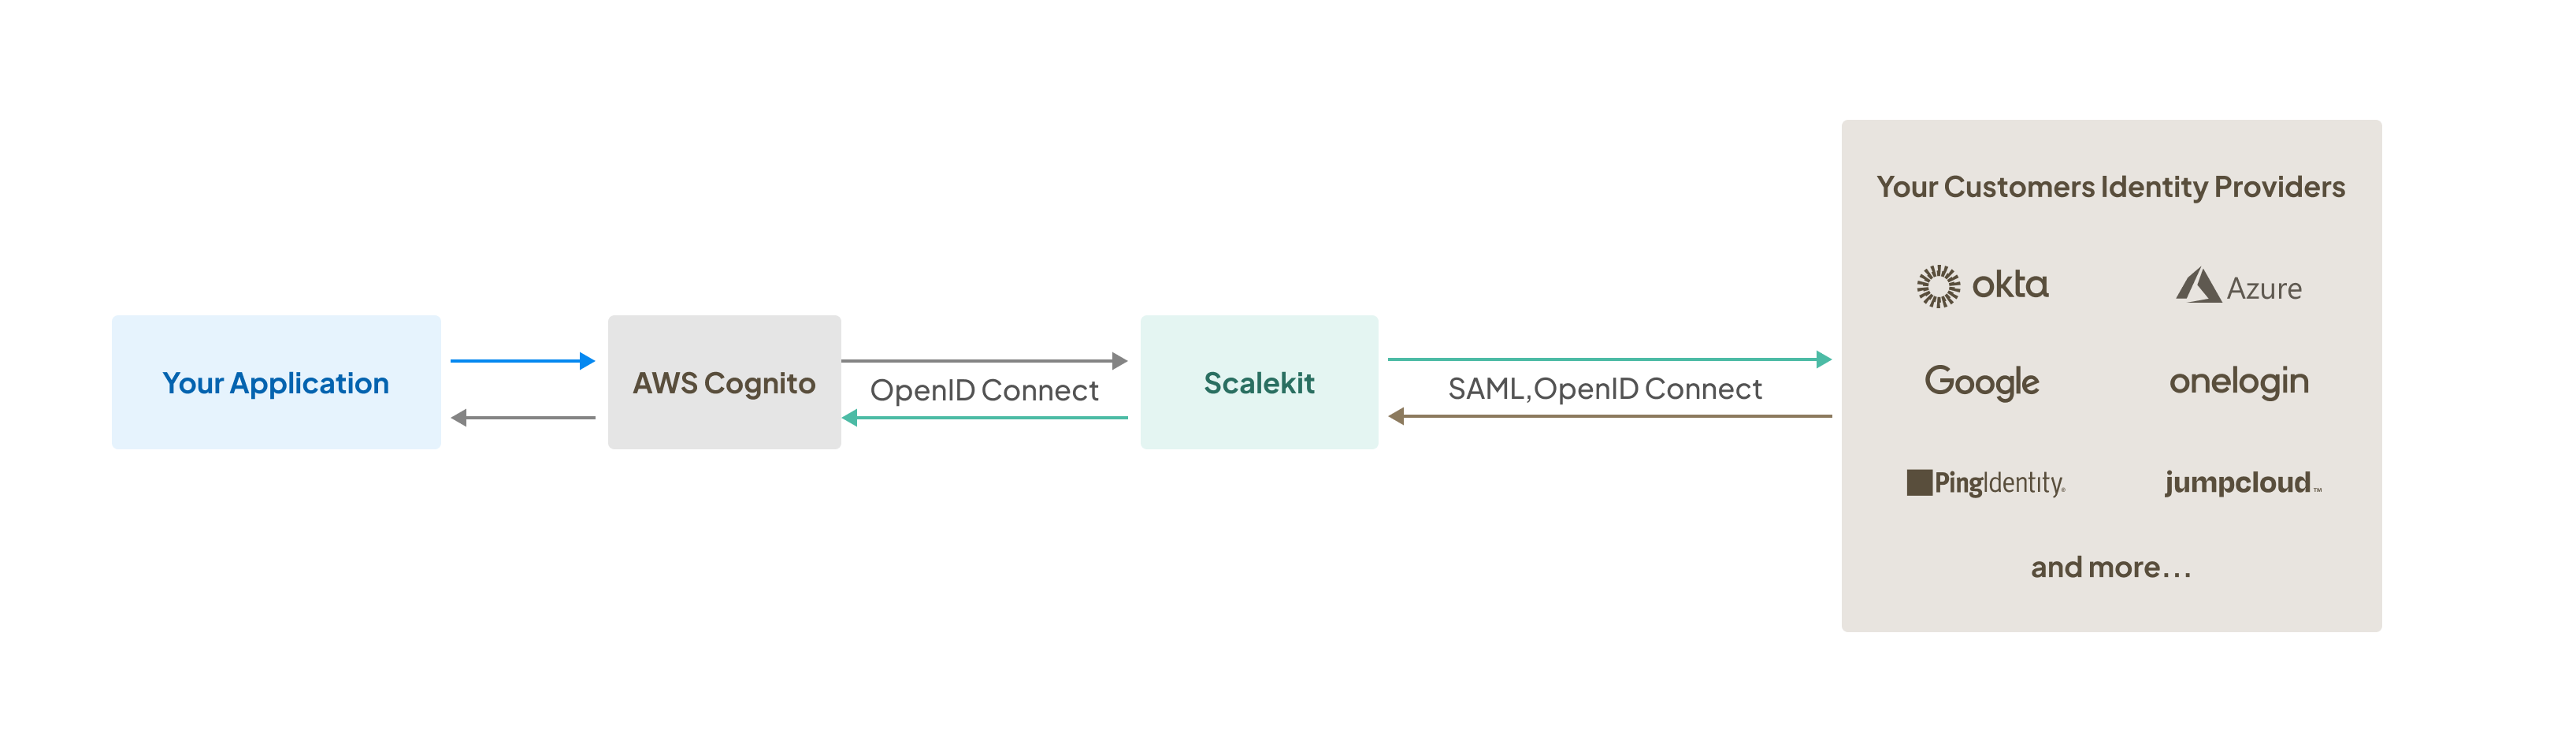
Here’s a typical flow illustrating the integration:
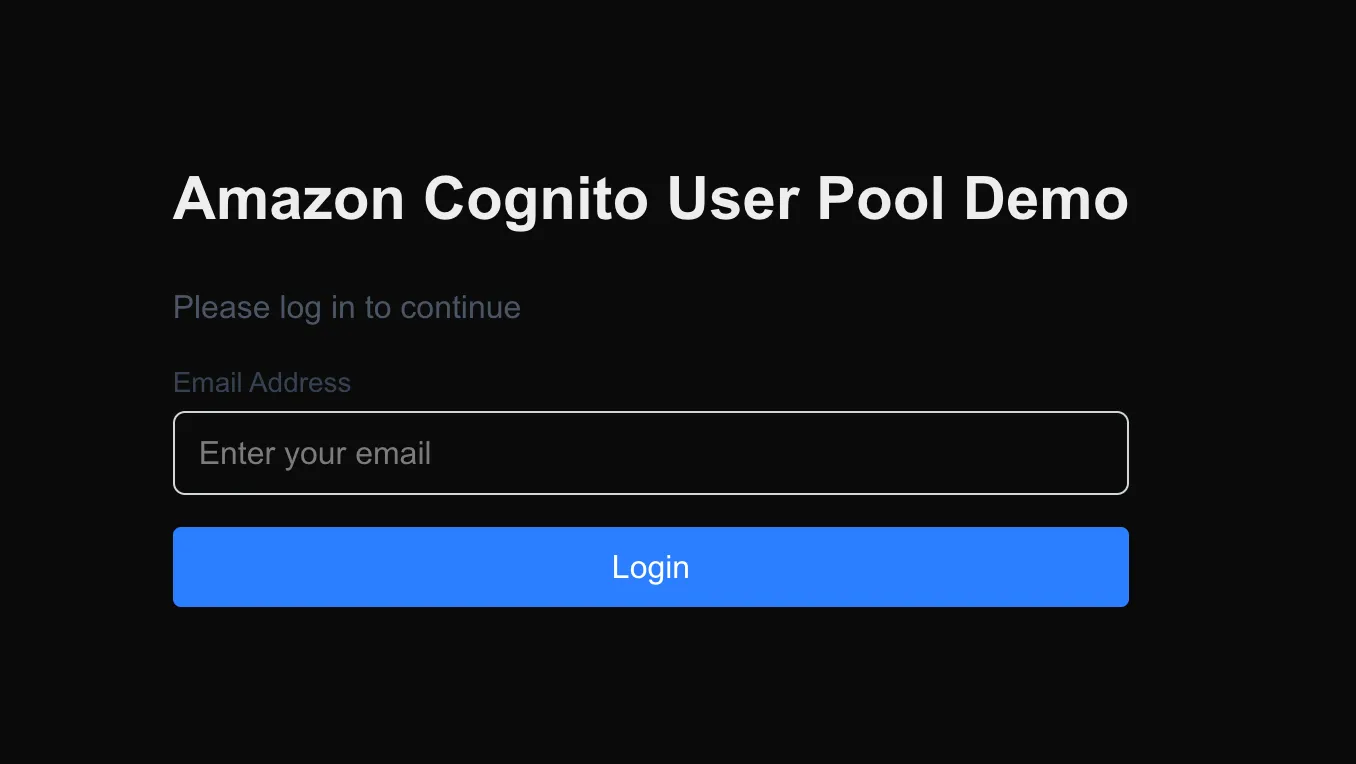
- User initiates login: Enterprise users enter their company email address on your application’s custom login page (not managed by AWS Cognito) to initiate SSO
- Authentication via Scalekit: Based on identifiers such as the user’s company email and Scalekit’s connection identifier, users are redirected to authenticate through their organization’s Identity Provider (IdP)
Prefer exploring an example app? Check out this Next.js example on GitHub
Configure Scalekit as an OIDC provider in AWS Cognito
Section titled “Configure Scalekit as an OIDC provider in AWS Cognito”To enable AWS Cognito to redirect users to Scalekit for SSO initiation, configure your Scalekit account as an OIDC provider within AWS Cognito:
- Navigate to AWS Cognito and select your existing User Pool
- Under the Authentication section, choose Social and external providers
- Click Add identity provider > OpenID Connect (OIDC)
AWS Cognito will display a form requiring specific details to establish the connection with Scalekit:
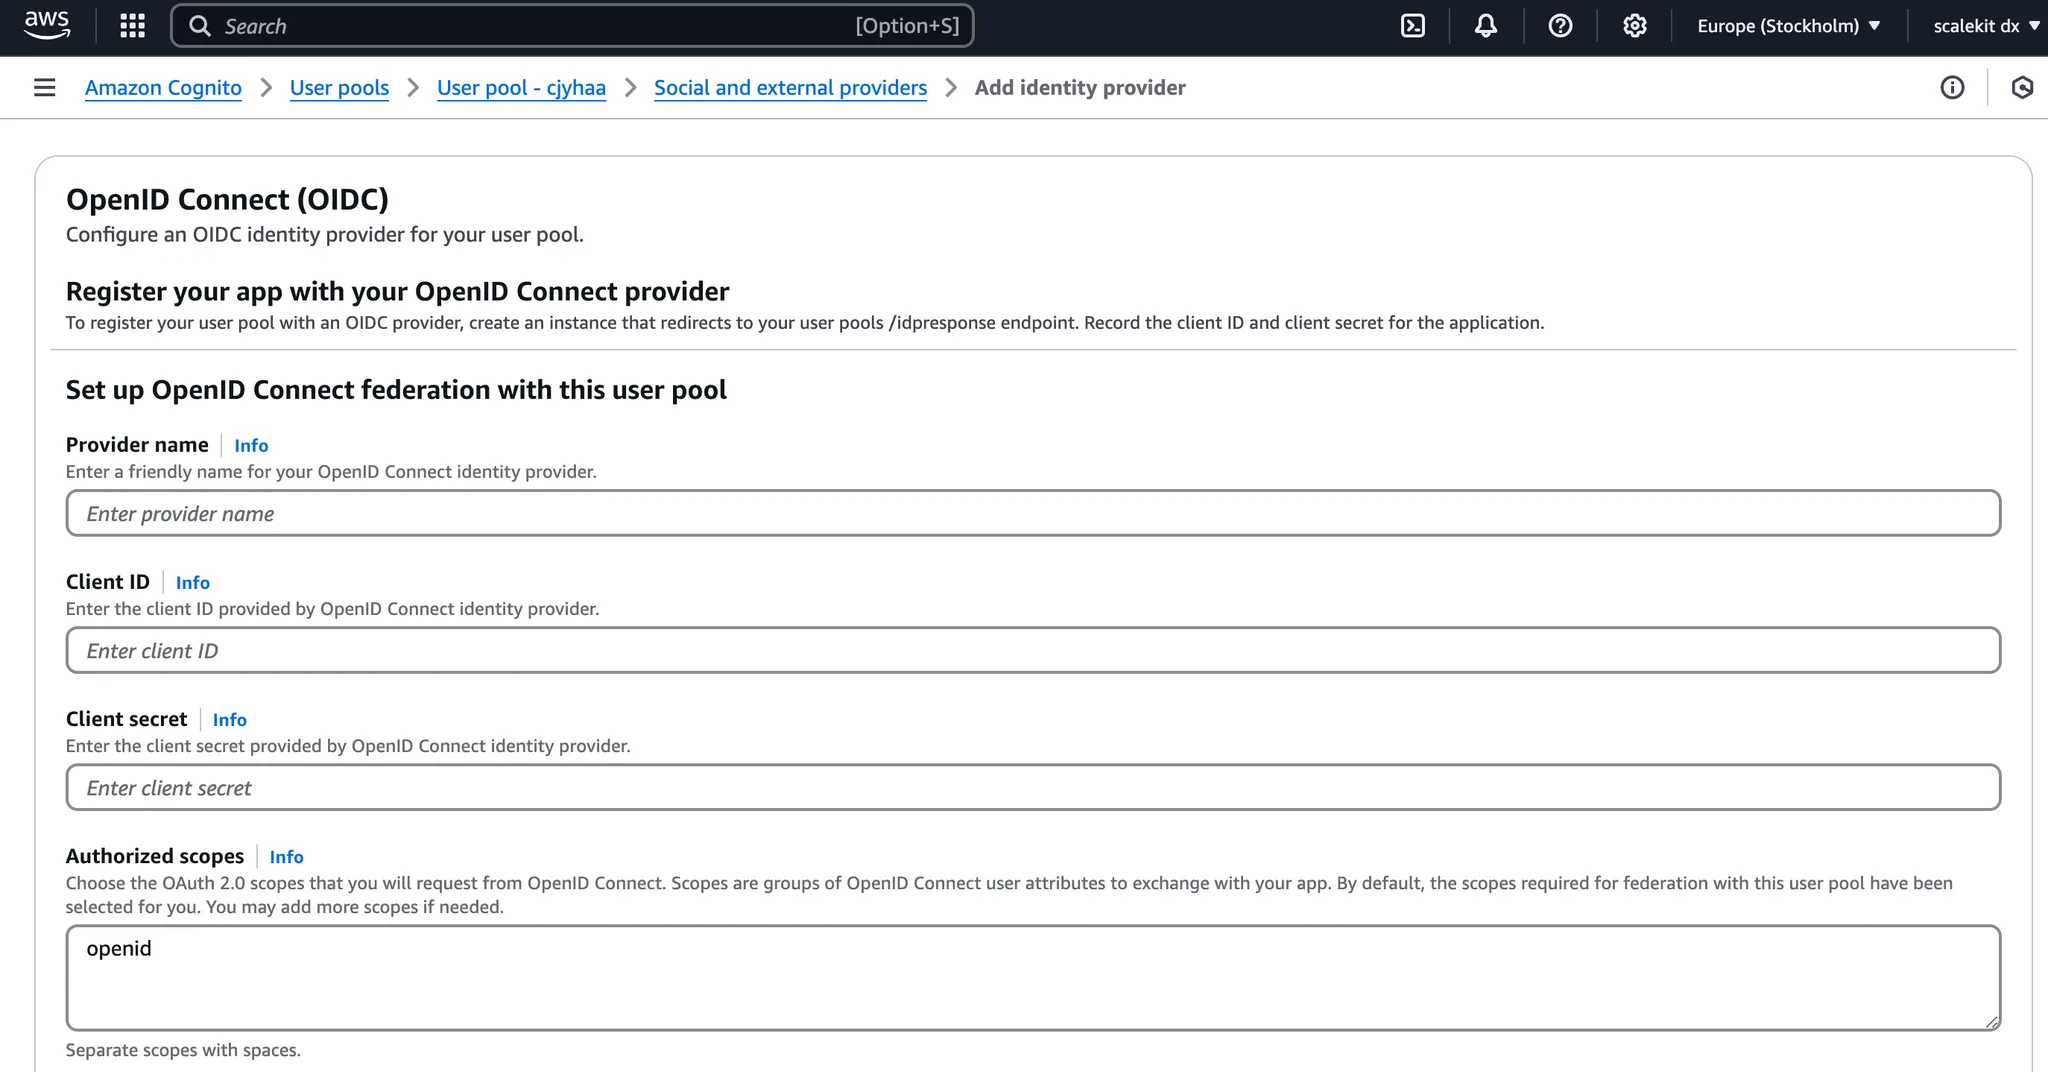
| Field | Description |
|---|---|
| Provider Name | A recognizable label for Scalekit within the AWS ecosystem. This name is used programmatically when generating authorization URLs. For example: ScalekitIdPRouter |
| Client ID | Obtain this from your Scalekit Dashboard under Authentication > Redirects > Allowed Callback URIs |
| Client Secret | Generate a secret from your Scalekit Dashboard (Authentication > Redirects > Allowed Callback URIs) and input it here |
| Authorized Scopes | Scopes defining the user attributes that AWS Cognito can access from Scalekit |
| Identifiers | Identifiers instruct AWS Cognito to check user-entered email addresses during sign-in and direct users accordingly to the associated identity provider based on their domain |
| Attribute Request Method | Method used to exchange attributes and generate tokens for users; ensure you map Scalekit’s user attributes correctly to your user pool attributes in AWS Cognito |
| Issuer URL | Enter your Scalekit environment URL found in the Scalekit Dashboard under Authentication > Redirects > Allowed Callback URIs. For development use https://{your-subdomain}.scalekit.dev and for production use https://{your-subdomain}.scalekit.com |
Scalekit’s profile information includes various user attributes useful for your application requirements. Map these attributes between both providers using the attribute list found at Scalekit Dashboard > Authentication > Single Sign-On.
This ensures standardized information exchange between your customers’ identity providers and your application.
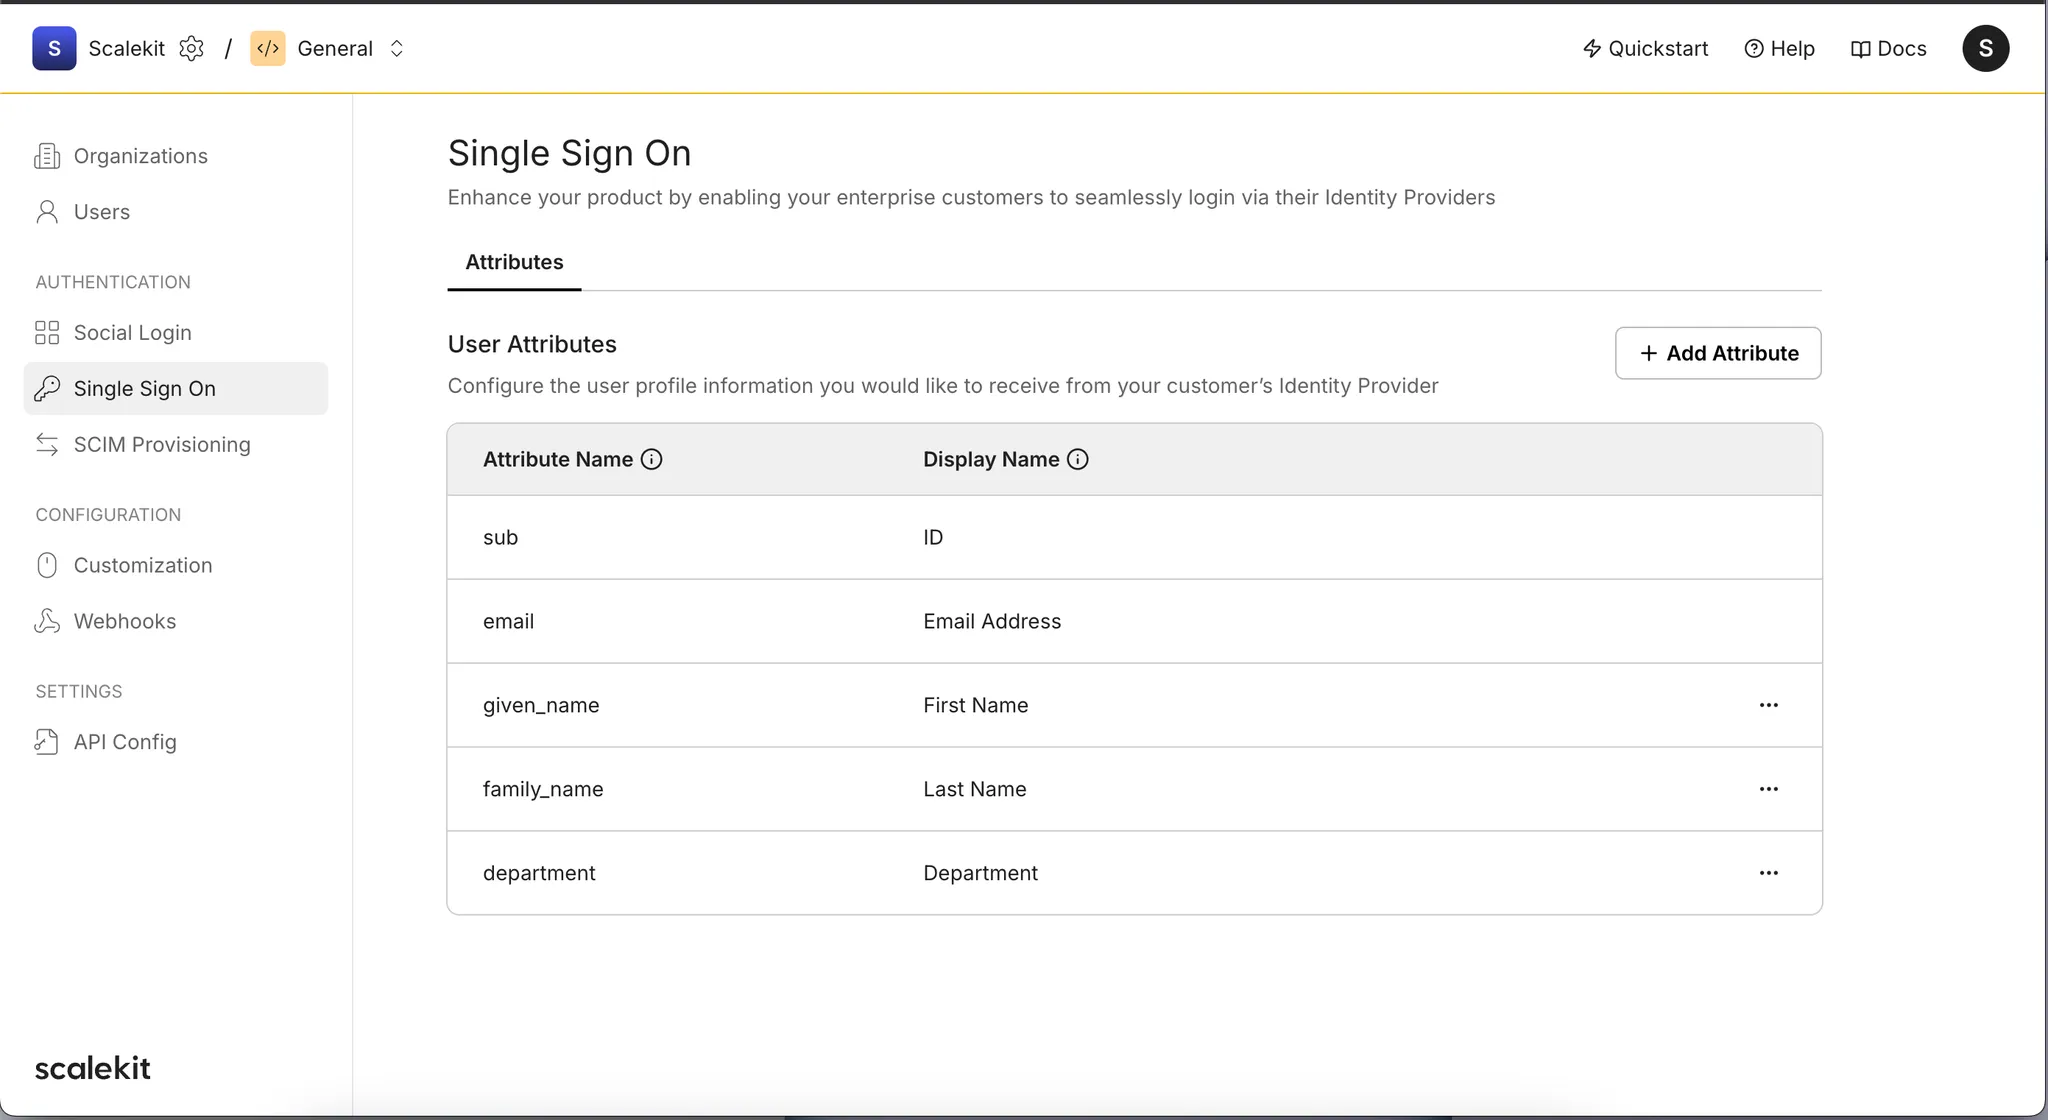
The same attribute names are considered OpenID Connect attributes within AWS Cognito, streamlining user profile synchronization between your app and identity providers.
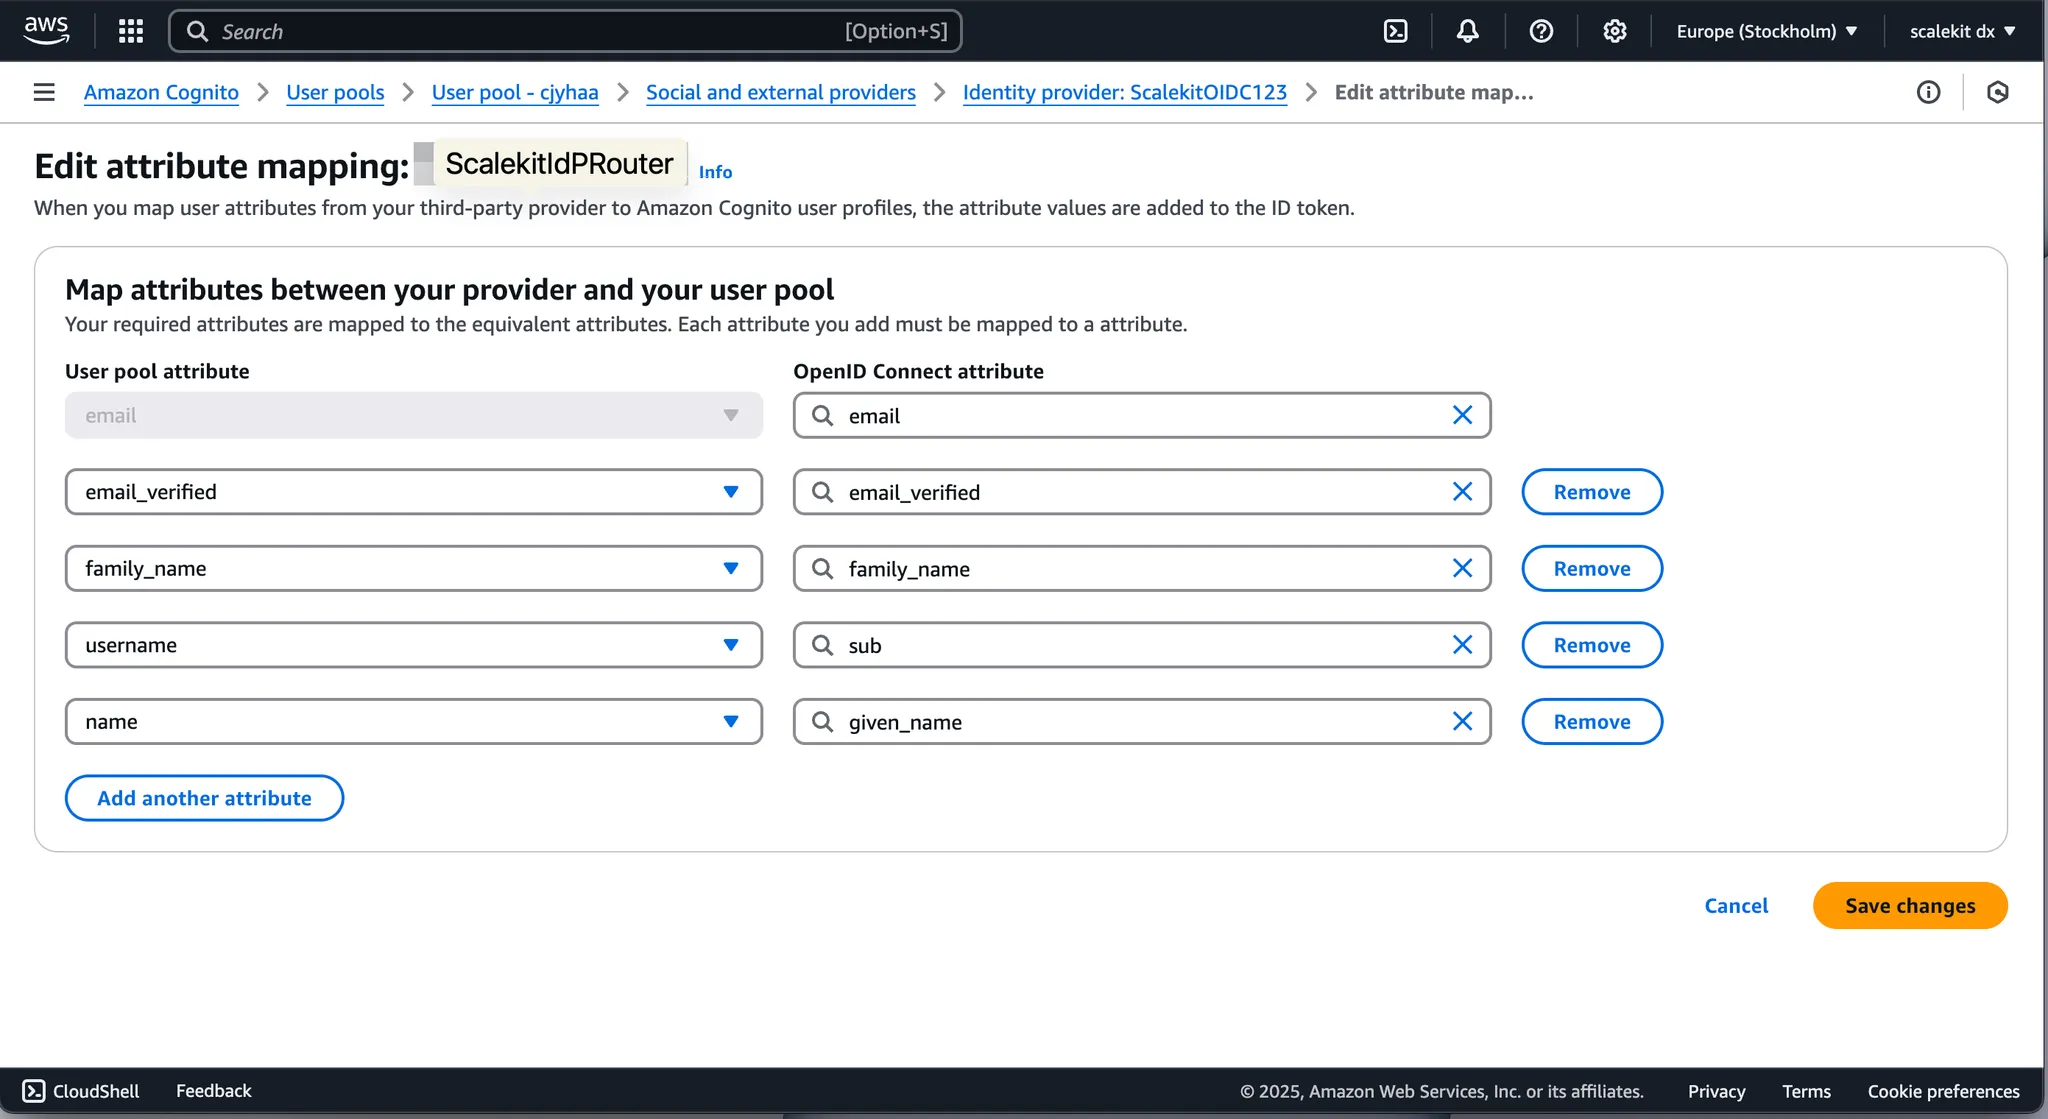
Click Add identity provider to complete adding Scalekit as an identity provider.
Implement Single Sign-On in your application
Section titled “Implement Single Sign-On in your application”Your application should use its own custom login page instead of the managed login page provided by AWS Cognito. This approach allows you to collect enterprise users’ email addresses and redirect them appropriately for authentication via SSO.
Generate an authorization URL with two additional parameters— identity_provider and login_hint — to redirect users seamlessly:
import { Issuer, Client } from "openid-client";
const client = await getOidcClient();
const authUrl = client.authorizationUrl({ scope: "openid email", state: state, nonce: nonce, identity_provider: "ScalekitIdPRouter", // Same as Provider name (above) login_hint: email, // User's company email address});console.log("authUrl", authUrl);const response = NextResponse.redirect(authUrl);Example authorization endpoint URL
Section titled “Example authorization endpoint URL”Here’s an example of a complete authorization endpoint URL incorporating the required parameters:
https://[domain].auth.[region].amazoncognito.com/oauth2/authorize ?client_id=k6tana1l8b0bvhk9gfixkurr6 &scope=openid%20email &response_type=code &redirect_uri=http%3A%2F%2Flocalhost%3A3000%2Fauth%2Fcallback &state=-5iLRZmPwwdqwqT-A4yiJM6KQvCLQM0JRx9QaXOlzRE &nonce=sGSXePnJ0Ue5GZyTpKG4rRsVeWyfZloImbMWunUDbG4 &identity_provider=ScalekitIdPRouter &login_hint=enterpriseuser%40example.orgFor ease of development, Scalekit supports testing with @example.org and @example.com domains. Authorization endpoints generated using these domains as login_hint will redirect enterprise users to Scalekit’s built-in IdP Simulator.
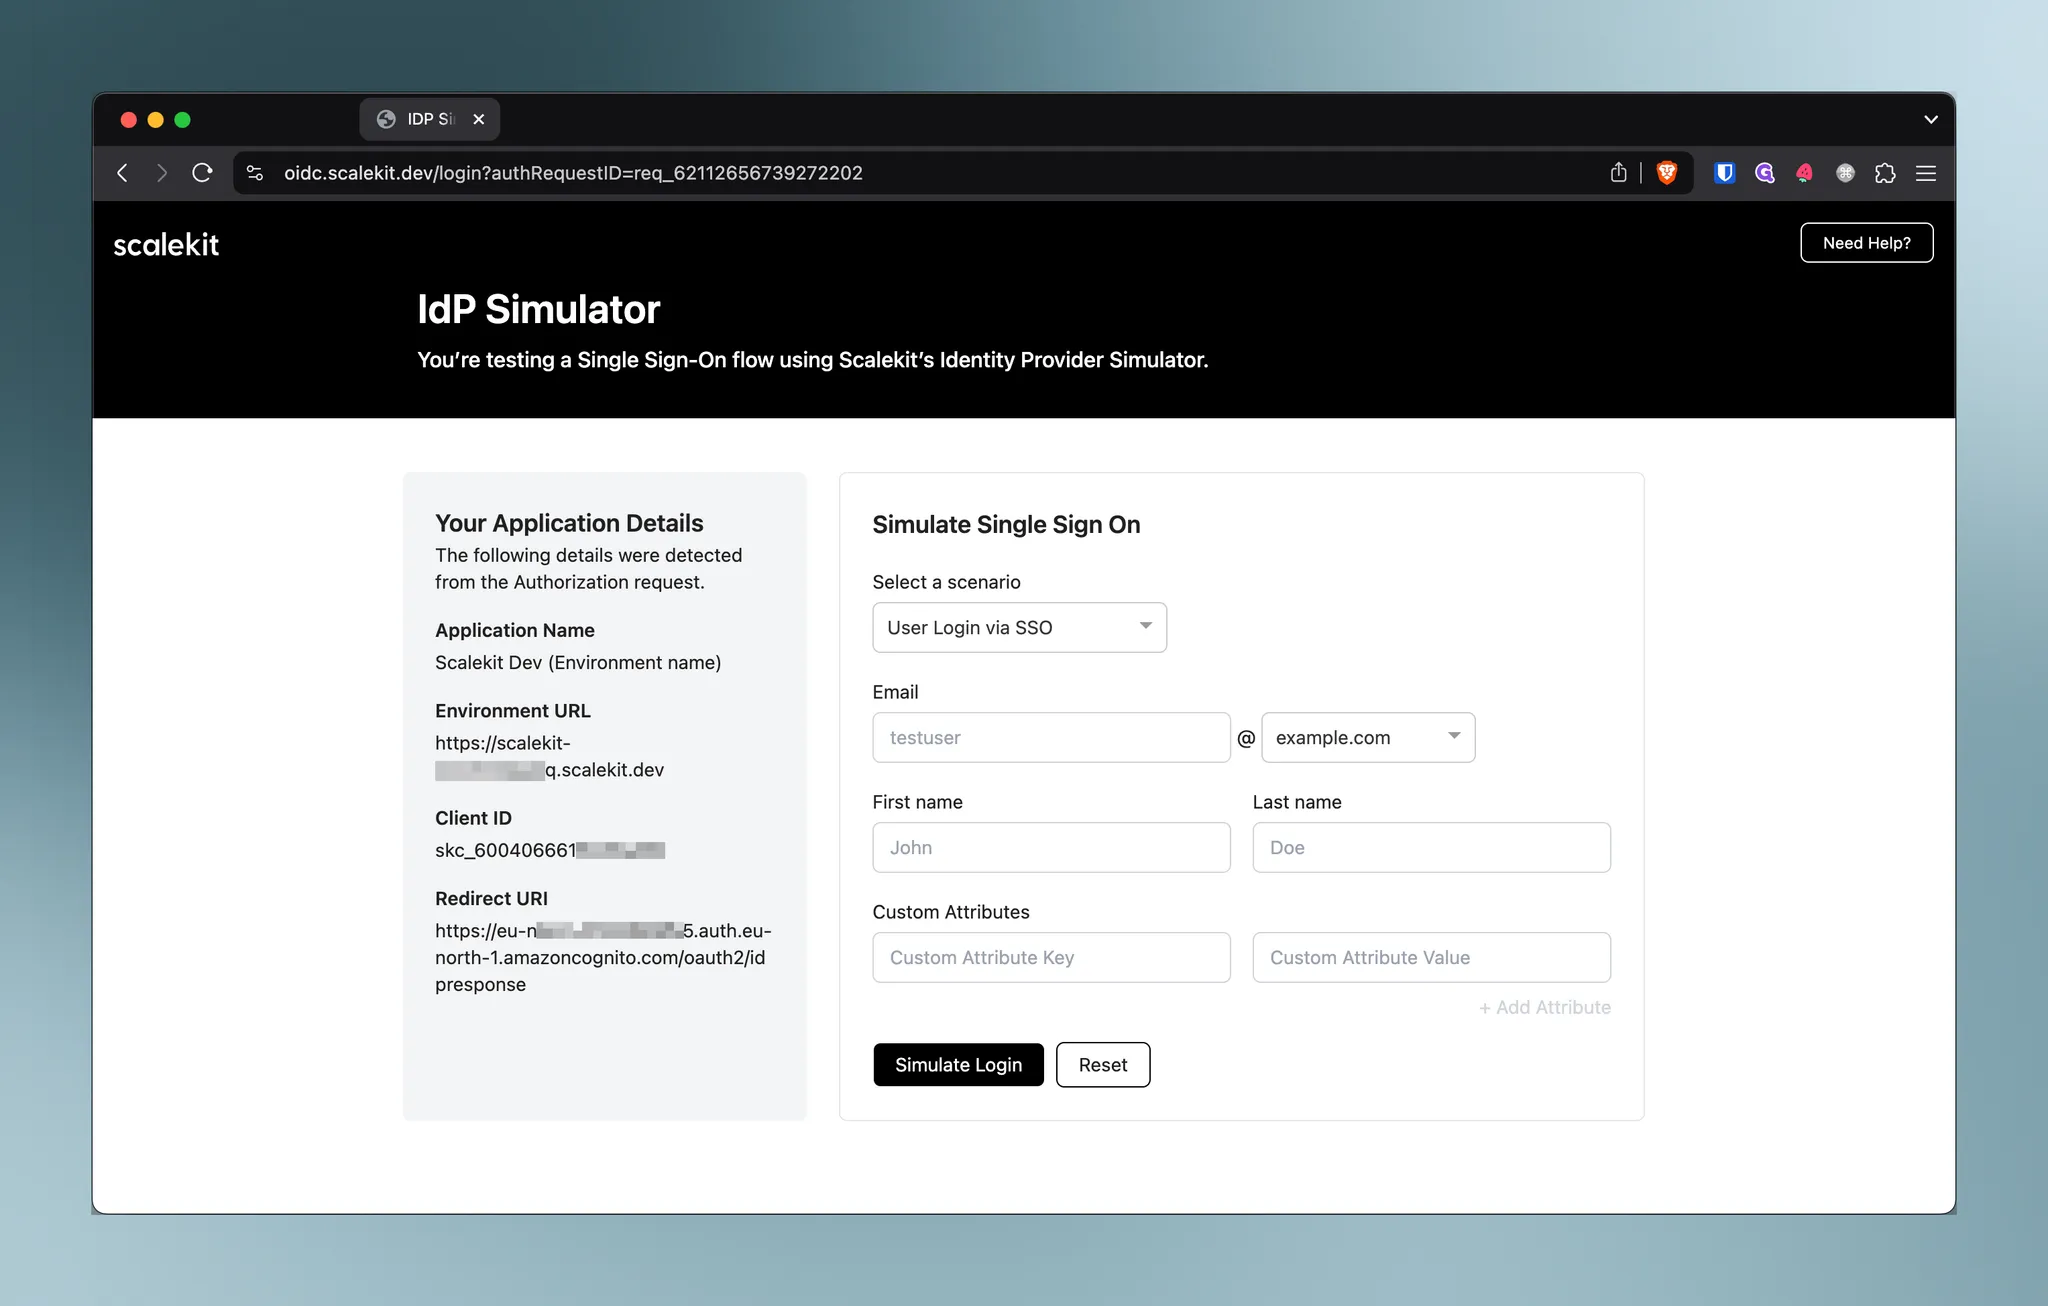
Treat the IdP Simulator as equivalent to an actual organization’s IdP authentication step. For instance, if John belongs to Megasoft (using Okta as their IdP), logging in with john@megasoft.org would redirect him to Okta’s authentication process (including MFA or other organizational policies).
Scalekit integrates seamlessly with major identity providers. Use Scalekit’s Admin Portal to onboard enterprise customers, enabling them to set up connections between their identity providers and your application.
Successful SSO response
Section titled “Successful SSO response”Upon successful authentication via SSO, your application receives user profile details mapped according to AWS Cognito’s configured user attributes:
{"sub": "807c593c-d0c1-709c-598f-633ec61bcc8b","email_verified": "false","email": "john@example.com","username": "scalekitIdPRouter_conn_60040666217971987;a2c49d97-d36f-460f-97c2-87eb295095af"}Now that you’ve successfully integrated AWS Cognito with Scalekit for SSO, here are some recommended next steps — Onboard Enterprise Customers using the Scalekit Admin Portal to help customers configure their identity providers.