
Intercept authentication flows
Apply decision checks at key points in the authentication flow
Execute custom business logic during sign-up or login processes. For example, you can integrate with external systems to validate user existence before allowing login, or prevent sign-ups originating from suspicious IP addresses.
Scalekit calls your application at key trigger points during authentication flows and waits for an ALLOW or DENY response to determine whether to continue with the authentication process. For example, one trigger point occurs immediately before a user signs up for your application. We’ll explore more trigger points throughout this guide.
Implementing interceptors
Section titled “Implementing interceptors”You can define interceptors at several trigger points during authentication flows.
| Trigger point | When it runs |
|---|---|
| Pre-signup | Before a user creates a new organization |
| Pre-session creation | Before session tokens are issued for a user |
| Pre-user invitation | Before an invitation is created or sent for a new organization member |
| Pre-M2M token creation | Before issuing a machine-to-machine access token |
At each trigger point, Scalekit sends a POST request to your interceptor endpoint with the relevant details needed to process the request.
-
Verify the interceptor request
Section titled “Verify the interceptor request”Create an HTTPS endpoint that receives and verifies POST requests from Scalekit. This critical security step ensures requests are authentic and haven’t been tampered with.
Express.js - Verify request signature // Security: ALWAYS verify requests are from Scalekit before processing// This prevents unauthorized parties from triggering your interceptor logicapp.post('/auth/interceptors/pre-signup', async (req, res) => {try {// Parse the request payload and headersconst event = await req.json();const headers = req.headers;// Get the signing secret from Scalekit dashboard > Interceptors tab// Store this securely in environment variablesconst interceptorSecret = process.env.SCALEKIT_INTERCEPTOR_SECRET;// Initialize Scalekit client (reference installation guide for setup)const scalekit = new ScalekitClient(process.env.SCALEKIT_ENVIRONMENT_URL,process.env.SCALEKIT_CLIENT_ID,process.env.SCALEKIT_CLIENT_SECRET);// Verify the interceptor payload signature// This confirms the request is from Scalekit and hasn't been tampered withawait scalekit.verifyInterceptorPayload(interceptorSecret, headers, event);// ✓ Request verified - proceed to business logic (next step)} catch (error) {console.error('Interceptor verification failed:', error);// DENY on verification failures to fail securelyreturn res.status(200).json({decision: 'DENY',error: {message: 'Unable to process request. Please try again later.'}});}});Flask - Verify request signature # Security: ALWAYS verify requests are from Scalekit before processing# This prevents unauthorized parties from triggering your interceptor logicfrom flask import Flask, request, jsonifyimport osapp = Flask(__name__)@app.route('/auth/interceptors/pre-signup', methods=['POST'])def interceptor_pre_signup():try:# Parse the request payload and headersevent = request.get_json()body = request.get_data()# Get the signing secret from Scalekit dashboard > Interceptors tab# Store this securely in environment variablesinterceptor_secret = os.getenv('SCALEKIT_INTERCEPTOR_SECRET')# Extract headers for verificationheaders = {'interceptor-id': request.headers.get('interceptor-id'),'interceptor-signature': request.headers.get('interceptor-signature'),'interceptor-timestamp': request.headers.get('interceptor-timestamp')}# Initialize Scalekit client (reference installation guide for setup)scalekit_client = ScalekitClient(env_url=os.getenv("SCALEKIT_ENVIRONMENT_URL"),client_id=os.getenv("SCALEKIT_CLIENT_ID"),client_secret=os.getenv("SCALEKIT_CLIENT_SECRET"))# Verify the interceptor payload signature# This confirms the request is from Scalekit and hasn't been tampered withis_valid = scalekit_client.verify_interceptor_payload(secret=interceptor_secret,headers=headers,payload=body)if not is_valid:return jsonify({'decision': 'DENY','error': {'message': 'Invalid request signature'}}), 200# ✓ Request verified - proceed to business logic (next step)except Exception as error:print(f'Interceptor verification failed: {error}')# DENY on verification failures to fail securelyreturn jsonify({'decision': 'DENY','error': {'message': 'Unable to process request. Please try again later.'}}), 200Gin - Verify request signature // Security: ALWAYS verify requests are from Scalekit before processing// This prevents unauthorized parties from triggering your interceptor logicpackage mainimport ("io""log""net/http""os""github.com/gin-gonic/gin")type InterceptorResponse struct {Decision string `json:"decision"`Error *InterceptorError `json:"error,omitempty"`}type InterceptorError struct {Message string `json:"message"`}func interceptorPreSignup(c *gin.Context) {// Parse the request payloadbodyBytes, err := io.ReadAll(c.Request.Body)if err != nil {c.JSON(http.StatusOK, InterceptorResponse{Decision: "DENY",Error: &InterceptorError{Message: "Unable to read request"},})return}// Get the signing secret from Scalekit dashboard > Interceptors tab// Store this securely in environment variablesinterceptorSecret := os.Getenv("SCALEKIT_INTERCEPTOR_SECRET")// Extract headers for verificationheaders := map[string]string{"interceptor-id": c.GetHeader("interceptor-id"),"interceptor-signature": c.GetHeader("interceptor-signature"),"interceptor-timestamp": c.GetHeader("interceptor-timestamp"),}// Initialize Scalekit client (reference installation guide for setup)scalekitClient := scalekit.NewScalekitClient(os.Getenv("SCALEKIT_ENVIRONMENT_URL"),os.Getenv("SCALEKIT_CLIENT_ID"),os.Getenv("SCALEKIT_CLIENT_SECRET"),)// Verify the interceptor payload signature// This confirms the request is from Scalekit and hasn't been tampered with_, err = scalekitClient.VerifyInterceptorPayload(interceptorSecret,headers,bodyBytes,)if err != nil {log.Printf("Interceptor verification failed: %v", err)// DENY on verification failures to fail securelyc.JSON(http.StatusOK, InterceptorResponse{Decision: "DENY",Error: &InterceptorError{Message: "Invalid request signature"},})return}// ✓ Request verified - proceed to business logic (next step)}Spring Boot - Verify request signature // Security: ALWAYS verify requests are from Scalekit before processing// This prevents unauthorized parties from triggering your interceptor logicpackage com.example.auth;import org.springframework.http.ResponseEntity;import org.springframework.web.bind.annotation.*;import java.util.Map;@RestController@RequestMapping("/auth/interceptors")public class InterceptorController {@PostMapping("/pre-signup")public ResponseEntity<Map<String, Object>> preSignupInterceptor(@RequestBody String body,@RequestHeader Map<String, String> headers) {try {// Get the signing secret from Scalekit dashboard > Interceptors tab// Store this securely in environment variablesString interceptorSecret = System.getenv("SCALEKIT_INTERCEPTOR_SECRET");// Initialize Scalekit client (reference installation guide for setup)ScalekitClient scalekitClient = new ScalekitClient(System.getenv("SCALEKIT_ENVIRONMENT_URL"),System.getenv("SCALEKIT_CLIENT_ID"),System.getenv("SCALEKIT_CLIENT_SECRET"));// Verify the interceptor payload signature// This confirms the request is from Scalekit and hasn't been tampered withboolean valid = scalekitClient.interceptor().verifyInterceptorPayload(interceptorSecret, headers, body.getBytes());if (!valid) {// DENY on invalid signaturesreturn ResponseEntity.ok(Map.of("decision", "DENY","error", Map.of("message", "Invalid request signature")));}// ✓ Request verified - proceed to business logic (next step)} catch (Exception error) {System.err.println("Interceptor verification failed: " + error.getMessage());// DENY on verification failures to fail securelyreturn ResponseEntity.ok(Map.of("decision", "DENY","error", Map.of("message", "Unable to process request. Please try again later.")));}}} -
Implement business logic and respond
Section titled “Implement business logic and respond”After verification, extract data from the payload, apply your custom validation logic, and return either ALLOW or DENY to control the authentication flow.
Express.js - Business logic and response // Use case: Apply custom validation rules before allowing authentication// Examples: email domain validation, IP filtering, database checks, etc.app.post('/auth/interceptors/pre-signup', async (req, res) => {try {// ... (verification code from Step 1)// Extract data from the verified payloadconst { interceptor_context, data } = event;const userEmail = interceptor_context?.user_email || data?.user?.email;// Implement your business logic// Example: Validate email domain against an allowlistconst emailDomain = userEmail?.split('@')[1];const allowedDomains = ['company.com', 'example.com'];if (!allowedDomains.includes(emailDomain)) {// DENY: Block the authentication flowreturn res.status(200).json({decision: 'DENY',error: {message: 'Sign-ups from this email domain are not permitted.'}});}// Optional: Log successful validations for audit purposesconsole.log(`Allowed signup for ${userEmail}`);// ALLOW: Permit the authentication flow to continuereturn res.status(200).json({decision: 'ALLOW'});} catch (error) {console.error('Interceptor error:', error);return res.status(200).json({decision: 'DENY',error: {message: 'Unable to process request. Please try again later.'}});}});Flask - Business logic and response # Use case: Apply custom validation rules before allowing authentication# Examples: email domain validation, IP filtering, database checks, etc.@app.route('/auth/interceptors/pre-signup', methods=['POST'])def interceptor_pre_signup():try:# ... (verification code from Step 1)# Extract data from the verified payloadinterceptor_context = event.get('interceptor_context', {})data = event.get('data', {})user_email = interceptor_context.get('user_email') or data.get('user', {}).get('email')# Implement your business logic# Example: Validate email domain against an allowlistemail_domain = user_email.split('@')[1] if user_email else ''allowed_domains = ['company.com', 'example.com']if email_domain not in allowed_domains:# DENY: Block the authentication flowreturn jsonify({'decision': 'DENY','error': {'message': 'Sign-ups from this email domain are not permitted.'}}), 200# Optional: Log successful validations for audit purposesprint(f'Allowed signup for {user_email}')# ALLOW: Permit the authentication flow to continuereturn jsonify({'decision': 'ALLOW'}), 200except Exception as error:print(f'Interceptor error: {error}')return jsonify({'decision': 'DENY','error': {'message': 'Unable to process request. Please try again later.'}}), 200Gin - Business logic and response // Use case: Apply custom validation rules before allowing authentication// Examples: email domain validation, IP filtering, database checks, etc.package mainimport ("encoding/json""strings")type InterceptorEvent struct {InterceptorContext struct {UserEmail string `json:"user_email"`} `json:"interceptor_context"`Data struct {User struct {Email string `json:"email"`} `json:"user"`} `json:"data"`}func interceptorPreSignup(c *gin.Context) {// ... (verification code from Step 1)// Extract data from the verified payloadvar event InterceptorEventif err := json.Unmarshal(bodyBytes, &event); err != nil {c.JSON(http.StatusOK, InterceptorResponse{Decision: "DENY",Error: &InterceptorError{Message: "Invalid request format"},})return}userEmail := event.InterceptorContext.UserEmailif userEmail == "" {userEmail = event.Data.User.Email}// Implement your business logic// Example: Validate email domain against an allowlistparts := strings.Split(userEmail, "@")if len(parts) != 2 {c.JSON(http.StatusOK, InterceptorResponse{Decision: "DENY",Error: &InterceptorError{Message: "Invalid email address"},})return}emailDomain := parts[1]allowedDomains := []string{"company.com", "example.com"}allowed := falsefor _, domain := range allowedDomains {if emailDomain == domain {allowed = truebreak}}if !allowed {// DENY: Block the authentication flowc.JSON(http.StatusOK, InterceptorResponse{Decision: "DENY",Error: &InterceptorError{Message: "Sign-ups from this email domain are not permitted.",},})return}// Optional: Log successful validations for audit purposeslog.Printf("Allowed signup for %s", userEmail)// ALLOW: Permit the authentication flow to continuec.JSON(http.StatusOK, InterceptorResponse{Decision: "ALLOW",})}Spring Boot - Business logic and response // Use case: Apply custom validation rules before allowing authentication// Examples: email domain validation, IP filtering, database checks, etc.package com.example.auth;import com.fasterxml.jackson.databind.JsonNode;import com.fasterxml.jackson.databind.ObjectMapper;import java.util.Arrays;import java.util.List;@PostMapping("/pre-signup")public ResponseEntity<Map<String, Object>> preSignupInterceptor(@RequestBody String body,@RequestHeader Map<String, String> headers) {try {// ... (verification code from Step 1)// Extract data from the verified payloadObjectMapper mapper = new ObjectMapper();JsonNode event = mapper.readTree(body);JsonNode interceptorContext = event.get("interceptor_context");JsonNode data = event.get("data");String userEmail = null;if (interceptorContext != null && interceptorContext.has("user_email")) {userEmail = interceptorContext.get("user_email").asText();} else if (data != null && data.has("user")) {userEmail = data.get("user").get("email").asText();}// Implement your business logic// Example: Validate email domain against an allowlistif (userEmail != null && userEmail.contains("@")) {String emailDomain = userEmail.split("@")[1];List<String> allowedDomains = Arrays.asList("company.com", "example.com");if (!allowedDomains.contains(emailDomain)) {// DENY: Block the authentication flowreturn ResponseEntity.ok(Map.of("decision", "DENY","error", Map.of("message", "Sign-ups from this email domain are not permitted.")));}}// Optional: Log successful validations for audit purposesSystem.out.println("Allowed signup for " + userEmail);// ALLOW: Permit the authentication flow to continuereturn ResponseEntity.ok(Map.of("decision", "ALLOW"));} catch (Exception error) {System.err.println("Interceptor error: " + error.getMessage());return ResponseEntity.ok(Map.of("decision", "DENY","error", Map.of("message", "Unable to process request. Please try again later.")));}} -
Register the interceptor in Scalekit dashboard
Section titled “Register the interceptor in Scalekit dashboard”Configure your interceptor by specifying the trigger point, endpoint URL, timeout settings, and fallback behavior.
In the Scalekit dashboard, navigate to the Interceptors tab to register your endpoint.
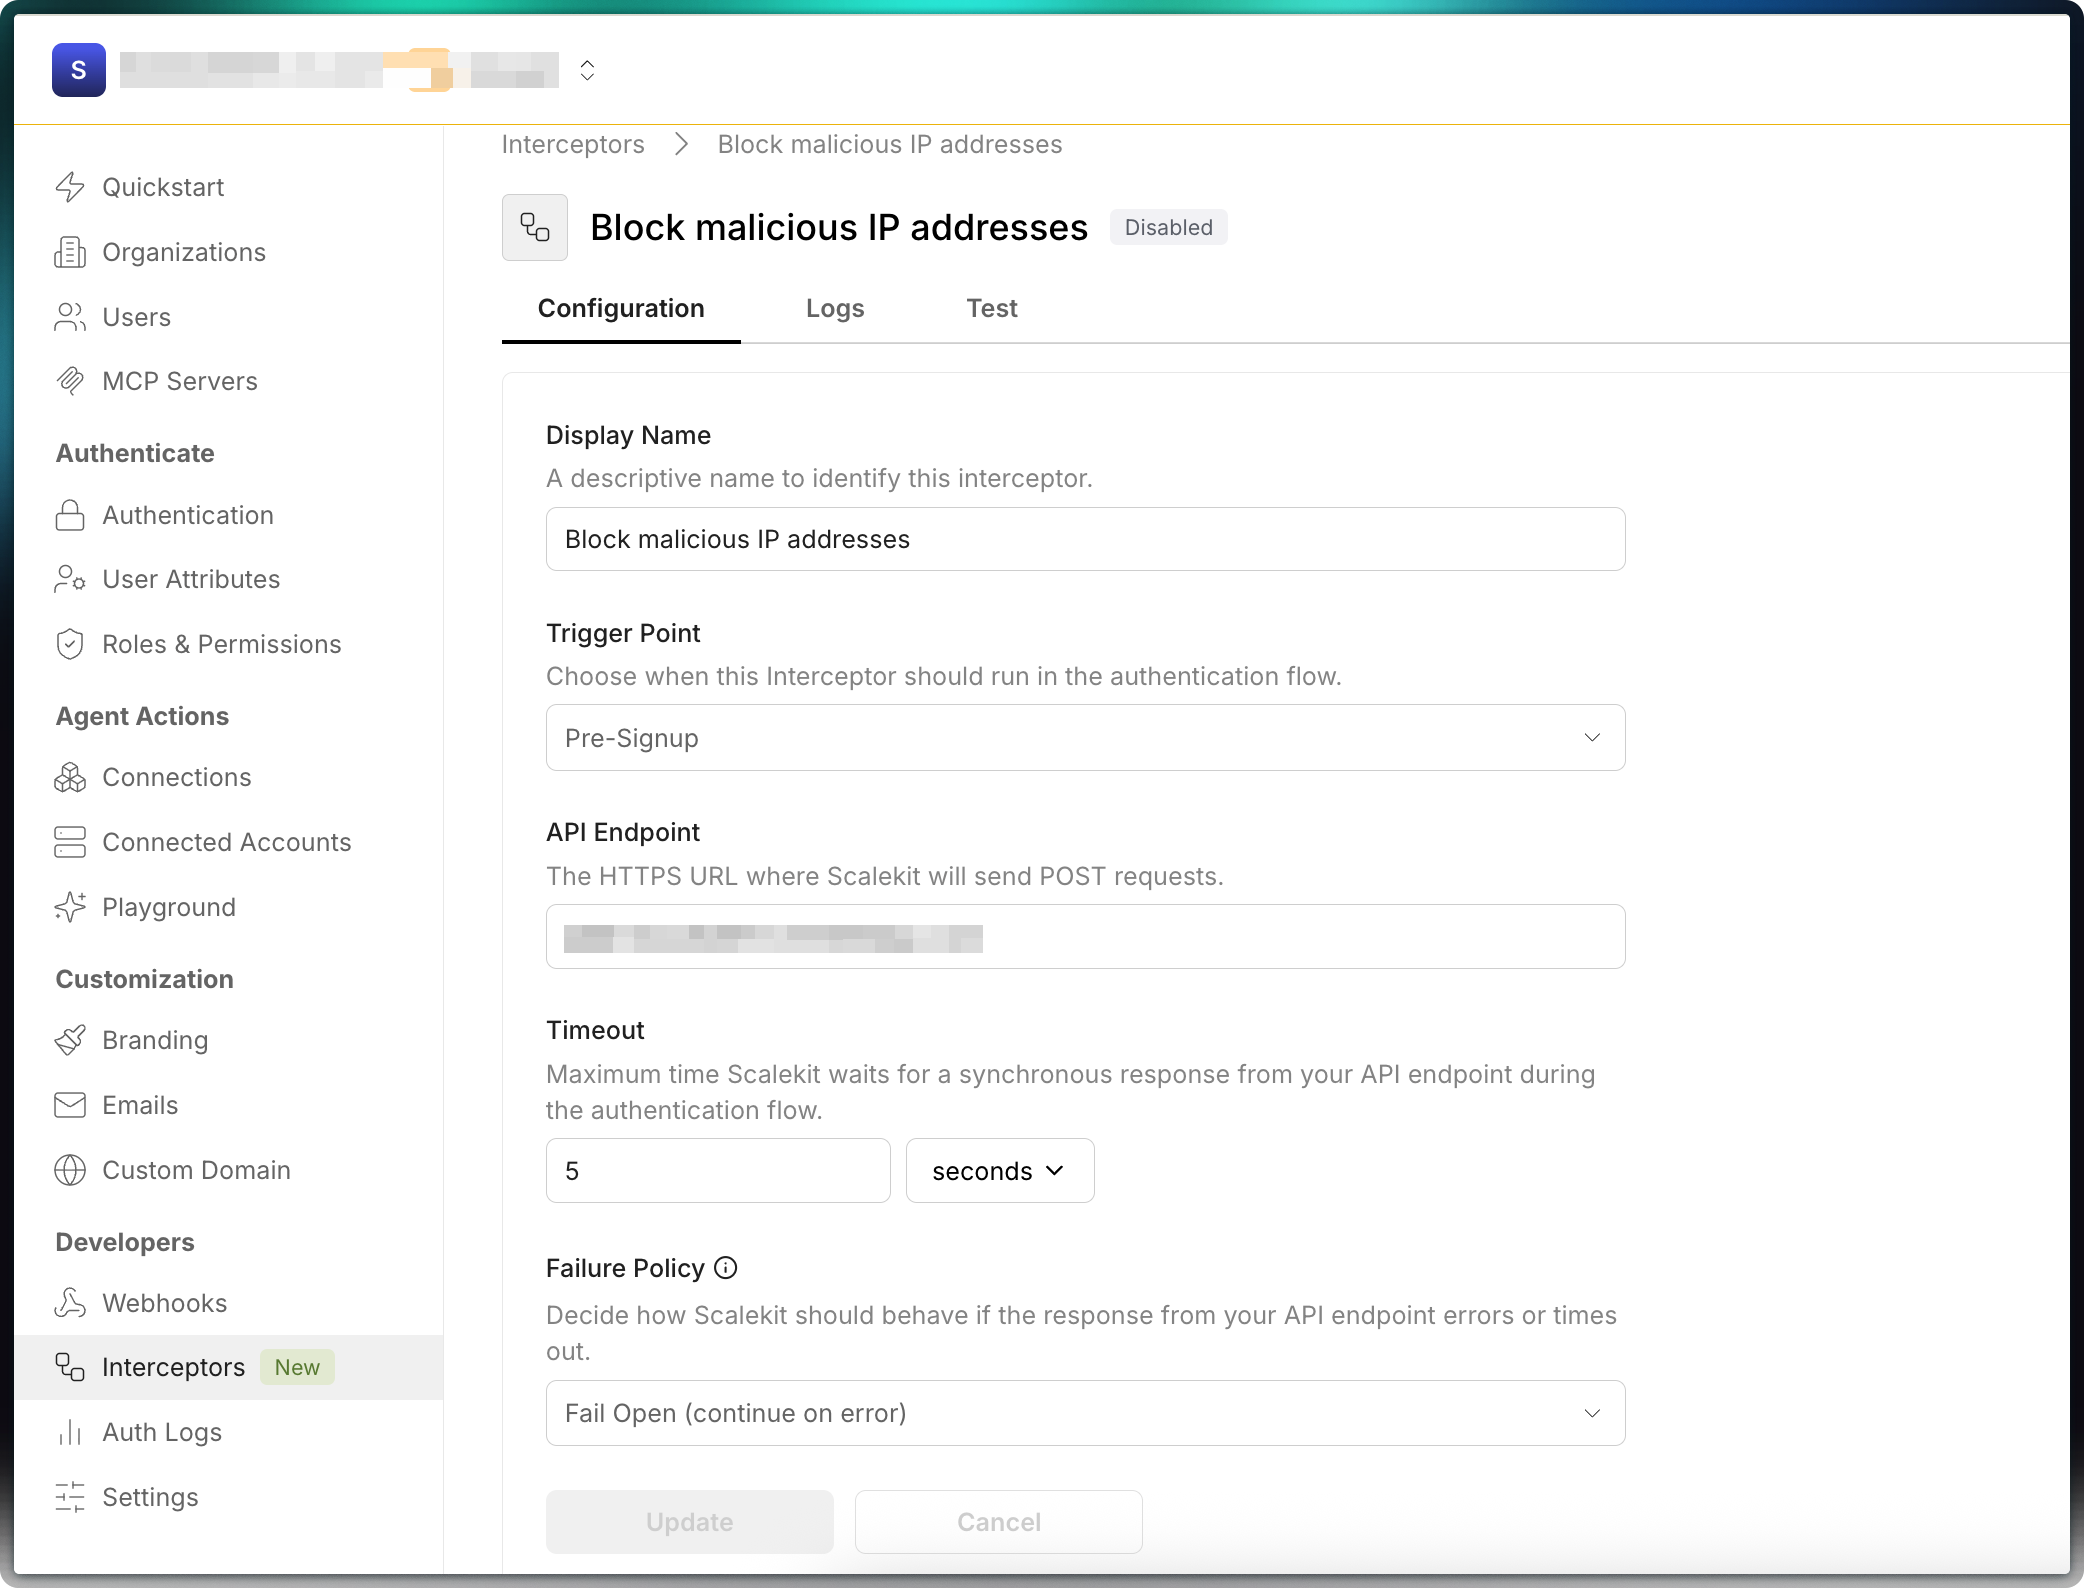
- Enter a descriptive name, choose a trigger point, and provide the HTTPS endpoint that will receive POST requests
- Set the timeout for your app’s response (recommended: 3-5 seconds)
- Choose the fallback behavior if your app fails or times out (allow or block the flow)
- Click Create
- Toggle Enable to activate the interceptor
-
Test the interceptor
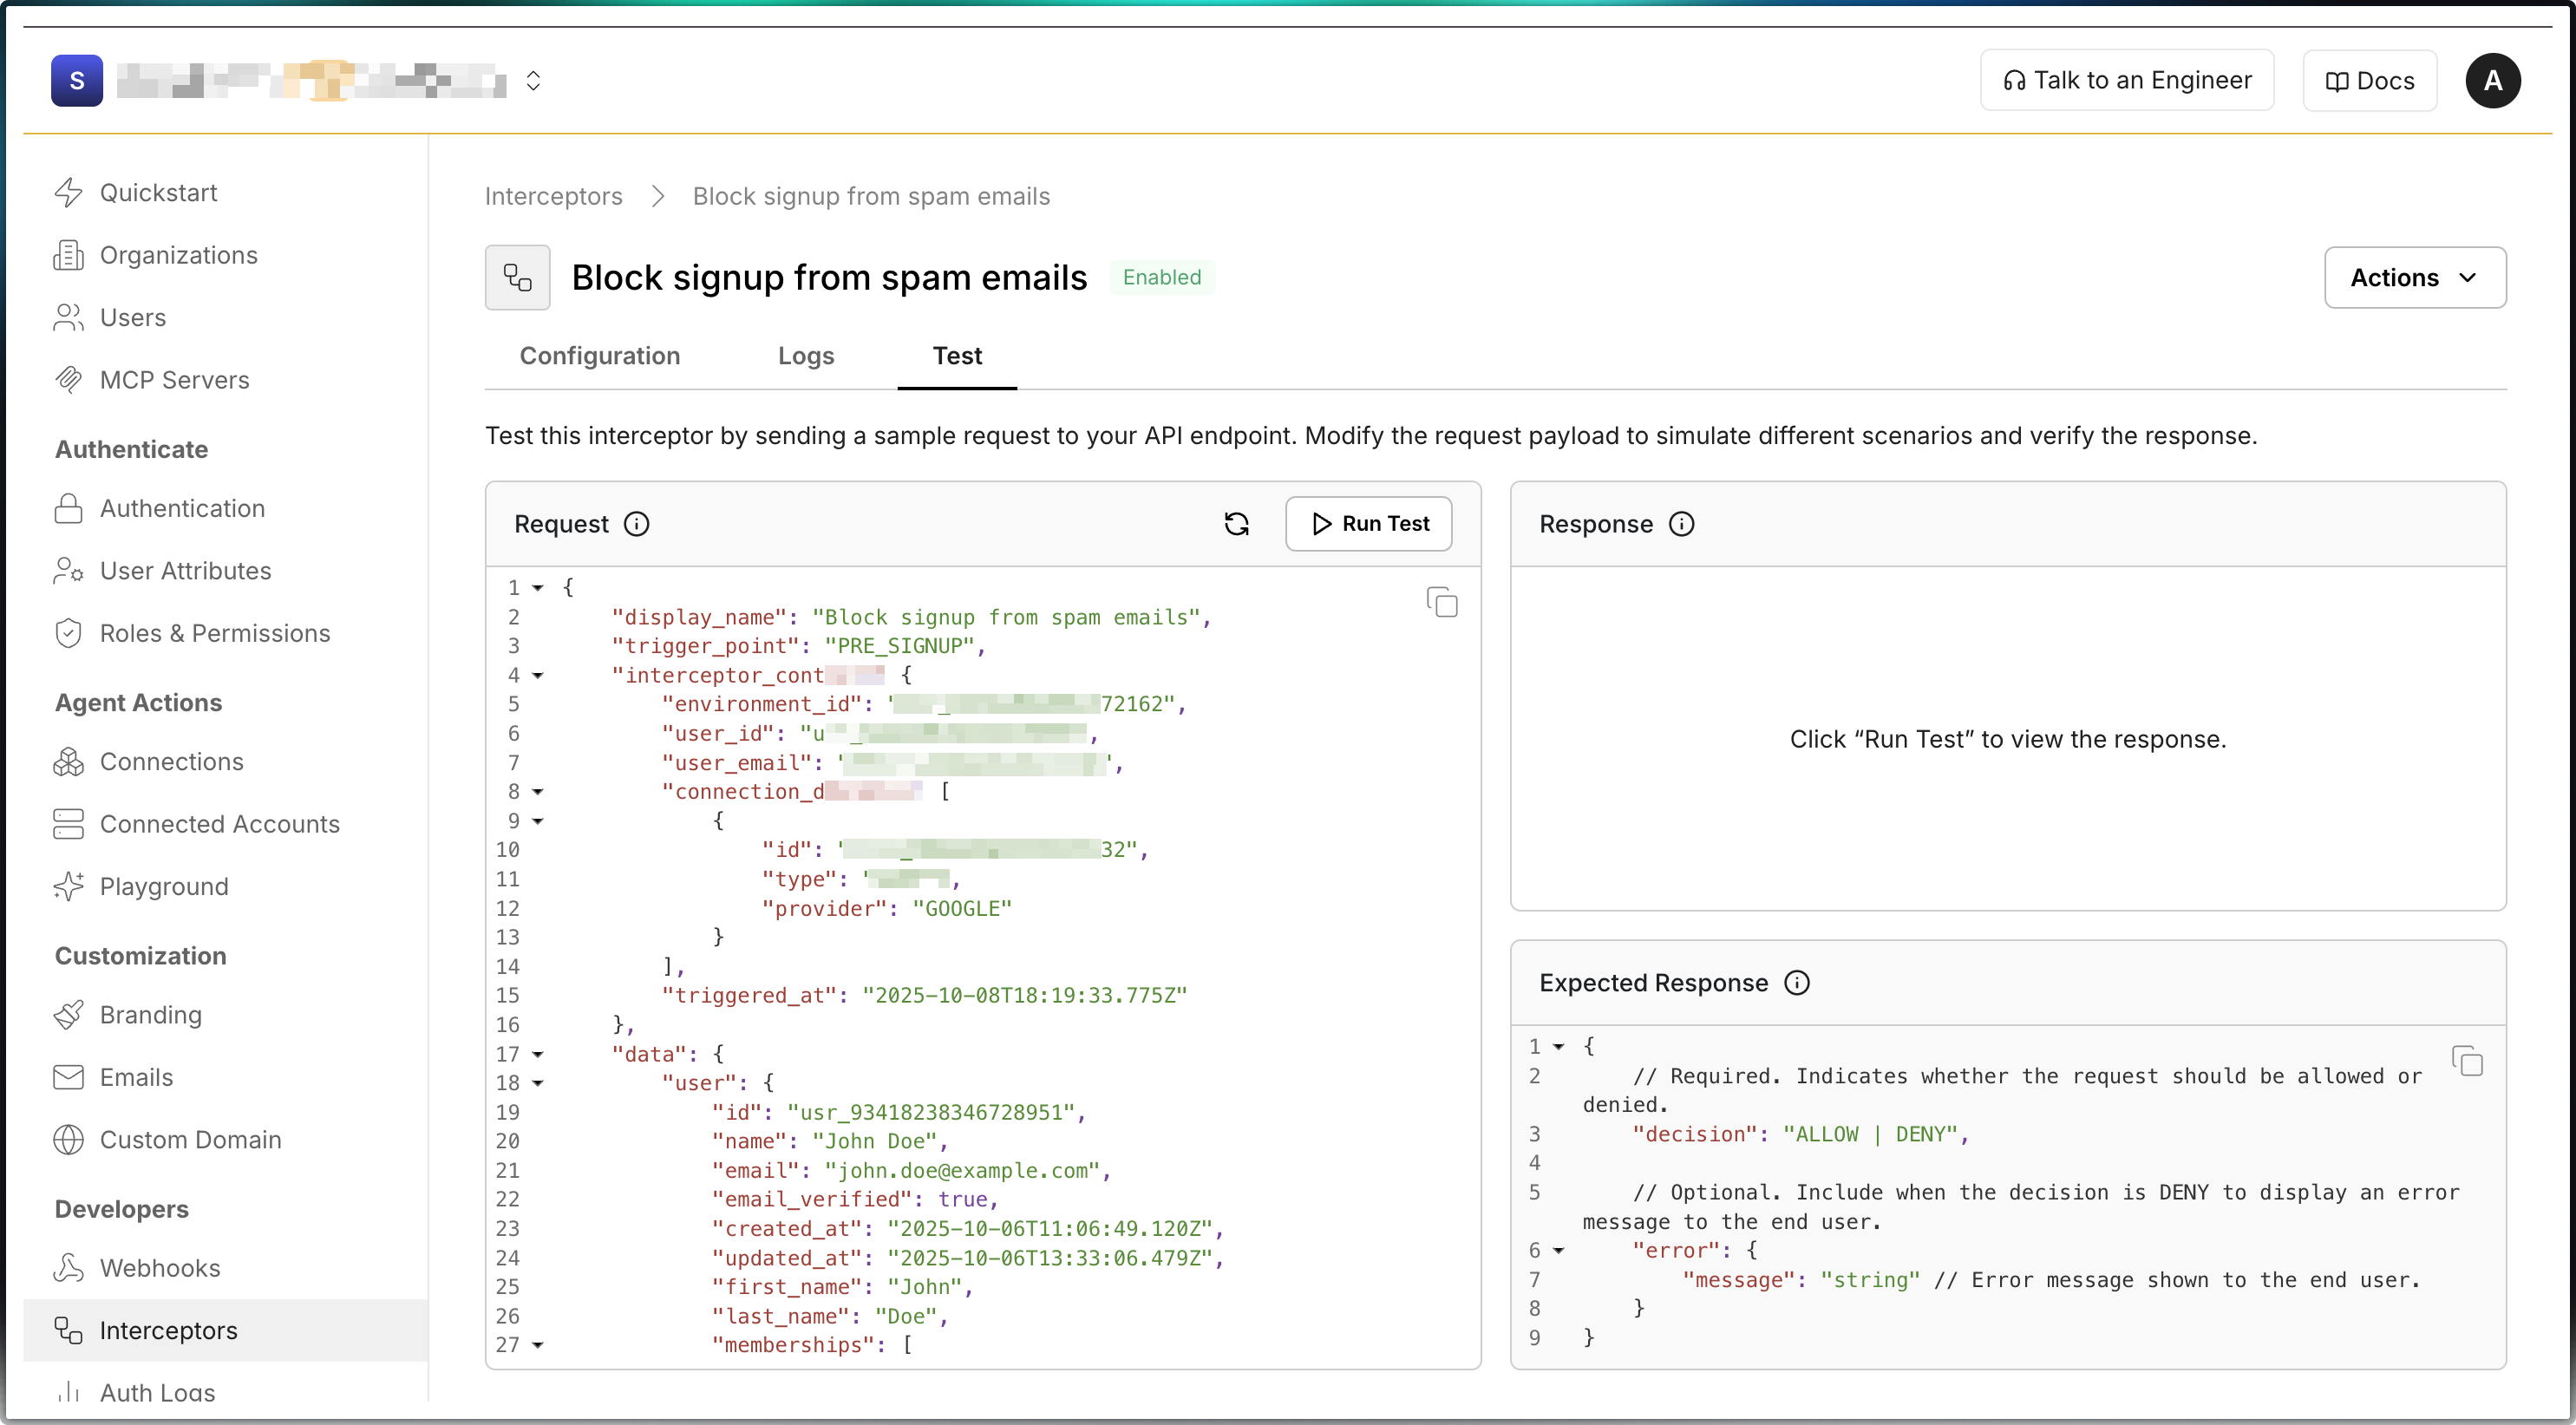
Section titled “Test the interceptor”Use the Test tab in the Scalekit dashboard to verify your implementation before enabling it in production.
- Open the Test tab on the Interceptors page
- The left panel shows the request body sent to your endpoint
- Click Send request to test your interceptor
- The right panel shows your application’s response
- Verify your endpoint returns the expected ALLOW or DENY decision
-
View interceptor request logs
Section titled “View interceptor request logs”Scalekit keeps a log of every interceptor request sent to your app and the response it returned. Use these logs to debug and troubleshoot issues.
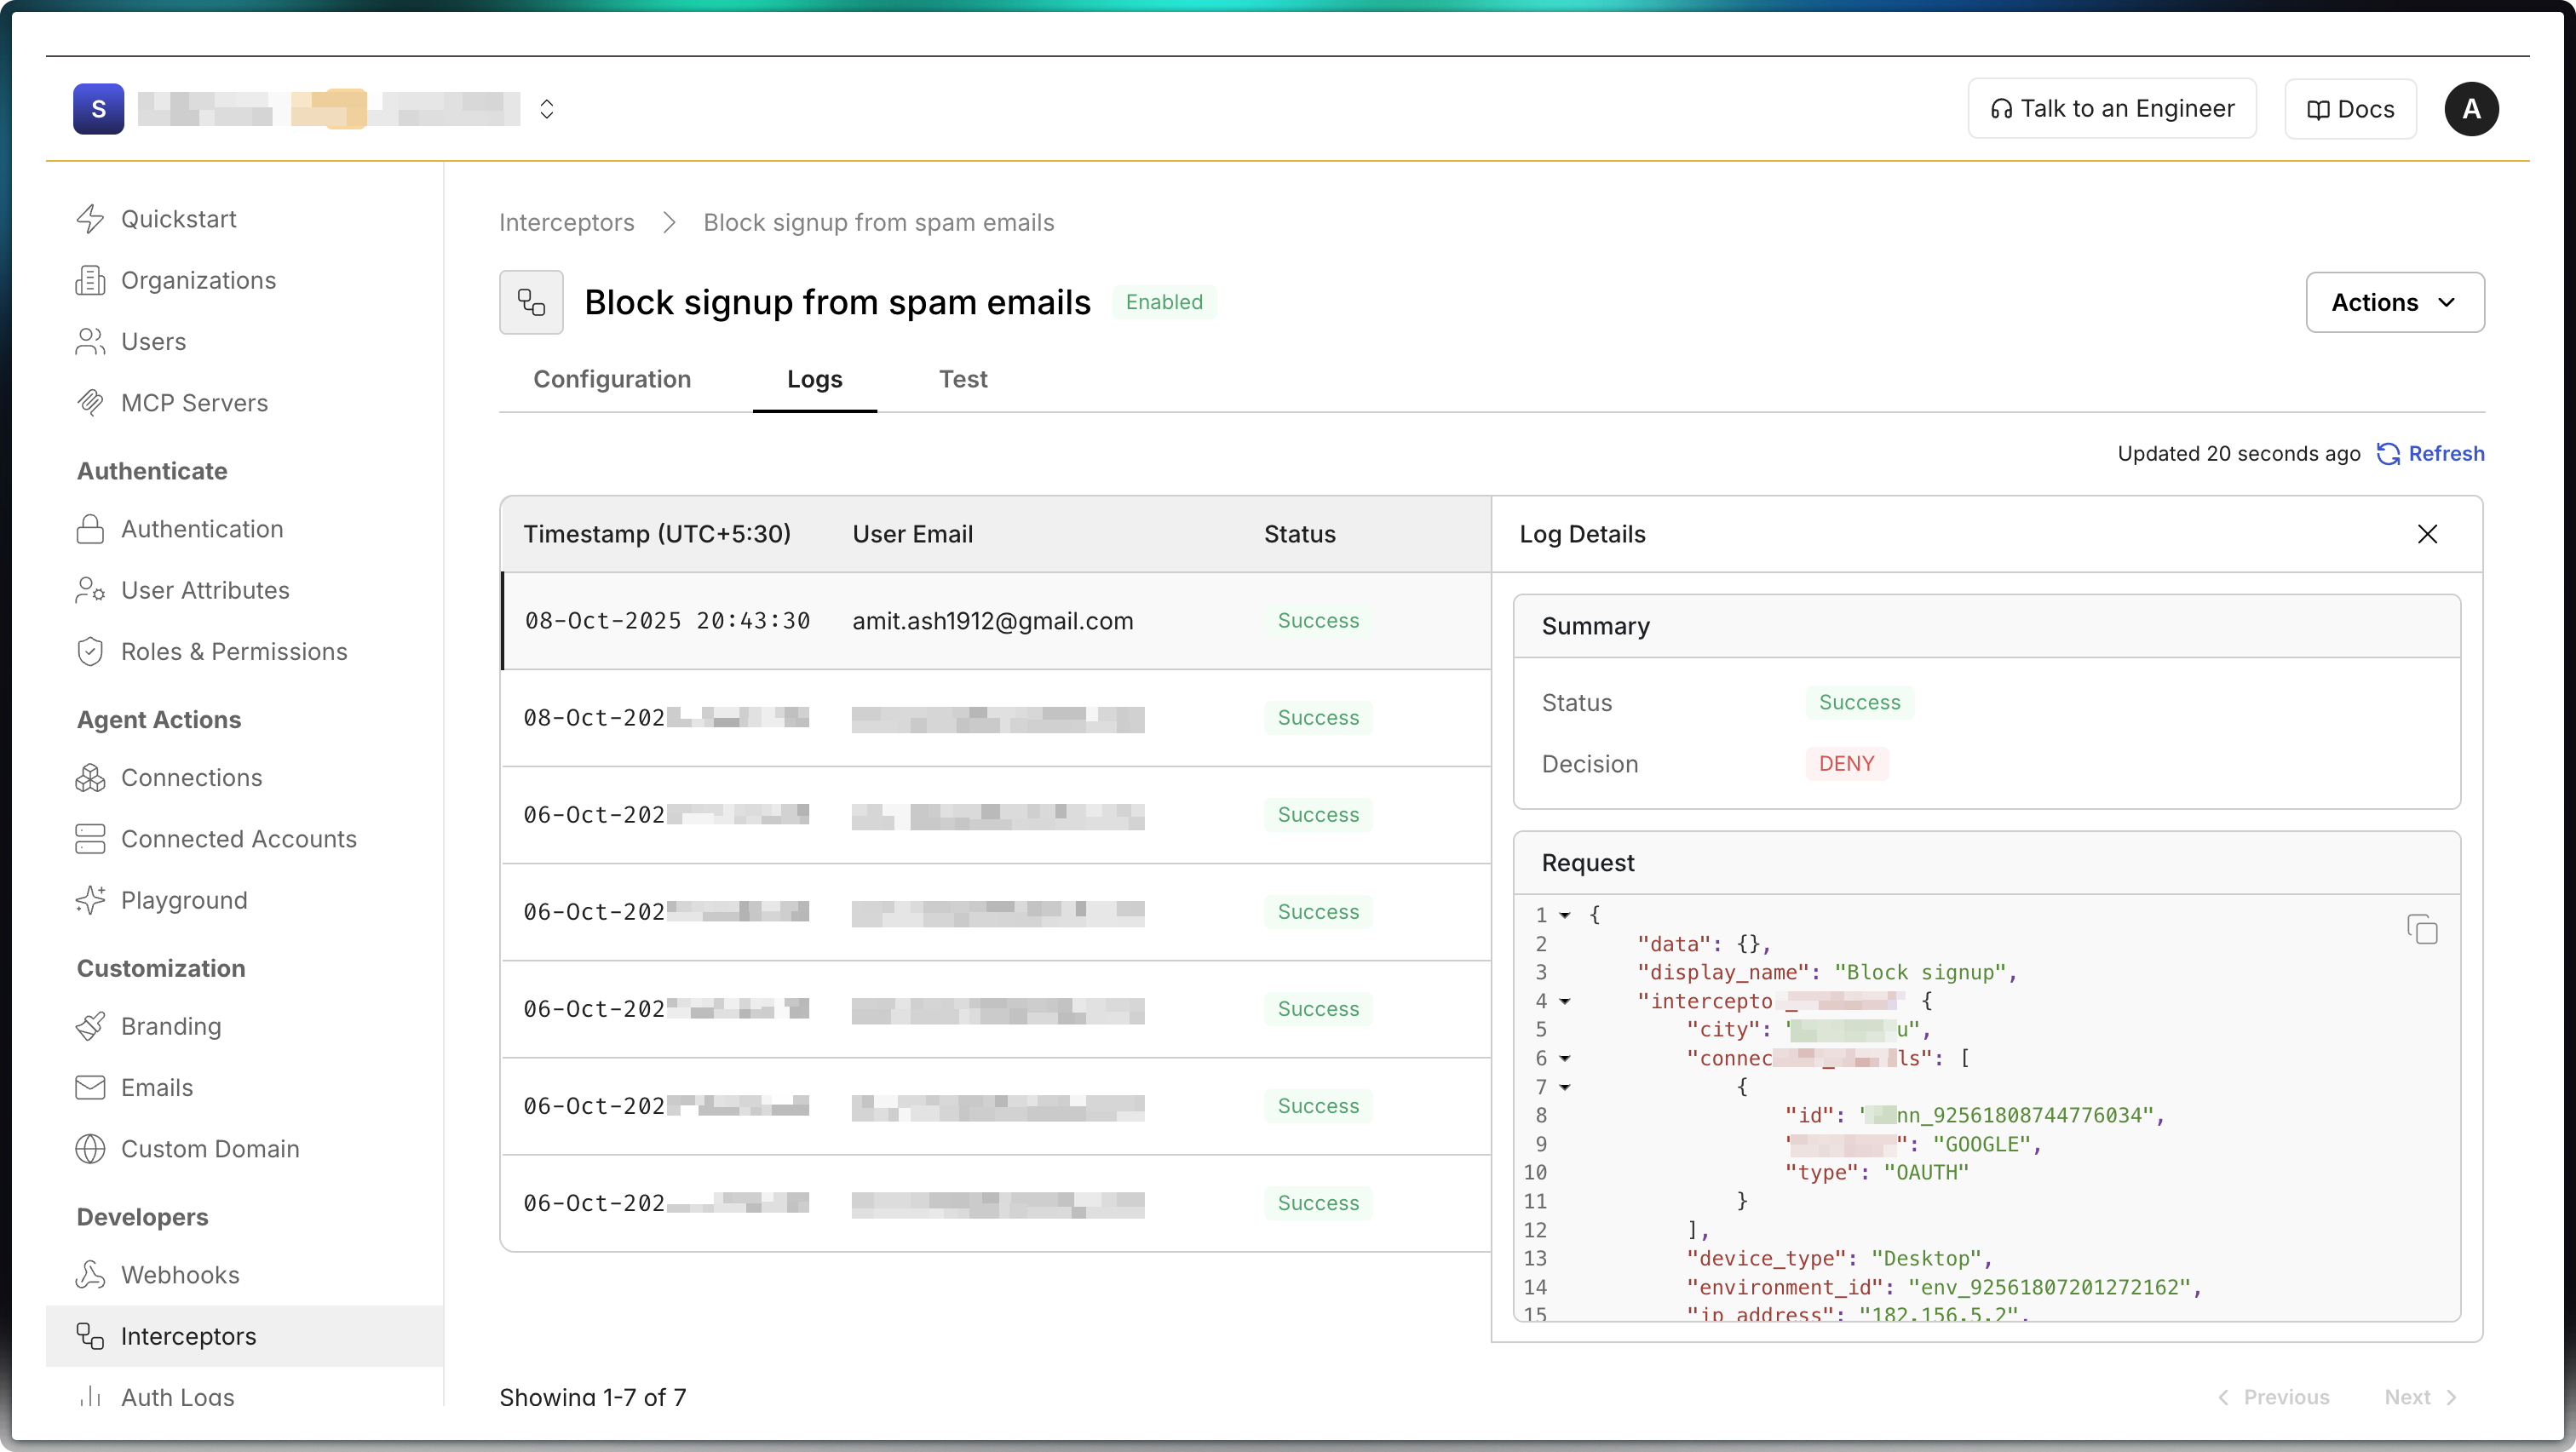
Requests and responses generated by the “Test” button are not logged. This keeps production logs free of test data.
Interceptor examples
Section titled “Interceptor examples”Block signups from restricted IP addresses
Section titled “Block signups from restricted IP addresses”Prevent new user signups from specific IP addresses or geographic regions. The request includes ip_address and region (country code) in interceptor_context.
app.post('/auth/interceptor/pre-signup', async (req, res) => { const { interceptor_context } = req.body;
// Extract IP address and region from the request const ipAddress = interceptor_context.ip_address; const region = interceptor_context.region;
// Define your IP blocklist (you can also check against a database) const blockedIPs = ['203.0.113.24', '198.51.100.42']; const blockedRegions = ['XX', 'YY']; // Example: blocked region codes
// Check if IP is blocked if (blockedIPs.includes(ipAddress)) { return res.json({ decision: 'DENY', error: { message: 'Signups from your IP address are not allowed due to security policy' } }); }
// Check if region is blocked if (blockedRegions.includes(region)) { return res.json({ decision: 'DENY', error: { message: 'Signups from your location are restricted due to compliance requirements' } }); }
// Allow signup to proceed return res.json({ decision: 'ALLOW' });});@app.post('/auth/interceptor/pre-signup')2 collapsed lines
async def pre_signup(request: Request): body = await request.json() interceptor_context = body['interceptor_context']
# Extract IP address and region from the request ip_address = interceptor_context['ip_address'] region = interceptor_context['region']
# Define your IP blocklist (you can also check against a database) blocked_ips = ['203.0.113.24', '198.51.100.42'] blocked_regions = ['XX', 'YY'] # Example: blocked region codes
# Check if IP is blocked if ip_address in blocked_ips: return { 'decision': 'DENY', 'error': { 'message': 'Signups from your IP address are not allowed due to security policy' } }
# Check if region is blocked if region in blocked_regions: return { 'decision': 'DENY', 'error': { 'message': 'Signups from your location are restricted due to compliance requirements' } }
# Allow signup to proceed return {'decision': 'ALLOW'}Modify claims in session tokens
Section titled “Modify claims in session tokens”Add custom claims to Access tokens issued by Scalekit. Fetch user metadata from your database and return claims in the response.claims object. Claims are automatically included in the access token after authentication.
app.post('/auth/interceptor/pre-session-creation', async (req, res) => { const { interceptor_context } = req.body;
const userId = interceptor_context.user_id; const organizationId = interceptor_context.organization_id;
// Fetch user subscription and permissions from your database const userMetadata = await fetchUserMetadata(userId, organizationId);
// Build custom claims based on your business logic const customClaims = { plan: userMetadata.subscription.plan, // 'free', 'pro', 'enterprise' plan_expires_at: userMetadata.subscription.expiresAt, features: userMetadata.features, // ['analytics', 'api_access', 'advanced_reports'] org_role: userMetadata.organizationRole, // 'admin', 'member', 'viewer' department: userMetadata.department, cost_center: userMetadata.costCenter };
// Return ALLOW decision with custom claims return res.json({ decision: 'ALLOW', response: { claims: customClaims } });});@app.post('/auth/interceptor/pre-session-creation')async def pre_session_creation(request: Request): body = await request.json() interceptor_context = body['interceptor_context']
user_id = interceptor_context['user_id'] organization_id = interceptor_context['organization_id']
# Fetch user subscription and permissions from your database user_metadata = await fetch_user_metadata(user_id, organization_id)
# Build custom claims based on your business logic custom_claims = { 'plan': user_metadata['subscription']['plan'], 'plan_expires_at': user_metadata['subscription']['expires_at'], 'features': user_metadata['features'], 'org_role': user_metadata['organization_role'], 'department': user_metadata['department'], 'cost_center': user_metadata['cost_center'] }
# Return ALLOW decision with custom claims return { 'decision': 'ALLOW', 'response': { 'claims': custom_claims } }After the interceptor returns custom claims, Scalekit includes them in the access token. When you decode the access token, it contains your custom claims in the custom_claims object along with standard JWT fields:
{ "aud": [ "prd_skc_96736847635480854" ], "client_id": "prd_skc_96736847635480854", "custom_claims": { "cost_center": "R&D-001", "department": "Engineering", "features": [ "analytics", "api_access", "advanced_reports" ], "org_role": "admin", "plan": "pro", "plan_expires_at": "2025-12-31T23:59:59Z" }, "exp": 1767964824, "iat": 1767964524, "iss": "https://auth.coffeedesk.app", "jti": "tkn_107201921814692618", "nbf": 1767964524, "oid": "org_97926637244383515",12 collapsed lines
"permissions": [ "data:read", "data:write", "organization:settings" ], "roles": [ "admin" ], "sid": "ses_107201917586768386", "sub": "usr_97931091561677319", "xoid": "wspace_97926637244383515", "xuid": "0a749c69-1153-4a8b-b56d-94ebde9da8de"}Provision a user into an existing organization
Section titled “Provision a user into an existing organization”Use the Pre-signup interceptor to provision a user into an existing organization instead of creating a new one during signup. This is useful when you want users from specific email domains to always join a pre-defined organization, avoiding duplicate organization creation.
In the following example, the B2B application provisions users into an existing organization based on their email domain. If no matching domain is found, the signup flow falls back to the default behavior and creates a new organization.
app.post('/auth/interceptors/pre-signup', async (req, res) => { const { interceptor_context } = req.body;
// Email attempting to sign up const userEmail = interceptor_context.user_email; const emailDomain = userEmail?.split('@')[1];
// Map email domains to organizations const domainOrgMappings = [ { domain: 'acmecorp.com', organization_id: 'org_123456789', external_organization_id: 'ext_acmecorp_123' }, { domain: 'megacorp.com', organization_id: 'org_987654321', external_organization_id: 'ext_megacorp_456' } ];
const match = domainOrgMappings.find( (entry) => entry.domain === emailDomain );
// Fallback to default signup behavior if (!match) { return res.json({ decision: 'ALLOW' }); }
return res.json({ decision: 'ALLOW', response: { create_organization_membership: { // Either external_organization_id or organization_id is required organization_id: match.organization_id, external_organization_id: match.external_organization_id } } });});@app.post('/auth/interceptors/pre-signup')def pre_signup(): body = request.get_json()
interceptor_context = body.get('interceptor_context', {})
# Email attempting to sign up user_email = interceptor_context.get('user_email') email_domain = user_email.split('@')[1] if user_email else None
# Map email domains to organizations domain_org_mappings = [ { domain: 'acmecorp.com', organization_id: 'org_123456789', external_organization_id: 'ext_acmecorp_123' }, { domain: 'megacorp.com', organization_id: 'org_987654321', external_organization_id: 'ext_megacorp_456' } ]
match = next( (entry for entry in domain_org_mappings if entry['domain'] == email_domain), None )
# Fallback to default signup behavior if not match: return {'decision': 'ALLOW'}
return { 'decision': 'ALLOW', 'response': { 'create_organization_membership': { # Either external_organization_id or organization_id is required 'organization_id': match.get('organization_id'), 'external_organization_id': match.get('external_organization_id') } } }