
Enable users to sign in with their Google accounts using OAuth 2.0
Set up →Modular social logins
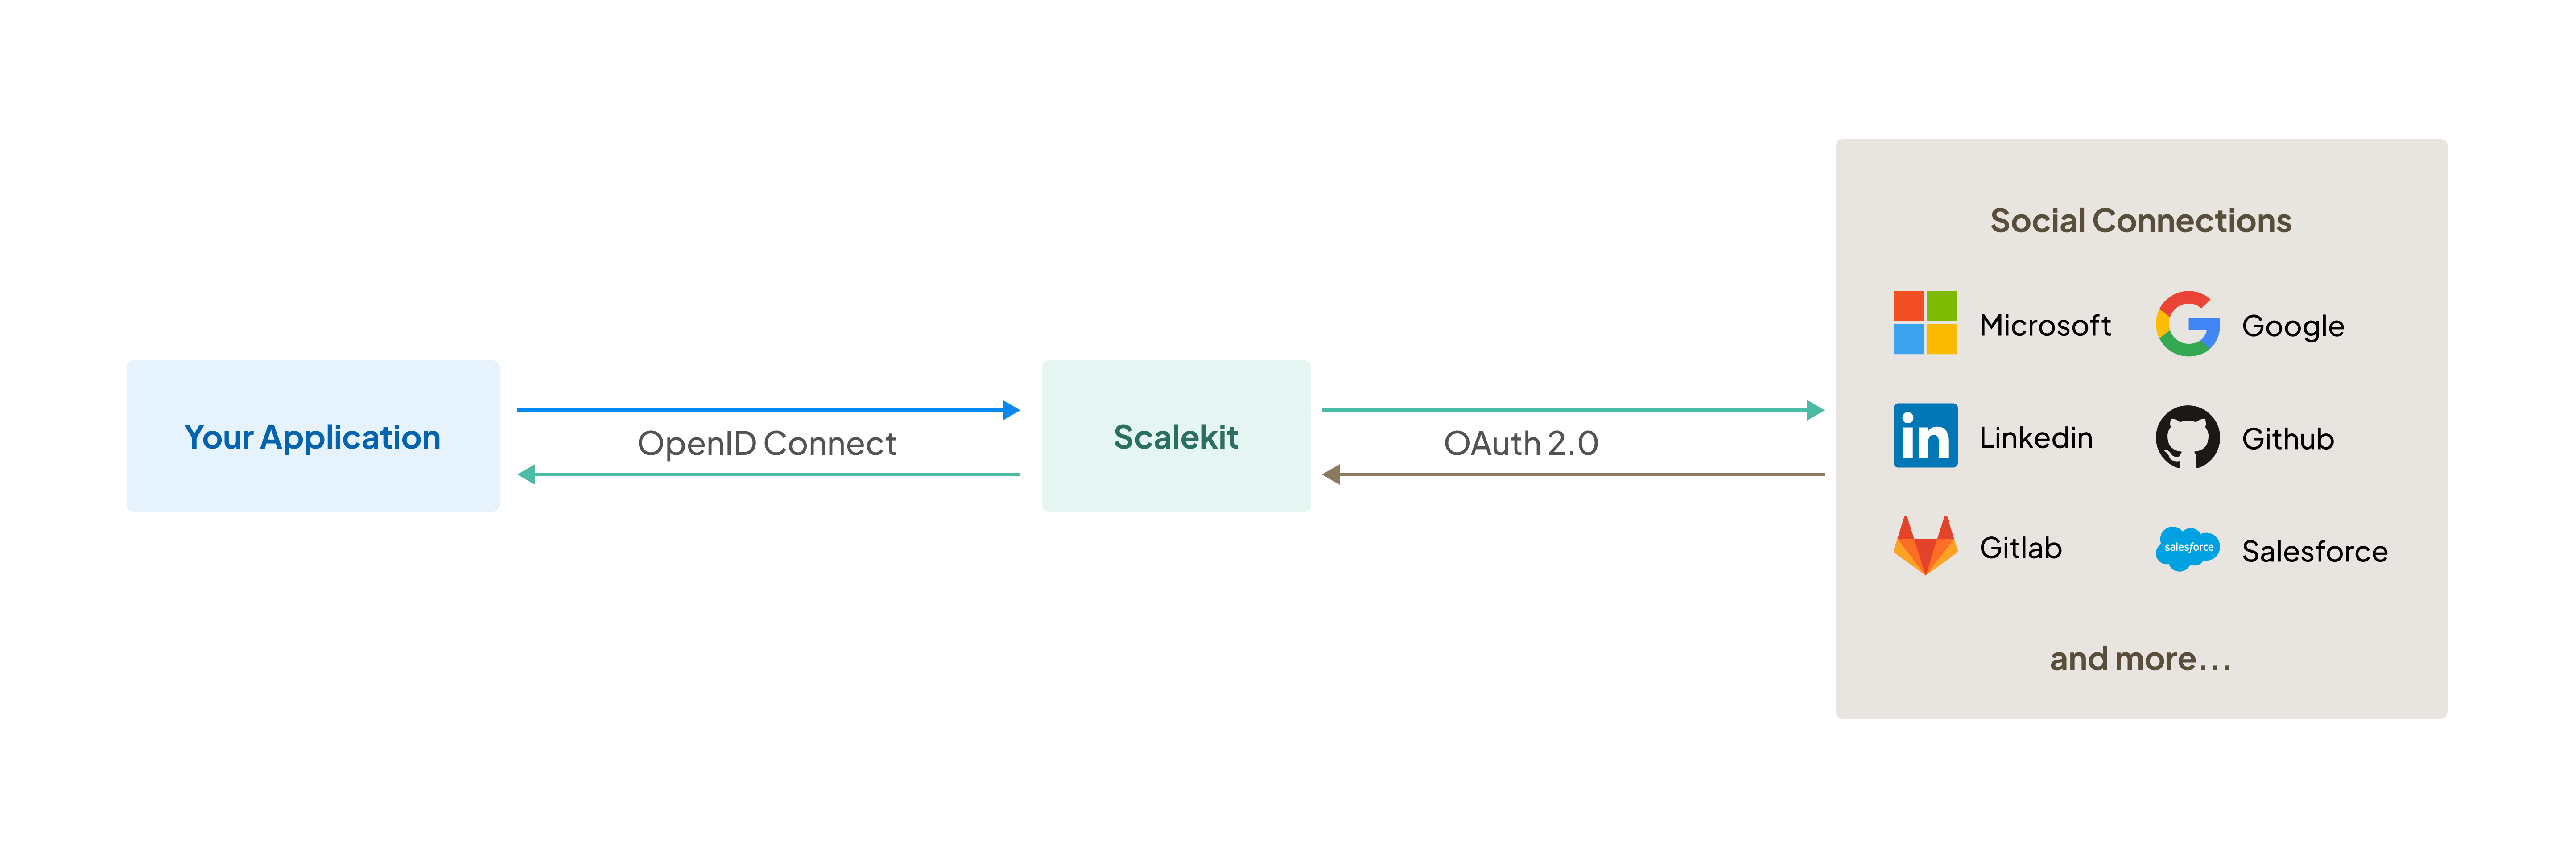
Learn how to integrate modular social logins module with Scalekit
Social login enables authentication through existing accounts from providers like Google, Microsoft, and GitHub. Users don’t need to create or remember new credentials, making the sign-in process faster and more convenient. This guide explains how to implement social login in your application with Scalekit’s OAuth 2.0 integration.
-
Set up Scalekit
Section titled “Set up Scalekit”Use the following instructions to install the SDK for your technology stack.
npm install @scalekit-sdk/nodepip install scalekit-sdk-pythongo get -u github.com/scalekit-inc/scalekit-sdk-go/* Gradle users - add the following to your dependencies in build file */implementation "com.scalekit:scalekit-sdk-java:2.0.11"<!-- Maven users - add the following to your `pom.xml` --><dependency><groupId>com.scalekit</groupId><artifactId>scalekit-sdk-java</artifactId><version>2.0.11</version></dependency>Follow the installation guide to configure Scalekit in your application.
Go to Dashboard > Authentication > General to turn off the Full-Stack Auth since you’d use the modular social logins module. This disables user management and session management features and let’s to only use social login authentication.
-
Configure social login providers
Section titled “Configure social login providers”Google login is pre-configured in all development environments for simplified testing. You can integrate additional social login providers by setting up your own connection credentials with each provider.
Navigate to Authentication > Auth Methods > Social logins in your dashboard to configure these settings
Google
GitHub
Allow users to authenticate using their GitHub credentials
Set up →Microsoft
Integrate Microsoft accounts for seamless user authentication
Set up →GitLab
Enable GitLab-based authentication for your application
Set up →LinkedIn
Let users sign in with their LinkedIn accounts using OAuth 2.0
Set up →Salesforce
Enable Salesforce-based authentication for your application
Set up →After configuration, Scalekit can interact with these providers to authenticate users and verify their identities.
-
From your application, redirect users to provider’s OAuth pages
Section titled “From your application, redirect users to provider’s OAuth pages”Create an authorization URL to redirect users to social provider’s sign-in page. Use the Scalekit SDK to construct this URL with your redirect URI and provider identifier.
Supported
providervalues:google,microsoft,github,salesforce,linkedin,gitlab//const authorizationURL = scalekit.getAuthorizationUrl(redirectUri, {provider: 'google',state: state, // recommended});/*https://auth.scalekit.com/authorize?client_id=skc_122056050118122349527&redirect_uri=https://yourapp.com/auth/callback&provider=google*/options = AuthorizationUrlOptions()options.provider = 'google'authorization_url = scalekit_client.get_authorization_url(redirect_uri=<redirect_uri>,options=options)options := scalekitClient.AuthorizationUrlOptions{}// Pass the social login provider details while constructing the authorization URL.options.Provider = "google"authorizationURL := scalekitClient.GetAuthorizationUrl(redirectUrl,options,)// Next step is to redirect the user to this authorization URL}package com.scalekit;import com.scalekit.internal.http.AuthorizationUrlOptions;public class Main {public static void main(String[] args) {ScalekitClient scalekitClient = new ScalekitClient("<SCALEKIT_ENVIRONMENT_URL>","<SCALEKIT_CLIENT_ID>","<SCALEKIT_CLIENT_SECRET>");AuthorizationUrlOptions options = new AuthorizationUrlOptions();options.setProvider("google");try {// Pass the social login provider details while constructing the authorization URL.String url = scalekitClient.authentication().getAuthorizationUrl(redirectUrl, options).toString();} catch (Exception e) {System.out.println(e.getMessage());}}}After the user successfully authenticates with the selected social login provider, they will be redirected back to your application. Scalekit passes an authorization
codeto your registered callback endpoint, which you’ll use in the next step to retrieve user information. -
Get user details from the callback
Section titled “Get user details from the callback”After successful authentication, Scalekit creates a user record and sends the user information to your callback endpoint.
- Add a callback endpoint in your application (typically
https://your-app.com/auth/callback) - Register it in your Scalekit dashboard > Authentication > Redirect URLS > Allowed Callback URLs
In authentication flow, Scalekit redirects to your callback URL with an authorization code. Your application exchanges this code for the user’s profile information and proceed to creating session and logging in the user.
const { code, state, error, error_description } = req.query;if (error) {// Handle errors (use error_description if present)}const authResult = await scalekit.authenticateWithCode(code, redirectUri);// authResult.user has the authenticated user's detailsconst userEmail = authResult.user.email;// Next step: create a session for this user and allow accesscode = request.args.get('code')error = request.args.get('error')error_description = request.args.get('error_description')if error:raise Exception(error_description)auth_result = scalekit_client.authenticate_with_code(code,<redirect_uri>)# result.user has the authenticated user's detailsuser_email = auth_result.user.email# Next step: create a session for this user and allow accesscode := r.URL.Query().Get("code")error := r.URL.Query().Get("error")errorDescription := r.URL.Query().Get("error_description")if error != "" {// Handle errors and exit}authResult, err := scalekitClient.AuthenticateWithCode(r.Context(), code, redirectUrl)if err != nil {// Handle errors and exit}// authResult.User has the authenticated user's detailsuserEmail := authResult.User.Email// Next step: create a session for this user and allow accessString code = request.getParameter("code");String error = request.getParameter("error");String errorDescription = request.getParameter("error_description");if (error != null && !error.isEmpty()) {// Handle errorsreturn;}try {AuthenticationResponse res = scalekitClient.authentication().authenticateWithCode(code, redirectUrl);// res.getIdTokenClaims() has the authenticated user's detailsString userEmail = res.getIdTokenClaims().getEmail();} catch (Exception e) {// Handle errors}// Next step: create a session for this user and allow accessThe auth result object
{user: {email: "john.doe@example.com" // User's email// any additional common fields},idToken: "<USER_PROFILE_JWT>", // JWT with user profile claimsaccessToken: "<API_CALL_JWT>", // JWT for API callsexpiresIn: 899 // Seconds until expiration}{"alg": "RS256","kid": "snk_82937465019283746","typ": "JWT"}.{"amr": ["conn_92847563920187364"],"at_hash": "j8kqPm3nRt5Kx2Vy9wL_Zp","aud": ["skc_73645291837465928"],"azp": "skc_73645291837465928","c_hash": "Hy4k2M9pWnX7vqR8_Jt3bg","client_id": "skc_73645291837465928","email": "alice.smith@example.com","email_verified": true,"exp": 1751697469,"iat": 1751438269,"iss": "https://demo-company-dev.scalekit.cloud","sid": "ses_83746592018273645","sub": "conn_92847563920187364;alice.smith@example.com" // A scalekit user ID is sent if user management is enabled}.[Signature]{"alg": "RS256","kid": "snk_794467716206433","typ": "JWT"}.{"iss": "https://acme-corp-dev.scalekit.cloud","sub": "conn_794467724427269;robert.wilson@acme.com","aud": ["skc_794467724259497"],"exp": 1751439169,"iat": 1751438269,"nbf": 1751438269,"client_id": "skc_794467724259497","jti": "tkn_794754665320942",// External identifiers if updated on Scalekit"xoid": "ext_org_123", // Organization ID"xuid": "ext_usr_456" // User ID}.[Signature] - Add a callback endpoint in your application (typically
Your application now supports social login authentication. Users can sign in securely using their preferred social identity providers like Google, GitHub, Microsoft, and more.