


The SignWell connector lets your AI agent act in each user's SignWell account. Each user connects their own SignWell API key once, and Scalekit sends it with every call, so your agent never handles credentials. It comes with 26 tools.
- Tools
- 26
- What they doRead · write · destructive
- 11 · 11 · 411 read11 write4 destructive
- Users sign in with
- API key
What you can do
- Send documents for signing: create documents from files or templates, send them to recipients, and send reminders
- Track signing status: check a document’s recipients, fields, and signing progress, and download the completed PDF
- Manage templates: create, update, and delete reusable templates with recipient placeholders and fields
- Run bulk sends: validate a CSV and send one document to many recipients, then track progress
- Manage webhooks: register, list, and delete callback URLs for events like signed, viewed, or declined
Setup
Install the SDK
Terminal window npm install @scalekit-sdk/node dotenvTerminal window pip install scalekit-sdk-python python-dotenvSet your credentials
Add your Scalekit credentials to your
.envfile. Find values in app.scalekit.com > Developers > API Credentials..env SCALEKIT_ENVIRONMENT_URL=<your-environment-url>SCALEKIT_CLIENT_ID=<your-client-id>SCALEKIT_CLIENT_SECRET=<your-client-secret>Create the SignWell connection
In AgentKit > Connections, create a SignWell connection. The name you give it is the
connection_nameyour code passes. See Configure connections.Console steps with screenshots
Register your SignWell API key with Scalekit so it can authenticate and proxy requests on behalf of your users. SignWell uses API key authentication.
-
Get a SignWell API key
-
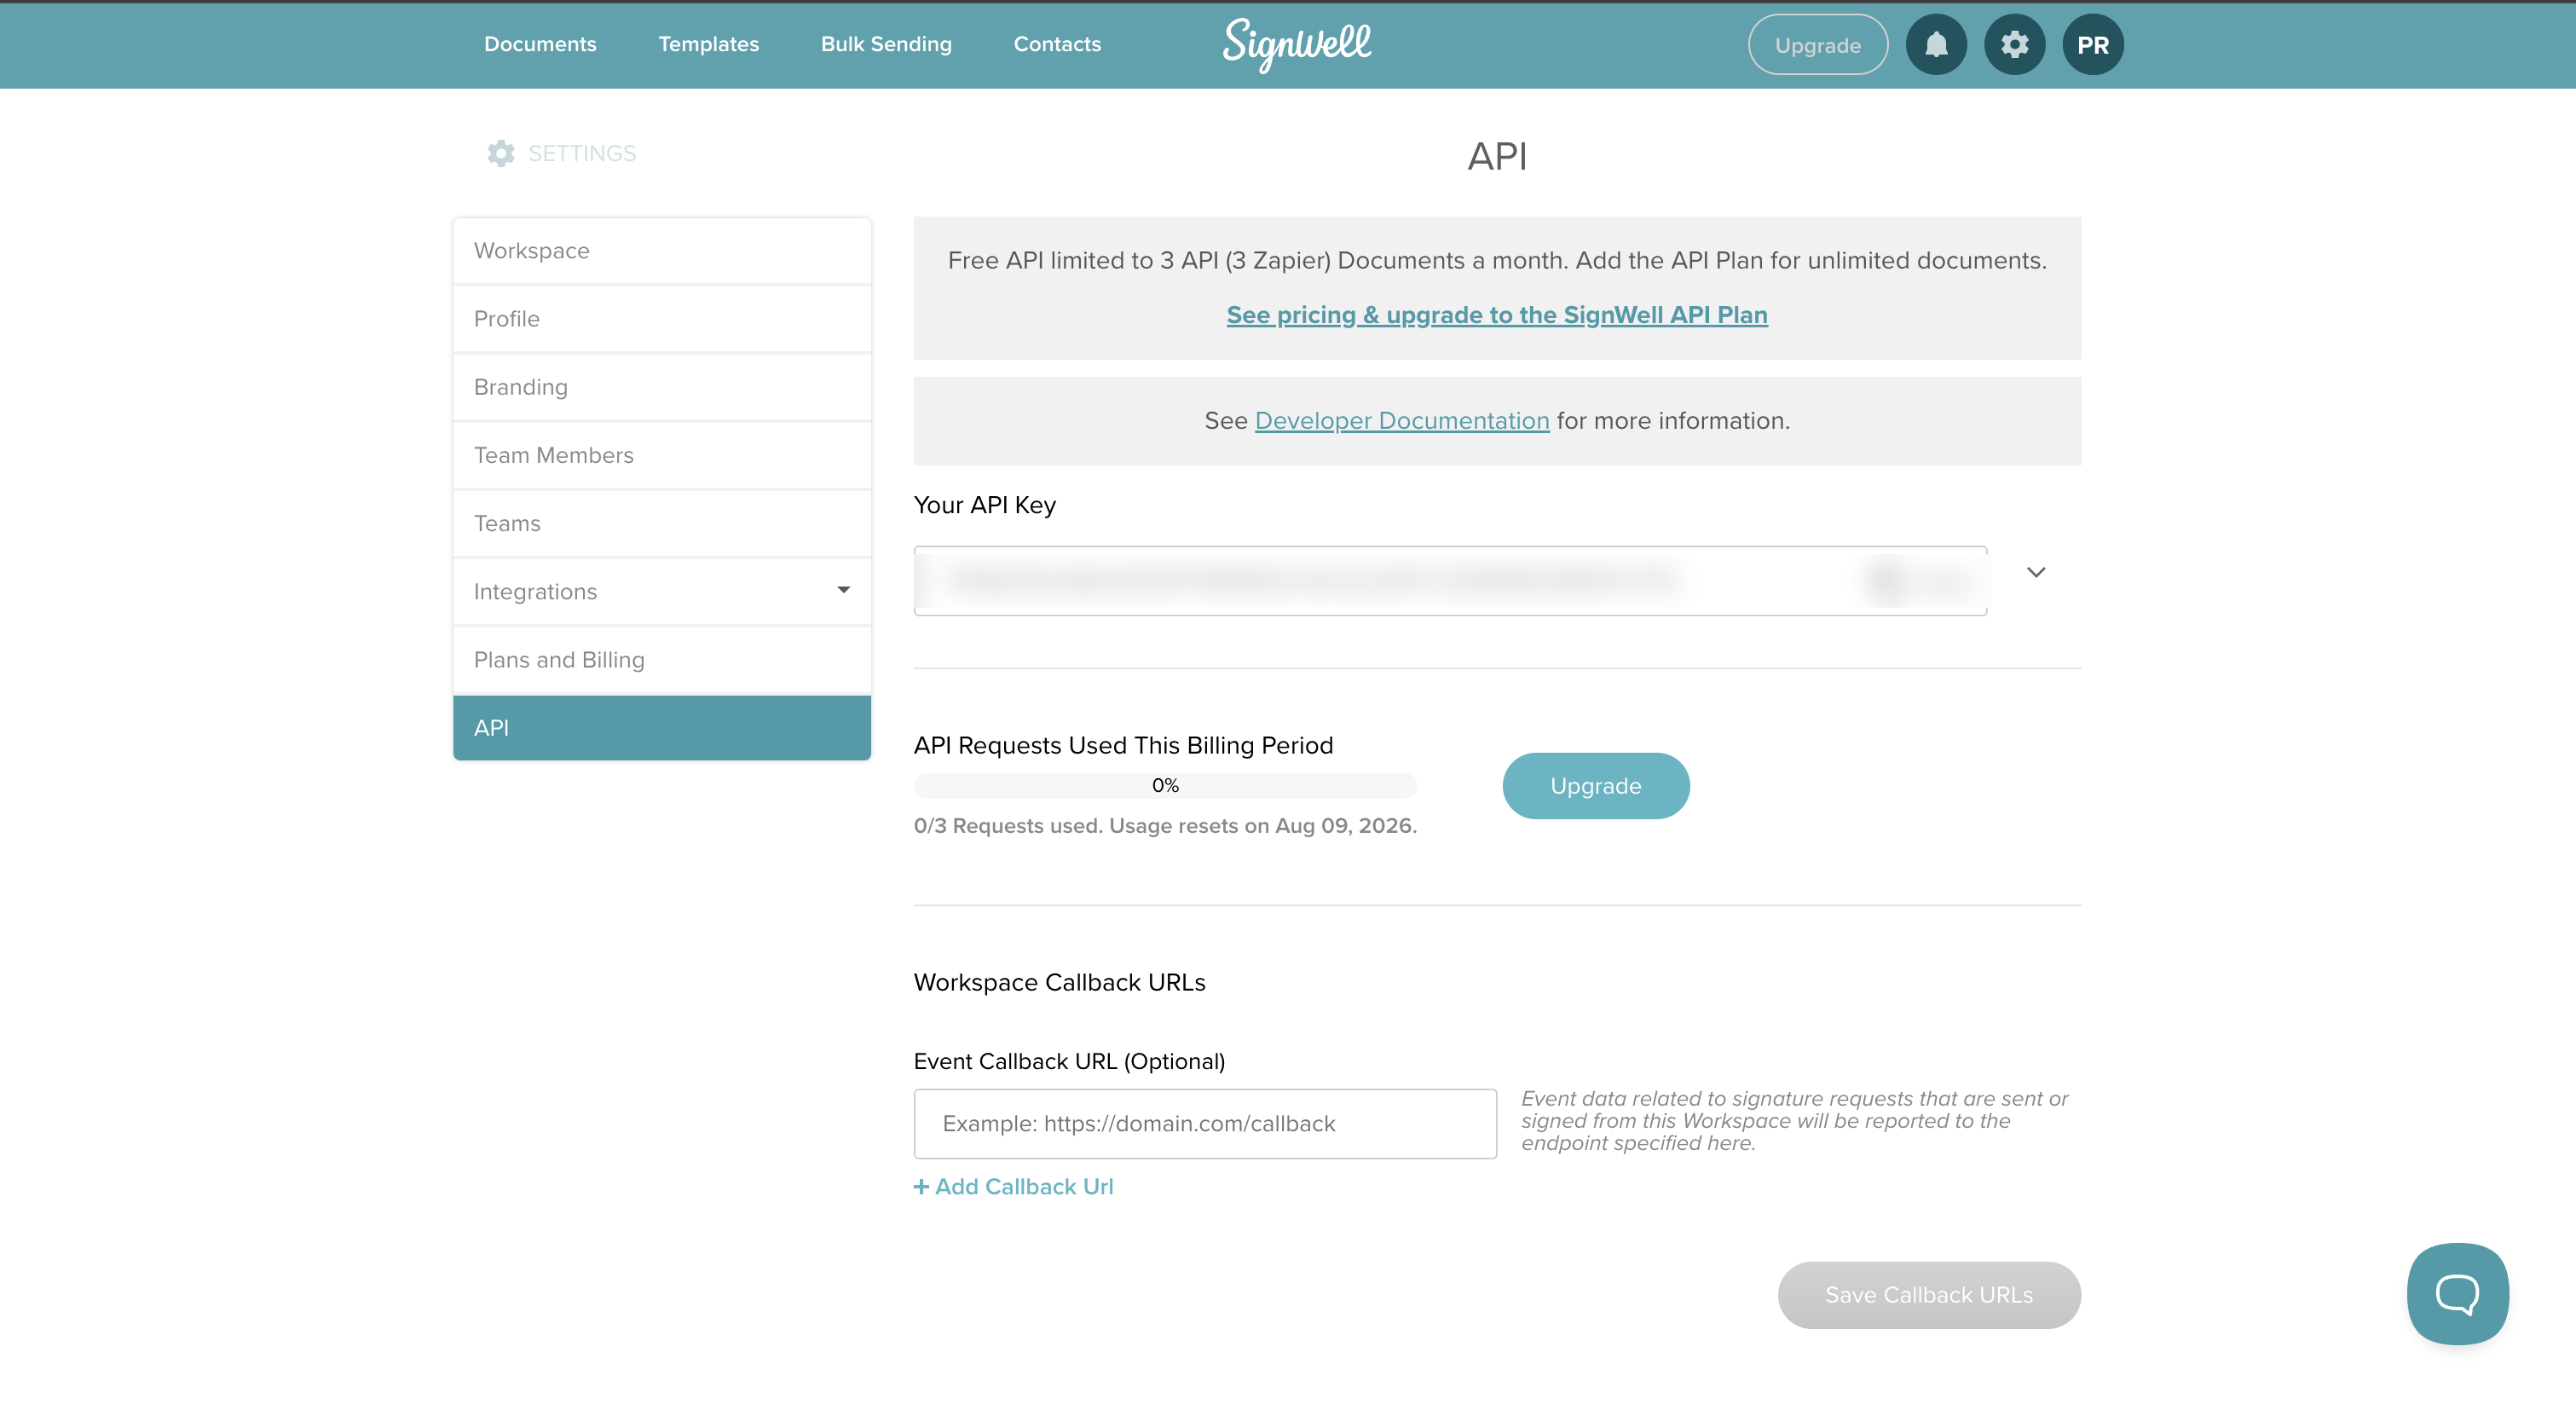
Sign in to signwell.com and go to Settings → API.
-
Under Your API Key, click Copy to copy your key.
-
-
Create a connection in Scalekit
- In the Scalekit dashboard, go to AgentKit → Connections → Create Connection.
- Search for SignWell and click Create.
- Note the Connection name — use this as
connection_namein your code (e.g.,signwell).
-
Add a connected account
Connected accounts link a specific user identifier in your system to a SignWell API key. Add one in the dashboard to test. In production, each user adds their own through the authorization link: they enter their credentials on the page it opens.
In the dashboard, to test
- Open the connection and click the Connected Accounts tab → Add account.
- Fill in Your User’s ID and API Key, then click Save.
From your backend, if your app already has the credentials
For example, when users enter them on a settings page in your app:
import { ConnectorStatus } from '@scalekit-sdk/node'const authorizationDetails = {details: {case: 'staticAuth',value: { details: { api_key: 'your-signwell-api-key' } },},}let { connectedAccount } = await scalekit.actions.upsertConnectedAccount({connectionName: 'signwell',identifier: 'user_123',authorizationDetails,})// Make sure the account is ACTIVE before the first tool call.if (connectedAccount?.status !== ConnectorStatus.ACTIVE) {;({ connectedAccount } = await scalekit.actions.upsertConnectedAccount({connectionName: 'signwell',identifier: 'user_123',authorizationDetails,}))}authorization_details = {"static_auth": {"api_key": "your-signwell-api-key"}}response = scalekit_client.actions.upsert_connected_account(connection_name="signwell",identifier="user_123",authorization_details=authorization_details,)# Make sure the account is ACTIVE before the first tool call.if response.connected_account.status != "ACTIVE":response = scalekit_client.actions.upsert_connected_account(connection_name="signwell",identifier="user_123",authorization_details=authorization_details,)
-
Authorize a user and make your first call
quickstart.mts import { ScalekitClient } from '@scalekit-sdk/node'import 'dotenv/config'import { createInterface } from 'node:readline/promises'const scalekit = new ScalekitClient(process.env.SCALEKIT_ENVIRONMENT_URL,process.env.SCALEKIT_CLIENT_ID,process.env.SCALEKIT_CLIENT_SECRET,)const actions = scalekit.actionsconst connector = 'signwell'const identifier = 'user_123'// Generate an authorization link for the userconst { link } = await actions.getAuthorizationLink({ connectionName: connector, identifier })console.log('Authorize SignWell:', link)const rl = createInterface({ input: process.stdin, output: process.stdout })await rl.question('Press Enter after authorizing...')rl.close()// Make your first callconst result = await actions.executeTool({connector,identifier,toolName: 'signwell_get_me',toolInput: {},})console.log(result)Terminal window npx tsx quickstart.mtsquickstart.py import osfrom scalekit import ScalekitClientfrom dotenv import load_dotenvload_dotenv()scalekit_client = ScalekitClient(env_url=os.getenv("SCALEKIT_ENVIRONMENT_URL"),client_id=os.getenv("SCALEKIT_CLIENT_ID"),client_secret=os.getenv("SCALEKIT_CLIENT_SECRET"),)actions = scalekit_client.actionsconnection_name = "signwell"identifier = "user_123"# Generate an authorization link for the userlink_response = actions.get_authorization_link(connection_name=connection_name,identifier=identifier,)print("Authorize SignWell:", link_response.link)input("Press Enter after authorizing...")# Make your first callresult = actions.execute_tool(tool_input={},tool_name="signwell_get_me",connection_name=connection_name,identifier=identifier,)print(result)Terminal window python quickstart.pyEach user opens the link once and enters their SignWell credentials there. If your app already has a user's credentials, add the account from your backend instead, as the console steps above show. See Authorize a user for the full flow and statuses.
Tools
Pass the exact name toexecute_toolsignwell_get_api_applicationGet details of a specific API Application including preferences and owner information.Read-onlyGet API Application
Get details of a specific API Application including preferences and owner information.
Inputs
idstringrequired- API Application ID (UUID).
signwell_get_bulk_sendGet details and status of a bulk send, including document counts and completion progress.Read-onlyGet Bulk Send
Get details and status of a bulk send, including document counts and completion progress.
Inputs
idstringrequired- Bulk send ID (UUID) to retrieve.
signwell_get_bulk_send_csv_templateGet a blank CSV template for the given template IDs.Read-onlyGet Bulk Send CSV Template
Get a blank CSV template for the given template IDs. Use this to understand the required columns before creating a bulk send.
Inputs
template_idsarrayrequired- Array of template ID strings (UUIDs) to generate the CSV template for.
base64boolean- When true, returns the CSV as a base64-encoded string in JSON. Recommended: true.default
true
signwell_get_bulk_send_documentsList all documents within a bulk send with pagination support.Read-onlyGet Bulk Send Documents
List all documents within a bulk send with pagination support.
Inputs
idstringrequired- Bulk send ID (UUID).
limitinteger- Number of results per page (1-50).default
10 pageinteger- Page number (minimum 1).default
1
signwell_get_completed_pdfGet the URL to download the completed signed document as PDF or ZIP.Read-onlyGet Completed PDF
Get the URL to download the completed signed document as PDF or ZIP. Returns a URL to the signed file.
Inputs
idstringrequired- Unique identifier (UUID) of the completed document.
audit_pageboolean- Include the audit trail page in the downloaded document.default
true file_formatstring- File format for the download: 'pdf' for a single PDF or 'zip' for a ZIP archive.one of
pdfzipdefaultpdf url_onlyboolean- Return JSON with a file_url instead of binary file data. Recommended: true.default
true
signwell_get_documentGet a document and all associated data including recipients, fields, and signing status.Read-onlyGet Document
Get a document and all associated data including recipients, fields, and signing status.
Inputs
idstringrequired- Unique identifier (UUID) of the document to retrieve.
signwell_get_meGet account information and user details associated with the current API key.Read-onlyGet Me
Get account information and user details associated with the current API key.
Inputs
This tool takes no inputs.
signwell_get_nom151_certificateDownload the NOM-151 compliance certificate for a completed document.Read-onlyGet NOM-151 Certificate
Download the NOM-151 compliance certificate for a completed document. NOM-151 is a Mexican regulatory standard for electronic signatures.
Inputs
idstringrequired- Unique identifier (UUID) of the completed document.
object_onlyboolean- If true, returns only the certificate object without additional metadata.
url_onlyboolean- If true, returns only a URL to download the certificate instead of the full object.
signwell_get_templateGet a document template and all associated template data including placeholders and fields.Read-onlyGet Template
Get a document template and all associated template data including placeholders and fields.
Inputs
idstringrequired- Template ID (UUID) of the document template to retrieve.
signwell_list_bulk_sendsList all bulk sends in the account with pagination support.Read-onlyList Bulk Sends
List all bulk sends in the account with pagination support.
Inputs
api_application_idstring- Filter by API Application ID.
limitinteger- Number of results per page (1-50, max 50).default
10 pageinteger- Page number (minimum 1).default
1 user_emailstring- Filter by user email. Admins can view others' bulk sends.
signwell_list_webhooksList all webhook subscriptions configured in the account.Read-onlyList Webhooks
List all webhook subscriptions configured in the account.
Inputs
This tool takes no inputs.
signwell_create_bulk_sendCreate a bulk send to send a document to many recipients at once using a CSV file and one or more templates.WriteCreate Bulk Send
Create a bulk send to send a document to many recipients at once using a CSV file and one or more templates.
Inputs
bulk_send_csvstringrequired- RFC 4648 base64-encoded CSV file content. Use Get Bulk Send CSV Template to retrieve the correct column format.
template_idsarrayrequired- Array of template ID strings (UUIDs) to use for the bulk send.
api_application_idstring- API Application ID for branding the signing experience.
apply_signing_orderboolean- Recipients sign one at a time in order.
custom_requester_emailstring- Custom requester email shown in all communications to recipients.
custom_requester_namestring- Custom requester name shown in all communications to recipients.
messagestring- Email message body for the signature request sent to each recipient.
namestring- Name for the bulk send, used as the document name for each recipient.
skip_row_errorsboolean- Skip rows with errors instead of failing the entire bulk send.default
false subjectstring- Email subject for the signature request sent to each recipient.
signwell_create_documentCreate and optionally send a new document for signing.WriteCreate Document
Create and optionally send a new document for signing. Set draft to true to save without sending.
Inputs
filesarrayrequired- Array of file objects to include in the document. Each object must have a 'name' (with a valid extension such as .pdf, .doc, .docx, .pages, .jpg) and either 'file_url' (a publicly accessible URL) or 'file_base64' (base64-encoded file content).
recipientsarrayrequired- Array of recipient objects. Each must have an 'id' (unique string identifier, e.g. '1'), 'email', and optionally 'name', 'passcode', 'subject', 'message'.
allow_declineboolean- Allow recipients to decline signing the document.default
true allow_reassignboolean- Allow recipients to reassign signing to another person.default
true apply_signing_orderboolean- Require recipients to sign one at a time in the specified order.default
false custom_requester_emailstring- Custom email address shown to recipients in email communications.
custom_requester_namestring- Custom name shown to recipients in email communications.
draftboolean- If true, saves the document as a draft without sending it to recipients.default
false embedded_signingboolean- Enable embedded signing so recipients can sign within an iFrame on your website.default
false expires_ininteger- Number of days before the signing request expires (1–365).
languagestring- Language for the recipient signing UI. ISO 639-1 code.one of
enfresdeplptdanlitrusvareltrskdefaulten messagestring- Email message body sent to recipients with the signing request (max 4000 chars).
metadataobject- Key-value metadata to attach to the document (max 50 pairs, keys max 40 chars, values max 500 chars).
namestring- Display name of the document.
redirect_urlstring- URL to redirect recipients to after they complete signing.
remindersboolean- Send automatic reminder emails to recipients on days 3, 6, and 10 after the initial request.default
true subjectstring- Email subject line for the signature request sent to recipients (max 255 chars).
test_modeboolean- When true, the document is created in test mode and does not count toward billing.default
false
signwell_create_document_from_templateCreate a document for signing from an existing template.WriteCreate Document from Template
Create a document for signing from an existing template. Assign recipients to template placeholders and optionally pre-fill field values.
Inputs
recipientsarrayrequired- Array of recipient objects mapping to template placeholders. Each must have 'id' (unique recipient identifier, any string), 'placeholder_name' (matching the template placeholder's name exactly, e.g. 'Signer'), and 'email'. Optionally include 'name'.
template_idstringrequired- Template ID (UUID) to create the document from.
allow_declineboolean- If true, allows recipients to decline signing the document.
allow_reassignboolean- If true, allows recipients to reassign the signing request to another person.
apply_signing_orderboolean- If true, recipients must sign in the sequential order defined in the template.
custom_requester_emailstring- Custom requester email address shown to recipients instead of the account owner's email.
custom_requester_namestring- Custom requester name shown to recipients instead of the account owner's name.
draftboolean- If true, saves the document as a draft without sending it to recipients.
expires_ininteger- Number of days before the signing request expires.
fieldsarray- Pre-filled field values for template fields. Each object has 'api_id' (the field's api_id from the template) and 'value'.
messagestring- Email message body sent to recipients. Overrides the template's default message. Maximum 4000 characters.
metadataobject- Key-value metadata to attach to the document for your own reference.
namestring- Name of the document to create. Displayed in the SignWell dashboard and emails.
redirect_urlstring- URL to redirect signers to after they complete signing.
remindersboolean- If true, automatic reminder emails will be sent to unsigned recipients.
subjectstring- Email subject line sent to recipients. Overrides the template's default subject. Maximum 255 characters.
test_modeboolean- If true, creates the document in test mode. Test mode documents do not count toward billing.
signwell_create_templateCreate a new reusable signing template with placeholders for recipients and optional pre-placed fields.WriteCreate Template
Create a new reusable signing template with placeholders for recipients and optional pre-placed fields.
Inputs
filesarrayrequired- Array of file objects. Each must have 'name' (with valid extension) and either 'file_url' (public URL) or 'file_base64' (base64-encoded content).
placeholdersarrayrequired- Array of placeholder objects. Each must have 'id' (unique string) and 'name' (role name, e.g. 'Client'). Optional: 'preassigned_recipient_name', 'preassigned_recipient_email'.
allow_declineboolean- Allow recipients to decline signing.
allow_reassignboolean- Allow recipients to reassign the signing request to someone else.
apply_signing_orderboolean- Sequential signing order — recipients sign one at a time in order.
draftboolean- If true, template is not yet available for use.
expires_ininteger- Days before signature request expires.
languagestring- Language code (ISO 639-1) for the signing interface.
messagestring- Default email message (max 4000 chars).
metadataobject- Arbitrary key-value metadata to associate with the template.
namestring- Template name.
redirect_urlstring- Post-signing redirect URL.
remindersboolean- Send reminder emails to recipients who have not yet signed.
subjectstring- Default email subject for documents created from this template.
signwell_create_webhookRegister a webhook callback URL to receive document lifecycle events (sent, viewed, signed, completed, declined, etc.).WriteCreate Webhook
Register a webhook callback URL to receive document lifecycle events (sent, viewed, signed, completed, declined, etc.).
Inputs
callback_urlstringrequired- HTTPS URL to POST document events to.
api_application_idstring- Scope the webhook to a specific API Application ID.
signwell_send_documentUpdate a draft document and send it to recipients for signing.WriteSend Document
Update a draft document and send it to recipients for signing.
Inputs
idstringrequired- Unique identifier (UUID) of the draft document to send.
allow_declineboolean- Allow recipients to decline signing the document.
allow_reassignboolean- Allow recipients to reassign their signing to another person.
apply_signing_orderboolean- Require recipients to sign one at a time in order.
custom_requester_emailstring- Custom email address shown to recipients in email communications.
custom_requester_namestring- Custom name shown to recipients in email communications.
embedded_signingboolean- Enable embedded signing via iFrame.
expires_ininteger- Number of days before the signing request expires (1–365).
messagestring- Email message body sent to recipients (max 4000 chars).
namestring- Update the display name of the document before sending.
redirect_urlstring- URL to redirect recipients to after they complete signing.
remindersboolean- Send automatic reminder emails on days 3, 6, and 10.
subjectstring- Email subject line for the signing request (max 255 chars).
signwell_send_reminderSend a reminder email to recipients who have not yet signed a document.WriteSend Reminder
Send a reminder email to recipients who have not yet signed a document.
Inputs
idstringrequired- Document ID (UUID) of the document to send reminders for.
recipientsarray- Specific recipients to remind. Each object has 'email' (string) and optionally 'name' (string). If omitted, all unsigned recipients are reminded.
signwell_update_authenticationUpdate passcode delivery settings for recipients on a sent document.WriteUpdate Authentication
Update passcode delivery settings for recipients on a sent document. Only recipients who have not started signing can be updated.
Inputs
idstringrequired- Document ID (UUID) of the document whose recipient authentication should be updated.
recipientsarrayrequired- Array of recipient authentication update objects. Each must have 'id' (recipient ID). Optional fields: 'passcode' (string), 'passcode_delivery' (object with 'enabled' bool, 'methods' array, 'expire_after_access' bool).
signwell_update_recipientsUpdate one or more recipients on a sent document that has not yet been fully signed.WriteUpdate Recipients
Update one or more recipients on a sent document that has not yet been fully signed. Recipients who have already started signing cannot be updated.
Inputs
idstringrequired- Document ID (UUID) of the document whose recipients should be updated.
recipientsarrayrequired- Array of recipient update objects. Each must have 'id' (recipient ID from Get Document), 'name' (string), and 'email' (string). Optional fields: 'subject', 'message', 'passcode'.
signwell_update_templateUpdate an existing document template.WriteUpdate Template
Update an existing document template. Replaces the template properties with the provided values.
- Idempotent
Inputs
idstringrequired- Template ID (UUID) of the template to update.
allow_declineboolean- Allow recipients to decline signing.
allow_reassignboolean- Allow recipients to reassign the signing request to someone else.
apply_signing_orderboolean- Sequential signing order — recipients sign one at a time in order.
expires_ininteger- Days before signature request expires.
messagestring- Default email message (max 4000 chars).
metadataobject- Arbitrary key-value metadata to associate with the template.
namestring- Template name.
redirect_urlstring- Post-signing redirect URL.
remindersboolean- Send reminder emails to recipients who have not yet signed.
subjectstring- Default email subject for documents created from this template.
signwell_validate_bulk_send_csvValidate a bulk send CSV file before creating the bulk send.WriteValidate Bulk Send CSV
Validate a bulk send CSV file before creating the bulk send. Returns validation errors by row if the CSV is invalid.
- Idempotent
Inputs
bulk_send_csvstringrequired- RFC 4648 base64-encoded CSV file content.
template_idsarrayrequired- Array of template ID strings (UUIDs) the CSV maps to.
signwell_delete_api_applicationPermanently delete an API Application from the SignWell account.DestructiveDelete API Application
Permanently delete an API Application from the SignWell account.
Inputs
idstringrequired- Unique identifier (UUID) of the API Application to delete.
signwell_delete_documentDelete a document.DestructiveDelete Document
Delete a document. Also cancels the document signing process if it is in progress.
Inputs
idstringrequired- Unique identifier (UUID) of the document to delete.
signwell_delete_templatePermanently delete a document template.DestructiveDelete Template
Permanently delete a document template. This action cannot be undone.
Inputs
idstringrequired- Template ID (UUID) of the template to permanently delete.
signwell_delete_webhookDelete a registered webhook callback URL.DestructiveDelete Webhook
Delete a registered webhook callback URL.
Inputs
idstringrequired- Webhook ID (UUID).
No tools match.


