
The Salesforce connector lets your AI agent act in each user's Salesforce account. Each user signs in to Salesforce once, and Scalekit stores and refreshes their tokens, so your agent never handles credentials. It comes with 74 tools.
- Tools
- 74
- What they doRead · write · destructive
- 35 · 28 · 1135 read28 write11 destructive
- Users sign in with
- OAuth
- OAuth app
- Your own Salesforce app
What you can do
- Read CRM records: retrieve accounts, contacts, leads, opportunities, and cases by ID or search query
- Create and update records: open leads, close opportunities, update deal stages, and edit contacts
- Log activities: create tasks and events linked to any CRM record
- Run SOQL queries: execute arbitrary Salesforce Object Query Language queries for custom data retrieval
- Search across objects: find records by name, email, phone, or any field value
- Call the Metadata API: use SOAP proxy calls to inspect and modify Salesforce org metadata
Setup
Install the SDK
Terminal window npm install @scalekit-sdk/node dotenvTerminal window pip install scalekit-sdk-python python-dotenvSet your credentials
Add your Scalekit credentials to your
.envfile. Find values in app.scalekit.com > Developers > API Credentials..env SCALEKIT_ENVIRONMENT_URL=<your-environment-url>SCALEKIT_CLIENT_ID=<your-client-id>SCALEKIT_CLIENT_SECRET=<your-client-secret>Create the Salesforce connection
In AgentKit > Connections, create a Salesforce connection and copy its redirect URI. The name you give it is the
connection_nameyour code passes. See Configure connections.Register an OAuth app
Salesforce connections use your own OAuth app. Register one with Salesforce and add the redirect URI you copied.
Then enter the app's Client ID and Client Secret on the Salesforce connection.
Console steps with screenshots
Register your Scalekit environment with the Salesforce connector using Salesforce’s External Client App (ECA) model. ECA is the recommended approach for distributing OAuth integrations to any Salesforce customer org. You need two orgs: a Partner Business Org for app creation and packaging, and a Developer Edition Org for namespace registration.
-
Prepare your Salesforce orgs
You need two orgs before starting:
- Partner Business Org — sign up at the Salesforce Partner Community. This org acts as your Dev Hub and is where you create and package the External Client App.
- Developer Edition Org — create one from your Partner Business Org. Use this org only to register a namespace.
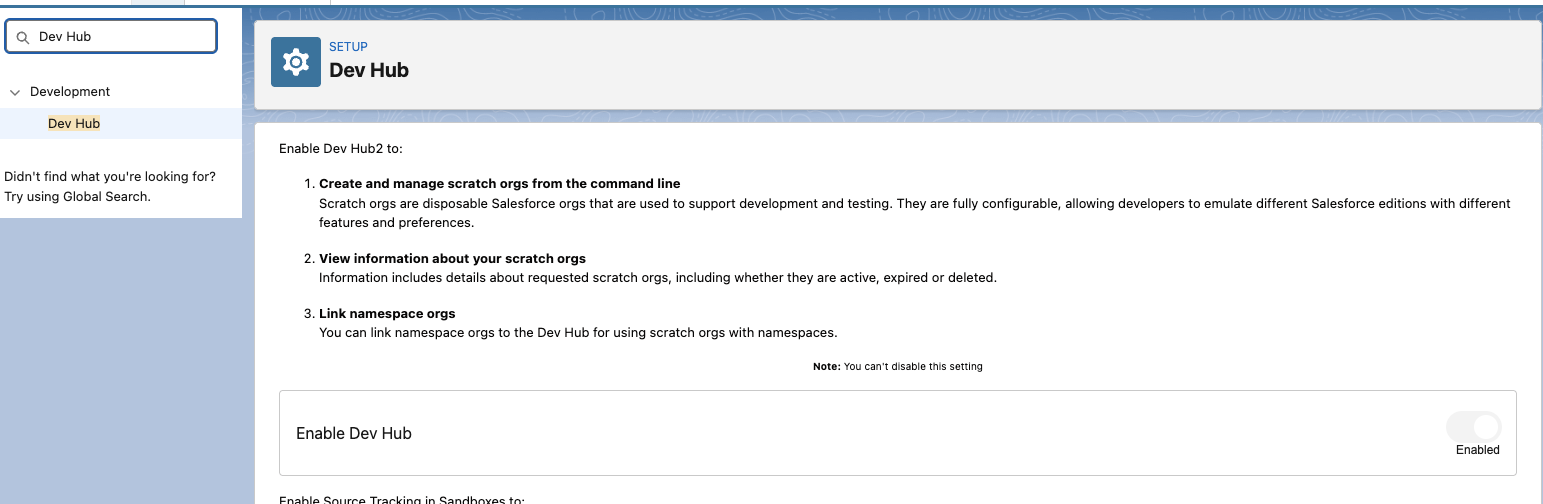
In your Partner Business Org, enable the Dev Hub:
- Go to Setup > Quick Find: Dev Hub.
- Enable Dev Hub and Unlocked Packages and Second-Generation Managed Packages.
-
Register a namespace
Create the namespace in your Developer Edition Org
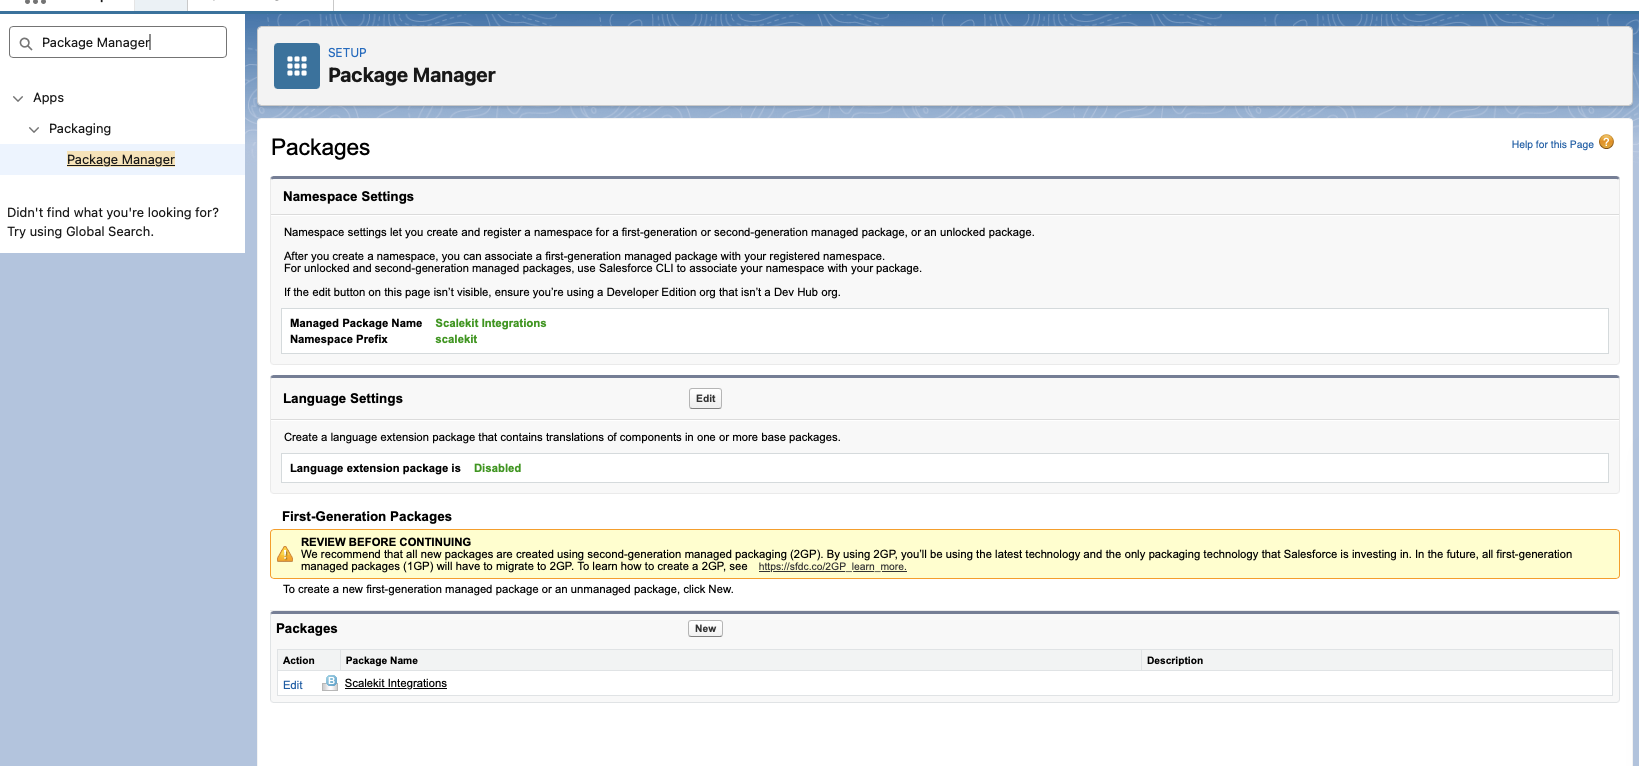
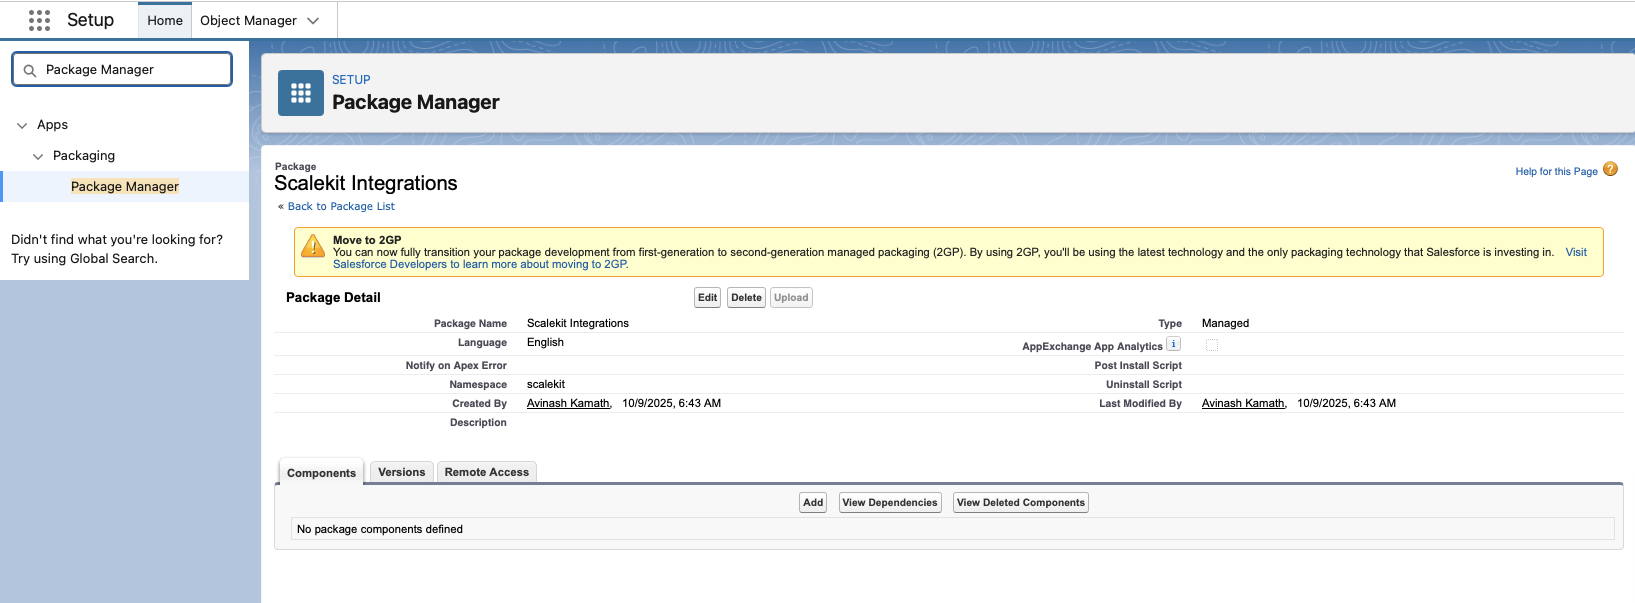
- Log in to your Developer Edition Org and go to Setup > Apps > Packaging > Package Manager.
- Click Edit next to the Namespace Prefix field.
- Enter your desired namespace identifier.
- Click Check Availability to confirm the namespace is not already taken.
- Click Review, then Save to finalize the namespace.
Note the namespace string — you will add it to your project config in a later step.
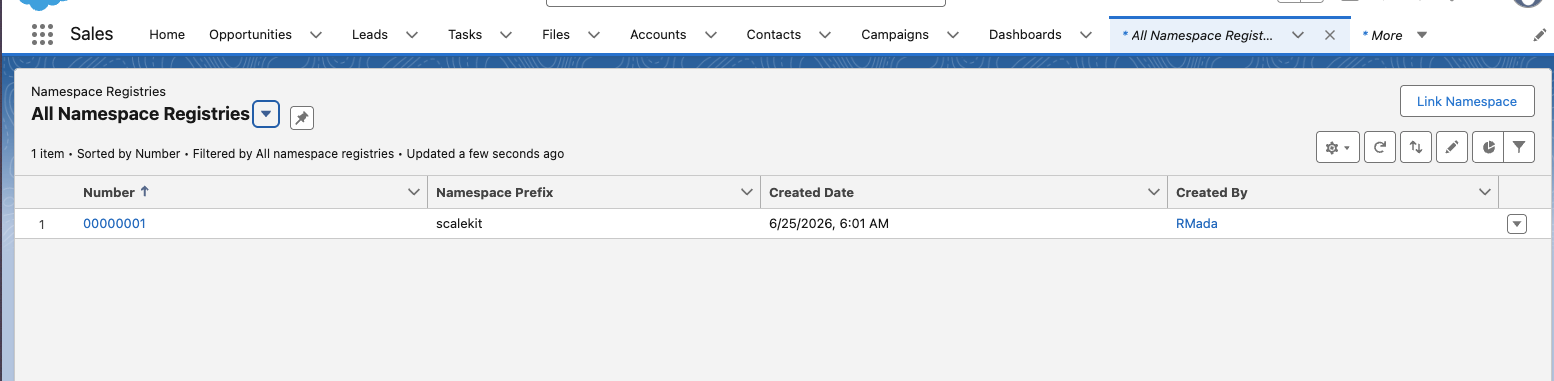
Link the namespace to your Dev Hub
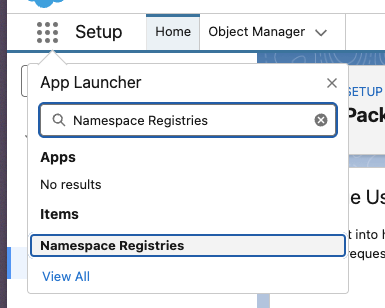
- Log in to your Partner Business Org and open the App Launcher.
- Search for and open Namespace Registries.
- Click Link Namespace.
- When prompted, authenticate using the credentials of the Developer Edition Org where you created the namespace.
- After logging in and granting access, your namespace appears in the registry list.
-
Copy the redirect URI from Scalekit
-
In the Scalekit dashboard, go to AgentKit > Connections > Create Connection.
-
Find Salesforce from the list of providers and click Create.
-
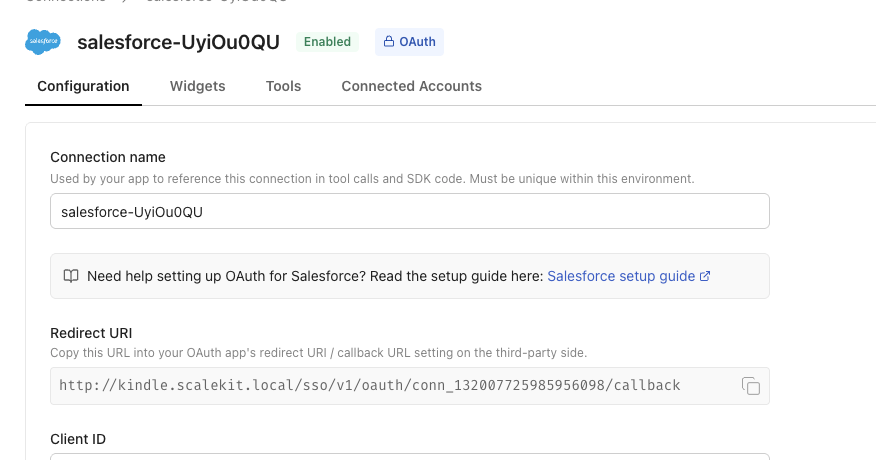
Copy the redirect URI. It looks like:
https://<SCALEKIT_ENVIRONMENT_URL>/sso/v1/oauth/<CONNECTION_ID>/callback
-
-
Create the External Client App
In your Partner Business Org, go to Setup > Platform Tools > Apps > External Client Apps and click New.
Configure the app with the following settings:
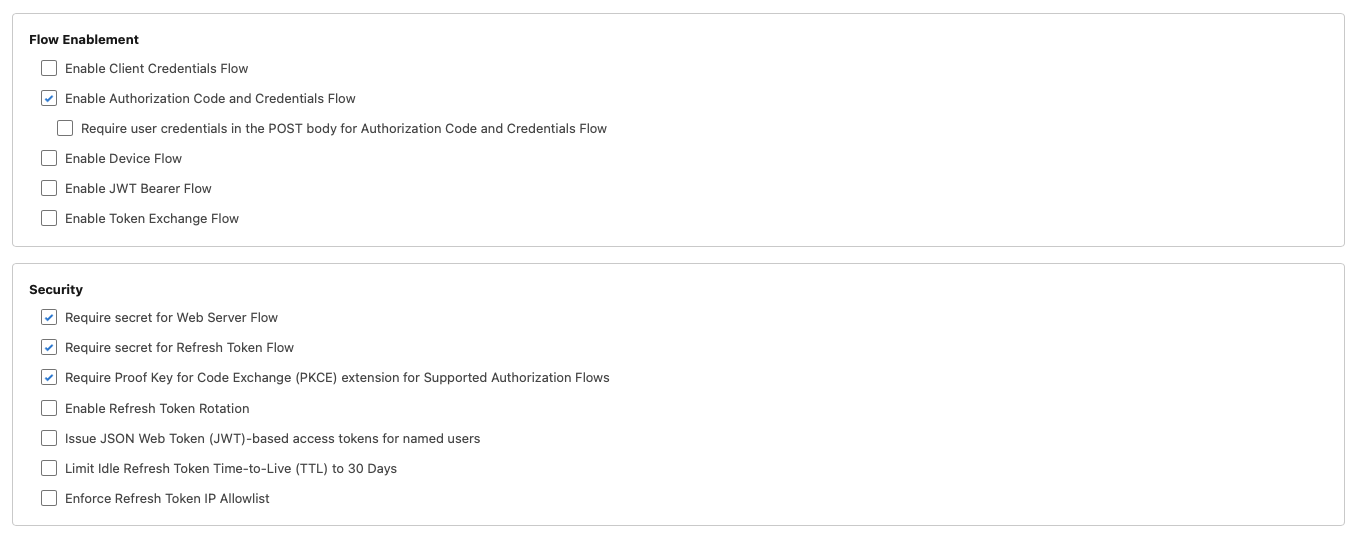
Setting Value Distribution State Packaged API (OAuth) Enabled Callback URL Redirect URI copied from Scalekit OAuth Scopes Access identity URL ( id), manage user data via APIs (api), perform requests at any time (refresh_token)Authorization Code and Credentials Flow Enabled Require user credentials in POST body for Authorization Code Flow Unchecked Require Proof Key for Code Exchange (PKCE) Checked 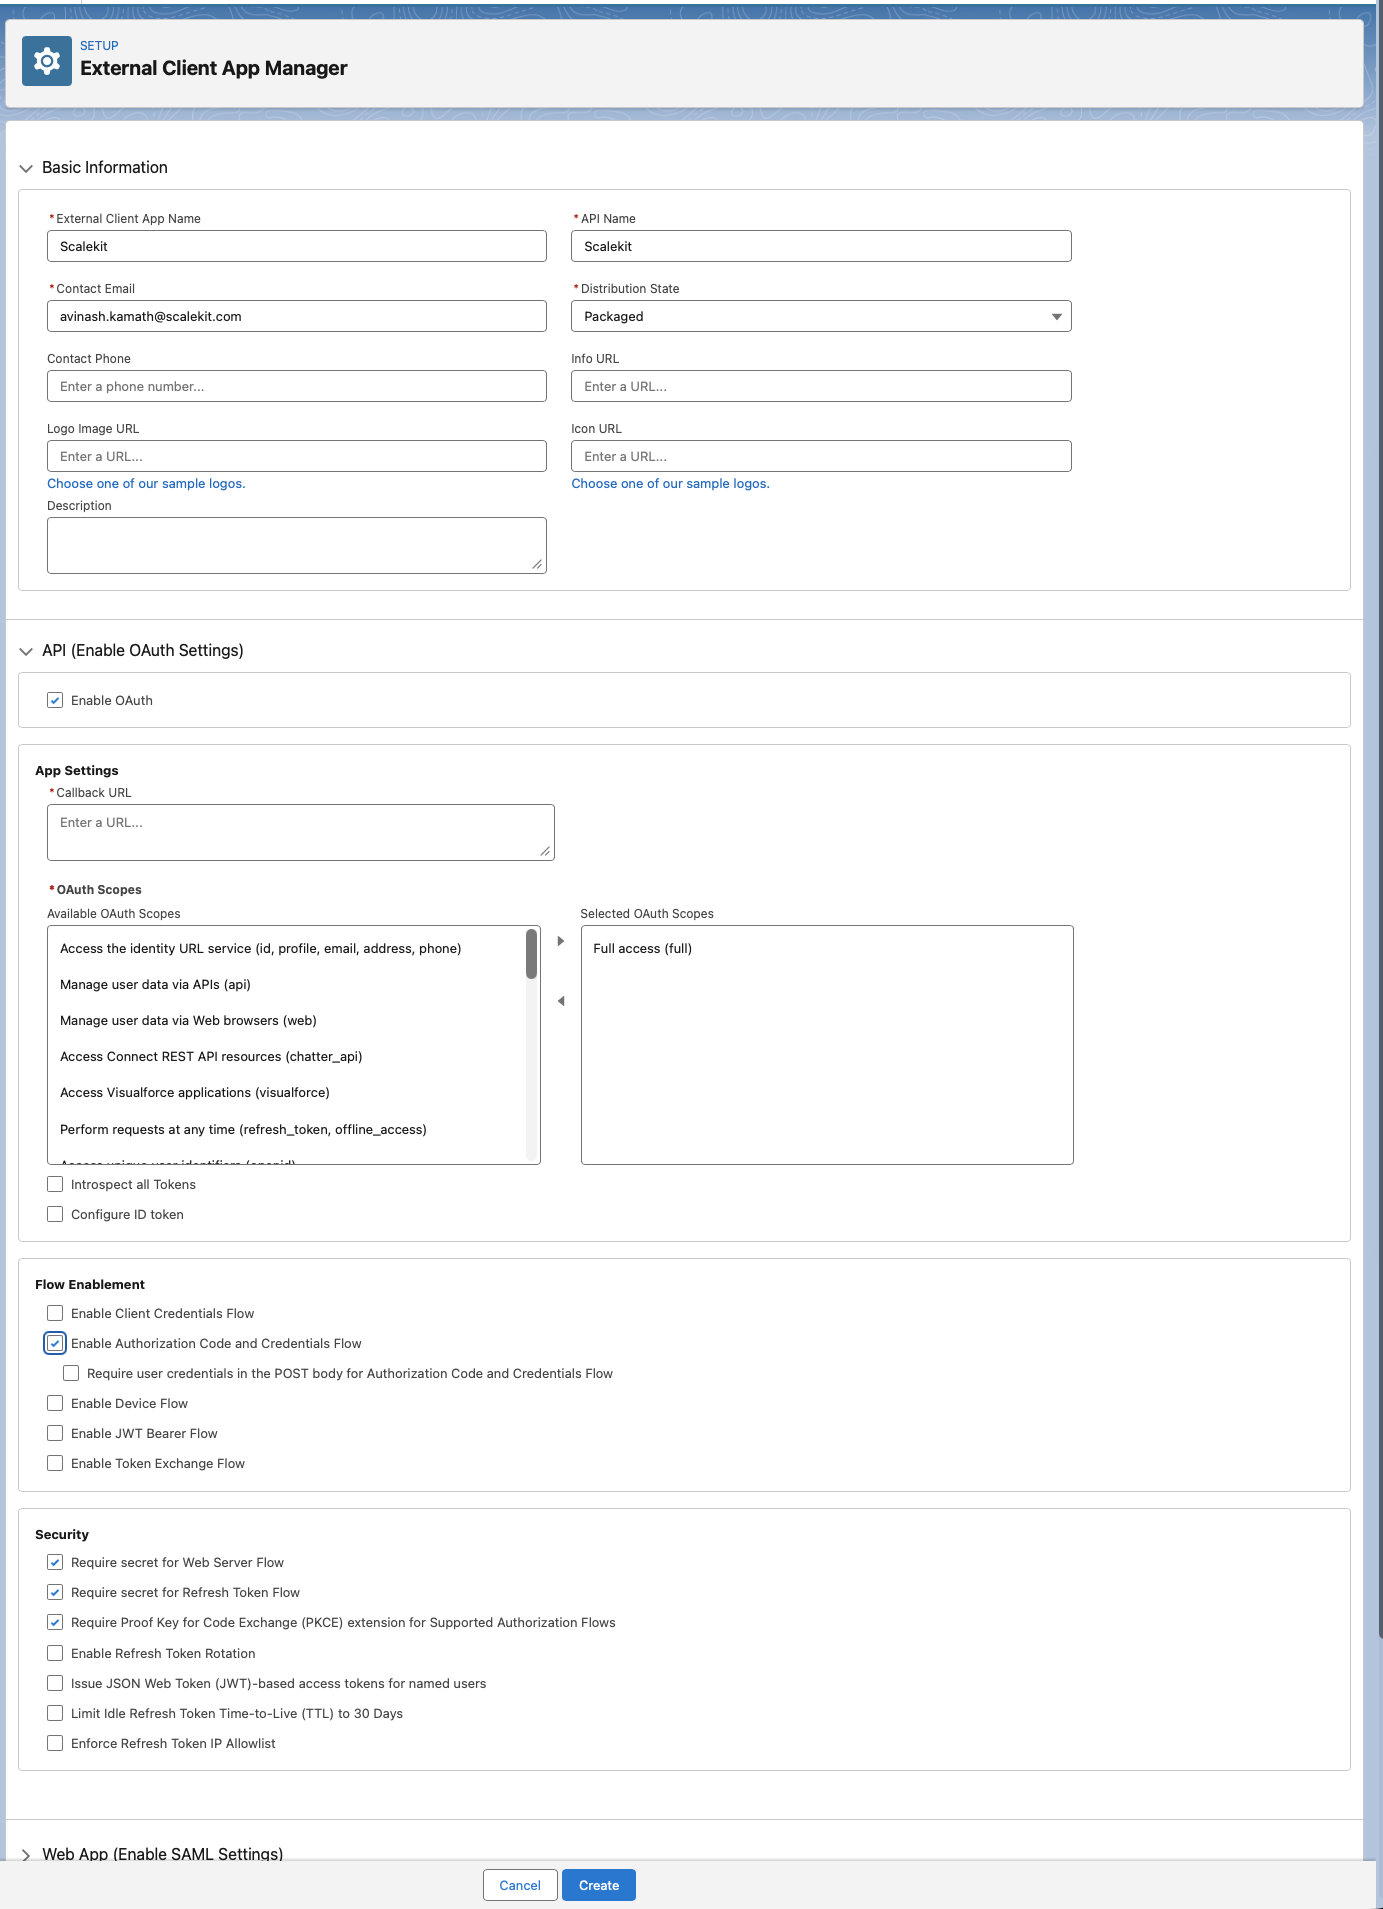
After saving, go to OAuth Settings > Consumer Key and Secret to retrieve your credentials:
- Consumer Key
- Consumer Secret — click Reveal to view and copy

-
Package and distribute the app
Use the Salesforce CLI to package the External Client App and generate an install URL. Complete these sub-steps in order.
-
Install the Salesforce CLI
Install the
sfCLI from the Salesforce CLI setup guide, or via npm:Terminal window npm install -g @salesforce/cliVerify the installation:
Terminal window sf --version -
Authenticate to your Dev Hub
Log in to your Partner Business Org and set it as the default Dev Hub:
Terminal window sf org login web --set-default-dev-hub --alias DevHub -
Create a DX project
Terminal window sf project generate --name my-integrationcd my-integration -
Set the namespace
Open
sfdx-project.jsonand add your namespace to the project definition:{"namespace": "<your-namespace>"} -
Retrieve the External Client App metadata
Pull the ECA configuration from your Partner Business Org into the project:
Terminal window sf project retrieve start --metadata ExternalClientApplication ExtlClntAppOauthSettings -
Create the managed package
Run this once to create the package definition:
Terminal window sf package create --name "Your App Display Name" --package-type Managed --path force-app -
Create a package version
Terminal window sf package version create --package "Your App Display Name" --installation-key-bypass --wait 10Note the version ID (starts with
04t...) from the output. -
Promote the version to released
Terminal window sf package version promote --package <VERSION_ID> -
Get the install URL
Construct the install URL using the promoted version ID:
https://login.salesforce.com/packaging/installPackage.apexp?p0=<VERSION_ID>
-
-
Add credentials in Scalekit
- In the Scalekit dashboard, go to AgentKit > Connections and open the connection you created.
- Enter your credentials:
- Client ID — Consumer Key from your External Client App
- Client Secret — Consumer Secret from your External Client App
- Package Install URL — the install URL from the previous step
- Permissions — any additional OAuth scopes beyond the defaults (see Salesforce OAuth Scopes documentation)
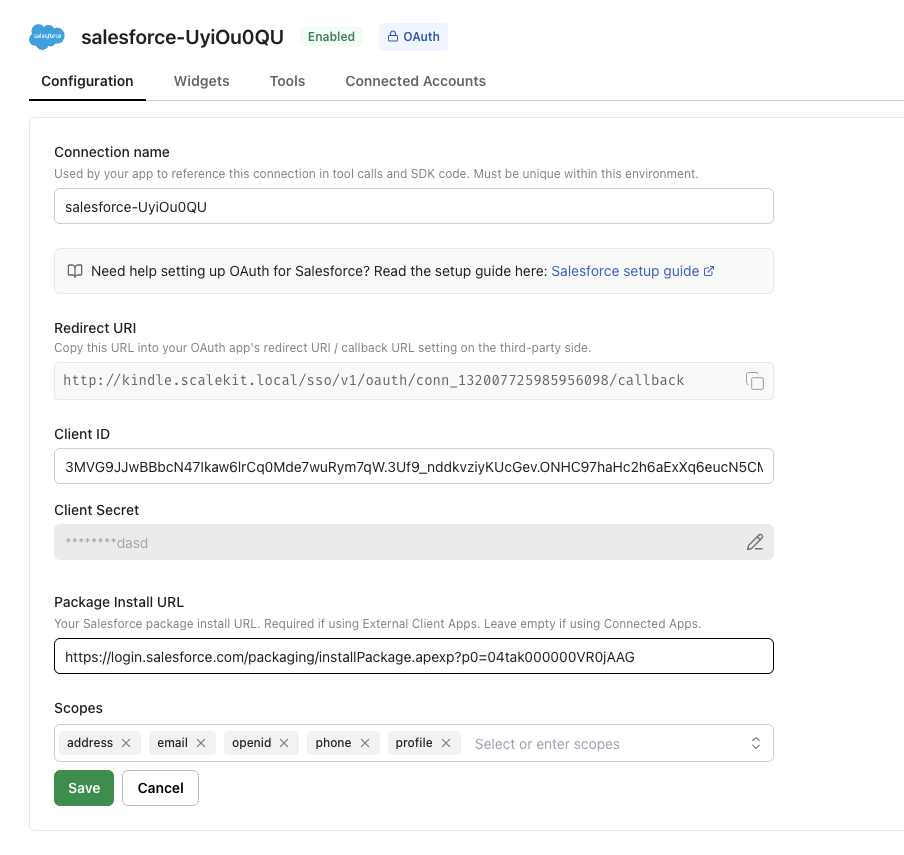
- Click Save.
-
How users install the package
A Salesforce admin must install the package in their org once before anyone in that org can connect. After the admin installs it, other users in the same org do not need to install it again — they can skip past the install screen.
Scalekit always shows the Install package screen first when a user opens the magic link:
- Admin (first time) — click Install to open the Salesforce package installation page and complete the installation.
- Non-admin or subsequent users — click Copy link to send the install URL to the org’s Salesforce admin, or click I’ve installed the package directly if the admin has already installed it.
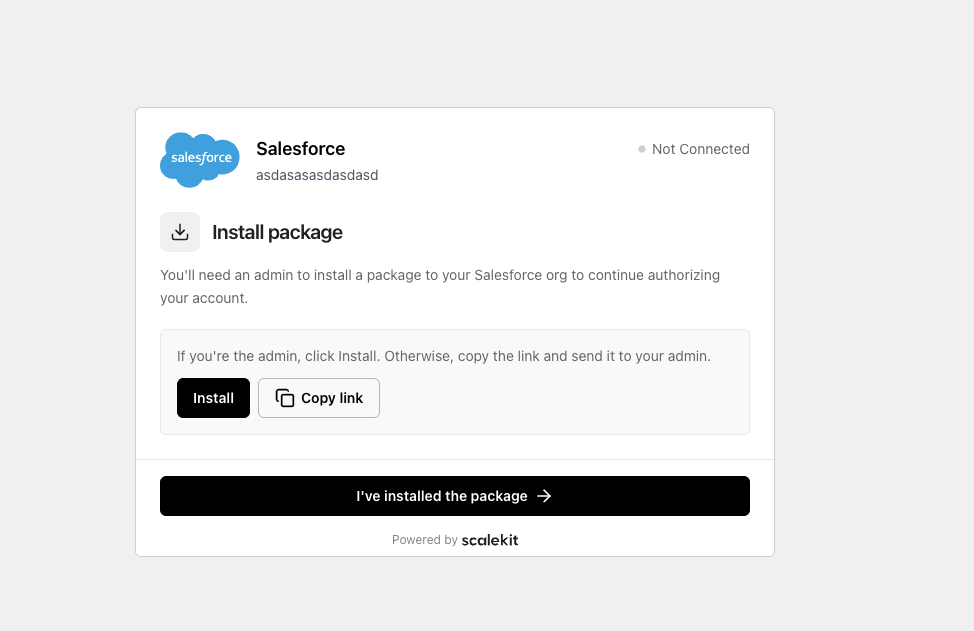
After clicking Install, Salesforce opens the package installation page:
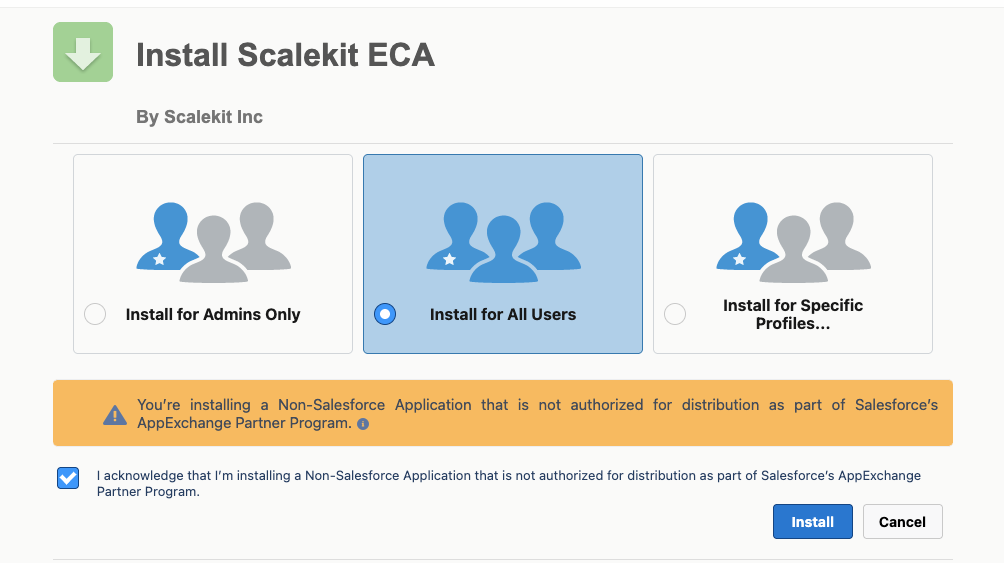
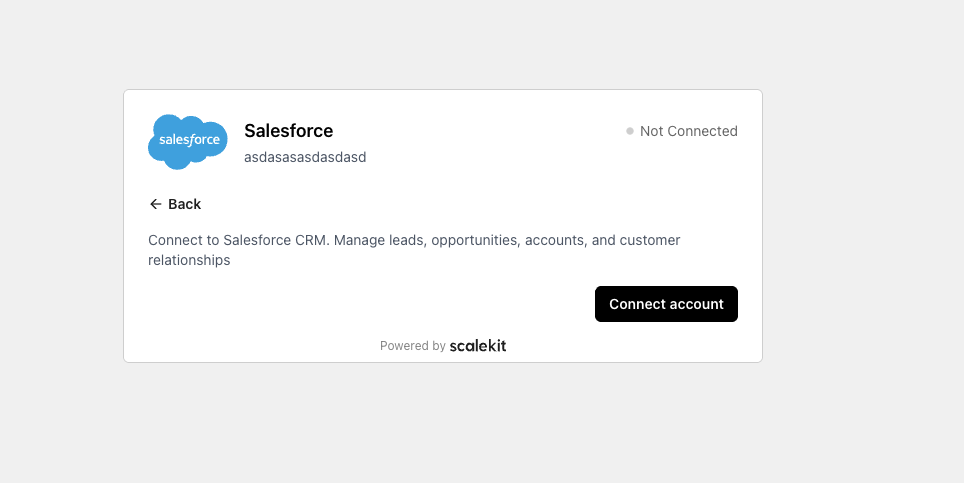
Once installation is complete, return to the magic link and click I’ve installed the package. This takes the user to the Connect account screen where they complete the OAuth authorization:
-
Authorize a user and make your first call
quickstart.mts import { ScalekitClient } from '@scalekit-sdk/node'import 'dotenv/config'import { createInterface } from 'node:readline/promises'const scalekit = new ScalekitClient(process.env.SCALEKIT_ENVIRONMENT_URL,process.env.SCALEKIT_CLIENT_ID,process.env.SCALEKIT_CLIENT_SECRET,)const actions = scalekit.actionsconst connector = 'salesforce'const identifier = 'user_123'// Generate an authorization link for the userconst { link } = await actions.getAuthorizationLink({ connectionName: connector, identifier })console.log('Authorize Salesforce:', link)const rl = createInterface({ input: process.stdin, output: process.stdout })await rl.question('Press Enter after authorizing...')rl.close()// Make your first callconst result = await actions.executeTool({connector,identifier,toolName: 'salesforce_global_describe',toolInput: {},})console.log(result)Terminal window npx tsx quickstart.mtsquickstart.py import osfrom scalekit import ScalekitClientfrom dotenv import load_dotenvload_dotenv()scalekit_client = ScalekitClient(env_url=os.getenv("SCALEKIT_ENVIRONMENT_URL"),client_id=os.getenv("SCALEKIT_CLIENT_ID"),client_secret=os.getenv("SCALEKIT_CLIENT_SECRET"),)actions = scalekit_client.actionsconnection_name = "salesforce"identifier = "user_123"# Generate an authorization link for the userlink_response = actions.get_authorization_link(connection_name=connection_name,identifier=identifier,)print("Authorize Salesforce:", link_response.link)input("Press Enter after authorizing...")# Make your first callresult = actions.execute_tool(tool_input={},tool_name="salesforce_global_describe",connection_name=connection_name,identifier=identifier,)print(result)Terminal window python quickstart.pyEach user signs in once. See Authorize a user for the full flow and statuses.
Tools
Pass the exact name toexecute_toolsalesforce_account_getRetrieve details of a specific account from Salesforce by account ID.Read-onlyGet Account
Retrieve details of a specific account from Salesforce by account ID. Returns account properties and associated data.
Inputs
account_idstringrequired- ID of the account to retrieve
fieldsstring- Comma-separated list of fields to include in the response
salesforce_accounts_listRetrieve a list of accounts from Salesforce using a pre-built SOQL query.Read-onlyList Accounts
Retrieve a list of accounts from Salesforce using a pre-built SOQL query. Returns basic account information.
Inputs
limitnumberrequired- Number of results to return per page
salesforce_bulk_job_getGet the status and progress of a Bulk API 2.0 ingest job by ID — state (Open, UploadComplete, InProgress, JobComplete, Aborted, Failed), record counts, and object/operation metadata.Read-onlyGet Bulk Ingest Job
Get the status and progress of a Bulk API 2.0 ingest job by ID — state (Open, UploadComplete, InProgress, JobComplete, Aborted, Failed), record counts, and object/operation metadata. Works for jobs created by any client (Data Loader, other integrations, or Salesforce Setup), not only ones created through this connector.
Inputs
job_idstringrequired- ID of the Bulk API 2.0 ingest job to check.
salesforce_case_getRetrieve a Case record from Salesforce by ID.Read-onlyGet Case
Retrieve a Case record from Salesforce by ID. Optionally specify which fields to return.
Inputs
case_idstringrequired- ID of the case to retrieve
fieldsstring- Comma-separated list of fields to include in the response
salesforce_chatter_comments_listList all comments on a Salesforce Chatter post (feed element).Read-onlyList Chatter Comments
List all comments on a Salesforce Chatter post (feed element).
Inputs
feed_element_idstringrequired- The ID of the Chatter post to list comments for
pagestring- Page token for retrieving the next page of results
page_sizenumber- Number of comments to return per page (default: 25, max: 100)
salesforce_chatter_post_getRetrieve a specific Salesforce Chatter post (feed element) by its ID.Read-onlyGet Chatter Post
Retrieve a specific Salesforce Chatter post (feed element) by its ID.
Inputs
feed_element_idstringrequired- The ID of the Chatter feed element (post) to retrieve.
salesforce_chatter_posts_searchSearch Salesforce Chatter posts (feed elements) by keyword across all feeds.Read-onlySearch Chatter Posts
Search Salesforce Chatter posts (feed elements) by keyword across all feeds.
Inputs
qstringrequired- Search query string to find matching Chatter posts
pagestring- Page token for retrieving the next page of results
page_sizenumber- Number of results to return per page (default: 25, max: 100)
salesforce_chatter_user_feed_listRetrieve feed elements (posts) from a Salesforce user's Chatter news feed.Read-onlyList User Chatter Feed
Retrieve feed elements (posts) from a Salesforce user's Chatter news feed. Use 'me' as the user ID to get the current user's feed.
Inputs
user_idstringrequired- The ID of the user whose Chatter feed to retrieve. Use 'me' for the current user.
pagestring- Page token for retrieving the next page of results. Use the value from the previous response's nextPageToken.
page_sizenumber- Number of feed elements to return per page (default: 25, max: 100)
sort_paramstring- Sort order for feed elements. Options: LastModifiedDateDesc (default), CreatedDateDesc, MostRecentActivity
salesforce_composite_sobjects_getRetrieve multiple Salesforce records of the same object type by ID in a single Collections API request, returning only the requested fields.Read-onlyGet SObject Collection
Retrieve multiple Salesforce records of the same object type by ID in a single Collections API request, returning only the requested fields.
Inputs
fieldsstringrequired- Comma-separated list of fields to include in the response (required by this endpoint)
record_idsstringrequired- Comma-separated list of record IDs to retrieve (same object type, up to ~800)
sobject_typestringrequired- The Salesforce SObject API name (all IDs must be this type)
salesforce_contact_getRetrieve details of a specific contact from Salesforce by contact ID.Read-onlyGet Contact
Retrieve details of a specific contact from Salesforce by contact ID. Returns contact properties and associated data.
Inputs
contact_idstringrequired- ID of the contact to retrieve
fieldsstring- Comma-separated list of fields to include in the response
salesforce_dashboard_getRetrieve dashboard data and results from Salesforce by dashboard ID.Read-onlyGet Dashboard
Retrieve dashboard data and results from Salesforce by dashboard ID. Returns dashboard component data and results from all underlying reports.
Inputs
dashboard_idstringrequired- ID of the dashboard to retrieve
filter1string- First dashboard filter value (DashboardFilterOption ID)
filter2string- Second dashboard filter value (DashboardFilterOption ID)
filter3string- Third dashboard filter value (DashboardFilterOption ID)
salesforce_dashboard_metadata_getRetrieve metadata for a Salesforce dashboard, including dashboard components, filters, layout, and the running user.Read-onlyGet Dashboard Metadata
Retrieve metadata for a Salesforce dashboard, including dashboard components, filters, layout, and the running user.
Inputs
dashboard_idstringrequired- The unique ID of the Salesforce dashboard
salesforce_global_describeRetrieve metadata about all available SObjects in the Salesforce organization.Read-onlyDescribe Global
Retrieve metadata about all available SObjects in the Salesforce organization. Returns list of all objects with basic information.
Inputs
This tool takes no inputs.
salesforce_lead_getRetrieve a Lead record from Salesforce by ID.Read-onlyGet Lead
Retrieve a Lead record from Salesforce by ID. Optionally specify which fields to return.
Inputs
lead_idstringrequired- ID of the lead to retrieve
fieldsstring- Comma-separated list of fields to include in the response
salesforce_limits_getRetrieve organization limits information from Salesforce.Read-onlyGet Limits
Retrieve organization limits information from Salesforce. Returns API usage limits, data storage limits, and other organizational constraints.
Inputs
This tool takes no inputs.
salesforce_object_describeRetrieve detailed metadata about a specific SObject in Salesforce.Read-onlyDescribe Object
Retrieve detailed metadata about a specific SObject in Salesforce. Returns fields, relationships, and other object metadata.
Inputs
sobjectstringrequired- SObject API name to describe
salesforce_opportunities_listRetrieve a list of opportunities from Salesforce using a pre-built SOQL query.Read-onlyList Opportunities
Retrieve a list of opportunities from Salesforce using a pre-built SOQL query. Returns basic opportunity information.
Inputs
limitnumber- Number of results to return per page
salesforce_opportunity_getRetrieve details of a specific opportunity from Salesforce by opportunity ID.Read-onlyGet Opportunity
Retrieve details of a specific opportunity from Salesforce by opportunity ID. Returns opportunity properties and associated data.
Inputs
opportunity_idstringrequired- ID of the opportunity to retrieve
fieldsstring- Comma-separated list of fields to include in the response
salesforce_query_allExecute a SOQL query against Salesforce data, including records recently deleted (in the recycle bin) or archived.Read-onlySOQL Query All
Execute a SOQL query against Salesforce data, including records recently deleted (in the recycle bin) or archived. Same query syntax as salesforce_query_soql, but scans the queryAll resource instead of query.
Inputs
querystringrequired- SOQL query string to execute
salesforce_query_next_pageFetch the next page of results from a previous SOQL query.Read-onlyQuery Next Page
Fetch the next page of results from a previous SOQL query. Use the nextRecordsUrl returned when a query response has done=false.
Inputs
cursorstringrequired- The record cursor from a previous SOQL query response. Extract the cursor ID from the nextRecordsUrl (e.g. '01gxx0000002GJm-2000' from '/services/data/v66.0/query/01gxx0000002GJm-2000')
salesforce_query_soqlExecute SOQL queries against Salesforce data.Read-onlySOQL Query
Execute SOQL queries against Salesforce data. Supports complex queries with joins, filters, and aggregations.
Inputs
querystringrequired- SOQL query string to execute
salesforce_report_instance_results_getFetch the results of a previously queued asynchronous report run, by report ID and instance ID.Read-onlyGet Report Instance Results
Fetch the results of a previously queued asynchronous report run, by report ID and instance ID. Results are retained for a rolling 24-hour period after the run completed.
Inputs
instance_idstringrequired- The ID of the asynchronous report run instance
report_idstringrequired- The unique ID of the Salesforce report
salesforce_report_instances_listList up to 2000 asynchronous run instances of a Salesforce report, sorted by run request date.Read-onlyList Report Instances
List up to 2000 asynchronous run instances of a Salesforce report, sorted by run request date. Use with salesforce_report_run_async and salesforce_report_instance_results_get.
Inputs
report_idstringrequired- The unique ID of the Salesforce report
salesforce_report_listList up to 200 tabular, matrix, or summary reports recently viewed by the current user, via the Salesforce Analytics API.Read-onlyList Reports
List up to 200 tabular, matrix, or summary reports recently viewed by the current user, via the Salesforce Analytics API.
Inputs
This tool takes no inputs.
salesforce_report_metadata_getRetrieve report, report type, and related metadata for a Salesforce report.Read-onlyGet Report Metadata
Retrieve report, report type, and related metadata for a Salesforce report. Returns information about report structure, fields, groupings, and configuration.
Inputs
report_idstringrequired- The unique ID of the Salesforce report
salesforce_report_results_getRun a Salesforce report synchronously using its saved filters and return the results (fact map, groupings, and metadata).Read-onlyRun Report
Run a Salesforce report synchronously using its saved filters and return the results (fact map, groupings, and metadata). Best for reports that finish quickly; use salesforce_report_run_async for long-running reports.
Inputs
report_idstringrequired- The unique ID of the Salesforce report
include_detailsstring- Whether to include detail rows in addition to summary data
salesforce_search_parameterizedExecute parameterized searches against Salesforce data.Read-onlyParameterized Search
Execute parameterized searches against Salesforce data. Provides simplified search interface with predefined parameters.
Inputs
search_textstringrequired- Text to search for
sobjectstringrequired- SObject type to search in
fieldsstring- Comma-separated list of fields to return
salesforce_search_soslExecute SOSL searches against Salesforce data.Read-onlySOSL Search
Execute SOSL searches against Salesforce data. Performs full-text search across multiple objects and fields.
Inputs
search_querystringrequired- SOSL search query string to execute
salesforce_sobject_getRetrieve a record from any Salesforce SObject type by ID.Read-onlyGet SObject
Retrieve a record from any Salesforce SObject type by ID. Optionally specify which fields to return.
Inputs
record_idstringrequired- ID of the record to retrieve
sobject_typestringrequired- The Salesforce SObject API name (e.g., Account, Contact, Lead, CustomObject__c)
fieldsstring- Comma-separated list of fields to include in the response
salesforce_sobject_get_deletedGet a list of individual records of the given SObject type that were deleted within a given time span (soft-deleted, still in the recycle bin).Read-onlyGet Deleted SObjects
Get a list of individual records of the given SObject type that were deleted within a given time span (soft-deleted, still in the recycle bin). Useful for sync and change-tracking agents.
Inputs
endstringrequired- End of the time span, as an ISO 8601 datetime.
sobject_typestringrequired- The Salesforce SObject API name (e.g., Account, Contact, Lead, CustomObject__c)
startstringrequired- Start of the time span, as an ISO 8601 datetime.
salesforce_sobject_get_updatedGet a list of individual records of the given SObject type that were updated within a given time span.Read-onlyGet Updated SObjects
Get a list of individual records of the given SObject type that were updated within a given time span. Useful for sync and change-tracking agents.
Inputs
endstringrequired- End of the time span, as an ISO 8601 datetime.
sobject_typestringrequired- The Salesforce SObject API name (e.g., Account, Contact, Lead, CustomObject__c)
startstringrequired- Start of the time span, as an ISO 8601 datetime.
salesforce_soql_executeExecute custom SOQL queries against Salesforce data.Read-onlyExecute SOQL
Execute custom SOQL queries against Salesforce data. Supports complex queries with joins, filters, aggregations, and custom field selection. Before querying unfamiliar fields, especially on metadata objects like FieldDefinition, call salesforce_object_describe to confirm the field exists. convertCurrency() is a currency-conversion function, not an aggregate — wrap it in SUM()/AVG() or use it with GROUP BY, not on its own. SOQL does not support OR across unrelated conditions or subqueries; use IN or separate queries instead. Field aliases (AS alias) are valid only on aggregate expressions, not on plain field selections.
Inputs
soql_querystringrequired- SOQL query string to execute
salesforce_tooling_query_executeExecute SOQL queries against Salesforce Tooling API to access metadata objects like ApexClass, ApexTrigger, CustomObject, and development metadata.Read-onlyTooling API Query
Execute SOQL queries against Salesforce Tooling API to access metadata objects like ApexClass, ApexTrigger, CustomObject, and development metadata. Use this for querying metadata rather than data objects. Metadata objects expose a different, more limited field set than standard objects — call salesforce_tooling_sobject_describe first to confirm a field exists before filtering or selecting on it (for example, FieldDefinition does not support every field you might expect). SOQL does not support OR across unrelated conditions or subqueries; use IN or separate queries instead. Tooling API only exposes development metadata objects (ApexClass, ApexTrigger, CustomField, CustomObject, Flow, and similar) — permission and org-configuration objects like ObjectPermissions, FieldPermissions, SetupEntityAccess, Organization, and Domain are not queryable here; use salesforce_soql_execute for those instead. When selecting the Metadata or FullName field on a Tooling API object, the query must return at most one row — filter down to a single record (for example, by Id) rather than running a list-style query.
Inputs
soql_querystringrequired- SOQL query string to execute against Tooling API
salesforce_tooling_sobject_describeRetrieve detailed metadata schema for a specific Tooling API object type.Read-onlyDescribe Tooling SObject
Retrieve detailed metadata schema for a specific Tooling API object type. Returns fields, relationships, and other metadata properties.
Inputs
sobjectstringrequired- Tooling API object name to describe
salesforce_tooling_sobject_getRetrieve a metadata record from any Salesforce Tooling API object type by ID.Read-onlyGet Tooling SObject
Retrieve a metadata record from any Salesforce Tooling API object type by ID. Optionally specify which fields to return.
Inputs
record_idstringrequired- ID of the metadata record to retrieve
sobject_typestringrequired- The Tooling API object name (e.g., ApexClass, ApexTrigger, CustomObject)
fieldsstring- Comma-separated list of fields to include in the response
salesforce_account_createCreate a new Account in Salesforce.WriteCreate Account
Create a new Account in Salesforce. Supports standard fields
Inputs
Namestringrequired- Account Name
AccountNumberstring- Account number for the organization
AnnualRevenuenumber- Annual revenue
BillingCitystring- Billing city
BillingCountrystring- Billing country
BillingPostalCodestring- Billing postal code
BillingStatestring- Billing state/province
BillingStreetstring- Billing street
Descriptionstring- Description
Industrystring- Industry
NumberOfEmployeesinteger- Number of employees
OwnerIdstring- Record owner (User/Queue Id)
Phonestring- Main phone number
RecordTypeIdstring- Record Type Id
Websitestring- Website URL
salesforce_account_updateUpdate an existing Account in Salesforce by account ID.WriteUpdate Account
Update an existing Account in Salesforce by account ID. Allows updating account properties like name, phone, website, industry, billing information, and more.
- Idempotent
Inputs
account_idstringrequired- ID of the account to update
AccountNumberstring- Account number for the organization
AccountSourcestring- Lead source for this account
AnnualRevenuenumber- Annual revenue
BillingCitystring- Billing city
BillingCountrystring- Billing country
BillingGeocodeAccuracystring- Billing geocode accuracy
BillingLatitudenumber- Billing address latitude
BillingLongitudenumber- Billing address longitude
BillingPostalCodestring- Billing postal code
BillingStatestring- Billing state/province
BillingStreetstring- Billing street
CleanStatusstring- Data.com clean status
Descriptionstring- Description
DunsNumberstring- D-U-N-S Number
Faxstring- Fax number
Industrystring- Industry
Jigsawstring- Data.com key
JigsawCompanyIdstring- Jigsaw company ID
NaicsCodestring- NAICS code
NaicsDescstring- NAICS description
Namestring- Account Name
NumberOfEmployeesinteger- Number of employees
OwnerIdstring- Record owner (User/Queue Id)
Ownershipstring- Ownership type
ParentIdstring- Parent Account Id
Phonestring- Main phone number
Ratingstring- Account rating
RecordTypeIdstring- Record Type Id
ShippingCitystring- Shipping city
ShippingCountrystring- Shipping country
ShippingGeocodeAccuracystring- Shipping geocode accuracy
ShippingLatitudenumber- Shipping address latitude
ShippingLongitudenumber- Shipping address longitude
ShippingPostalCodestring- Shipping postal code
ShippingStatestring- Shipping state/province
ShippingStreetstring- Shipping street
Sicstring- SIC code
SicDescstring- SIC description
Sitestring- Account site or location
TickerSymbolstring- Stock ticker symbol
Tradestylestring- Trade style name
Typestring- Account type
Websitestring- Website URL
YearStartedstring- Year the company started
salesforce_case_createCreate a new Case record in Salesforce.WriteCreate Case
Create a new Case record in Salesforce. Allows setting standard Case fields.
Inputs
AccountIdstring- Related Account Id
ContactIdstring- Related Contact Id
Descriptionstring- Detailed description of the case
Originstring- Case origin
OwnerIdstring- Record owner (User/Queue Id)
Prioritystring- Case priority
Reasonstring- Case reason
Statusstring- Case status
Subjectstring- Subject line of the case
SuppliedCompanystring- Company supplied by the customer
SuppliedEmailstring- Email supplied by the customer
SuppliedNamestring- Name supplied by the customer
SuppliedPhonestring- Phone supplied by the customer
Typestring- Case type
salesforce_case_updateUpdate an existing Case record in Salesforce by ID.WriteUpdate Case
Update an existing Case record in Salesforce by ID. Allows updating standard Case fields.
- Idempotent
Inputs
case_idstringrequired- ID of the case to update
AccountIdstring- Related Account Id
ContactIdstring- Related Contact Id
Descriptionstring- Detailed description of the case
Originstring- Case origin
OwnerIdstring- Record owner (User/Queue Id)
Prioritystring- Case priority
Reasonstring- Case reason
Statusstring- Case status
Subjectstring- Subject line of the case
SuppliedCompanystring- Company supplied by the customer
SuppliedEmailstring- Email supplied by the customer
SuppliedNamestring- Name supplied by the customer
SuppliedPhonestring- Phone supplied by the customer
Typestring- Case type
salesforce_chatter_comment_createAdd a comment to a Salesforce Chatter post (feed element).WriteCreate Chatter Comment
Add a comment to a Salesforce Chatter post (feed element).
Inputs
feed_element_idstringrequired- The ID of the Chatter post to comment on
textstringrequired- The text body of the comment
salesforce_chatter_post_createCreate a new post (feed element) on a Salesforce Chatter feed.WriteCreate Chatter Post
Create a new post (feed element) on a Salesforce Chatter feed. Use 'me' as subject_id to post to the current user's feed.
Inputs
textstringrequired- The text body of the Chatter post
is_rich_textboolean- If true, the text body will be treated as HTML rich text. Default is false (plain text).
message_segmentsarray- Advanced: provide raw Salesforce message segments array for full rich text control (bold, italic, links, mentions, etc.). When provided, overrides 'text' and 'is_rich_text'. Each segment must have a 'type' field (Text, MarkupBegin, MarkupEnd, Mention, Link). MarkupBegin/End use markupType: Bold, Italic, Underline, Paragraph, etc.
subject_idstring- The ID of the subject (user, record, or group) to post to. Use 'me' for the current user's feed.
salesforce_compositeExecute multiple Salesforce REST API requests in a single call using the Composite API.WriteComposite
Execute multiple Salesforce REST API requests in a single call using the Composite API. Allows for efficient batch operations and related data retrieval.
Inputs
composite_requeststringrequired- JSON string containing composite request with multiple sub-requests
salesforce_composite_batchExecute up to 25 REST API subrequests in a single Composite Batch call.WriteComposite Batch
Execute up to 25 REST API subrequests in a single Composite Batch call. Each subrequest runs independently (no cross-subrequest rollback) and counts against API rate limits individually; results are returned in request order.
Inputs
batch_requestsstringrequired- JSON array of subrequests, each with method, url, and optional richInput/referenceId/httpHeaders
salesforce_composite_sobjects_createCreate multiple Salesforce sObject records (of the same or different types) in a single Collections API request.WriteCreate SObject Collection
Create multiple Salesforce sObject records (of the same or different types) in a single Collections API request. Do not include an id field — Salesforce assigns one.
Inputs
recordsstringrequired- JSON array of sObject records, each with an attributes.type and its fields
all_or_nonestring- Whether to roll back all records if any single record fails
salesforce_composite_sobjects_updateUpdate multiple Salesforce sObject records (of the same or different types) in a single Collections API request.WriteUpdate SObject Collection
Update multiple Salesforce sObject records (of the same or different types) in a single Collections API request. Each record must include its id alongside attributes.type.
- Idempotent
Inputs
recordsstringrequired- JSON array of sObject records, each with an attributes.type and its fields
all_or_nonestring- Whether to roll back all records if any single record fails
salesforce_composite_tree_createCreate a tree of up to 200 related sObject records (e.g.WriteCreate SObject Tree
Create a tree of up to 200 related sObject records (e.g. an Account with nested Contacts) in a single call, with relationships between the new records resolved server-side. Distinct from the flat Collections API (salesforce_composite_sobjects_create), which cannot express parent/child nesting in one request.
Inputs
recordsstringrequired- JSON array of root sObject tree records. Each record needs attributes.type and attributes.referenceId (a caller-assigned temporary ID unique within the request), plus its fields. Nested child relationships are embedded as '<RelationshipName>': {"records": [...]}, each child record also needing its own attributes.type/referenceId.
sobject_typestringrequired- The root Salesforce SObject API name for the tree (e.g., Account).
salesforce_contact_createCreate a new contact in Salesforce.WriteCreate Contact
Create a new contact in Salesforce. Allows setting contact properties like name, email, phone, account association, and other standard fields.
Inputs
LastNamestringrequired- Last name of the contact (required)
AccountIdstring- Salesforce Account Id associated with this contact
Departmentstring- Department of the contact
Descriptionstring- Free-form description
Emailstring- Email address of the contact
FirstNamestring- First name of the contact
LeadSourcestring- Lead source for the contact
MailingCitystring- Mailing city
MailingCountrystring- Mailing country
MailingPostalCodestring- Mailing postal code
MailingStatestring- Mailing state/province
MailingStreetstring- Mailing street
MobilePhonestring- Mobile phone of the contact
Phonestring- Phone number of the contact
Titlestring- Job title of the contact
salesforce_contact_updateUpdate an existing Contact record in Salesforce by ID.WriteUpdate Contact
Update an existing Contact record in Salesforce by ID. Allows updating standard Contact fields.
- Idempotent
Inputs
contact_idstringrequired- ID of the contact to update
AccountIdstring- Salesforce Account Id associated with this contact
Departmentstring- Department of the contact
Descriptionstring- Free-form description
Emailstring- Email address of the contact
FirstNamestring- First name of the contact
LastNamestring- Last name of the contact
LeadSourcestring- Lead source for the contact
MailingCitystring- Mailing city
MailingCountrystring- Mailing country
MailingPostalCodestring- Mailing postal code
MailingStatestring- Mailing state/province
MailingStreetstring- Mailing street
MobilePhonestring- Mobile phone of the contact
Phonestring- Phone number of the contact
Titlestring- Job title of the contact
salesforce_dashboard_cloneClone an existing dashboard in Salesforce.WriteClone Dashboard
Clone an existing dashboard in Salesforce. Creates a copy of the source dashboard in the specified folder.
Inputs
folderIdstringrequired- Folder to place the cloned dashboard
source_dashboard_idstringrequired- ID of the dashboard to clone
namestring- Name for the cloned dashboard
salesforce_dashboard_updateUpdate a Salesforce dashboard.WriteUpdate Dashboard
Update a Salesforce dashboard. Supports renaming, moving to a folder, and saving sticky filters. Use GET dashboard first to find filter IDs.
- Idempotent
Inputs
dashboard_idstringrequired- ID of the dashboard to update
filtersarray- Dashboard filters to save (array)
folderIdstring- Folder to move the dashboard to
namestring- New name for the dashboard
salesforce_lead_createCreate a new Lead record in Salesforce.WriteCreate Lead
Create a new Lead record in Salesforce. Allows setting standard Lead fields.
Inputs
Companystringrequired- Company the lead belongs to (required)
LastNamestringrequired- Last name of the lead (required)
AnnualRevenuenumber- Annual revenue of the lead's company
Citystring- City
Countrystring- Country
Descriptionstring- Free-form description
Emailstring- Email address of the lead
FirstNamestring- First name of the lead
Industrystring- Industry of the lead's company
LeadSourcestring- Lead source
MobilePhonestring- Mobile phone of the lead
NumberOfEmployeesinteger- Number of employees
OwnerIdstring- Record owner (User/Queue Id)
Phonestring- Phone number of the lead
PostalCodestring- Postal code
Ratingstring- Lead rating
Statestring- State/province
Statusstring- Lead status
Streetstring- Street address
Titlestring- Job title of the lead
Websitestring- Company website
salesforce_lead_updateUpdate an existing Lead record in Salesforce by ID.WriteUpdate Lead
Update an existing Lead record in Salesforce by ID. Allows updating standard Lead fields.
- Idempotent
Inputs
lead_idstringrequired- ID of the lead to update
AnnualRevenuenumber- Annual revenue of the lead's company
Citystring- City
Companystring- Company the lead belongs to (required)
Countrystring- Country
Descriptionstring- Free-form description
Emailstring- Email address of the lead
FirstNamestring- First name of the lead
Industrystring- Industry of the lead's company
LastNamestring- Last name of the lead (required)
LeadSourcestring- Lead source
MobilePhonestring- Mobile phone of the lead
NumberOfEmployeesinteger- Number of employees
OwnerIdstring- Record owner (User/Queue Id)
Phonestring- Phone number of the lead
PostalCodestring- Postal code
Ratingstring- Lead rating
Statestring- State/province
Statusstring- Lead status
Streetstring- Street address
Titlestring- Job title of the lead
Websitestring- Company website
salesforce_opportunity_createCreate a new opportunity in Salesforce.WriteCreate Opportunity
Create a new opportunity in Salesforce. Allows setting opportunity properties like name, amount, stage, close date, and account association.
Inputs
CloseDatestringrequired- Expected close date (YYYY-MM-DD, required)
Namestringrequired- Opportunity name (required)
StageNamestringrequired- Current sales stage (required)
AccountIdstring- Associated Account Id
Amountnumber- Opportunity amount
CampaignIdstring- Related Campaign Id
Custom_Field__cstring- Example custom field (replace with your org’s custom field API name)
Descriptionstring- Opportunity description
ForecastCategoryNamestring- Forecast category name
LeadSourcestring- Lead source
NextStepstring- Next step in the sales process
OwnerIdstring- Record owner (User/Queue Id)
PricebookIdstring- Associated Price Book Id
Probabilitynumber- Probability percentage (0–100)
RecordTypeIdstring- Record Type Id for Opportunity
Typestring- Opportunity type
salesforce_opportunity_updateUpdate an existing opportunity in Salesforce by opportunity ID.WriteUpdate Opportunity
Update an existing opportunity in Salesforce by opportunity ID. Allows updating opportunity properties like name, amount, stage, and close date.
- Idempotent
Inputs
opportunity_idstringrequired- ID of the opportunity to update
AccountIdstring- Associated Account Id
Amountnumber- Opportunity amount
CampaignIdstring- Related Campaign Id
CloseDatestring- Expected close date (YYYY-MM-DD)
Descriptionstring- Opportunity description
ForecastCategoryNamestring- Forecast category name
LeadSourcestring- Lead source
Namestring- Opportunity name
NextStepstring- Next step in the sales process
OwnerIdstring- Record owner (User/Queue Id)
Pricebook2Idstring- Associated Price Book Id
Probabilitynumber- Probability percentage (0–100)
RecordTypeIdstring- Record Type Id for Opportunity
StageNamestring- Current sales stage
Typestring- Opportunity type
salesforce_report_createCreate a new report in Salesforce using the Analytics API.WriteCreate Report
Create a new report in Salesforce using the Analytics API. Minimal verified version with only confirmed working fields.
Inputs
namestringrequired- Report name
reportTypestringrequired- The report type's API name from your Salesforce org (e.g. Opportunity, AccountList). Find valid values in Setup > Report Types
aggregatesstring- Aggregates configuration (JSON array)
chartstring- Chart configuration (JSON object)
descriptionstring- Report description
detailColumnsstring- Detail columns (JSON array of field names)
folderIdstring- Folder ID where report will be stored
groupingsAcrossstring- Column groupings (JSON array)
groupingsDownstring- Row groupings (JSON array)
reportBooleanFilterstring- Filter logic
reportFiltersstring- Report filters (JSON array)
reportFormatstring- Report format type. TABULAR (default, no groupings), SUMMARY (supports row groupings), or MATRIX (supports row and column groupings)one of
TABULARSUMMARYMATRIX scopestring- Report scope. organization (all records) or team (current user's team records)one of
organizationteam
salesforce_report_execute_with_filtersRun a Salesforce report synchronously while overriding its filters, groupings, or aggregates for this run only (the saved report definition is not modified).WriteRun Report With Filters
Run a Salesforce report synchronously while overriding its filters, groupings, or aggregates for this run only (the saved report definition is not modified). Provide reportMetadata as a JSON object string with the fields to override.
Inputs
report_idstringrequired- The unique ID of the Salesforce report
report_metadatastringrequired- JSON object with reportMetadata overrides (filters, groupingsDown, groupingsAcross, etc.)
salesforce_report_run_asyncQueue an asynchronous run of a Salesforce report and return an instance ID immediately.WriteRun Report Asynchronously
Queue an asynchronous run of a Salesforce report and return an instance ID immediately. Use for long-running reports that risk the API's synchronous timeout; poll salesforce_report_instance_results_get with the returned instance ID to fetch results (retained for 24 hours). Optionally override filters for this run via reportMetadata.
Inputs
report_idstringrequired- The unique ID of the Salesforce report
report_metadatastring- Optional JSON object with reportMetadata overrides for this async run
salesforce_report_updateUpdate an existing report in Salesforce by report ID.WriteUpdate Report
Update an existing report in Salesforce by report ID. Minimal verified version with only confirmed working fields. Only updates fields that are provided.
- Idempotent
Inputs
report_idstringrequired- ID of the report to update
aggregatesstring- Aggregates configuration (JSON array)
chartstring- Chart configuration (JSON object)
descriptionstring- Updated report description
detailColumnsstring- Detail columns (JSON array of field names)
folderIdstring- Move report to different folder
groupingsAcrossstring- Column groupings (JSON array)
groupingsDownstring- Row groupings (JSON array)
namestring- Updated report name
reportBooleanFilterstring- Filter logic
reportFiltersstring- Report filters (JSON array)
reportFormatstring- Report format type. TABULAR (default, no groupings), SUMMARY (supports row groupings), or MATRIX (supports row and column groupings)one of
TABULARSUMMARYMATRIX scopestring- Report scope. organization (all records) or team (current user's team records)one of
organizationteam
salesforce_sobject_createCreate a new record for any Salesforce SObject type (Account, Contact, Lead, Opportunity, custom objects, etc.).WriteCreate SObject
Create a new record for any Salesforce SObject type (Account, Contact, Lead, Opportunity, custom objects, etc.). Provide the object type and fields as a dynamic object.
Inputs
fieldsobjectrequired- Object containing field names and values to set on the new record
sobject_typestringrequired- The Salesforce SObject API name (e.g., Account, Contact, Lead, CustomObject__c)
salesforce_sobject_updateUpdate an existing record for any Salesforce SObject type by ID.WriteUpdate SObject
Update an existing record for any Salesforce SObject type by ID. Only the fields provided will be updated. Before updating, call salesforce_object_describe on sobject_type to confirm each field in fields exists, is updateable (not a formula, rollup-summary, or system field like CreatedDate), and to get valid picklist values — restricted picklists reject values outside their defined set. Match each field's data type exactly: send numbers as JSON numbers, not quoted strings. Confirm record_id actually belongs to sobject_type; a mismatched ID (for example, a Contact or Lead ID passed with sobject_type set to Account) returns an update error rather than a not-found error. Updating a deleted record also fails. Org-specific validation rules (for example, restrictions on changing OwnerId) can block an update too — read the returned error message rather than retrying with the same payload.
- Idempotent
Inputs
fieldsobjectrequired- Object containing field names and values to update on the record
record_idstringrequired- ID of the record to update
sobject_typestringrequired- The Salesforce SObject API name (e.g., Account, Contact, Lead, CustomObject__c)
salesforce_tooling_execute_anonymousExecute a block of anonymous Apex code on demand via the Tooling API, without saving it.WriteExecute Anonymous Apex
Execute a block of anonymous Apex code on demand via the Tooling API, without saving it. Apex can read and write org data (DML), so this is not a read-only operation despite using GET. Distinct from the existing Tooling sObject CRUD/describe/query tools, which operate on saved metadata rather than running arbitrary code. Returns compile/execution success flags and any exception details.
Inputs
apex_codestringrequired- The Apex code to compile and execute anonymously.
salesforce_tooling_sobject_createCreate a new metadata record for any Salesforce Tooling API object type (ApexClass, ApexTrigger, CustomField, etc.).WriteCreate Tooling SObject
Create a new metadata record for any Salesforce Tooling API object type (ApexClass, ApexTrigger, CustomField, etc.). Supports both simple and nested field structures. For CustomField, use FullName and Metadata properties.
Inputs
fieldsobjectrequired- Object containing field names and values to set on the new metadata record. Supports nested structures for complex metadata types.
sobject_typestringrequired- The Tooling API object name (e.g., ApexClass, ApexTrigger, CustomObject)
salesforce_tooling_sobject_updateUpdate an existing metadata record for any Salesforce Tooling API object type by ID.WriteUpdate Tooling SObject
Update an existing metadata record for any Salesforce Tooling API object type by ID. Supports both simple and nested field structures. Only the fields provided will be updated.
- Idempotent
Inputs
fieldsobjectrequired- Object containing field names and values to update on the metadata record. Supports nested structures for complex metadata types.
record_idstringrequired- ID of the metadata record to update
sobject_typestringrequired- The Tooling API object name (e.g., ApexClass, ApexTrigger, CustomObject)
salesforce_account_deleteDelete an existing Account from Salesforce by account ID.DestructiveDelete Account
Delete an existing Account from Salesforce by account ID. This is a destructive operation that permanently removes the account record.
- Idempotent
Inputs
account_idstringrequired- ID of the account to delete
salesforce_case_deleteDelete an existing Case record from Salesforce by ID.DestructiveDelete Case
Delete an existing Case record from Salesforce by ID. This is a destructive operation that permanently removes the record.
- Idempotent
Inputs
case_idstringrequired- ID of the case to delete
salesforce_chatter_comment_deleteDelete a comment from a Salesforce Chatter post.DestructiveDelete Chatter Comment
Delete a comment from a Salesforce Chatter post.
- Idempotent
Inputs
comment_idstringrequired- The ID of the Chatter comment to delete
salesforce_chatter_post_deleteDelete a Salesforce Chatter post (feed element) by its ID.DestructiveDelete Chatter Post
Delete a Salesforce Chatter post (feed element) by its ID.
- Idempotent
Inputs
feed_element_idstringrequired- The ID of the Chatter post to delete
salesforce_composite_sobjects_deleteDelete multiple Salesforce records (of the same or different types) in a single Collections API request, by ID.DestructiveDelete SObject Collection
Delete multiple Salesforce records (of the same or different types) in a single Collections API request, by ID. Up to 200 record IDs per request.
- Idempotent
Inputs
record_idsstringrequired- Comma-separated list of record IDs to delete
all_or_nonestring- Whether to roll back all records if any single record fails
salesforce_contact_deleteDelete an existing Contact record from Salesforce by ID.DestructiveDelete Contact
Delete an existing Contact record from Salesforce by ID. This is a destructive operation that permanently removes the record.
- Idempotent
Inputs
contact_idstringrequired- ID of the contact to delete
salesforce_lead_deleteDelete an existing Lead record from Salesforce by ID.DestructiveDelete Lead
Delete an existing Lead record from Salesforce by ID. This is a destructive operation that permanently removes the record.
- Idempotent
Inputs
lead_idstringrequired- ID of the lead to delete
salesforce_opportunity_deleteDelete an existing Opportunity record from Salesforce by ID.DestructiveDelete Opportunity
Delete an existing Opportunity record from Salesforce by ID. This is a destructive operation that permanently removes the record.
- Idempotent
Inputs
opportunity_idstringrequired- ID of the opportunity to delete
salesforce_report_deleteDelete an existing report from Salesforce by report ID.DestructiveDelete Report
Delete an existing report from Salesforce by report ID. This is a destructive operation that permanently removes the report and cannot be undone.
- Idempotent
Inputs
report_idstringrequired- ID of the report to delete
salesforce_sobject_deleteDelete a record from any Salesforce SObject type by ID.DestructiveDelete SObject
Delete a record from any Salesforce SObject type by ID. This is a destructive operation that permanently removes the record.
- Idempotent
Inputs
record_idstringrequired- ID of the record to delete
sobject_typestringrequired- The Salesforce SObject API name (e.g., Account, Contact, Lead, CustomObject__c)
salesforce_tooling_sobject_deleteDelete a metadata record from any Salesforce Tooling API object type by ID.DestructiveDelete Tooling SObject
Delete a metadata record from any Salesforce Tooling API object type by ID. This is a destructive operation that permanently removes the metadata.
- Idempotent
Inputs
record_idstringrequired- ID of the metadata record to delete
sobject_typestringrequired- The Tooling API object name (e.g., ApexClass, ApexTrigger, CustomObject)
No tools match.
Clone dashboards
Section titled “Clone dashboards”To rename a cloned dashboard, use a two-step pattern:
- Call
salesforce_dashboard_clonewith the source dashboard ID. - Call
salesforce_dashboard_updatewith the cloned dashboard ID and the new name.
{ "dashboard_id": "<cloned_dashboard_id>", "name": "New dashboard name"}See the Salesforce Dashboard clone API for clone payload fields.
Call the Metadata API through SOAP proxy
Section titled “Call the Metadata API through SOAP proxy”The Salesforce Metadata API is a SOAP-based API for reading and modifying your Salesforce org’s configuration, not its data. Use it to inspect or deploy custom objects, page layouts, validation rules, Apex classes, permission sets, profiles, and other org metadata.
Salesforce SOAP APIs only accept opaque access tokens, not JSON Web Token (JWT) access tokens. In your Salesforce Connected App, make sure Issue JSON Web Token (JWT)-based access tokens for named users is unchecked. If you disable this option after users have already authenticated, users must re-authenticate before SOAP proxy calls work.
Get the API version for the connected account
The Metadata API SOAP endpoint URL requires a version number. Retrieve the version from the connected account’s api_config.
15 collapsed lines
import os
import scalekit.clientfrom dotenv import load_dotenv
load_dotenv()
connection_name = "salesforce" # Connection name from the Scalekit dashboardidentifier = "6fe1c057-f684-4303-9555-3dd8807319b4" # Your user's identifier as registered in Scalekit
scalekit_client = scalekit.client.ScalekitClient( client_id=os.getenv("SCALEKIT_CLIENT_ID"), client_secret=os.getenv("SCALEKIT_CLIENT_SECRET"), env_url=os.getenv("SCALEKIT_ENVIRONMENT_URL"),)actions = scalekit_client.actions
result = actions.get_connected_account( connection_name=connection_name, identifier=identifier,)
raw_version = result.connected_account.api_config.get("version")if not raw_version: raise ValueError("Salesforce connected account is missing api_config.version")
api_version = raw_version.lstrip("v") # e.g. "66.0"-
Build the SOAP body
Construct the SOAP envelope for the operation you want to call. Do not include a
<SessionHeader>element. Scalekit injects the session header with the connected account’s access token.The
soap_bodystring uses theapi_versionvalue from the previous section.soap_body = f"""<?xml version="1.0" encoding="UTF-8"?><soapenv:Envelopexmlns:soapenv="http://schemas.xmlsoap.org/soap/envelope/"xmlns:met="http://soap.sforce.com/2006/04/metadata"><soapenv:Body><met:describeMetadata><met:asOfVersion>{api_version}</met:asOfVersion></met:describeMetadata></soapenv:Body></soapenv:Envelope>""" -
Send the SOAP request through Scalekit
Pass the SOAP body as
raw_body. SetContent-Typetotext/xml; charset=UTF-8andSOAPActionto the operation name. Scalekit resolves the user’s Salesforce instance URL, so the request only needs the Metadata API path.try:response = actions.request(connection_name=connection_name,identifier=identifier,path=f"/services/Soap/m/{api_version}",method="POST",raw_body=soap_body,headers={"Content-Type": "text/xml; charset=UTF-8","SOAPAction": "describeMetadata",},)except Exception as exc:raise RuntimeError("Salesforce Metadata API SOAP proxy request failed") from excprint(response.content)
Workflows
Make your first call
Once a user authorizes the connection, make a request to Salesforce through the Scalekit proxy. The example below retrieves the authenticated user’s profile — a useful sanity-check call.
const result = await actions.request({  connectionName: 'salesforce',  identifier: 'user_123',  method: 'GET',  path: '/chatter/users/me',})
console.log(result)
result = actions.request( connection_name='salesforce', identifier='user_123', method="GET", path="/chatter/users/me",)print(result)Query records with SOQL
Retrieve this month’s open opportunities, sorted by deal size:
const result = await actions.request({  connectionName: 'salesforce',  identifier: 'user_123',  method: 'GET',  path: '/query',  params: {    q: 'SELECT Id, Name, Amount, StageName, CloseDate FROM Opportunity WHERE CloseDate = THIS_MONTH ORDER BY Amount DESC LIMIT 10',  },})
console.log(result.records)
result = actions.request( connection_name='salesforce', identifier='user_123', method="GET", path="/query", params={ "q": "SELECT Id, Name, Amount, StageName, CloseDate FROM Opportunity WHERE CloseDate = THIS_MONTH ORDER BY Amount DESC LIMIT 10" },)
print(result["records"])Log a sales call and advance a lead
Find a lead by email, update its status, then log a completed task — all in one agent turn.
This workflow uses Scalekit’s tool calling API (execute_tool), which takes the tool names listed under Tools on this page.
// 1. Search for the leadconst searchResult = await actions.request({ connectionName: 'salesforce', identifier: 'user_123', method: 'GET', path: '/query', params: { q: "SELECT Id, Status FROM Lead WHERE Email = 'jane@acme.com' LIMIT 1" },})const lead = searchResult.records[0]
// 2. Update the lead statusawait actions.request({ connectionName: 'salesforce', identifier: 'user_123', method: 'PATCH', path: `/sobjects/Lead/${lead.Id}`, body: { Status: 'Working - Contacted' },})
// 3. Log a completed task linked to the leadawait actions.request({ connectionName: 'salesforce', identifier: 'user_123', method: 'POST', path: '/sobjects/Task', body: { WhoId: lead.Id, Subject: 'Discovery call — follow up in 3 days', Status: 'Completed', ActivityDate: '2025-04-10', },})# 1. Find the lead by emailsearch_result = actions.execute_tool( tool_name="salesforce_query_soql", connection_name='salesforce', identifier='user_123', tool_input={ "query": "SELECT Id, Status FROM Lead WHERE Email = 'jane@acme.com' LIMIT 1", },)lead_id = search_result.data["records"][0]["Id"]
# 2. Update the lead statusactions.execute_tool( tool_name="salesforce_lead_update", connection_name='salesforce', identifier='user_123', tool_input={ "lead_id": lead_id, "Status": "Working - Contacted", },)
# 3. Log a completed task linked to the leadactions.execute_tool( tool_name="salesforce_sobject_create", connection_name='salesforce', identifier='user_123', tool_input={ "sobject_type": "Task", "fields": { "WhoId": lead_id, "Subject": "Discovery call — follow up in 3 days", "Status": "Completed", "ActivityDate": "2025-04-10", }, },)