
The Google Ads connector lets your AI agent act in each user's Google Ads account. Each user signs in to Google Ads once, and Scalekit stores and refreshes their tokens, so your agent never handles credentials. It comes with 35 tools.
- Tools
- 35
- What they doRead · write · destructive
- 4 · 23 · 84 read23 write8 destructive
- Users sign in with
- OAuth
- OAuth app
- Your own Google app
What you can do
- Manage campaigns: create, update, and remove campaigns, and set their budgets, bidding strategies, and targeting
- Build ad groups and ads: create ad groups, write responsive search ads, and pause, enable, or remove ads
- Manage keywords: add, rebid, pause, or remove keywords and generate keyword ideas with traffic estimates
- Query performance data: run Google Ads queries to pull campaigns, ad groups, keywords, and metrics
- Track conversions and audiences: create conversion actions, build remarketing lists, and add or remove Customer Match members
- Organize with assets and labels: create sitelinks, callouts, and images, link them to campaigns, and apply labels
Setup
Install the SDK
Terminal window npm install @scalekit-sdk/node dotenvTerminal window pip install scalekit-sdk-python python-dotenvSet your credentials
Add your Scalekit credentials to your
.envfile. Find values in app.scalekit.com > Developers > API Credentials..env SCALEKIT_ENVIRONMENT_URL=<your-environment-url>SCALEKIT_CLIENT_ID=<your-client-id>SCALEKIT_CLIENT_SECRET=<your-client-secret>Create the Google Ads connection
In AgentKit > Connections, create a Google Ads connection and copy its redirect URI. The name you give it is the
connection_nameyour code passes. See Configure connections.Register a Google OAuth app
Google Ads connections use your own OAuth app. Register one with Google and add the redirect URI you copied.
Then enter the app's Client ID and Client Secret on the Google Ads connection.
Console steps with screenshots
Register your Scalekit environment with the Google Ads connector so Scalekit handles the authentication flow and token lifecycle for you. The connection name you create will be used to identify and invoke the connection programmatically. Then complete the configuration in your application as follows:
-
Set up auth redirects
-
In Scalekit dashboard, go to AgentKit > Connections > Create Connection. Find Google Ads and click Create. Click Use your own credentials and copy the redirect URI. It looks like
https://<SCALEKIT_ENVIRONMENT_URL>/sso/v1/oauth/<CONNECTION_ID>/callback.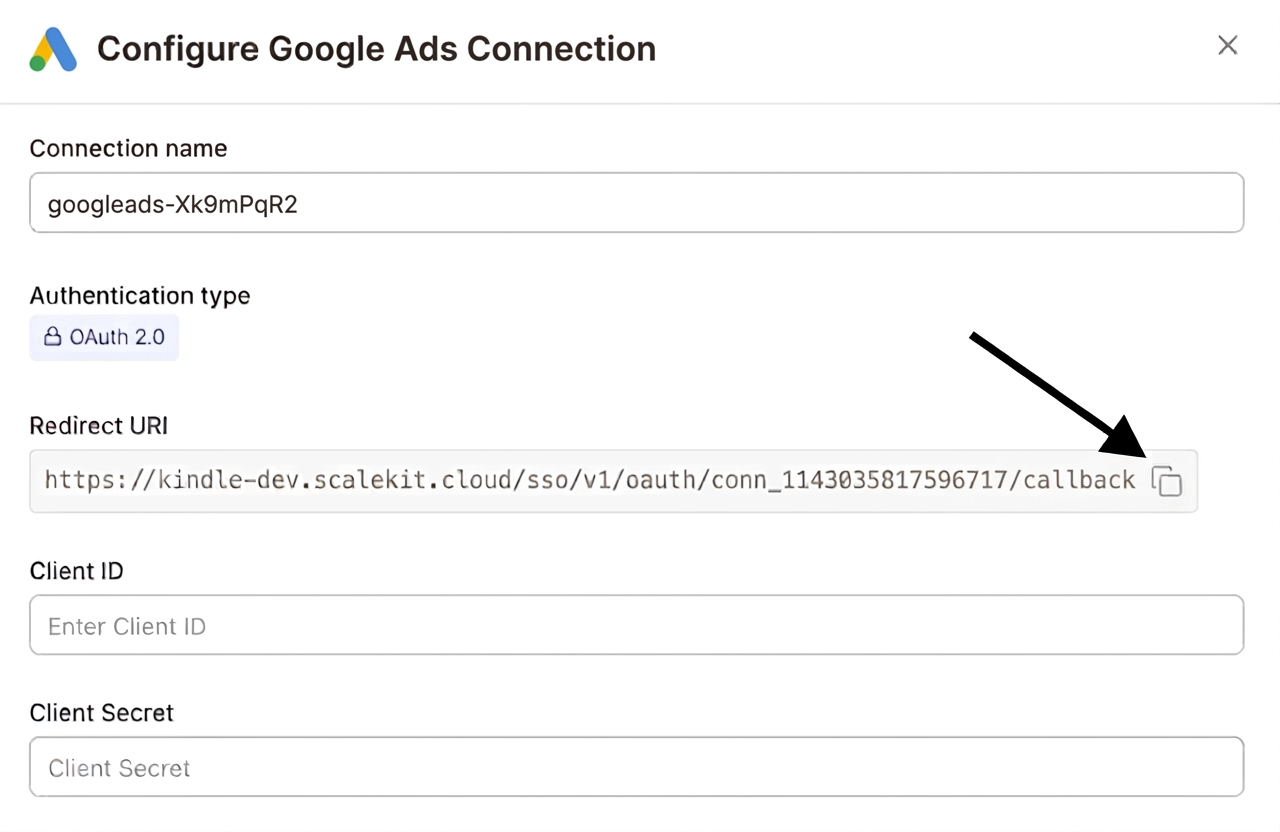
-
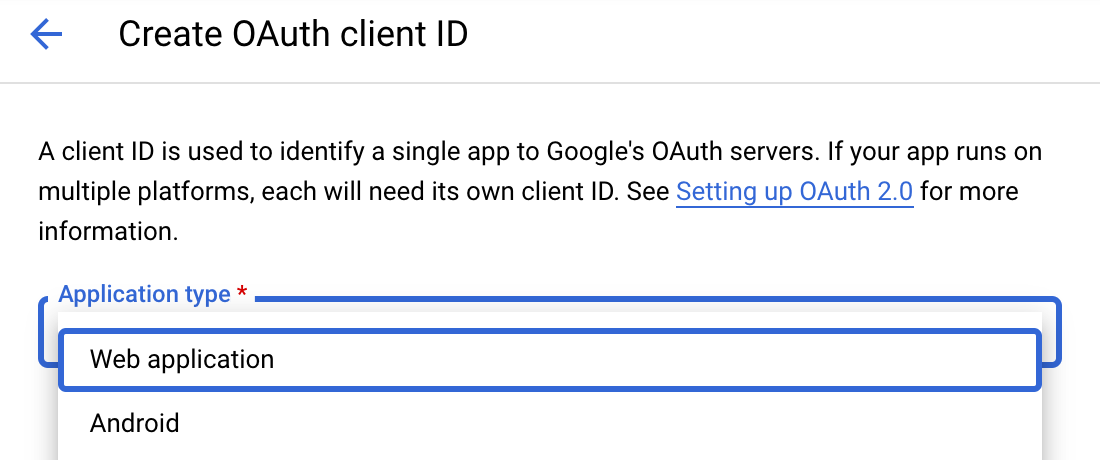
Navigate to Google Cloud Console → APIs & Services → Credentials. Select + Create Credentials, then OAuth client ID. Choose Web application from the Application type menu.
-
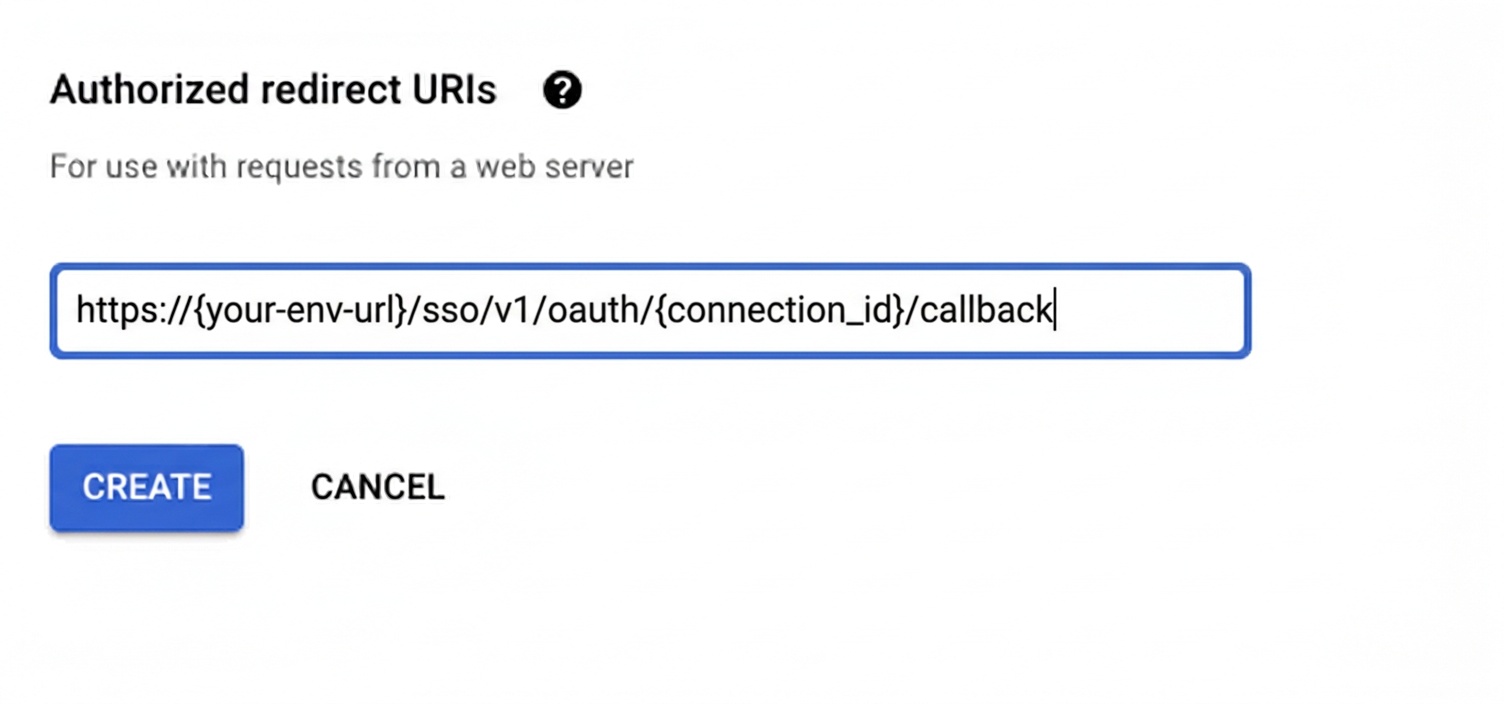
Under Authorized redirect URIs, click + Add URI, paste the redirect URI, and click Create.
-
-
Enable the Google Ads API
- In Google Cloud Console, go to APIs & Services → Library. Search for “Google Ads API” and click Enable.
-
Get client credentials
- Google provides your Client ID and Client Secret after you create the OAuth client ID in step 1.
-
Add credentials in Scalekit
-
In Scalekit dashboard, go to AgentKit > Connections and open the connection you created.
-
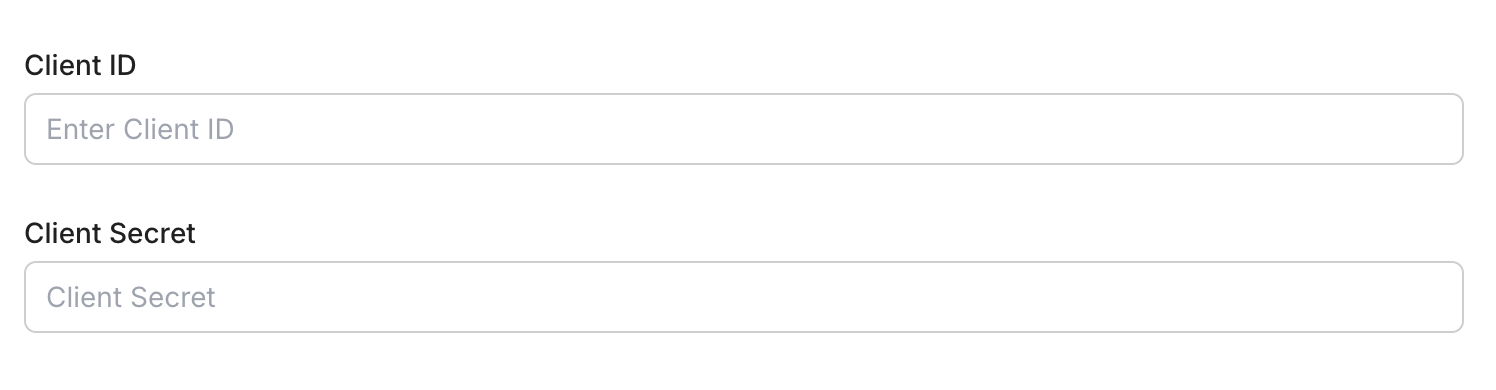
Enter your credentials:
- Client ID (from above)
- Client Secret (from above)
- Permissions (scopes — see Google API Scopes reference)
-
Click Save.
-
-
Enter your developer token
-
Enter your 22-character developer token from the Google Ads API Center. You can obtain a developer token by following the Google Ads developer token guide.

-
-
Authorize a user and make your first call
quickstart.mts import { ScalekitClient } from '@scalekit-sdk/node'import 'dotenv/config'import { createInterface } from 'node:readline/promises'const scalekit = new ScalekitClient(process.env.SCALEKIT_ENVIRONMENT_URL,process.env.SCALEKIT_CLIENT_ID,process.env.SCALEKIT_CLIENT_SECRET,)const actions = scalekit.actionsconst connector = 'googleads'const identifier = 'user_123'// Generate an authorization link for the userconst { link } = await actions.getAuthorizationLink({ connectionName: connector, identifier })console.log('Authorize Google Ads:', link)const rl = createInterface({ input: process.stdin, output: process.stdout })await rl.question('Press Enter after authorizing...')rl.close()// Make your first callconst result = await actions.executeTool({connector,identifier,toolName: 'googleads_customers_list',toolInput: {},})console.log(result)Terminal window npx tsx quickstart.mtsquickstart.py import osfrom scalekit import ScalekitClientfrom dotenv import load_dotenvload_dotenv()scalekit_client = ScalekitClient(env_url=os.getenv("SCALEKIT_ENVIRONMENT_URL"),client_id=os.getenv("SCALEKIT_CLIENT_ID"),client_secret=os.getenv("SCALEKIT_CLIENT_SECRET"),)actions = scalekit_client.actionsconnection_name = "googleads"identifier = "user_123"# Generate an authorization link for the userlink_response = actions.get_authorization_link(connection_name=connection_name,identifier=identifier,)print("Authorize Google Ads:", link_response.link)input("Press Enter after authorizing...")# Make your first callresult = actions.execute_tool(tool_input={},tool_name="googleads_customers_list",connection_name=connection_name,identifier=identifier,)print(result)Terminal window python quickstart.pyEach user signs in once. See Authorize a user for the full flow and statuses.
Tools
Pass the exact name toexecute_toolgoogleads_customers_listList all Google Ads customer accounts accessible with the current OAuth credentials.Read-onlyList Accessible Customers
List all Google Ads customer accounts accessible with the current OAuth credentials. Returns resource names for all accounts the authenticated user can access.
Inputs
This tool takes no inputs.
Also accepts
schema_versionandtool_versionto pin a version.googleads_geo_target_constant_suggestLook up Google Ads geo target constant resource names for location names (cities, regions, countries) or geo-target IDs.Read-onlySuggest Geo Target Constants
Look up Google Ads geo target constant resource names for location names (cities, regions, countries) or geo-target IDs. Use this to resolve human-readable place names into the geoTargetConstants resource names required by googleads_keyword_ideas_generate and location targeting.
Inputs
geo_target_idsarray- List of known geo target IDs to resolve directly into geoTargetConstants resource names.
localestring- Locale to use for returning location names in the response.default
en location_namesarray- List of free-text location names to resolve, such as city, region, or country names. Provide either location_names or geo_target_ids (or both).
googleads_keyword_ideas_generateGenerate keyword ideas and traffic estimates for keyword research and campaign planning using seed keywords or a seed URL.Read-onlyGenerate Keyword Ideas
Generate keyword ideas and traffic estimates for keyword research and campaign planning using seed keywords or a seed URL.
Inputs
customer_idstring- Google Ads customer account ID to operate on (digits only, no hyphens). Defaults to the Google Ads Customer ID entered when the account was connected; set it only to target a different account, e.g. a specific client account under a manager (MCC).
geo_target_constantsarray- List of geo target constant resource names to filter results by location. Example: ["geoTargetConstants/2840"] for United States.
include_adult_keywordsboolean- Whether to include adult keywords in the response.
keyword_plan_networkstring- The network to target for keyword ideas. GOOGLE_SEARCH returns ideas for Google Search only. GOOGLE_SEARCH_AND_PARTNERS includes Google Search Partners.one of
GOOGLE_SEARCHGOOGLE_SEARCH_AND_PARTNERS keywordsarray- List of seed keyword strings for idea generation. Example: ["running shoes","athletic footwear"]. Provide either keywords or url_seed (or both).
languagestring- Language resource name to filter keyword ideas. Use the languageConstants resource name, e.g., languageConstants/1000 for English.
page_sizeinteger- Number of keyword ideas to return. Defaults to 1000 if not specified.
url_seedstring- URL to use as seed for keyword ideas (alternative to keyword seeds). The content of the page is analyzed to generate related keyword suggestions.
Also accepts
schema_versionandtool_versionto pin a version.googleads_searchExecute a GAQL (Google Ads Query Language) query to retrieve campaigns, ad groups, keywords, metrics, and any other Google Ads data.Read-onlySearch (GAQL Query)
Execute a GAQL (Google Ads Query Language) query to retrieve campaigns, ad groups, keywords, metrics, and any other Google Ads data. Returns paginated results.
Inputs
querystringrequired- GAQL query string to execute. Use SELECT, FROM, WHERE, ORDER BY, and LIMIT clauses. Example: SELECT campaign.id, campaign.name, campaign.status FROM campaign WHERE campaign.status != 'REMOVED' LIMIT 50
customer_idstring- Google Ads customer account ID to operate on (digits only, no hyphens). Defaults to the Google Ads Customer ID entered when the account was connected; set it only to target a different account, e.g. a specific client account under a manager (MCC).
page_sizeinteger- Number of results to return per page. Maximum is 10000. Defaults to 10000 if not specified.
page_tokenstring- Token for retrieving the next page of results. Obtained from the nextPageToken field of a previous response.
Also accepts
schema_versionandtool_versionto pin a version.googleads_ad_group_asset_linkAttach an existing asset to an ad group so it can serve with that ad group, for example a sitelink, callout or structured snippet.WriteLink Asset to Ad Group
Attach an existing asset to an ad group so it can serve with that ad group, for example a sitelink, callout or structured snippet. Ad-group links override campaign-level links for the same field type. Create the asset first with the asset creation tool, then link it here. The link is immutable: to change which asset or field type is used, remove the link and create a new one.
Inputs
ad_groupstringrequired- Resource name of the ad group to attach the asset to, in the format customers/{customer_id}/adGroups/{ad_group_id}. To find it from an ad group name, run the search tool with: SELECT ad_group.resource_name, ad_group.name FROM ad_group WHERE ad_group.name = 'Your Ad Group'. It is also returned when an ad group is created.
assetstringrequired- Resource name of the asset to attach, in the format customers/{customer_id}/assets/{asset_id}. Returned when the asset is created. To find an existing one, run the search tool with: SELECT asset.resource_name, asset.name, asset.type FROM asset. The asset must already be of the type this link needs - sitelink, callout, structured snippet, call, price, promotion, mobile app and hotel callout assets have to exist in the account already, as the asset creation tool only makes text, image and YouTube video assets.
field_typestringrequired- How the asset is used by the ad group. Must match the asset's own type - a SitelinkAsset can only be linked as SITELINK, a CalloutAsset as CALLOUT, and so on.one of
SITELINKCALLOUTSTRUCTURED_SNIPPETCALLPRICEPROMOTIONMOBILE_APPHOTEL_CALLOUTLEAD_FORMAD_IMAGE customer_idstring- Google Ads customer account ID to operate on (digits only, no hyphens). Defaults to the Google Ads Customer ID entered when the account was connected; set it only to target a different account, e.g. a specific client account under a manager (MCC).
Also accepts
schema_versionandtool_versionto pin a version.googleads_ad_group_createCreate a new ad group within an existing campaign.WriteCreate Ad Group
Create a new ad group within an existing campaign. Ad groups contain ads and keywords that share targeting and bid settings.
Inputs
campaignstringrequired- Resource name of the campaign to add the ad group to, in the format customers/{customer_id}/campaigns/{campaign_id}.
namestringrequired- Name of the ad group. Should describe the theme of the ads and keywords in this group.
ad_group_typestring- Type of the ad group. SEARCH_STANDARD is the default for Search campaigns. DISPLAY_STANDARD for Display campaigns. SEARCH_DYNAMIC_ADS for dynamic search ads.one of
SEARCH_STANDARDDISPLAY_STANDARDSEARCH_DYNAMIC_ADS cpc_bid_microsstring- Default cost-per-click bid for this ad group in micros. 1,000,000 micros = $1.00. Individual keyword bids override this.
cpm_bid_microsstring- Default cost-per-thousand-impressions bid in micros for Display campaigns.
customer_idstring- Google Ads customer account ID to operate on (digits only, no hyphens). Defaults to the Google Ads Customer ID entered when the account was connected; set it only to target a different account, e.g. a specific client account under a manager (MCC).
statusstring- Initial status of the ad group. ENABLED serves ads; PAUSED stops serving ads.one of
ENABLEDPAUSED target_cpa_microsstring- Target CPA for this ad group in micros, overriding the campaign-level target.
Also accepts
schema_versionandtool_versionto pin a version.googleads_ad_group_label_createApply a label to an ad group for organization and filtering.WriteAdd Label to Ad Group
Apply a label to an ad group for organization and filtering. Labels help categorize ad groups and make them easier to find and manage in the Google Ads UI.
Inputs
ad_groupstringrequired- Resource name of the ad group to apply the label to, in the format customers/{customer_id}/adGroups/{ad_group_id}.
labelstringrequired- Resource name of the label to apply, in the format customers/{customer_id}/labels/{label_id}.
customer_idstring- Google Ads customer account ID to operate on (digits only, no hyphens). Defaults to the Google Ads Customer ID entered when the account was connected; set it only to target a different account, e.g. a specific client account under a manager (MCC).
Also accepts
schema_versionandtool_versionto pin a version.googleads_ad_group_updateUpdate an ad group's name, status, or default bid amounts.WriteUpdate Ad Group
Update an ad group's name, status, or default bid amounts. Only the fields you provide will be updated.
- Idempotent
Inputs
resource_namestringrequired- Resource name of the ad group to update, in the format customers/{customer_id}/adGroups/{ad_group_id}.
cpc_bid_microsstring- New default CPC bid in micros for this ad group. 1,000,000 micros = $1.00.
customer_idstring- Google Ads customer account ID to operate on (digits only, no hyphens). Defaults to the Google Ads Customer ID entered when the account was connected; set it only to target a different account, e.g. a specific client account under a manager (MCC).
namestring- New name for the ad group.
statusstring- New status for the ad group. ENABLED serves ads; PAUSED stops serving; REMOVED permanently deletes.one of
ENABLEDPAUSEDREMOVED
Also accepts
schema_versionandtool_versionto pin a version.googleads_ad_updateUpdate the status of an ad group ad.WriteUpdate Ad Status
Update the status of an ad group ad. Use this to enable, pause, or mark an ad for removal without deleting it.
- Idempotent
Inputs
resource_namestringrequired- Resource name of the ad group ad to update, in the format customers/{customer_id}/adGroupAds/{ad_group_id}~{ad_id}.
statusstringrequired- New status for the ad. ENABLED serves the ad; PAUSED stops it; REMOVED permanently removes it.one of
ENABLEDPAUSEDREMOVED customer_idstring- Google Ads customer account ID to operate on (digits only, no hyphens). Defaults to the Google Ads Customer ID entered when the account was connected; set it only to target a different account, e.g. a specific client account under a manager (MCC).
Also accepts
schema_versionandtool_versionto pin a version.googleads_asset_createCreate a reusable asset (text, image, YouTube video, sitelink, callout) that can be used across Performance Max campaigns, responsive ads, and other campaign types.WriteCreate Asset
Create a reusable asset (text, image, YouTube video, sitelink, callout) that can be used across Performance Max campaigns, responsive ads, and other campaign types. Assets are shared building blocks for ads.
Inputs
asset_typestringrequired- Type of asset to create. TEXT=text snippet, IMAGE=image file, YOUTUBE_VIDEO=YouTube video, SITELINK=sitelink extension, CALLOUT=callout extension, CALL=call extension, STRUCTURED_SNIPPET=structured snippet, MOBILE_APP=app extension.one of
TEXTIMAGEYOUTUBE_VIDEOMEDIA_BUNDLESITELINKCALLOUTCALLSTRUCTURED_SNIPPETMOBILE_APP customer_idstring- Google Ads customer account ID to operate on (digits only, no hyphens). Defaults to the Google Ads Customer ID entered when the account was connected; set it only to target a different account, e.g. a specific client account under a manager (MCC).
image_urlstring- URL of the image to use for IMAGE type assets. The image will be downloaded and uploaded to Google Ads.
namestring- Optional name for the asset to identify it in the Google Ads asset library.
text_asset_textstring- Text content for TEXT type assets. Used in Performance Max campaigns and other ad formats.
youtube_video_idstring- YouTube video ID for YOUTUBE_VIDEO type assets. Found in the YouTube video URL after 'v=', e.g., 'dQw4w9WgXcQ'.
Also accepts
schema_versionandtool_versionto pin a version.googleads_bidding_strategy_createCreate a shared portfolio bidding strategy that can be applied to multiple campaigns.WriteCreate Portfolio Bidding Strategy
Create a shared portfolio bidding strategy that can be applied to multiple campaigns. Portfolio strategies allow centralized bid management across campaigns.
Inputs
namestringrequired- Name of the portfolio bidding strategy. Must be unique within the account.
strategy_typestringrequired- The type of bidding strategy. TARGET_CPA=optimize for conversions at a target cost. TARGET_ROAS=optimize for revenue at target return. MAXIMIZE_CLICKS=get most clicks. MAXIMIZE_CONVERSIONS=get most conversions. TARGET_IMPRESSION_SHARE=achieve a target impression share.one of
TARGET_CPATARGET_ROASMAXIMIZE_CLICKSMAXIMIZE_CONVERSIONSTARGET_IMPRESSION_SHARE cpc_bid_ceiling_microsstring- Maximum CPC bid ceiling in micros for MAXIMIZE_CLICKS strategy. 1,000,000 micros = $1.00.
cpc_bid_floor_microsstring- Minimum CPC bid floor in micros. Bids will not go below this value.
customer_idstring- Google Ads customer account ID to operate on (digits only, no hyphens). Defaults to the Google Ads Customer ID entered when the account was connected; set it only to target a different account, e.g. a specific client account under a manager (MCC).
target_cpa_microsstring- Target cost-per-acquisition in micros for TARGET_CPA strategy. 1,000,000 micros = $1.00.
target_roasnumber- Target return on ad spend for TARGET_ROAS strategy. For example, 3.5 means 350% ROAS.
Also accepts
schema_versionandtool_versionto pin a version.googleads_bidding_strategy_updateUpdate a portfolio bidding strategy's name or target values.WriteUpdate Portfolio Bidding Strategy
Update a portfolio bidding strategy's name or target values. Only the fields you provide will be updated.
- Idempotent
Inputs
resource_namestringrequired- Resource name of the bidding strategy to update, in the format customers/{customer_id}/biddingStrategies/{bidding_strategy_id}.
customer_idstring- Google Ads customer account ID to operate on (digits only, no hyphens). Defaults to the Google Ads Customer ID entered when the account was connected; set it only to target a different account, e.g. a specific client account under a manager (MCC).
namestring- New name for the bidding strategy. Must be unique within the account.
target_cpa_microsstring- New target cost-per-acquisition in micros for TARGET_CPA strategy. 1,000,000 micros = $1.00.
target_roasnumber- New target return on ad spend for TARGET_ROAS strategy. For example, 3.5 means 350% ROAS.
Also accepts
schema_versionandtool_versionto pin a version.googleads_budget_createCreate a new campaign budget in Google Ads.WriteCreate Campaign Budget
Create a new campaign budget in Google Ads. The budget amount is specified in micros (1,000,000 micros = $1.00). Budgets can be shared across multiple campaigns.
Inputs
amount_microsstringrequired- Daily budget amount in micros. 1,000,000 micros = $1.00. For a $10/day budget, enter 10000000.
namestringrequired- Name of the campaign budget. Must be unique within the account.
customer_idstring- Google Ads customer account ID to operate on (digits only, no hyphens). Defaults to the Google Ads Customer ID entered when the account was connected; set it only to target a different account, e.g. a specific client account under a manager (MCC).
delivery_methodstring- Budget delivery method. STANDARD spreads budget evenly throughout the day. ACCELERATED spends budget as quickly as possible.one of
STANDARDACCELERATED explicitly_sharedboolean- Whether this budget is explicitly shared across campaigns. If false, the budget is exclusive to a single campaign.
Also accepts
schema_versionandtool_versionto pin a version.googleads_budget_updateUpdate an existing campaign budget's name, daily amount, or delivery method.WriteUpdate Campaign Budget
Update an existing campaign budget's name, daily amount, or delivery method. Only the fields you provide will be updated.
- Idempotent
Inputs
resource_namestringrequired- Resource name of the budget to update, in the format customers/{customer_id}/campaignBudgets/{budget_id}.
amount_microsstring- New daily budget amount in micros. 1,000,000 micros = $1.00. For a $10/day budget, enter 10000000.
customer_idstring- Google Ads customer account ID to operate on (digits only, no hyphens). Defaults to the Google Ads Customer ID entered when the account was connected; set it only to target a different account, e.g. a specific client account under a manager (MCC).
delivery_methodstring- Budget delivery method. STANDARD spreads budget evenly throughout the day. ACCELERATED spends as fast as possible.one of
STANDARDACCELERATED namestring- New name for the campaign budget. Must be unique within the account.
Also accepts
schema_versionandtool_versionto pin a version.googleads_campaign_asset_linkAttach an existing asset to a campaign so it can serve with that campaign, for example a sitelink, callout, structured snippet or image.WriteLink Asset to Campaign
Attach an existing asset to a campaign so it can serve with that campaign, for example a sitelink, callout, structured snippet or image. Create the asset first with the asset creation tool, then link it here. The link is immutable: to change which asset or field type is used, remove the link and create a new one.
Inputs
assetstringrequired- Resource name of the asset to attach, in the format customers/{customer_id}/assets/{asset_id}. Returned when the asset is created. To find an existing one, run the search tool with: SELECT asset.resource_name, asset.name, asset.type FROM asset. The asset must already be of the type this link needs - sitelink, callout, structured snippet, call, price, promotion, mobile app and hotel callout assets have to exist in the account already, as the asset creation tool only makes text, image and YouTube video assets.
campaignstringrequired- Resource name of the campaign to attach the asset to, in the format customers/{customer_id}/campaigns/{campaign_id}. To find it from a campaign name, run the search tool with: SELECT campaign.resource_name, campaign.name FROM campaign WHERE campaign.name = 'Your Campaign'. It is also returned when a campaign is created.
field_typestringrequired- How the asset is used by the campaign. Must match the asset's own type - a SitelinkAsset can only be linked as SITELINK, a CalloutAsset as CALLOUT, and so on.one of
SITELINKCALLOUTSTRUCTURED_SNIPPETCALLPRICEPROMOTIONMOBILE_APPHOTEL_CALLOUTLEAD_FORMAD_IMAGE customer_idstring- Google Ads customer account ID to operate on (digits only, no hyphens). Defaults to the Google Ads Customer ID entered when the account was connected; set it only to target a different account, e.g. a specific client account under a manager (MCC).
Also accepts
schema_versionandtool_versionto pin a version.googleads_campaign_createCreate a new advertising campaign in Google Ads.WriteCreate Campaign
Create a new advertising campaign in Google Ads. Specify the campaign name, channel type, linked budget, and optional bidding strategy. The campaign is created in PAUSED status by default for safety.
Inputs
advertising_channel_typestringrequired- The advertising channel type for the campaign. Determines where ads are served. SEARCH=text ads on Google Search, DISPLAY=banner ads on Google Display Network, SHOPPING=product listings, VIDEO=YouTube ads, PERFORMANCE_MAX=automated across all channels.one of
SEARCHDISPLAYSHOPPINGVIDEOSMARTPERFORMANCE_MAX campaign_budgetstringrequired- Resource name of the campaign budget to link, in the format customers/{customer_id}/campaignBudgets/{budget_id}. Create a budget first using googleads_budget_create.
namestringrequired- Name of the campaign. Must be unique within the account.
bidding_strategy_typestring- Bidding strategy type to use. TARGET_CPA=optimize for conversions at a target cost. TARGET_ROAS=optimize for revenue at a target return. MAXIMIZE_CLICKS=get the most clicks. MAXIMIZE_CONVERSIONS=get the most conversions. MANUAL_CPC=set bids manually.
customer_idstring- Google Ads customer account ID to operate on (digits only, no hyphens). Defaults to the Google Ads Customer ID entered when the account was connected; set it only to target a different account, e.g. a specific client account under a manager (MCC).
end_datestring- Campaign end date in YYYYMMDD format. Leave blank for campaigns with no end date.
start_datestring- Campaign start date in YYYYMMDD format. Defaults to today if not specified.
statusstring- Initial status of the campaign. PAUSED is recommended to review settings before enabling. ENABLED starts serving ads immediately.one of
ENABLEDPAUSED target_cpa_microsstring- Target cost-per-acquisition in micros when using TARGET_CPA bidding. 1,000,000 micros = $1.00.
target_roasnumber- Target return on ad spend as a decimal when using TARGET_ROAS bidding. For example, 3.5 means 350% ROAS ($3.50 revenue per $1.00 spent).
target_spend_microsstring- Maximum daily spend target in micros when using MAXIMIZE_CLICKS bidding. 1,000,000 micros = $1.00.
Also accepts
schema_versionandtool_versionto pin a version.googleads_campaign_criterion_createAdd a targeting criterion to a campaign, such as a geographic location, device type, or negative keyword.WriteCreate Campaign Targeting Criterion
Add a targeting criterion to a campaign, such as a geographic location, device type, or negative keyword. Location criteria use geo target constant IDs, and device criteria specify DESKTOP, MOBILE, TABLET, or CONNECTED_TV.
Inputs
campaignstringrequired- Resource name of the campaign to add the criterion to, in the format customers/{customer_id}/campaigns/{campaign_id}.
criterion_typestringrequired- The type of targeting criterion to add. LOCATION=geographic targeting, DEVICE=device type targeting, KEYWORD=negative keyword exclusion, PLACEMENT=placement exclusion.one of
LOCATIONDEVICEKEYWORDPLACEMENT bid_modifiernumber- Bid modifier multiplier for this criterion. 1.5 means +50% bid, 0.5 means -50% bid. Only applicable to non-negative criteria.
customer_idstring- Google Ads customer account ID to operate on (digits only, no hyphens). Defaults to the Google Ads Customer ID entered when the account was connected; set it only to target a different account, e.g. a specific client account under a manager (MCC).
device_typestring- Device type for DEVICE criterion. One of DESKTOP, MOBILE, TABLET, or CONNECTED_TV.one of
DESKTOPMOBILETABLETCONNECTED_TV location_idstring- Geo target constant ID for LOCATION criterion. For example, 2840 = United States, 2826 = United Kingdom. Find IDs via the GeoTargetConstant resource.
negativeboolean- Whether this is a negative (exclusion) criterion. If true, the campaign will exclude traffic matching this criterion.
Also accepts
schema_versionandtool_versionto pin a version.googleads_campaign_label_createApply a label to a campaign for organization and filtering.WriteAdd Label to Campaign
Apply a label to a campaign for organization and filtering. Labels help categorize campaigns and make them easier to find and manage in the Google Ads UI.
Inputs
campaignstringrequired- Resource name of the campaign to apply the label to, in the format customers/{customer_id}/campaigns/{campaign_id}.
labelstringrequired- Resource name of the label to apply, in the format customers/{customer_id}/labels/{label_id}.
customer_idstring- Google Ads customer account ID to operate on (digits only, no hyphens). Defaults to the Google Ads Customer ID entered when the account was connected; set it only to target a different account, e.g. a specific client account under a manager (MCC).
Also accepts
schema_versionandtool_versionto pin a version.googleads_campaign_updateUpdate an existing Google Ads campaign's settings such as name, status, budget, or bidding strategy.WriteUpdate Campaign
Update an existing Google Ads campaign's settings such as name, status, budget, or bidding strategy. Only the fields you provide will be updated.
- Idempotent
Inputs
resource_namestringrequired- Resource name of the campaign to update, in the format customers/{customer_id}/campaigns/{campaign_id}.
campaign_budgetstring- New budget resource name to link, in the format customers/{customer_id}/campaignBudgets/{budget_id}.
customer_idstring- Google Ads customer account ID to operate on (digits only, no hyphens). Defaults to the Google Ads Customer ID entered when the account was connected; set it only to target a different account, e.g. a specific client account under a manager (MCC).
namestring- New name for the campaign. Must be unique within the account.
statusstring- New status for the campaign. ENABLED starts serving ads; PAUSED stops serving ads; REMOVED permanently deletes the campaign.one of
ENABLEDPAUSEDREMOVED target_cpa_microsstring- New target cost-per-acquisition in micros for TARGET_CPA bidding. 1,000,000 micros = $1.00.
target_roasnumber- New target return on ad spend for TARGET_ROAS bidding. For example, 3.5 means 350% ROAS.
Also accepts
schema_versionandtool_versionto pin a version.googleads_conversion_action_createCreate a conversion action to track valuable customer actions such as purchases, form submissions, phone calls, or app downloads.WriteCreate Conversion Action
Create a conversion action to track valuable customer actions such as purchases, form submissions, phone calls, or app downloads. Conversion actions are used for Smart Bidding and performance measurement.
Inputs
categorystringrequired- Category that best describes the conversion. PURCHASE=e-commerce transactions, SIGNUP=account registrations, LEAD=lead form submissions, CONTACT=contact page actions, PHONE_CALL_LEAD=phone call initiated, PAGE_VIEW=page views, OTHER=custom conversions.one of
PURCHASESIGNUPLEADCONTACTSUBSCRIBE_PAIDPHONE_CALL_LEADIMPORTPAGE_VIEWOTHER namestringrequired- Name of the conversion action. Should clearly identify the customer action being tracked.
typestringrequired- Conversion type that determines how the conversion is tracked. WEBPAGE=tag on a webpage, CLICK_TO_CALL=phone call from an ad, GOOGLE_PLAY_DOWNLOAD=app download, UPLOAD_CLICKS=offline conversion imported from clicks, UPLOAD_CALLS=offline conversion imported from calls.one of
WEBPAGECLICK_TO_CALLGOOGLE_PLAY_DOWNLOADUPLOAD_CLICKSUPLOAD_CALLS click_through_lookback_window_daysinteger- Number of days after a click to attribute a conversion. Typical values are 7, 30, or 90 days.
counting_typestring- How conversions are counted. ONE_PER_CLICK counts at most one conversion per ad click. MANY_PER_CLICK counts all conversions per click (useful for purchases where a user might buy multiple times).one of
ONE_PER_CLICKMANY_PER_CLICK customer_idstring- Google Ads customer account ID to operate on (digits only, no hyphens). Defaults to the Google Ads Customer ID entered when the account was connected; set it only to target a different account, e.g. a specific client account under a manager (MCC).
value_settings_default_currency_codestring- Currency code for the default conversion value, e.g., USD, EUR, GBP.
value_settings_default_valuenumber- Default monetary value of each conversion. For example, 50.0 for a $50 conversion value.
view_through_lookback_window_daysinteger- Number of days after an ad view (without a click) to attribute a conversion.
Also accepts
schema_versionandtool_versionto pin a version.googleads_conversion_action_updateUpdate a conversion action's name, status, default value, or counting type.WriteUpdate Conversion Action
Update a conversion action's name, status, default value, or counting type. Only the fields you provide will be updated.
- Idempotent
Inputs
resource_namestringrequired- Resource name of the conversion action to update, in the format customers/{customer_id}/conversionActions/{conversion_action_id}.
counting_typestring- Updated counting type. ONE_PER_CLICK counts at most one conversion per ad click. MANY_PER_CLICK counts all conversions per click.one of
ONE_PER_CLICKMANY_PER_CLICK customer_idstring- Google Ads customer account ID to operate on (digits only, no hyphens). Defaults to the Google Ads Customer ID entered when the account was connected; set it only to target a different account, e.g. a specific client account under a manager (MCC).
namestring- New name for the conversion action.
statusstring- New status for the conversion action. ENABLED tracks conversions; REMOVED permanently removes the action.one of
ENABLEDREMOVED value_settings_default_valuenumber- New default monetary value for each conversion.
Also accepts
schema_versionandtool_versionto pin a version.googleads_keyword_createAdd a keyword to an ad group for search targeting.WriteCreate Keyword
Add a keyword to an ad group for search targeting. Specify the keyword text, match type (EXACT, PHRASE, or BROAD), and an optional CPC bid. Set negative=true to add it as a negative keyword.
Inputs
ad_groupstringrequired- Resource name of the ad group to add the keyword to, in the format customers/{customer_id}/adGroups/{ad_group_id}.
keyword_textstringrequired- The keyword text to target. For EXACT match, use the exact phrase. For PHRASE, the query must contain this phrase. For BROAD, Google shows ads for related searches.
match_typestringrequired- Keyword match type. EXACT=matches only the exact query. PHRASE=matches queries containing the phrase. BROAD=matches related queries (widest reach).one of
EXACTPHRASEBROAD cpc_bid_microsstring- CPC bid for this keyword in micros. 1,000,000 micros = $1.00. Overrides the ad group default bid.
customer_idstring- Google Ads customer account ID to operate on (digits only, no hyphens). Defaults to the Google Ads Customer ID entered when the account was connected; set it only to target a different account, e.g. a specific client account under a manager (MCC).
negativeboolean- If true, creates a negative keyword that prevents ads from showing for searches matching this keyword.
statusstring- Initial status of the keyword. ENABLED means the keyword can trigger ads. PAUSED disables it.one of
ENABLEDPAUSED
Also accepts
schema_versionandtool_versionto pin a version.googleads_keyword_updateUpdate a keyword's bid amount or status.WriteUpdate Keyword
Update a keyword's bid amount or status. The keyword text and match type cannot be changed after creation; remove and recreate the keyword if those need to change.
- Idempotent
Inputs
resource_namestringrequired- Resource name of the keyword (ad group criterion) to update, in the format customers/{customer_id}/adGroupCriteria/{ad_group_id}~{criterion_id}.
cpc_bid_microsstring- New CPC bid for this keyword in micros. 1,000,000 micros = $1.00.
customer_idstring- Google Ads customer account ID to operate on (digits only, no hyphens). Defaults to the Google Ads Customer ID entered when the account was connected; set it only to target a different account, e.g. a specific client account under a manager (MCC).
statusstring- New status for the keyword. ENABLED allows the keyword to trigger ads; PAUSED disables it.one of
ENABLEDPAUSED
Also accepts
schema_versionandtool_versionto pin a version.googleads_label_createCreate a label that can be applied to campaigns, ad groups, ads, or keywords for organization and filtering.WriteCreate Label
Create a label that can be applied to campaigns, ad groups, ads, or keywords for organization and filtering. Labels help categorize and manage large accounts.
Inputs
namestringrequired- Name of the label. Must be unique within the account. Should describe the categorization purpose.
customer_idstring- Google Ads customer account ID to operate on (digits only, no hyphens). Defaults to the Google Ads Customer ID entered when the account was connected; set it only to target a different account, e.g. a specific client account under a manager (MCC).
text_label_background_colorstring- Background color for the label displayed in the Google Ads UI. Must be a valid hex color code.
text_label_descriptionstring- Optional description for the label explaining its purpose or categorization criteria.
Also accepts
schema_versionandtool_versionto pin a version.googleads_responsive_search_ad_createCreate a responsive search ad in an ad group.WriteCreate Responsive Search Ad
Create a responsive search ad in an ad group. Provide 3-15 headlines (max 30 chars each) and 2-4 descriptions (max 90 chars each) as JSON arrays. Google automatically tests combinations to find the best performing ads.
Inputs
ad_groupstringrequired- Resource name of the ad group to add the ad to, in the format customers/{customer_id}/adGroups/{ad_group_id}.
descriptionsarrayrequired- List of 2-4 description strings, each max 90 characters. Google will test combinations. Example: ["Shop top brands with free shipping.","Order now and save 50%."]
final_urlsarrayrequired- List of landing page URLs for the ad. The first URL is the primary destination. Example: ["https://example.com/shoes"]
headlinesarrayrequired- List of 3-15 headline strings, each max 30 characters. Google will test combinations. Example: ["Buy Shoes Online","Free Shipping","Best Prices"]
customer_idstring- Google Ads customer account ID to operate on (digits only, no hyphens). Defaults to the Google Ads Customer ID entered when the account was connected; set it only to target a different account, e.g. a specific client account under a manager (MCC).
path1string- First display URL path appended to the domain (max 15 characters). Shown in the ad URL but not the actual landing page.
path2string- Second display URL path appended after path1 (max 15 characters). Shown in the ad URL.
statusstring- Initial status of the ad. ENABLED serves the ad; PAUSED pauses it.one of
ENABLEDPAUSED
Also accepts
schema_versionandtool_versionto pin a version.googleads_user_list_createCreate a remarketing audience list (user list) for targeting or exclusion in campaigns.WriteCreate Remarketing Audience List
Create a remarketing audience list (user list) for targeting or exclusion in campaigns. User lists can be used to re-engage past visitors, customers, or users who completed specific actions.
Inputs
namestringrequired- Name of the user list. Should describe the audience segment.
customer_idstring- Google Ads customer account ID to operate on (digits only, no hyphens). Defaults to the Google Ads Customer ID entered when the account was connected; set it only to target a different account, e.g. a specific client account under a manager (MCC).
descriptionstring- Description of the audience list explaining what kind of users it targets.
membership_life_spaninteger- Number of days users remain on the list after their most recent qualifying action. Range: 1-540 days. Use 10000 for no expiration.
Also accepts
schema_versionandtool_versionto pin a version.googleads_user_list_updateUpdate a remarketing audience list's name, description, or membership duration.WriteUpdate Remarketing Audience List
Update a remarketing audience list's name, description, or membership duration. Only the fields you provide will be updated.
- Idempotent
Inputs
resource_namestringrequired- Resource name of the user list to update, in the format customers/{customer_id}/userLists/{user_list_id}.
customer_idstring- Google Ads customer account ID to operate on (digits only, no hyphens). Defaults to the Google Ads Customer ID entered when the account was connected; set it only to target a different account, e.g. a specific client account under a manager (MCC).
descriptionstring- New description of the audience list.
membership_life_spaninteger- New number of days users remain on the list. Range: 1-540 days. Use 10000 for no expiration.
namestring- New name for the user list.
Also accepts
schema_versionandtool_versionto pin a version.googleads_ad_group_bid_modifierCreate, update or remove an ad-group-level bid adjustment, so bids are raised or lowered for a segment such as a device type.DestructiveManage Ad Group Bid Modifier
Create, update or remove an ad-group-level bid adjustment, so bids are raised or lowered for a segment such as a device type. A bid modifier of 1.5 bids 50% more, 0.5 bids 50% less, and 0 opts the segment out entirely. CREATE needs the ad group and the device; UPDATE and REMOVE need the bid modifier resource name. The device cannot be changed after creation - remove the modifier and create a new one instead.
Inputs
operationstringrequired- Which action to perform. CREATE adds a new bid modifier, UPDATE changes the multiplier on an existing one, REMOVE deletes it.one of
CREATEUPDATEREMOVE ad_groupstring- Resource name of the ad group the adjustment applies to, in the format customers/{customer_id}/adGroups/{ad_group_id}. Required for CREATE. To find it, run the search tool with: SELECT ad_group.resource_name, ad_group.name FROM ad_group WHERE ad_group.name = 'Your Ad Group'.
bid_modifiernumber- Bid multiplier applied when the criterion matches. Google requires it to be in the range 0.1 - 10.0, or exactly 0 to opt out of the device type entirely. 1.5 bids 50% more, 0.5 bids 50% less, 1.0 leaves bids unchanged. Required for CREATE and UPDATE; it is the only field UPDATE can change.
customer_idstring- Google Ads customer account ID to operate on (digits only, no hyphens). Defaults to the Google Ads Customer ID entered when the account was connected; set it only to target a different account, e.g. a specific client account under a manager (MCC).
devicestring- Device type the adjustment applies to. Required for CREATE and immutable afterwards.one of
MOBILETABLETDESKTOPCONNECTED_TV resource_namestring- Resource name of an existing bid modifier, in the format customers/{customer_id}/adGroupBidModifiers/{ad_group_id}~{criterion_id}. Required for UPDATE and REMOVE. To find it, run the search tool with: SELECT ad_group_bid_modifier.resource_name, ad_group_bid_modifier.bid_modifier, ad_group_bid_modifier.device.type FROM ad_group_bid_modifier WHERE ad_group.id = AD_GROUP_ID.
Also accepts
schema_versionandtool_versionto pin a version.googleads_ad_group_removeRemove an ad group and all its ads and keywords permanently.DestructiveRemove Ad Group
Remove an ad group and all its ads and keywords permanently. This action cannot be undone.
- Idempotent
Inputs
resource_namestringrequired- Resource name of the ad group to remove, in the format customers/{customer_id}/adGroups/{ad_group_id}.
customer_idstring- Google Ads customer account ID to operate on (digits only, no hyphens). Defaults to the Google Ads Customer ID entered when the account was connected; set it only to target a different account, e.g. a specific client account under a manager (MCC).
Also accepts
schema_versionandtool_versionto pin a version.googleads_ad_removeRemove an ad from an ad group permanently.DestructiveRemove Ad
Remove an ad from an ad group permanently. The ad will no longer serve and cannot be recovered.
- Idempotent
Inputs
resource_namestringrequired- Resource name of the ad to remove, in the format customers/{customer_id}/adGroupAds/{ad_group_id}~{ad_id}.
customer_idstring- Google Ads customer account ID to operate on (digits only, no hyphens). Defaults to the Google Ads Customer ID entered when the account was connected; set it only to target a different account, e.g. a specific client account under a manager (MCC).
Also accepts
schema_versionandtool_versionto pin a version.googleads_budget_removeRemove a campaign budget permanently.DestructiveRemove Campaign Budget
Remove a campaign budget permanently. The budget must not be linked to any active campaigns before removal.
- Idempotent
Inputs
resource_namestringrequired- Resource name of the budget to remove, in the format customers/{customer_id}/campaignBudgets/{budget_id}.
customer_idstring- Google Ads customer account ID to operate on (digits only, no hyphens). Defaults to the Google Ads Customer ID entered when the account was connected; set it only to target a different account, e.g. a specific client account under a manager (MCC).
Also accepts
schema_versionandtool_versionto pin a version.googleads_campaign_criterion_removeRemove a targeting criterion from a campaign.DestructiveRemove Campaign Targeting Criterion
Remove a targeting criterion from a campaign. This removes the targeting or exclusion rule (e.g., location targeting, device bid modifier, or negative keyword) from the campaign.
- Idempotent
Inputs
resource_namestringrequired- Resource name of the campaign criterion to remove, in the format customers/{customer_id}/campaignCriteria/{campaign_id}~{criterion_id}.
customer_idstring- Google Ads customer account ID to operate on (digits only, no hyphens). Defaults to the Google Ads Customer ID entered when the account was connected; set it only to target a different account, e.g. a specific client account under a manager (MCC).
Also accepts
schema_versionandtool_versionto pin a version.googleads_campaign_removeRemove (permanently delete) a Google Ads campaign and all its child ad groups and ads.DestructiveRemove Campaign
Remove (permanently delete) a Google Ads campaign and all its child ad groups and ads. This action cannot be undone.
- Idempotent
Inputs
resource_namestringrequired- Resource name of the campaign to remove, in the format customers/{customer_id}/campaigns/{campaign_id}.
customer_idstring- Google Ads customer account ID to operate on (digits only, no hyphens). Defaults to the Google Ads Customer ID entered when the account was connected; set it only to target a different account, e.g. a specific client account under a manager (MCC).
Also accepts
schema_versionandtool_versionto pin a version.googleads_customer_list_members_mutateAdd or remove members of a Customer Match user list by uploading already-hashed contact details.DestructiveAdd or Remove Customer List Members
Add or remove members of a Customer Match user list by uploading already-hashed contact details. The list must be a CRM-based (Customer Match) user list; a basic remarketing list cannot accept members. Each email or phone number is treated as one person, and Google caps a single upload at 10 people, so send large audiences in batches. Values must be normalised then SHA-256 hashed and hex encoded before they are passed in: trim whitespace, lowercase the whole value, and put phone numbers in E.164 form first. This service does not update the "Segment members" count shown in the Google Ads UI.
Inputs
operationstringrequired- Whether to add the supplied people to the list or remove them from it.one of
ADDREMOVE user_liststringrequired- Resource name of the Customer Match user list to modify, in the format customers/{customer_id}/userLists/{user_list_id}. It must be a CRM-based list; a basic remarketing list cannot hold uploaded members and will be rejected. To find eligible lists, run the search tool with: SELECT user_list.resource_name, user_list.name FROM user_list WHERE user_list.type = 'CRM_BASED'.
customer_idstring- Google Ads customer account ID to operate on (digits only, no hyphens). Defaults to the Google Ads Customer ID entered when the account was connected; set it only to target a different account, e.g. a specific client account under a manager (MCC).
hashed_emailsarray- Email addresses of the people to add or remove, each normalised then SHA-256 hashed and hex encoded. Normalise by removing leading and trailing whitespace and lowercasing the whole address; additionally, for gmail.com and googlemail.com addresses only, strip every period from the part before the @ and drop the + together with everything after it, so Jane.Doe+Shop@gmail.com is hashed as janedoe@gmail.com. Skipping those Gmail rules produces a hash that silently fails to match anyone. Each entry counts as one person.
hashed_phone_numbersarray- Phone numbers of the people to add or remove, each converted to E.164 format with a leading + and the country code (for example +14155550123), then SHA-256 hashed and hex encoded. Each entry counts as one person.
Also accepts
schema_versionandtool_versionto pin a version.googleads_keyword_removeRemove a keyword from an ad group permanently.DestructiveRemove Keyword
Remove a keyword from an ad group permanently. The keyword can no longer trigger ads after removal.
- Idempotent
Inputs
resource_namestringrequired- Resource name of the keyword (ad group criterion) to remove, in the format customers/{customer_id}/adGroupCriteria/{ad_group_id}~{criterion_id}.
customer_idstring- Google Ads customer account ID to operate on (digits only, no hyphens). Defaults to the Google Ads Customer ID entered when the account was connected; set it only to target a different account, e.g. a specific client account under a manager (MCC).
Also accepts
schema_versionandtool_versionto pin a version.
No tools match.