
The Atlassian Rovo MCP connector routes your AI agent's tool calls to Atlassian Rovo's own MCP server through Scalekit. Each user signs in to Atlassian Rovo once, and Scalekit stores and refreshes their tokens, so your agent never handles credentials. It comes with 39 tools.
- Tools
- 39
- What they doRead · write · destructive
- 26 · 13 · 026 read13 write0 destructive
- Users sign in with
- OAuth
- OAuth app
- Scalekit's or your own
What you can do
- Manage Jira issues: create, edit, transition, comment on, and link issues; add worklogs
- Search with JQL: query issues using Jira Query Language with full field and filter support
- Work with Confluence: create, update, and retrieve pages; add footer and inline comments
- Manage Compass components: create, get, and search services, libraries, and applications; define custom fields and relationships
- Look up users and resources: resolve Atlassian account IDs, list accessible cloud sites, and find project metadata
- Fetch Atlassian content: retrieve any Atlassian object by its ARI or URL (e.g. a Jira issue or Confluence page URL)
Setup
Install the SDK
Terminal window npm install @scalekit-sdk/node dotenvTerminal window pip install scalekit-sdk-python python-dotenvSet your credentials
Add your Scalekit credentials to your
.envfile. Find values in app.scalekit.com > Developers > API Credentials..env SCALEKIT_ENVIRONMENT_URL=<your-environment-url>SCALEKIT_CLIENT_ID=<your-client-id>SCALEKIT_CLIENT_SECRET=<your-client-secret>Create the Atlassian Rovo MCP connection
In AgentKit > Connections, create an Atlassian Rovo MCP connection. The name you give it is the
connection_nameyour code passes. See Configure connections.Scalekit credentials are available for Atlassian Rovo MCP server, so you don't need to register an OAuth app. To show your own app on the consent screen, use your own credentials instead.
Use your own OAuth app
Atlassian Rovo MCP uses Dynamic Client Registration (DCR) — no client ID or secret is needed. The only step is registering your Scalekit redirect URI as an allowed domain in Atlassian Administration.
-
Copy the redirect URI from Scalekit
In the Scalekit dashboard, go to AgentKit > Connections > Create Connection. Find Atlassian Rovo MCP and click Create. Copy the redirect URI — it looks like
https://<SCALEKIT_ENVIRONMENT_URL>/sso/v1/oauth/<CONNECTION_ID>/callback.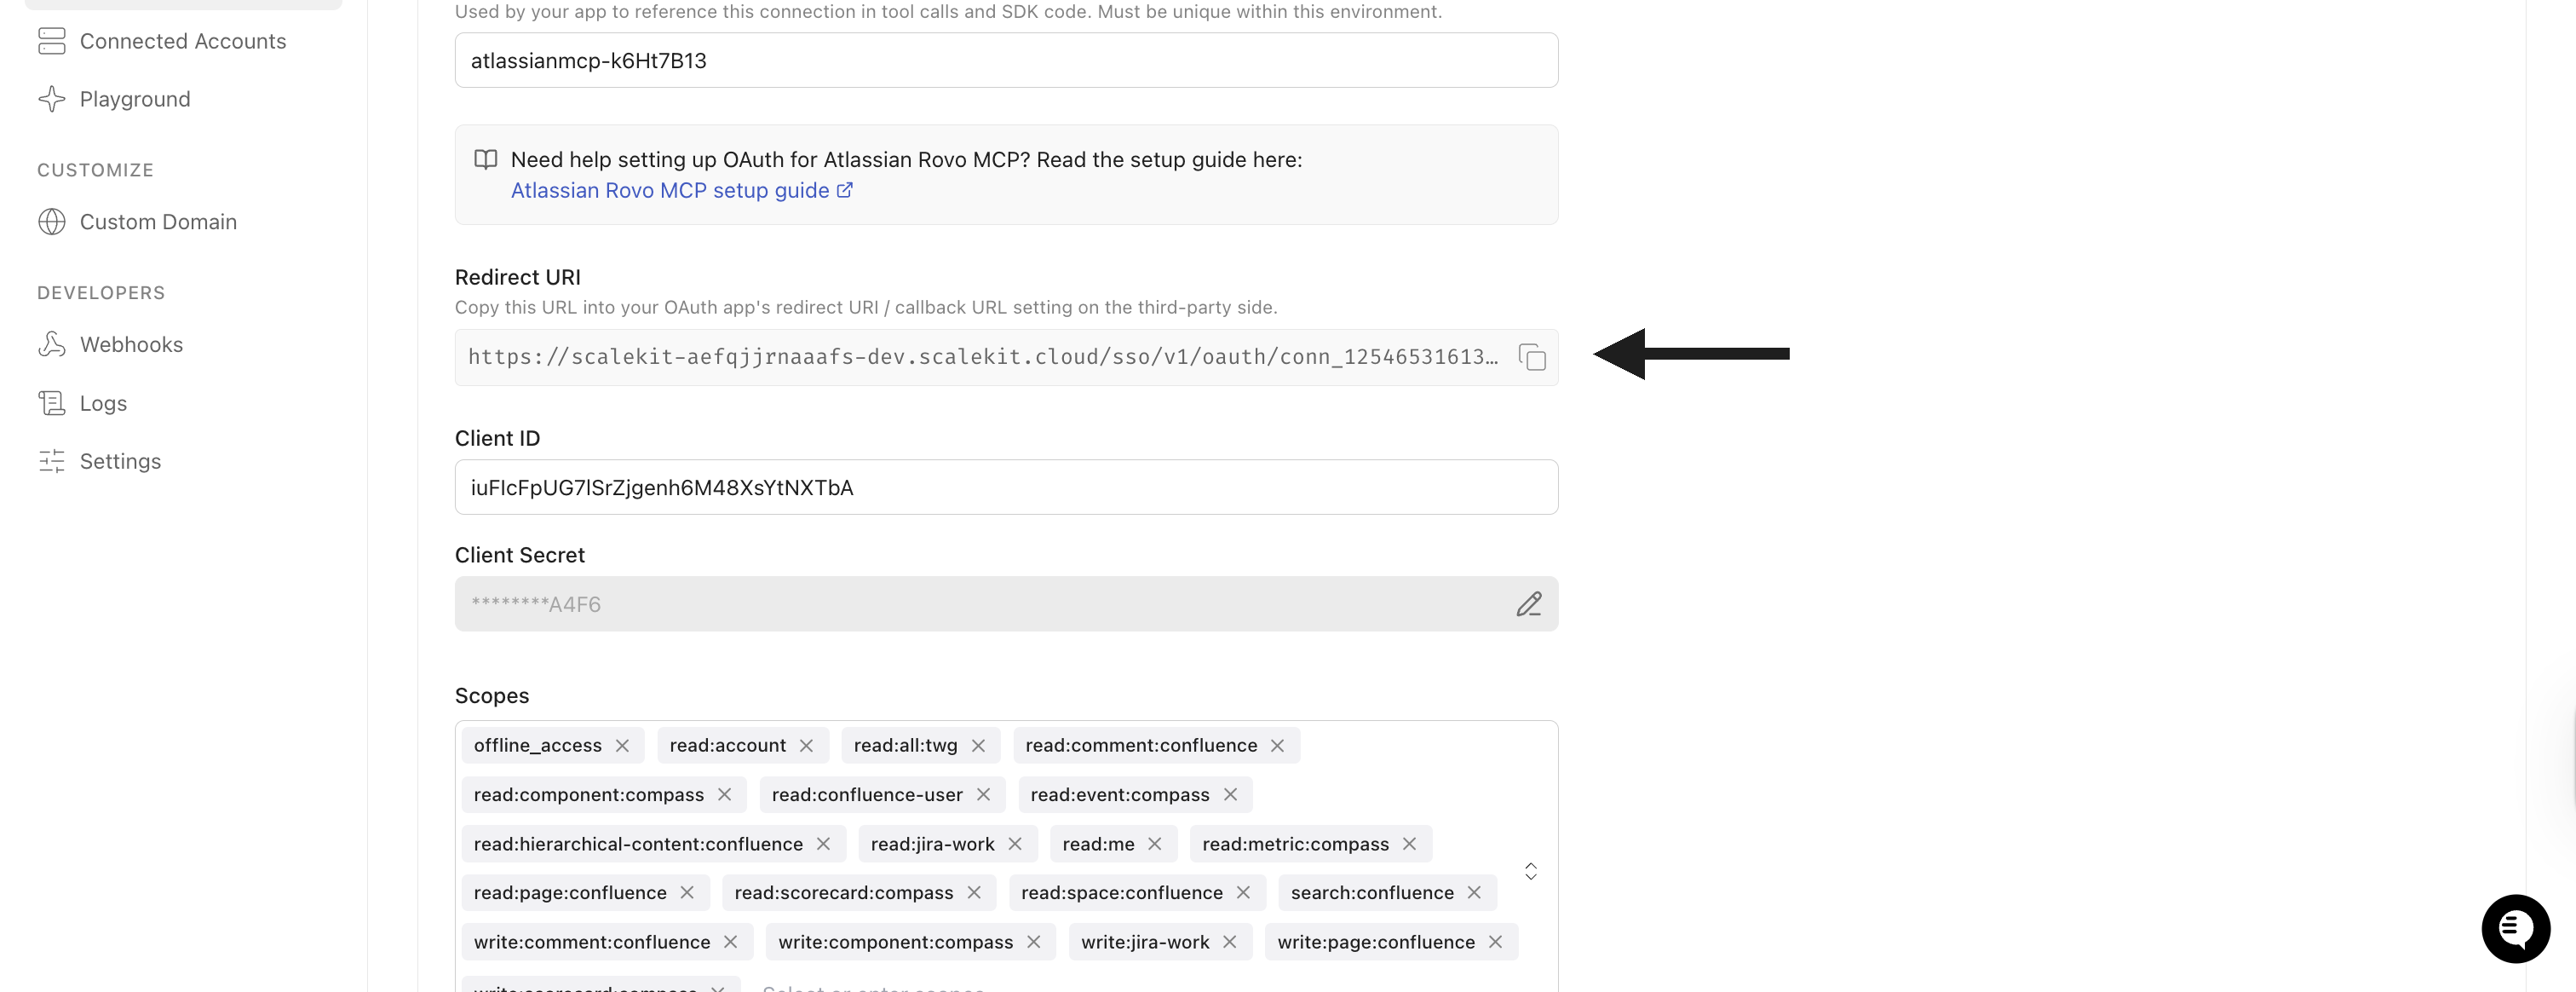
-
Open the Rovo MCP server settings in Atlassian
- Go to admin.atlassian.com and select your organisation.
- In the left sidebar, expand Rovo and click Rovo access.
- Click Rovo MCP server in the submenu.
- Select the Domains tab at the top of the page.
-
Add the redirect URI as a domain
- Under Your domains, click Add domain.
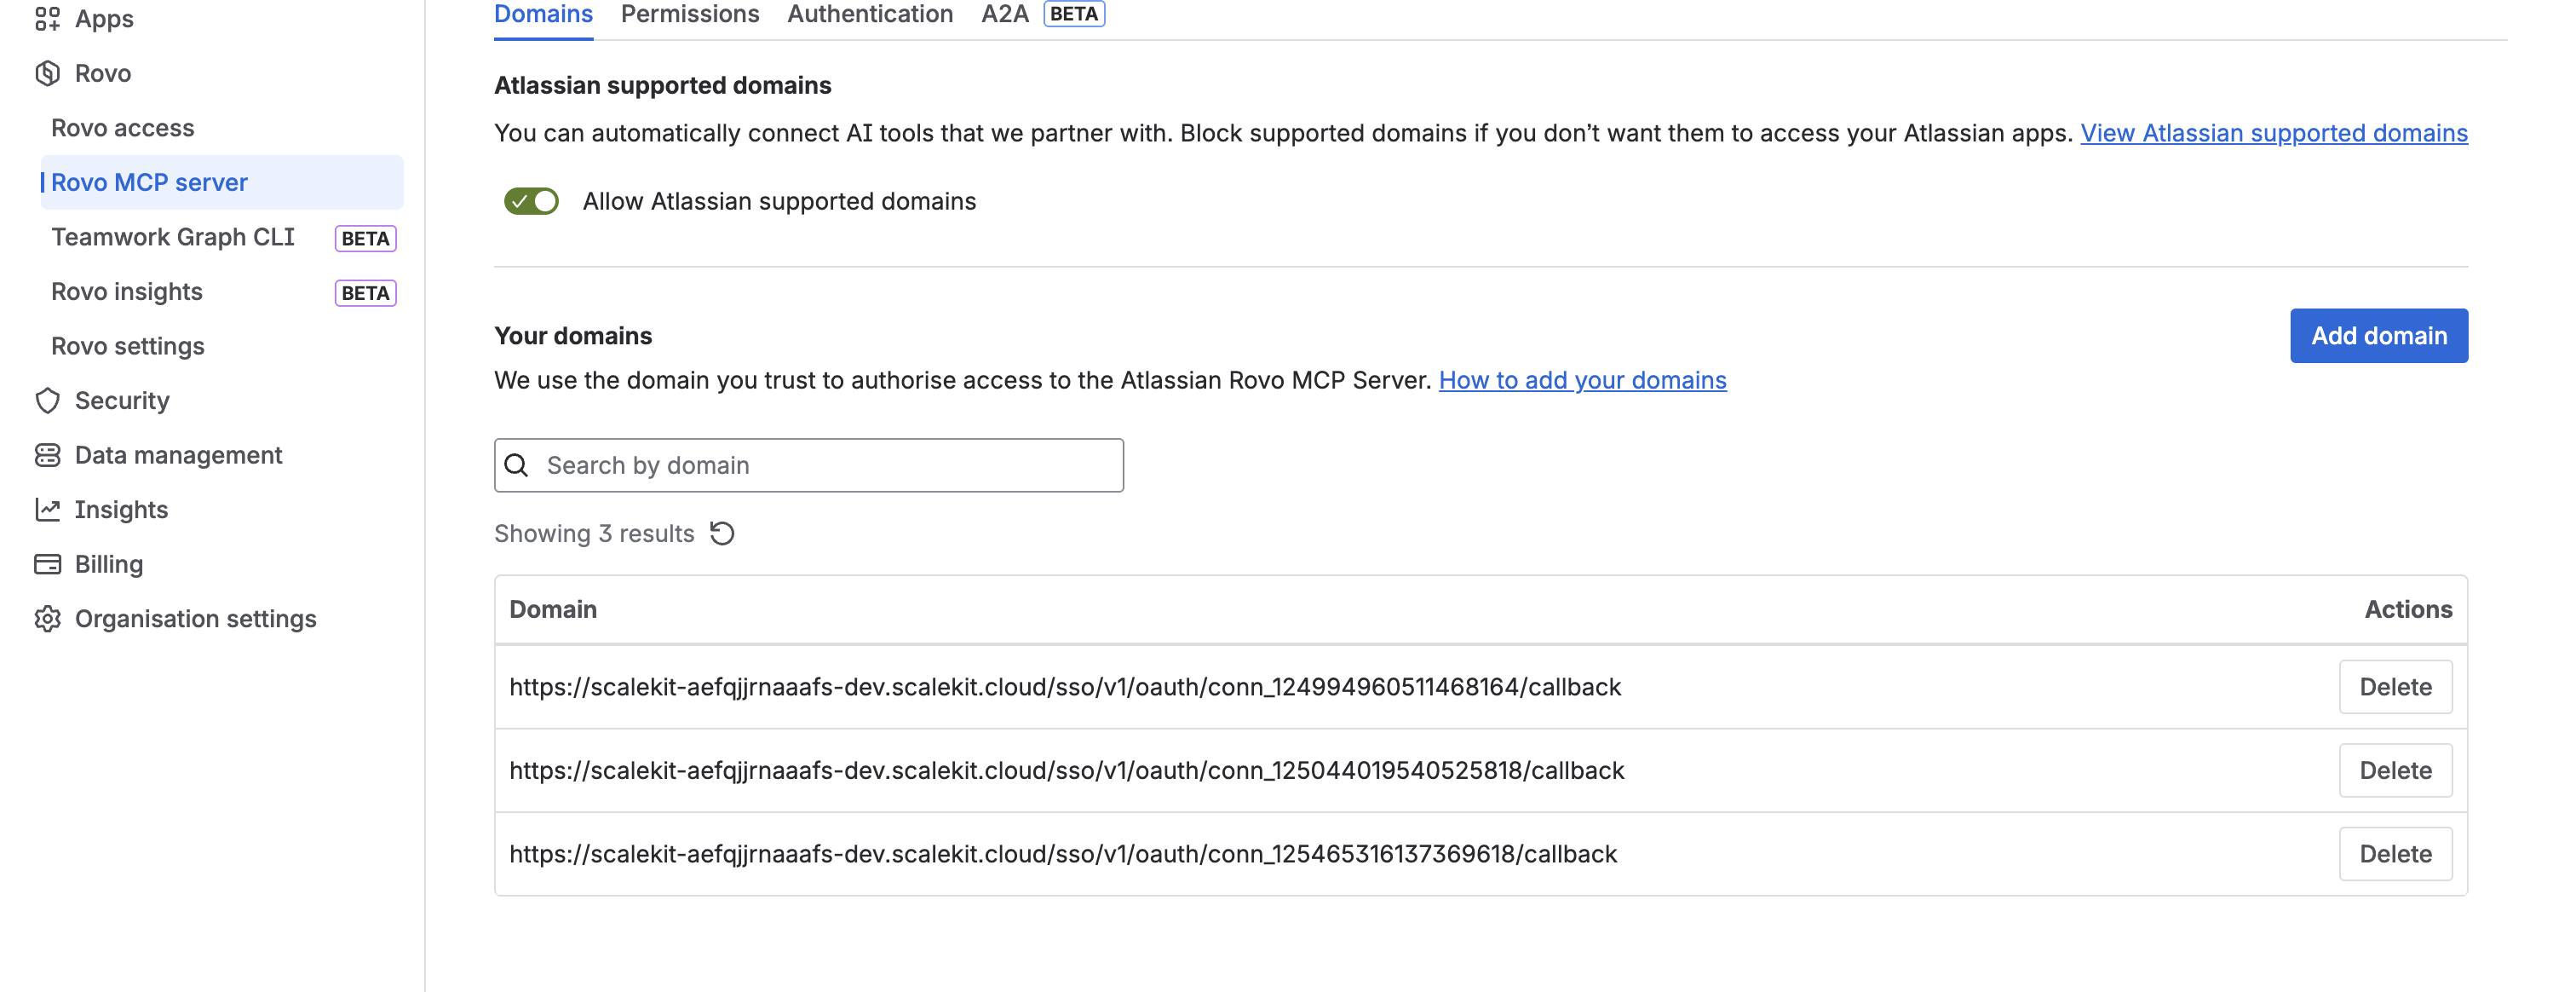
- In the Add domain dialog, paste the redirect URI from Scalekit into the Domain field.
- Accept the terms and click Add.
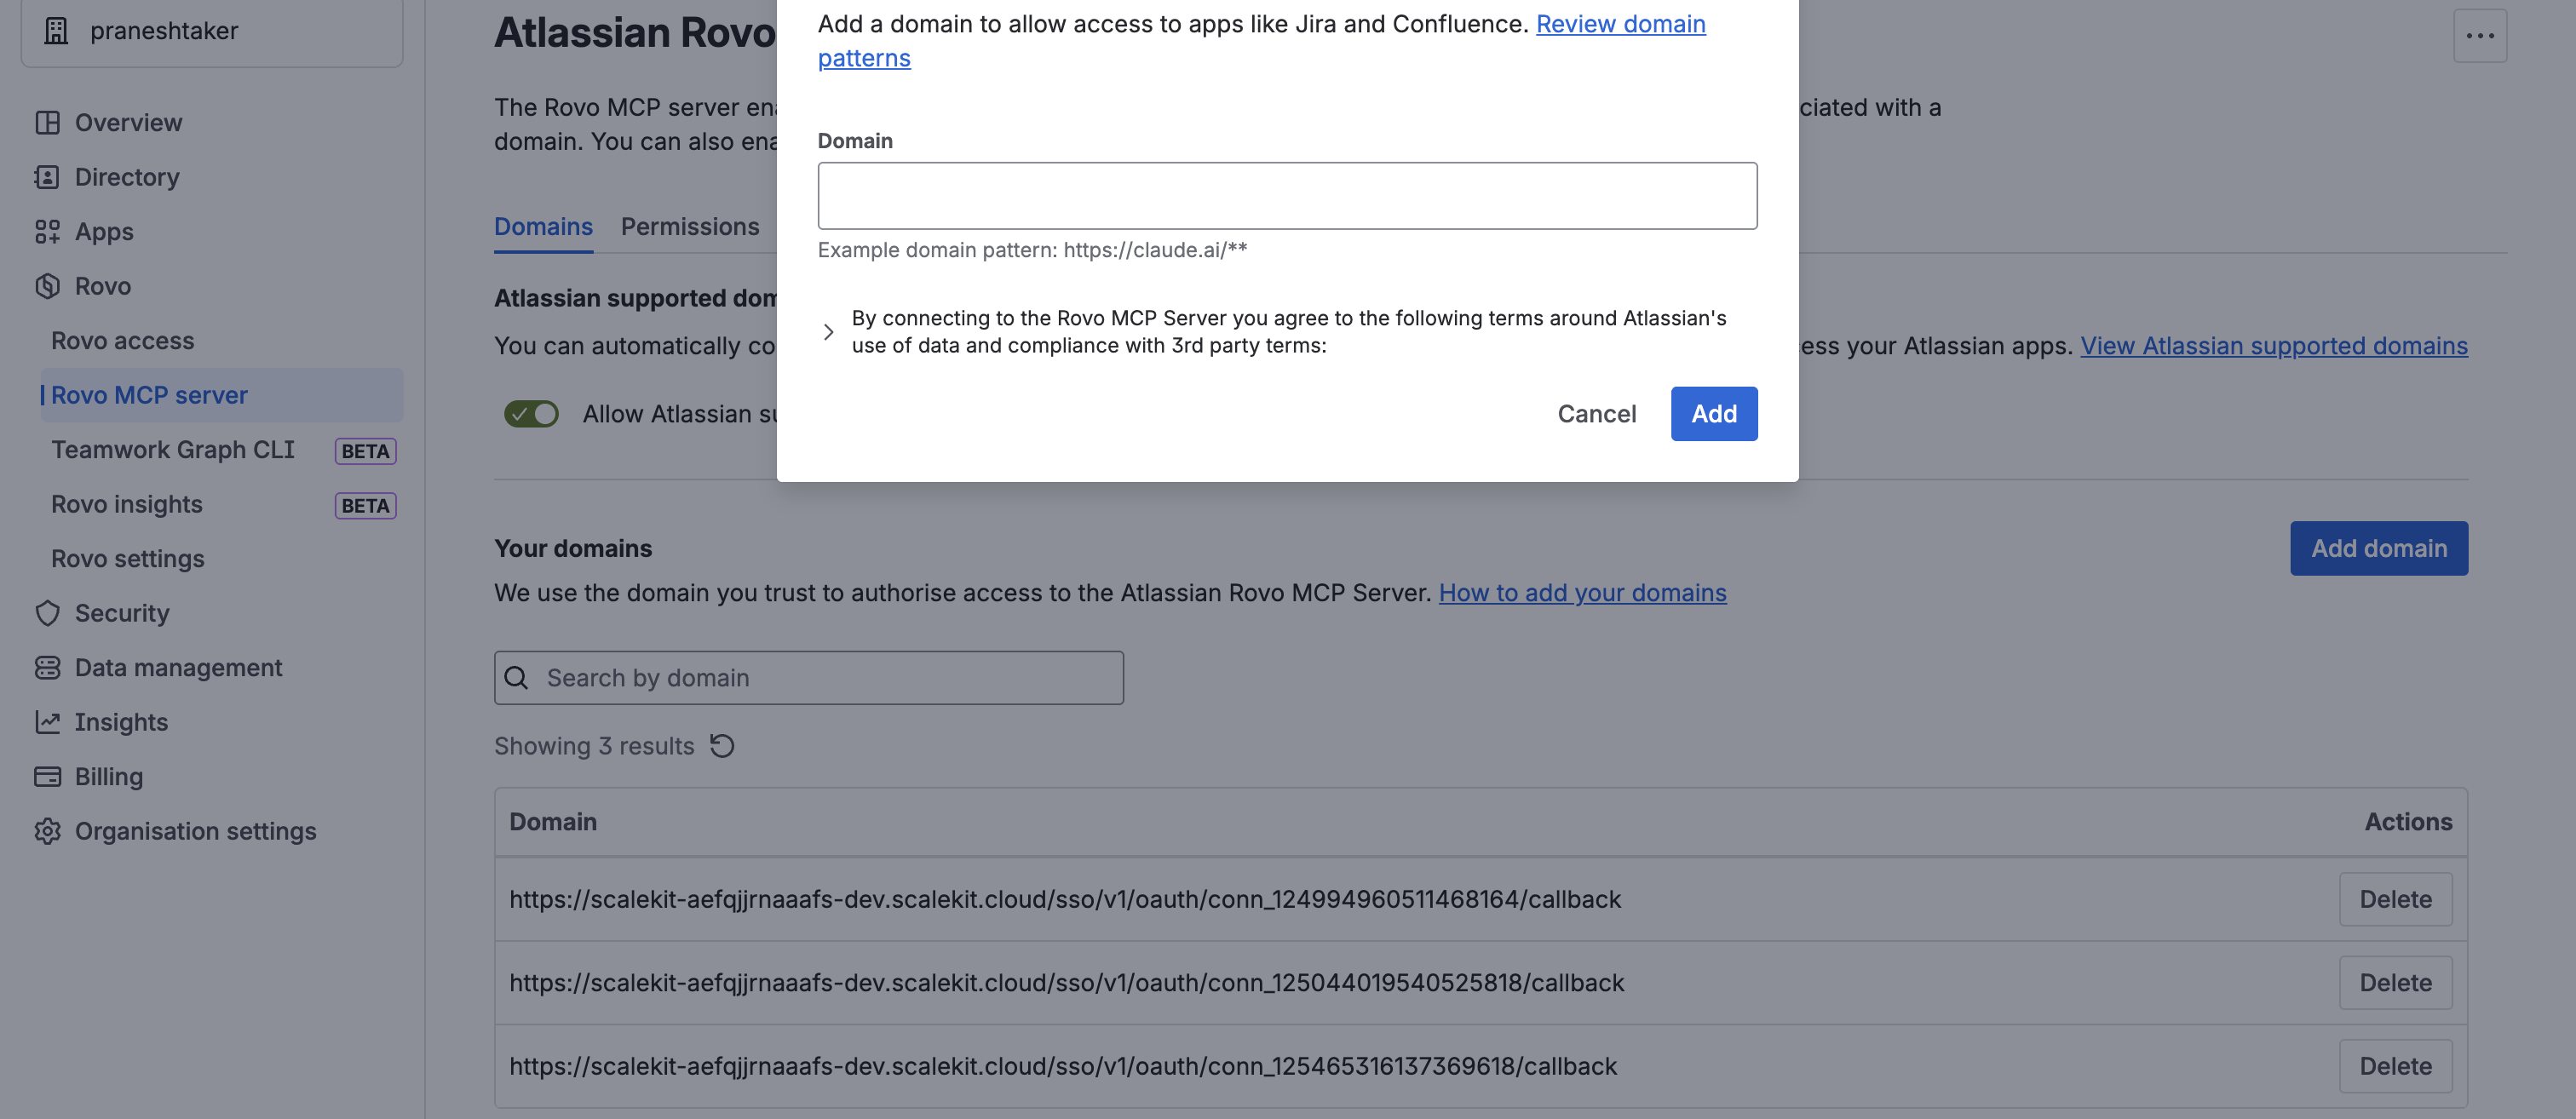
Once added, Scalekit automatically registers the OAuth client via DCR and handles token management for every user who authorizes the connection — no further configuration needed.
-
Authorize a user and make your first call
quickstart.mts import { ScalekitClient } from '@scalekit-sdk/node'import 'dotenv/config'import { createInterface } from 'node:readline/promises'const scalekit = new ScalekitClient(process.env.SCALEKIT_ENVIRONMENT_URL,process.env.SCALEKIT_CLIENT_ID,process.env.SCALEKIT_CLIENT_SECRET,)const actions = scalekit.actionsconst connector = 'atlassianmcp'const identifier = 'user_123'// Generate an authorization link for the userconst { link } = await actions.getAuthorizationLink({ connectionName: connector, identifier })console.log('Authorize Atlassian Rovo MCP:', link)const rl = createInterface({ input: process.stdin, output: process.stdout })await rl.question('Press Enter after authorizing...')rl.close()// Make your first callconst result = await actions.executeTool({connector,identifier,toolName: 'atlassianmcp_atlassianuserinfo',toolInput: {},})console.log(result)Terminal window npx tsx quickstart.mtsquickstart.py import osfrom scalekit import ScalekitClientfrom dotenv import load_dotenvload_dotenv()scalekit_client = ScalekitClient(env_url=os.getenv("SCALEKIT_ENVIRONMENT_URL"),client_id=os.getenv("SCALEKIT_CLIENT_ID"),client_secret=os.getenv("SCALEKIT_CLIENT_SECRET"),)actions = scalekit_client.actionsconnection_name = "atlassianmcp"identifier = "user_123"# Generate an authorization link for the userlink_response = actions.get_authorization_link(connection_name=connection_name,identifier=identifier,)print("Authorize Atlassian Rovo MCP:", link_response.link)input("Press Enter after authorizing...")# Make your first callresult = actions.execute_tool(tool_input={},tool_name="atlassianmcp_atlassianuserinfo",connection_name=connection_name,identifier=identifier,)print(result)Terminal window python quickstart.pyEach user signs in once. See Authorize a user for the full flow and statuses.
Tools
Pass the exact name toexecute_toolatlassianmcp_atlassianuserinfoRetrieve the profile information for the currently authenticated Atlassian user.Read-onlyAtlassianUserInfo
Retrieve the profile information for the currently authenticated Atlassian user.
Inputs
This tool takes no inputs.
atlassianmcp_fetchFetch details about any Atlassian object by its ARI (Atlassian Resource Identifier) or URL.Read-onlyFetch
Fetch details about any Atlassian object by its ARI (Atlassian Resource Identifier) or URL.
Inputs
idstringrequired- An ARI or URL identifying the object (e.g. ari:cloud:jira:...:issue/10059 or https://site.atlassian.net/browse/KAN-1).
cloudIdstring- The cloud site ID (UUID) of your Atlassian instance. Use getAccessibleAtlassianResources to retrieve it.
atlassianmcp_getaccessibleatlassianresourcesList all Atlassian cloud sites accessible to the authenticated user, including their cloud IDs.Read-onlyGetAccessibleAtlassianResources
List all Atlassian cloud sites accessible to the authenticated user, including their cloud IDs.
Inputs
This tool takes no inputs.
atlassianmcp_getcompasscomponentRetrieve details of a specific Compass component by its ID.Read-onlyGetCompassComponent
Retrieve details of a specific Compass component by its ID.
Inputs
cloudIdstringrequired- The cloud site ID (UUID) of your Atlassian instance. Use getAccessibleAtlassianResources to retrieve it.
componentIdstringrequired- The ID of the component to get
includeCustomFieldsInResponseboolean- Set to true to include custom field values in the component response.default
true includeRelatedComponentsAndDependenciesInResponseboolean- Set to true to include related components and dependencies.default
false includeRelatedLinksInResponseboolean- Set to true to include related links in the component response.default
true
atlassianmcp_getcompasscomponentsSearch and list Compass components in a workspace, with optional filters.Read-onlyGetCompassComponents
Search and list Compass components in a workspace, with optional filters.
Inputs
cloudIdstringrequired- The cloud site ID (UUID) of your Atlassian instance. Use getAccessibleAtlassianResources to retrieve it.
afterstring- Cursor for fetching the next page of results.
filtersobject- Filter criteria for Compass components as JSON (e.g. {"typeIds": ["SERVICE"]}).
maxResultsnumber- Maximum number of results to return per page.default
10 querystring- Search query to find Atlassian content across Jira and Confluence.
atlassianmcp_getcompasscustomfielddefinitionsList all custom field definitions configured in a Compass workspace.Read-onlyGetCompassCustomFieldDefinitions
List all custom field definitions configured in a Compass workspace.
Inputs
cloudIdstringrequired- The cloud site ID (UUID) of your Atlassian instance. Use getAccessibleAtlassianResources to retrieve it.
atlassianmcp_getconfluencecommentchildrenRetrieve replies to a specific Confluence comment.Read-onlyGetConfluenceCommentChildren
Retrieve replies to a specific Confluence comment.
Inputs
cloudIdstringrequired- The cloud site ID (UUID) of your Atlassian instance. Use getAccessibleAtlassianResources to retrieve it.
commentIdstringrequired- The ID of the Confluence comment to retrieve children for.
commentTypestringrequired- Type of comment to retrieve children for: footer or inline.one of
footerinline contentFormatstring- Format of the content body — use markdown for plain text or adf for Atlassian Document Format (JSON).one of
markdownadf cursorstring- Cursor string for paginating through results.
limitnumber- Maximum number of items to return.
sortstring- Sort order for results (e.g. created-date, -modified, title).one of
id-idcreated-date-created-date
atlassianmcp_getconfluencepageRetrieve the content and metadata of a specific Confluence page by its ID.Read-onlyGetConfluencePage
Retrieve the content and metadata of a specific Confluence page by its ID.
Inputs
cloudIdstringrequired- The cloud site ID (UUID) of your Atlassian instance. Use getAccessibleAtlassianResources to retrieve it.
pageIdstringrequired- The numeric ID of the Confluence page. Use getConfluenceSpaces or search to find page IDs.
contentFormatstring- Format of the content body — use markdown for plain text or adf for Atlassian Document Format (JSON).one of
htmlmarkdownadf contentTypestring- Type of Confluence content: page, blogpost, or custom.one of
pageblogdefaultpage
atlassianmcp_getconfluencepagedescendantsList all pages nested under a Confluence page, up to a specified depth.Read-onlyGetConfluencePageDescendants
List all pages nested under a Confluence page, up to a specified depth.
Inputs
cloudIdstringrequired- The cloud site ID (UUID) of your Atlassian instance. Use getAccessibleAtlassianResources to retrieve it.
pageIdstringrequired- The numeric ID of the Confluence page. Use getConfluenceSpaces or search to find page IDs.
cursorstring- Cursor string for paginating through results.
depthnumber- How deep to fetch descendants — all for the full tree or 1 for direct children only.
limitnumber- Maximum number of items to return.
atlassianmcp_getconfluencepageinlinecommentsList inline comments on a Confluence page, optionally filtered by resolution status.Read-onlyGetConfluencePageInlineComments
List inline comments on a Confluence page, optionally filtered by resolution status.
Inputs
cloudIdstringrequired- The cloud site ID (UUID) of your Atlassian instance. Use getAccessibleAtlassianResources to retrieve it.
pageIdstringrequired- The numeric ID of the Confluence page. Use getConfluenceSpaces or search to find page IDs.
contentFormatstring- Format of the content body — use markdown for plain text or adf for Atlassian Document Format (JSON).one of
markdownadf contentTypestring- Type of Confluence content: page, blogpost, or custom.one of
pageblogdefaultpage cursorstring- Cursor string for paginating through results.
includeRepliesboolean- Whether to include comment replies in the response (true or false).default
false limitnumber- Maximum number of items to return.
repliesPerCommentinteger- Maximum number of replies to include per comment.
resolutionStatusstring- Filter inline comments by resolution status (open or resolved).one of
resolvedopendanglingreopeneddefaultopen sortstring- Sort order for results (e.g. created-date, -modified, title).one of
id-idcreated-date-created-date statusstring- Filter by content status (e.g. current, archived, trashed).one of
currentarchivedtrasheddeletedhistoricaldraftdefaultcurrent
atlassianmcp_getconfluencespacesList Confluence spaces accessible to the authenticated user, with optional filters.Read-onlyGetConfluenceSpaces
List Confluence spaces accessible to the authenticated user, with optional filters.
Inputs
cloudIdstringrequired- The cloud site ID (UUID) of your Atlassian instance. Use getAccessibleAtlassianResources to retrieve it.
expandstring- Comma-separated list of fields to expand in the response.
favoritedBystring- Return spaces favourited by this user account ID.
favouriteboolean- Set to true to return only spaces marked as favourite.
idsstring- List of space IDs to filter by.
keysstring- List of space keys to filter by.
labelsstring- List of space labels to filter by.
limitnumber- Maximum number of items to return.
startnumber- Index of the first result for pagination (defaults to 0).
statusstring- Filter by content status (e.g. current, archived, trashed).one of
currentarchived typestring- Space type filter (e.g. global or personal).one of
globalpersonal
atlassianmcp_getissuelinktypesList all available issue link types in a Jira instance (e.g.Read-onlyGetIssueLinkTypes
List all available issue link types in a Jira instance (e.g. Blocks, Relates, Duplicate).
Inputs
cloudIdstringrequired- The cloud site ID (UUID) of your Atlassian instance. Use getAccessibleAtlassianResources to retrieve it.
atlassianmcp_getjiraissueRetrieve the details of a specific Jira issue by its ID or key.Read-onlyGetJiraIssue
Retrieve the details of a specific Jira issue by its ID or key.
Inputs
cloudIdstringrequired- The cloud site ID (UUID) of your Atlassian instance. Use getAccessibleAtlassianResources to retrieve it.
issueIdOrKeystringrequired- The Jira issue ID (e.g. 10001) or key (e.g. KAN-1).
expandstring- Comma-separated list of fields to expand in the response.
failFastboolean- Set to true to fail fast if any fields cannot be found.
fieldsarray- Fields to update as a JSON object, e.g. {"summary": "New title", "priority": {"name": "High"}}.
fieldsByKeysboolean- Set to true to reference custom fields by their keys instead of IDs.
propertiesarray- List of issue properties to include in the response.
responseContentFormatstring- Format to return content in — markdown (default) or adf.one of
markdownadf updateHistoryboolean- Set to true to record that the issue was viewed in the user's history.
atlassianmcp_getjiraissueremoteissuelinksList remote links (external resources) attached to a Jira issue.Read-onlyGetJiraIssueRemoteIssueLinks
List remote links (external resources) attached to a Jira issue.
Inputs
cloudIdstringrequired- The cloud site ID (UUID) of your Atlassian instance. Use getAccessibleAtlassianResources to retrieve it.
issueIdOrKeystringrequired- The Jira issue ID (e.g. 10001) or key (e.g. KAN-1).
globalIdstring- Optional global ID to filter remote issue links.
atlassianmcp_getjiraissuetypemetawithfieldsRetrieve field metadata for a specific Jira issue type in a project.Read-onlyGetJiraIssueTypeMetaWithFields
Retrieve field metadata for a specific Jira issue type in a project.
Inputs
cloudIdstringrequired- The cloud site ID (UUID) of your Atlassian instance. Use getAccessibleAtlassianResources to retrieve it.
issueTypeIdstringrequired- The ID of the Jira issue type. Use getJiraProjectIssueTypesMetadata to list available types.
projectIdOrKeystringrequired- The Jira project ID or key (e.g. KAN or 10000). Use getVisibleJiraProjects to find it.
maxResultsnumber- Maximum number of results to return per page.
requiredFieldsOnlyboolean- When true (default), returns only the fields that are required to create an issue of this type, reducing response size. Set to false to return all available fields (both required and optional).
startAtnumber- Index of the first result to return (for pagination, defaults to 0).
atlassianmcp_getjiraprojectissuetypesmetadataList all issue types and their field metadata for a Jira project.Read-onlyGetJiraProjectIssueTypesMetadata
List all issue types and their field metadata for a Jira project.
Inputs
cloudIdstringrequired- The cloud site ID (UUID) of your Atlassian instance. Use getAccessibleAtlassianResources to retrieve it.
projectIdOrKeystringrequired- The Jira project ID or key (e.g. KAN or 10000). Use getVisibleJiraProjects to find it.
maxResultsnumber- Maximum number of results to return per page.default
50 startAtnumber- Index of the first result to return (for pagination, defaults to 0).default
0
atlassianmcp_getpagesinconfluencespaceList all pages in a Confluence space, optionally filtered by title or status.Read-onlyGetPagesInConfluenceSpace
List all pages in a Confluence space, optionally filtered by title or status.
Inputs
cloudIdstringrequired- The cloud site ID (UUID) of your Atlassian instance. Use getAccessibleAtlassianResources to retrieve it.
spaceIdstringrequired- The numeric ID of the Confluence space. Use getConfluenceSpaces to list available spaces.
contentFormatstring- Format of the content body — use markdown for plain text or adf for Atlassian Document Format (JSON).one of
markdownadf contentTypestring- Type of Confluence content: page, blogpost, or custom.one of
pageblogdefaultpage cursorstring- Cursor string for paginating through results.
limitinteger- Max results (default: 25, max: 250).
sortstring- Sort order for results (e.g. created-date, -modified, title).one of
id-idcreated-date-created-datemodified-date-modified-datetitle-title statusstring- Filter by content status (e.g. current, archived, trashed).one of
currentarchiveddeletedtrashed titlestring- The title of the Confluence page.
atlassianmcp_getteamworkgraphcontextRetrieve the teamwork graph context for an Atlassian object, showing related work across Jira, Confluence, and Compass.Read-onlyGetTeamworkGraphContext
Retrieve the teamwork graph context for an Atlassian object, showing related work across Jira, Confluence, and Compass.
Inputs
cloudIdstringrequired- The cloud site ID (UUID) of your Atlassian instance. Use getAccessibleAtlassianResources to retrieve it.
objectIdentifierstringrequired- Identifier for the object — an issue key (e.g. KAN-4), ARI, or URL.
objectTypestringrequired- Type of the Atlassian object (e.g. JiraWorkItem, ConfluencePage, ConfluenceSpace, AtlassianUser, CompassComponent).one of
AtlassianGoalAtlassianGoalUpdateAtlassianHomeCommentAtlassianHomeTagAtlassianProjectAtlassianProjectUpdateAtlassianTeamAtlassianUserCompassComponentConfluenceBlogPostConfluenceCommentConfluenceDatabaseConfluencePageConfluenceSpaceConfluenceWhiteboardExternalCalendarEventExternalConversationExternalDeploymentExternalDesignExternalDocumentExternalOrganisationExternalPositionExternalPullRequestExternalRepositoryExternalServiceFocusFocusAreaJiraSpaceJiraSprintJiraVersionJiraWorkItemJiraWorkItemCommentAssetsObjectLoomMeetingLoomMeetingRecurrenceLoomVideo afterstring- Cursor for fetching the next page of results.
detailLevelstring- Level of detail to return for related objects (FULL or MINIMAL).one of
summaryfulldefaultsummary firstinteger- Number of items to return in this page.default
50 relationshipTypesarray- Filter by specific relationship types (e.g. DEPENDS_ON, BLOCKED_BY).
targetObjectTypesarray- Filter related objects by type (e.g. JiraWorkItem, ConfluencePage).
timeRangeobject- Optional time range filter as JSON: {"from": "<ISO8601>", "to": "<ISO8601>"}.
atlassianmcp_getteamworkgraphobjectHydrate one or more Atlassian objects from their URLs or ARIs to get their current state.Read-onlyGetTeamworkGraphObject
Hydrate one or more Atlassian objects from their URLs or ARIs to get their current state.
Inputs
cloudIdstringrequired- The cloud site ID (UUID) of your Atlassian instance. Use getAccessibleAtlassianResources to retrieve it.
objectsarrayrequired- List of object URLs or ARIs to hydrate (e.g. https://site.atlassian.net/browse/KAN-1).
atlassianmcp_gettransitionsforjiraissueList all available workflow transitions for a Jira issue, used before calling transitionJiraIssue.Read-onlyGetTransitionsForJiraIssue
List all available workflow transitions for a Jira issue, used before calling transitionJiraIssue.
Inputs
cloudIdstringrequired- The cloud site ID (UUID) of your Atlassian instance. Use getAccessibleAtlassianResources to retrieve it.
issueIdOrKeystringrequired- The Jira issue ID (e.g. 10001) or key (e.g. KAN-1).
expandstring- Comma-separated list of fields to expand in the response.
includeUnavailableTransitionsboolean- Set to true to include transitions that are not currently available.
skipRemoteOnlyConditionboolean- Set to true to skip conditions that only apply to remote calls.
sortByOpsBarAndStatusboolean- Set to true to sort transitions by the ops bar and status.
transitionIdstring- The ID of a specific transition to retrieve. Use getTransitionsForJiraIssue to list transitions.
atlassianmcp_getvisiblejiraprojectsList Jira projects visible to the authenticated user, with optional search filtering.Read-onlyGetVisibleJiraProjects
List Jira projects visible to the authenticated user, with optional search filtering.
Inputs
cloudIdstringrequired- The cloud site ID (UUID) of your Atlassian instance. Use getAccessibleAtlassianResources to retrieve it.
actionstring- The action to filter projects by (e.g. browse, create).one of
viewbrowseeditcreatedefaultcreate expandIssueTypesboolean- Set to true to include issue type details in the project list response.default
true maxResultsnumber- Maximum number of results to return per page.default
50 searchStringstring- Text to search for when looking up Jira users.
startAtnumber- Index of the first result to return (for pagination, defaults to 0).default
0
atlassianmcp_lookupjiraaccountidSearch for Atlassian user accounts by name or email to find their account IDs.Read-onlyLookupJiraAccountId
Search for Atlassian user accounts by name or email to find their account IDs.
Inputs
cloudIdstringrequired- The cloud site ID (UUID) of your Atlassian instance. Use getAccessibleAtlassianResources to retrieve it.
searchStringstringrequired- Text to search for when looking up Jira users.
atlassianmcp_searchSearch across all Atlassian products (Jira and Confluence) using a keyword query.Read-onlySearch
Search across all Atlassian products (Jira and Confluence) using a keyword query.
Inputs
querystringrequired- Search query to find Atlassian content across Jira and Confluence.
cloudIdstring- The cloud site ID (UUID) of your Atlassian instance. Use getAccessibleAtlassianResources to retrieve it.
atlassianmcp_searchconfluenceusingcqlSearch Confluence content using Confluence Query Language (CQL).Read-onlySearchConfluenceUsingCql
Search Confluence content using Confluence Query Language (CQL).
Inputs
cloudIdstringrequired- The cloud site ID (UUID) of your Atlassian instance. Use getAccessibleAtlassianResources to retrieve it.
cqlstringrequired- Confluence Query Language string (e.g. type = page AND space = SD AND title ~ "meeting").
cqlcontextstring- Optional JSON object to restrict CQL scope (e.g. {"spaceKey": "SD"}).
cursorstring- Cursor string for paginating through results.
expandstring- Comma-separated list of fields to expand in the response.
limitnumber- Maximum number of items to return.
nextboolean- Include next page link
prevboolean- Include previous page link
atlassianmcp_searchjiraissuesusingjqlSearch for Jira issues using Jira Query Language (JQL).Read-onlySearchJiraIssuesUsingJql
Search for Jira issues using Jira Query Language (JQL).
Inputs
cloudIdstringrequired- The cloud site ID (UUID) of your Atlassian instance. Use getAccessibleAtlassianResources to retrieve it.
jqlstringrequired- Jira Query Language string to filter issues (e.g. project = KAN AND status = "In Progress").
fieldsarray- Fields to update as a JSON object, e.g. {"summary": "New title", "priority": {"name": "High"}}.
maxResultsnumber- Maximum number of results to return per page.default
10 nextPageTokenstring- Token for fetching the next page of results.
responseContentFormatstring- Format to return content in — markdown (default) or adf.one of
markdownadf searchResultModestring- Default "issues". Never count for normal search or if nextPageToken used. If total for same query is known, reuse it. Use "count" only when no trusted count exists and either the user asks or a downstream step needs it. Use "all" only if both count and issues required.one of
issuescountall
atlassianmcp_addcommenttojiraissueAdd a comment to an existing Jira issue, or update an existing comment by passing its commentId.WriteAddCommentToJiraIssue
Add a comment to an existing Jira issue, or update an existing comment by passing its commentId.
Inputs
cloudIdstringrequired- The cloud site ID (UUID) of your Atlassian instance. Use getAccessibleAtlassianResources to retrieve it.
commentBodystringrequired- The text content of the comment to add.
issueIdOrKeystringrequired- The Jira issue ID (e.g. 10001) or key (e.g. KAN-1).
commentIdstring- ID of an existing comment to update. If omitted, a new comment is added.
commentVisibilityobject- Restrict comment visibility as JSON (e.g. {"type": "role", "value": "Dev Team"}).
contentFormatstring- Format of the content body — use markdown for plain text or adf for Atlassian Document Format (JSON).one of
markdownadf responseContentFormatstring- Format to return content in — markdown (default) or adf.one of
markdownadf
atlassianmcp_addworklogtojiraissueLog time spent on a Jira issue by adding a worklog entry.WriteAddWorklogToJiraIssue
Log time spent on a Jira issue by adding a worklog entry.
Inputs
cloudIdstringrequired- The cloud site ID (UUID) of your Atlassian instance. Use getAccessibleAtlassianResources to retrieve it.
issueIdOrKeystringrequired- The Jira issue ID (e.g. 10001) or key (e.g. KAN-1).
timeSpentstringrequired- Time spent on the issue, in Jira duration format (e.g. 1h, 2h 30m, 1d).
commentBodystring- The text content of the comment to add.
contentFormatstring- Format of the content body — use markdown for plain text or adf for Atlassian Document Format (JSON).one of
markdownadf startedstring- The date and time the work started, in ISO 8601 format (e.g. 2026-05-15T10:00:00.000+0000).
visibilityobject- Restrict worklog visibility as JSON (e.g. {"type": "role", "value": "Dev Team"}).
worklogIdstring- The ID of an existing worklog entry to update.
atlassianmcp_createcompasscomponentCreate a new component in Atlassian Compass (e.g.WriteCreateCompassComponent
Create a new component in Atlassian Compass (e.g. a service, library, or application).
Inputs
cloudIdstringrequired- The cloud site ID (UUID) of your Atlassian instance. Use getAccessibleAtlassianResources to retrieve it.
namestringrequired- Name of the Compass component.
typeIdstringrequired- Type ID of the Compass component (e.g. SERVICE, LIBRARY, APPLICATION).
descriptionstring- The full description of the Jira issue.
labelsarray- List of space labels to filter by.
ownerIdstring- Atlassian account ID of the component owner.
atlassianmcp_createcompasscomponentrelationshipCreate a dependency or relationship between two Compass components.WriteCreateCompassComponentRelationship
Create a dependency or relationship between two Compass components.
Inputs
cloudIdstringrequired- The cloud site ID (UUID) of your Atlassian instance. Use getAccessibleAtlassianResources to retrieve it.
fromComponentIdstringrequired- The ID of the source Compass component in the relationship.
relationshipTypestringrequired- The type of relationship between components (e.g. DEPENDS_ON).one of
DEPENDS_ONDEPENDENCY_OF toComponentIdstringrequired- The ID of the target Compass component in the relationship.
atlassianmcp_createcompasscustomfielddefinitionDefine a new custom field for Compass components in your workspace.WriteCreateCompassCustomFieldDefinition
Define a new custom field for Compass components in your workspace.
Inputs
cloudIdstringrequired- The cloud site ID (UUID) of your Atlassian instance. Use getAccessibleAtlassianResources to retrieve it.
inputobjectrequired- Custom field definition as JSON (fields: name, type, description).
atlassianmcp_createconfluenceinlinecommentAdd an inline comment anchored to selected text on a Confluence page.WriteCreateConfluenceInlineComment
Add an inline comment anchored to selected text on a Confluence page.
Inputs
bodystringrequired- The body content of the Confluence page or comment, in the format specified by contentFormat.
cloudIdstringrequired- The cloud site ID (UUID) of your Atlassian instance. Use getAccessibleAtlassianResources to retrieve it.
contentFormatstring- Format of the content body — use markdown for plain text or adf for Atlassian Document Format (JSON).one of
htmlmarkdownadf contentTypestring- Type of Confluence content: page, blogpost, or custom.one of
pageblogdefaultpage inlineCommentPropertiesobject- Inline comment anchor as JSON: {"textSelection": "<text>", "textSelectionMatchCount": N, "textSelectionMatchIndex": N}.
pageIdstring- The numeric ID of the Confluence page. Use getConfluenceSpaces or search to find page IDs.
parentCommentIdstring- Optional ID of the parent comment, for creating a reply.
atlassianmcp_createconfluencepageCreate a new Confluence page in a space, optionally nested under a parent page.WriteCreateConfluencePage
Create a new Confluence page in a space, optionally nested under a parent page.
Inputs
bodystringrequired- The body content of the Confluence page or comment, in the format specified by contentFormat.
cloudIdstringrequired- The cloud site ID (UUID) of your Atlassian instance. Use getAccessibleAtlassianResources to retrieve it.
spaceIdstringrequired- The numeric ID of the Confluence space. Use getConfluenceSpaces to list available spaces.
contentFormatstring- Format of the content body — use markdown for plain text or adf for Atlassian Document Format (JSON).one of
htmlmarkdownadf contentTypestring- Type of Confluence content: page, blogpost, or custom.one of
pageblogdefaultpage isPrivateboolean- Set to true to create the page as private (only visible to the creator).
parentIdstring- The ID of the parent page under which to create or move this page.
statusstring- Filter by content status (e.g. current, archived, trashed).one of
currentdraftdefaultcurrent subtypestring- Confluence page subtype (e.g. live for live pages).one of
live titlestring- The title of the Confluence page.
atlassianmcp_createissuelinkLink two Jira issues together with a relationship type (e.g.WriteCreateIssueLink
Link two Jira issues together with a relationship type (e.g. Relates, Blocks, Duplicate).
Inputs
cloudIdstringrequired- The cloud site ID (UUID) of your Atlassian instance. Use getAccessibleAtlassianResources to retrieve it.
inwardIssuestringrequired- The key of the inward issue in the link (e.g. KAN-1).
outwardIssuestringrequired- The key of the outward issue in the link (e.g. KAN-2).
typestringrequired- Space type filter (e.g. global or personal).
commentstring- An optional comment to attach to the issue link.
contentFormatstring- Format of the content body — use markdown for plain text or adf for Atlassian Document Format (JSON).one of
markdownadf
atlassianmcp_createjiraissueCreate a new Jira issue in a project with the specified summary, type, and optional fields.WriteCreateJiraIssue
Create a new Jira issue in a project with the specified summary, type, and optional fields.
Inputs
cloudIdstringrequired- The cloud site ID (UUID) of your Atlassian instance. Use getAccessibleAtlassianResources to retrieve it.
issueTypeNamestringrequired- The name of the Jira issue type (e.g. Task, Story, Bug, Epic).
projectKeystringrequired- The Jira project key (e.g. KAN). Use getVisibleJiraProjects to list available projects.
summarystringrequired- A short summary of the Jira issue (the issue title).
additional_fieldsobject- Additional Jira fields to set on creation, as a JSON object (e.g. priority, labels).
assignee_account_idstring- Atlassian account ID of the user to assign. Use lookupJiraAccountId to find account IDs.
contentFormatstring- Format of the content body — use markdown for plain text or adf for Atlassian Document Format (JSON).one of
markdownadf descriptionstring- Issue description. With contentFormat "markdown" (default), pass plain text or Markdown as a string. With contentFormat "adf", pass an ADF JSON string or a document object with type "doc".
parentstring- The parent issue key (e.g. KAN-1) for creating subtasks or child issues.
responseContentFormatstring- Format to return content in — markdown (default) or adf.one of
markdownadf transitionobject- The transition to perform, as JSON: {"id": "<transition_id>"}. Use getTransitionsForJiraIssue to list valid transitions.
atlassianmcp_editjiraissueUpdate fields on an existing Jira issue, such as summary, priority, or description.WriteEditJiraIssue
Update fields on an existing Jira issue, such as summary, priority, or description.
- Idempotent
Inputs
cloudIdstringrequired- The cloud site ID (UUID) of your Atlassian instance. Use getAccessibleAtlassianResources to retrieve it.
fieldsobjectrequired- Fields to update as a JSON object, e.g. {"summary": "New title", "priority": {"name": "High"}}.
issueIdOrKeystringrequired- The Jira issue ID (e.g. 10001) or key (e.g. KAN-1).
contentFormatstring- Format of the content body — use markdown for plain text or adf for Atlassian Document Format (JSON).one of
markdownadf responseContentFormatstring- Format to return content in — markdown (default) or adf.one of
markdownadf
atlassianmcp_transitionjiraissueMove a Jira issue to a new workflow status using a transition ID.WriteTransitionJiraIssue
Move a Jira issue to a new workflow status using a transition ID.
- Idempotent
Inputs
cloudIdstringrequired- The cloud site ID (UUID) of your Atlassian instance. Use getAccessibleAtlassianResources to retrieve it.
issueIdOrKeystringrequired- The Jira issue ID (e.g. 10001) or key (e.g. KAN-1).
transitionobjectrequired- The transition to perform, as JSON: {"id": "<transition_id>"}. Use getTransitionsForJiraIssue to list valid transitions.
fieldsobject- Fields to update as a JSON object, e.g. {"summary": "New title", "priority": {"name": "High"}}.
historyMetadataobject- Optional metadata to record in the issue history (e.g. {"activityDescription": "Updated via API"}).
updateobject- Issue update operations as a JSON object (e.g. adding comment).
atlassianmcp_updateconfluencepageUpdate the title, body, or other properties of an existing Confluence page.WriteUpdateConfluencePage
Update the title, body, or other properties of an existing Confluence page.
- Idempotent
Inputs
bodystringrequired- The body content of the Confluence page or comment, in the format specified by contentFormat.
cloudIdstringrequired- The cloud site ID (UUID) of your Atlassian instance. Use getAccessibleAtlassianResources to retrieve it.
pageIdstringrequired- The numeric ID of the Confluence page. Use getConfluenceSpaces or search to find page IDs.
contentFormatstring- Format of the content body — use markdown for plain text or adf for Atlassian Document Format (JSON).one of
htmlmarkdownadf contentTypestring- Type of Confluence content: page, blogpost, or custom.one of
pageblogdefaultpage includeBodyboolean- Set to true to include the page body in the update response.default
false parentIdstring- The ID of the parent page under which to create or move this page.
spaceIdstring- The numeric ID of the Confluence space. Use getConfluenceSpaces to list available spaces.
statusstring- Filter by content status (e.g. current, archived, trashed).one of
currentdraftdefaultcurrent titlestring- The title of the Confluence page.
versionMessagestring- Optional message describing what changed in this version of the page.
No tools match.
Workflows
Get your cloud ID
Most Atlassian Rovo MCP tools require a cloudId — the UUID that identifies your Atlassian cloud site. Call atlassianmcp_getaccessibleatlassianresources once to retrieve it, then pass the id field value in every subsequent tool call.
// Step 1 — get the cloud IDconst resources = await actions.executeTool({ connector: 'atlassianmcp', identifier: 'user_123', toolName: 'atlassianmcp_getaccessibleatlassianresources', toolInput: {},});const cloudId = resources[0].id;
// Step 2 — use cloudId in subsequent callsconst issue = await actions.executeTool({ connector: 'atlassianmcp', identifier: 'user_123', toolName: 'atlassianmcp_getjiraissue', toolInput: { cloudId, issueIdOrKey: 'KAN-1', },});console.log(issue);# Step 1 — get the cloud IDresources = actions.execute_tool( connection_name="atlassianmcp", identifier="user_123", tool_name="atlassianmcp_getaccessibleatlassianresources", tool_input={},)cloud_id = resources[0]["id"]
# Step 2 — use cloud_id in subsequent callsissue = actions.execute_tool( connection_name="atlassianmcp", identifier="user_123", tool_name="atlassianmcp_getjiraissue", tool_input={ "cloudId": cloud_id, "issueIdOrKey": "KAN-1", },)print(issue)The atlassianmcp_getaccessibleatlassianresources response looks like this:
[ { "id": "a4c9b3e2-1234-5678-abcd-ef0123456789", "name": "My Company", "url": "https://mycompany.atlassian.net", "scopes": ["read:jira-work", "write:jira-work", "read:confluence-content.all"] }]Use id as the cloudId parameter. If the user belongs to multiple Atlassian sites, the list contains one entry per site — pick the one matching the target url.