Monday.com connector
OAuth 2.0Project ManagementCollaborationProductivityConnect to Monday.com. Manage boards, tasks, workflows, teams, and project collaboration
Monday.com connector
-
Install the SDK
Section titled “Install the SDK”Terminal window npm install @scalekit-sdk/nodeTerminal window pip install scalekit -
Set your credentials
Section titled “Set your credentials”Add your Scalekit credentials to your
.envfile. Find values in app.scalekit.com > Developers > API Credentials..env SCALEKIT_ENVIRONMENT_URL=<your-environment-url>SCALEKIT_CLIENT_ID=<your-client-id>SCALEKIT_CLIENT_SECRET=<your-client-secret> -
Set up the connector
Section titled “Set up the connector”Register your Monday.com credentials with Scalekit so it handles the token lifecycle. You do this once per environment.
Dashboard setup steps
Register your Scalekit environment with the Monday.com connector so Scalekit handles the authentication flow and token lifecycle for you. The connection name you create will be used to identify and invoke the connection programmatically. You’ll need your app credentials from the Monday.com Developer Center.
-
Set up auth redirects
-
In Scalekit dashboard, go to AgentKit > Connections > Create Connection.
-
Find Monday.com from the list of providers and click Create. Copy the redirect URI. It looks like
https://<SCALEKIT_ENVIRONMENT_URL>/sso/v1/oauth/<CONNECTION_ID>/callback.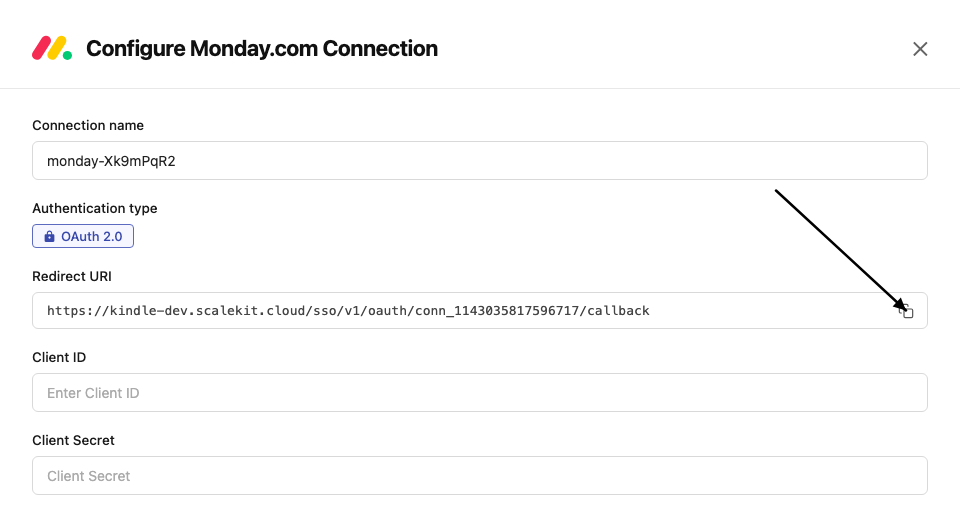
-
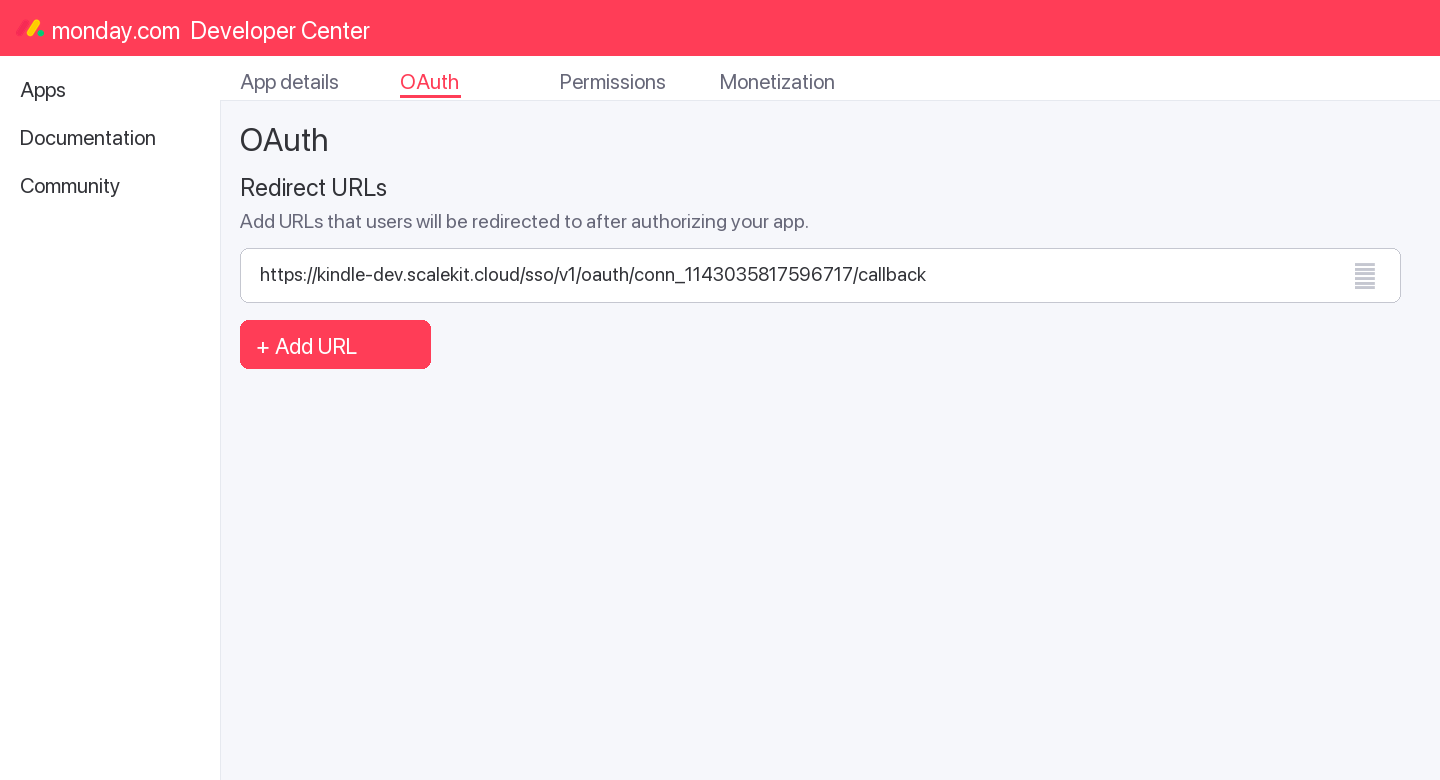
In the Monday.com Developer Center, open your app and go to the OAuth tab.
-
Add the copied URI under Redirect URLs and save.
-
-
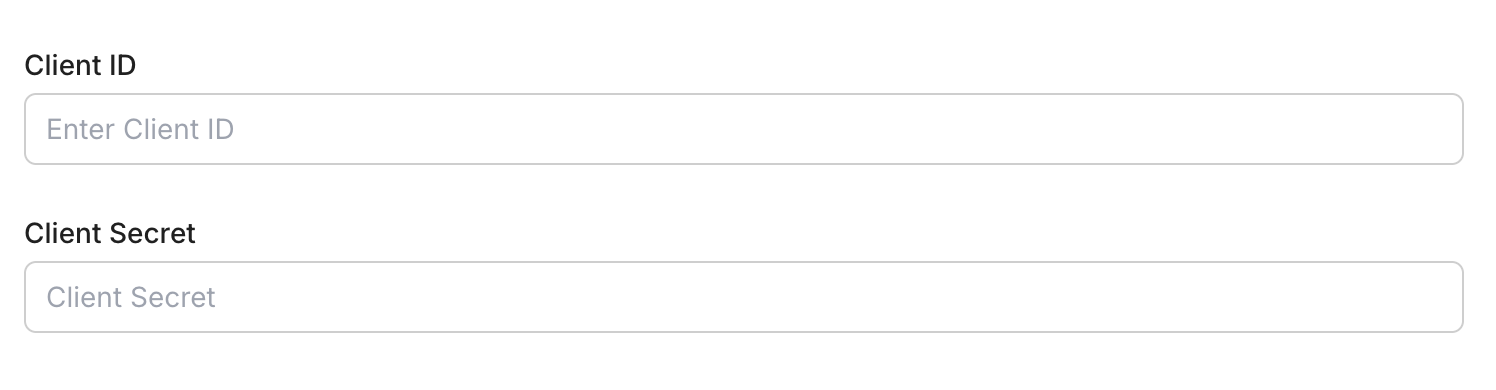
Get client credentials
- In the Monday.com Developer Center, open your app and go to the Basic Information tab:
- Client ID — listed under Client ID
- Client Secret — listed under Client Secret
- In the Monday.com Developer Center, open your app and go to the Basic Information tab:
-
Add credentials in Scalekit
-
In Scalekit dashboard, go to AgentKit > Connections and open the connection you created.
-
Enter your credentials:
- Client ID (from your Monday.com app)
- Client Secret (from your Monday.com app)
- Permissions — select the scopes your app needs (see Monday.com OAuth scopes)
-
Click Save.
-
-
-
Authorize and make your first call
Section titled “Authorize and make your first call”quickstart.ts import { ScalekitClient } from '@scalekit-sdk/node'import 'dotenv/config'const scalekit = new ScalekitClient(process.env.SCALEKIT_ENV_URL,process.env.SCALEKIT_CLIENT_ID,process.env.SCALEKIT_CLIENT_SECRET,)const actions = scalekit.actionsconst connector = 'monday'const identifier = 'user_123'// Generate an authorization link for the userconst { link } = await actions.getAuthorizationLink({ connectionName: connector, identifier })console.log('Authorize Monday:', link)process.stdout.write('Press Enter after authorizing...')await new Promise(r => process.stdin.once('data', r))// Make your first API call through the proxyconst result = await actions.request({connectionName: connector,identifier,path: '/v2',method: 'POST',body: JSON.stringify({ query: '{ boards (limit: 5) { id name } }' }),})console.log(result)quickstart.py import osimport jsonfrom scalekit.client import ScalekitClientfrom dotenv import load_dotenvload_dotenv()scalekit_client = ScalekitClient(env_url=os.getenv("SCALEKIT_ENV_URL"),client_id=os.getenv("SCALEKIT_CLIENT_ID"),client_secret=os.getenv("SCALEKIT_CLIENT_SECRET"),)actions = scalekit_client.actionsconnection_name = "monday"identifier = "user_123"# Generate an authorization link for the userlink_response = actions.get_authorization_link(connection_name=connection_name,identifier=identifier,)print("Authorize Monday:", link_response.link)input("Press Enter after authorizing...")# Make your first API call through the proxyresult = actions.request(connection_name=connection_name,identifier=identifier,path="/v2",method="POST",body=json.dumps({"query": "{ boards (limit: 5) { id name } }"}),)print(result)
What you can do
Section titled “What you can do”Connect this agent connector to let your agent:
- Manage boards — create, update, archive, duplicate, and delete boards across workspaces
- Manage items — create, update, move, duplicate, archive, and delete items (rows) on any board
- Update column values — set single or multiple column values including status, date, people, and custom types
- Manage groups — create, rename, reorder, duplicate, archive, and delete groups within a board
- Post updates — add, edit, and delete comments and activity updates on items
- Manage structure — create and delete columns, manage subitems, webhooks, workspaces, teams, and tags
Common workflows
Section titled “Common workflows”Proxy API call
const result = await actions.request({ connectionName: 'monday', identifier: 'user_123', path: '/v2', method: 'POST', body: JSON.stringify({ query: '{ boards (limit: 5) { id name } }' }),});console.log(result);import json
result = actions.request( connection_name='monday', identifier='user_123', path="/v2", method="POST", body=json.dumps({"query": "{ boards (limit: 5) { id name } }"}))print(result)Execute a tool
const result = await actions.executeTool({ connector: 'monday', identifier: 'user_123', toolName: 'monday_list', toolInput: {},});console.log(result);result = actions.execute_tool( connection_name='monday', identifier='user_123', tool_name='monday_list', tool_input={},)print(result)Getting resource IDs
Section titled “Getting resource IDs”Most Monday.com tools require one or more resource IDs. Run list/read tools first to discover real IDs — never guess them.
| Resource | Tool to get ID | Field in response |
|---|---|---|
| Board ID | monday_boards_list | data.boards[].id |
| Item ID | monday_items_list (requires board_id) | data.boards[].items_page.items[].id |
| Group ID | monday_items_list | data.boards[].items_page.items[].group.id |
| Column ID | monday_items_list | data.boards[].items_page.items[].column_values[].id |
| User ID | monday_users_list or monday_me_get | data.users[].id / data.me.id |
| Workspace ID | monday_workspaces_list | data.workspaces[].id |
| Update ID | monday_updates_list | data.updates[].id |
| Tag ID | monday_tags_list | data.tags[].id |
| Team ID | monday_teams_list | data.teams[].id |
| Webhook ID | monday_webhooks_list (requires board_id) | data.webhooks[].id |
| Doc ID | monday_docs_list | data.docs[].id |
| Subitem ID | monday_subitem_create response | data.create_subitem.id |
Tool list
Section titled “Tool list”Use the exact tool names from the Tool list below when you call execute_tool. If you’re not sure which name to use, list the tools available for the current user first.
monday_board_archive#Archive a board in Monday.com.1 param
Archive a board in Monday.com.
board_idstringrequiredID of the board to archivemonday_board_create#Create a new board in Monday.com.6 params
Create a new board in Monday.com.
board_kindstringrequiredBoard type: public, private, or shareboard_namestringrequiredName for the new boarddescriptionstringoptionalDescription for the boardfolder_idintegeroptionalFolder ID to place the board intemplate_idintegeroptionalTemplate ID to base the board onworkspace_idintegeroptionalID of the workspace to create the board inmonday_board_delete#Permanently delete a board from Monday.com.1 param
Permanently delete a board from Monday.com.
board_idstringrequiredID of the board to deletemonday_board_duplicate#Create a copy of an existing board.5 params
Create a copy of an existing board.
board_idstringrequiredID of the board to duplicateduplicate_typestringrequiredWhat to duplicate: duplicate_board_with_structure, duplicate_board_with_pulses, or duplicate_board_with_pulses_and_updatesboard_namestringoptionalName for the duplicated boardkeep_subscribersbooleanoptionalWhether to keep board subscribersworkspace_idstringoptionalDestination workspace IDmonday_board_subscribers_add#Subscribe users to a board so they receive notifications.3 params
Subscribe users to a board so they receive notifications.
board_idstringrequiredID of the board to add subscribers touser_idsarrayrequiredArray of user IDs to subscribekindstringoptionalRole: subscriber or ownermonday_board_update#Update a board's name, description, or communication settings.3 params
Update a board's name, description, or communication settings.
board_attributestringrequiredAttribute to update: name, description, or communicationboard_idstringrequiredID of the board to updatenew_valuestringrequiredNew value for the attributemonday_boards_list#Retrieve a list of boards from your Monday.com account with optional filtering.6 params
Retrieve a list of boards from your Monday.com account with optional filtering.
board_kindstringoptionalFilter by kind: public, private, sharelimitintegeroptionalNumber of boards to return (default 10)order_bystringoptionalSort order: created_at or used_atpageintegeroptionalPage number for paginationstatestringoptionalFilter by state: active, archived, deleted, allworkspace_idsarrayoptionalFilter by workspace IDsmonday_column_create#Add a new column to a Monday.com board.6 params
Add a new column to a Monday.com board.
board_idstringrequiredID of the board to add the column tocolumn_typestringrequiredColumn type: text, long_text, numbers, status, dropdown, date, timeline, people, checkbox, email, phone, link, file, color_picker, rating, time_tracking, formula, auto_number, etc.titlestringrequiredTitle/name for the new columnafter_column_idstringoptionalColumn ID to insert this column afterdefaultsstringoptionalJSON of default settings for the columndescriptionstringoptionalOptional description for the columnmonday_column_delete#Permanently delete a column from a board.2 params
Permanently delete a column from a board.
board_idstringrequiredID of the boardcolumn_idstringrequiredID of the column to deletemonday_column_title_change#Rename a column on a board.3 params
Rename a column on a board.
board_idstringrequiredID of the boardcolumn_idstringrequiredID of the column to renametitlestringrequiredNew title for the columnmonday_docs_list#List documents (monday Docs) in your account.4 params
List documents (monday Docs) in your account.
idsarrayoptionalFilter by specific doc IDslimitintegeroptionalNumber of docs to returnpageintegeroptionalPage number for paginationworkspace_idsarrayoptionalFilter by workspace IDsmonday_group_archive#Archive a group on a board.2 params
Archive a group on a board.
board_idstringrequiredID of the boardgroup_idstringrequiredID of the group to archivemonday_group_create#Create a new group on a Monday.com board.4 params
Create a new group on a Monday.com board.
board_idstringrequiredID of the board to add the group togroup_namestringrequiredName of the group to createposition_relative_methodstringoptionalPositioning: before_at or after_atrelative_tostringoptionalGroup ID to position this group relative tomonday_group_delete#Permanently delete a group from a board.2 params
Permanently delete a group from a board.
board_idstringrequiredID of the boardgroup_idstringrequiredID of the group to deletemonday_group_duplicate#Create a copy of a group on a board.3 params
Create a copy of a group on a board.
board_idstringrequiredID of the boardgroup_idstringrequiredID of the group to duplicateadd_to_topbooleanoptionalWhether to add the duplicate at the top of the boardmonday_group_update#Update a group's name, color, or position on a board.4 params
Update a group's name, color, or position on a board.
attributestringrequiredAttribute to update: title or colorboard_idstringrequiredID of the boardgroup_idstringrequiredID of the group to updatenew_valuestringrequiredNew value for the attributemonday_item_archive#Archive an item on a Monday.com board.1 param
Archive an item on a Monday.com board.
item_idstringrequiredID of the item to archivemonday_item_column_value_change#Update the value of a single column on an item.5 params
Update the value of a single column on an item.
board_idstringrequiredID of the board the item belongs tocolumn_idstringrequiredID of the column to update (e.g., status, date4, text)item_idstringrequiredID of the item to updatevaluestringrequiredNew value as a JSON string. Format varies by column type.create_labels_if_missingbooleanoptionalAuto-create labels if they don't existmonday_item_column_values_change#Update multiple column values on an item in a single request (up to 50 columns).4 params
Update multiple column values on an item in a single request (up to 50 columns).
board_idstringrequiredID of the board the item belongs tocolumn_valuesstringrequiredJSON object mapping column IDs to their new valuesitem_idstringrequiredID of the item to updatecreate_labels_if_missingbooleanoptionalAuto-create labels if they don't existmonday_item_create#Create a new item (row) on a Monday.com board.5 params
Create a new item (row) on a Monday.com board.
board_idstringrequiredID of the board to create the item onitem_namestringrequiredName of the item to createcolumn_valuesstringoptionalJSON string of column values to setcreate_labels_if_missingbooleanoptionalAuto-create status/dropdown labels if they don't existgroup_idstringoptionalID of the group to add the item tomonday_item_delete#Permanently delete an item from a Monday.com board.1 param
Permanently delete an item from a Monday.com board.
item_idstringrequiredID of the item to deletemonday_item_duplicate#Create a copy of an item on the same board.3 params
Create a copy of an item on the same board.
board_idstringrequiredID of the board the item belongs toitem_idstringrequiredID of the item to duplicatewith_updatesbooleanoptionalWhether to copy the item's updates/commentsmonday_item_move_to_board#Transfer an item to a different board.4 params
Transfer an item to a different board.
board_idstringrequiredID of the destination boardgroup_idstringrequiredID of the group on the destination boarditem_idstringrequiredID of the item to movecolumns_mappingstringoptionalJSON array mapping source column IDs to destination column IDsmonday_item_move_to_group#Move an item to a different group on the same board.2 params
Move an item to a different group on the same board.
group_idstringrequiredID of the destination groupitem_idstringrequiredID of the item to movemonday_items_list#Retrieve items from a Monday.com board. Returns items with their column values, group, and creator details.4 params
Retrieve items from a Monday.com board. Returns items with their column values, group, and creator details.
board_idstringrequiredID of the board to list items fromcursorstringoptionalPagination cursor from a previous responsegroup_idstringoptionalFilter by group IDlimitintegeroptionalNumber of items to return per page (max 500)monday_items_search#Search for items on a board filtered by specific column values.5 params
Search for items on a board filtered by specific column values.
board_idstringrequiredID of the board to searchcolumn_idstringrequiredID of the column to filter bycolumn_valuestringrequiredValue to search for in the columncursorstringoptionalPagination cursor from a previous responselimitintegeroptionalNumber of items to return per pagemonday_me_get#Retrieve the profile of the currently authenticated Monday.com user.0 params
Retrieve the profile of the currently authenticated Monday.com user.
monday_notification_create#Send a notification to a user in Monday.com.4 params
Send a notification to a user in Monday.com.
target_idstringrequiredID of the target item or board for contexttarget_typestringrequiredTarget type: Project (board) or Post (item)textstringrequiredNotification message textuser_idstringrequiredID of the user to notifymonday_subitem_create#Create a subitem (child item) under a parent item.4 params
Create a subitem (child item) under a parent item.
item_namestringrequiredName of the subitemparent_item_idstringrequiredID of the parent itemcolumn_valuesstringoptionalJSON object of column values to set on creationcreate_labels_if_missingbooleanoptionalAuto-create labels if they don't existmonday_tag_create_or_get#Create a new tag or retrieve an existing one by name.2 params
Create a new tag or retrieve an existing one by name.
tag_namestringrequiredName of the tag to create or retrieveboard_idstringoptionalID of the board to associate the tag withmonday_tags_list#Retrieve tags from Monday.com.1 param
Retrieve tags from Monday.com.
idsarrayoptionalFilter by specific tag IDsmonday_team_users_add#Add one or more users to a Monday.com team.2 params
Add one or more users to a Monday.com team.
team_idstringrequiredID of the team to add users touser_idsarrayrequiredArray of user IDs to add to the teammonday_team_users_remove#Remove one or more users from a Monday.com team.2 params
Remove one or more users from a Monday.com team.
team_idstringrequiredID of the team to remove users fromuser_idsarrayrequiredArray of user IDs to remove from the teammonday_teams_list#List teams in your Monday.com account.1 param
List teams in your Monday.com account.
idsarrayoptionalFilter by specific team IDsmonday_update_create#Post a comment or update on a Monday.com item.2 params
Post a comment or update on a Monday.com item.
bodystringrequiredContent of the update/comment (HTML supported)item_idstringrequiredID of the item to post the update onmonday_update_delete#Delete an update/comment from an item.1 param
Delete an update/comment from an item.
idstringrequiredID of the update to deletemonday_update_edit#Edit the text of an existing update/comment.2 params
Edit the text of an existing update/comment.
bodystringrequiredNew content for the updateidstringrequiredID of the update to editmonday_updates_list#Retrieve updates (comments/activity posts) from Monday.com.3 params
Retrieve updates (comments/activity posts) from Monday.com.
item_idstringoptionalFilter updates by item IDlimitintegeroptionalNumber of updates to returnpageintegeroptionalPage number for paginationmonday_users_list#List users in your Monday.com account.7 params
List users in your Monday.com account.
emailsarrayoptionalFilter by email addressesidsarrayoptionalFilter by specific user IDskindstringoptionalUser kind: all, non_guests, guests, non_pendinglimitintegeroptionalNumber of users to returnnamestringoptionalFilter by name (partial match)newest_firstbooleanoptionalSort newest users firstpageintegeroptionalPage number for paginationmonday_webhook_create#Register a new webhook for a board event.4 params
Register a new webhook for a board event.
board_idstringrequiredID of the board to watcheventstringrequiredEvent to trigger on: change_column_value, create_item, delete_item, create_update, change_status_column_value, change_subitem_column_value, create_subitem, move_item_to_group, etc.urlstringrequiredURL to send webhook payloads toconfigstringoptionalOptional JSON configuration for the event (e.g., specific column filter)monday_webhook_delete#Delete a webhook registration.1 param
Delete a webhook registration.
idstringrequiredID of the webhook to deletemonday_webhooks_list#List all webhooks registered for a board.2 params
List all webhooks registered for a board.
board_idstringrequiredID of the board to list webhooks forapp_webhooks_onlybooleanoptionalReturn only webhooks created by the current appmonday_workspace_create#Create a new workspace in Monday.com.3 params
Create a new workspace in Monday.com.
kindstringrequiredWorkspace type: open or closednamestringrequiredName for the new workspacedescriptionstringoptionalOptional description for the workspacemonday_workspaces_list#List all workspaces in your Monday.com account.5 params
List all workspaces in your Monday.com account.
idsarrayoptionalFilter by specific workspace IDskindstringoptionalWorkspace kind: open or closedlimitintegeroptionalNumber of workspaces to returnpageintegeroptionalPage number for paginationstatestringoptionalWorkspace state: all, active, archived, deleted