Zoom connector
OAuth 2.0CommunicationCalendarConnect to Zoom. Schedule meetings, manage recordings, and handle video conferencing workflows
Zoom connector
-
Install the SDK
Section titled “Install the SDK”Terminal window npm install @scalekit-sdk/nodeTerminal window pip install scalekit -
Set your credentials
Section titled “Set your credentials”Add your Scalekit credentials to your
.envfile. Find values in app.scalekit.com > Developers > API Credentials..env SCALEKIT_ENVIRONMENT_URL=<your-environment-url>SCALEKIT_CLIENT_ID=<your-client-id>SCALEKIT_CLIENT_SECRET=<your-client-secret> -
Set up the connector
Section titled “Set up the connector”Register your Zoom credentials with Scalekit so it handles the token lifecycle. You do this once per environment.
Dashboard setup steps
Register your Scalekit environment with the Zoom connector so Scalekit handles the authentication flow and token lifecycle for you. The connection name you create will be used to identify and invoke the connection programmatically. You’ll need your app credentials from the Zoom App Marketplace.
-
Set up auth redirects
-
In Scalekit dashboard, go to AgentKit > Connections > Create Connection. Find Zoom and click Create. Copy the redirect URI. It looks like
https://<SCALEKIT_ENVIRONMENT_URL>/sso/v1/oauth/<CONNECTION_ID>/callback.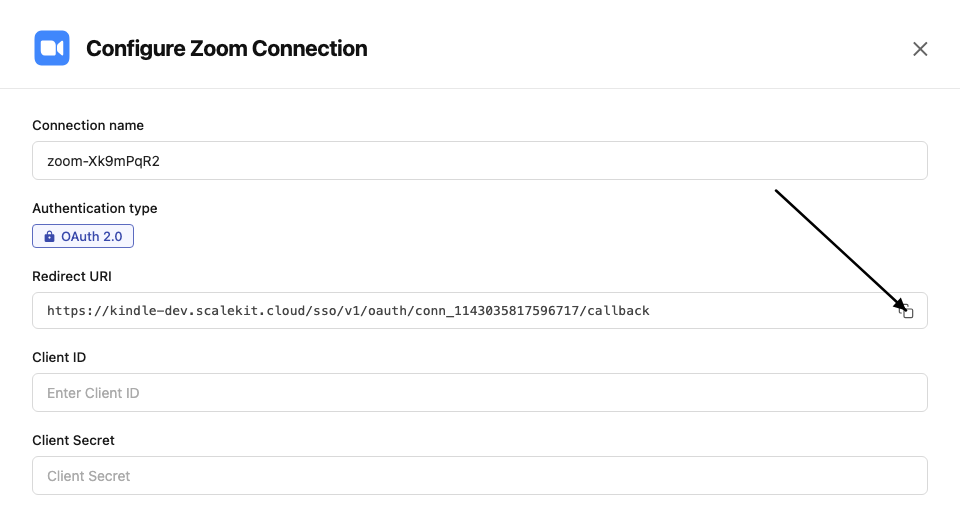
-
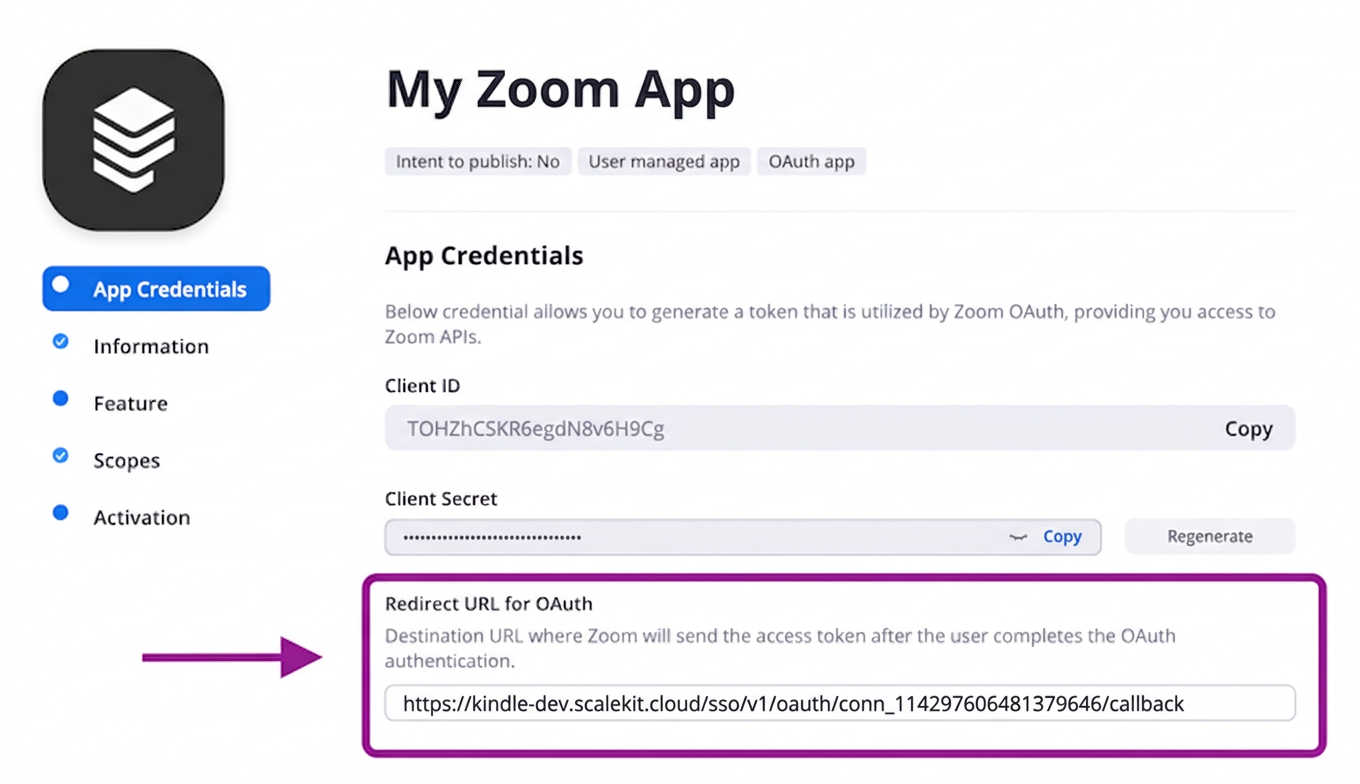
In the Zoom App Marketplace, open your app and go to App Credentials.
-
Paste the copied URI into the Redirect URL for OAuth field and also add it to the OAuth allow list.
-
-
Get client credentials
- In the Zoom App Marketplace, open your app and go to App Credentials:
- Client ID — listed under Client ID
- Client Secret — listed under Client Secret
- In the Zoom App Marketplace, open your app and go to App Credentials:
-
Add credentials in Scalekit
-
In Scalekit dashboard, go to AgentKit > Connections and open the connection you created.
-
Enter your credentials:
- Client ID (from your Zoom app)
- Client Secret (from your Zoom app)
- Permissions — select the scopes your app needs
-
Click Save.
-
-
-
Authorize and make your first call
Section titled “Authorize and make your first call”quickstart.ts import { ScalekitClient } from '@scalekit-sdk/node'import 'dotenv/config'const scalekit = new ScalekitClient(process.env.SCALEKIT_ENV_URL,process.env.SCALEKIT_CLIENT_ID,process.env.SCALEKIT_CLIENT_SECRET,)const actions = scalekit.actionsconst connector = 'zoom'const identifier = 'user_123'// Generate an authorization link for the userconst { link } = await actions.getAuthorizationLink({ connectionName: connector, identifier })console.log('Authorize Zoom:', link)process.stdout.write('Press Enter after authorizing...')await new Promise(r => process.stdin.once('data', r))// Make your first callconst result = await actions.executeTool({connector,identifier,toolName: 'zoom_chat_channels_list',toolInput: {},})console.log(result)quickstart.py import osfrom scalekit.client import ScalekitClientfrom dotenv import load_dotenvload_dotenv()scalekit_client = ScalekitClient(env_url=os.getenv("SCALEKIT_ENV_URL"),client_id=os.getenv("SCALEKIT_CLIENT_ID"),client_secret=os.getenv("SCALEKIT_CLIENT_SECRET"),)actions = scalekit_client.actionsconnection_name = "zoom"identifier = "user_123"# Generate an authorization link for the userlink_response = actions.get_authorization_link(connection_name=connection_name,identifier=identifier,)print("Authorize Zoom:", link_response.link)input("Press Enter after authorizing...")# Make your first callresult = actions.execute_tool(tool_input={},tool_name="zoom_chat_channels_list",connection_name=connection_name,identifier=identifier,)print(result)
What you can do
Section titled “What you can do”Connect this agent connector to let your agent:
- Add meeting registrant — Register a participant for a Zoom meeting
- Update meeting, chat channel, user — Update an existing Zoom meeting’s details
- Delete meeting recordings, user, meeting — Delete all cloud recordings for a specific meeting
- List chat channel members, meeting registrants, chat channels — List members of a Team Chat channel
- Get meeting, user, chat channel — Retrieve details of a specific Zoom meeting
- Create meeting, chat channel — Schedule a new Zoom meeting for a user
Common workflows
Section titled “Common workflows”Proxy API call
const result = await actions.request({ connectionName: 'zoom', identifier: 'user_123', path: '/v2/users/me', method: 'GET',});console.log(result);result = actions.request( connection_name='zoom', identifier='user_123', path="/v2/users/me", method="GET")print(result)Execute a tool
const result = await actions.executeTool({ connector: 'zoom', identifier: 'user_123', toolName: 'zoom_list', toolInput: {},});console.log(result);result = actions.execute_tool( tool_input={}, tool_name='zoom_list', connection_name='zoom', identifier='user_123',)print(result)Tool list
Section titled “Tool list”Use the exact tool names from the Tool list below when you call execute_tool. If you’re not sure which name to use, list the tools available for the current user first.
zoom_chat_channel_create#Create a new Team Chat channel.3 params
Create a new Team Chat channel.
namestringrequiredName of the channelmembersarrayoptionalList of member objects with email field to add to the channeltypeintegeroptionalChannel type: 1=private, 2=private with external users, 3=public, 4=new externalzoom_chat_channel_delete#Delete a Team Chat channel.1 param
Delete a Team Chat channel.
channel_idstringrequiredThe channel IDzoom_chat_channel_get#Get details of a specific Team Chat channel.1 param
Get details of a specific Team Chat channel.
channel_idstringrequiredThe channel IDzoom_chat_channel_member_invite#Invite one or more members to a Team Chat channel.2 params
Invite one or more members to a Team Chat channel.
channel_idstringrequiredThe channel IDmembersarrayrequiredArray of member objects with email fieldzoom_chat_channel_member_remove#Remove a member from a Team Chat channel.2 params
Remove a member from a Team Chat channel.
channel_idstringrequiredThe channel IDmember_idstringrequiredThe member ID or email to removezoom_chat_channel_members_list#List members of a Team Chat channel.3 params
List members of a Team Chat channel.
channel_idstringrequiredThe channel IDnext_page_tokenstringoptionalToken for next page of resultspage_sizeintegeroptionalNumber of members per page (max 50)zoom_chat_channel_messages_list#List messages in a Zoom Team Chat channel.5 params
List messages in a Zoom Team Chat channel.
channel_idstringrequiredThe channel ID to list messages fromuser_idstringrequiredThe user ID or 'me' for the authenticated userdatestringoptionalDate to retrieve messages for (yyyy-MM-dd). Defaults to today.next_page_tokenstringoptionalToken for next pagepage_sizeintegeroptionalNumber of messages per page (max 50)zoom_chat_channel_update#Update the name or settings of a Team Chat channel.2 params
Update the name or settings of a Team Chat channel.
channel_idstringrequiredThe channel IDnamestringoptionalNew name for the channelzoom_chat_channels_list#List all Zoom Team Chat channels the authenticated user belongs to.2 params
List all Zoom Team Chat channels the authenticated user belongs to.
next_page_tokenstringoptionalToken for next pagepage_sizeintegeroptionalNumber of channels per page (max 50)zoom_chat_message_send#Send a message in a Zoom Team Chat channel or to a user.4 params
Send a message in a Zoom Team Chat channel or to a user.
messagestringrequiredThe message text to senduser_idstringrequiredSender's user ID or 'me'to_channelstringoptionalChannel ID to send the message toto_jidstringoptionalJID of the user to send a direct message tozoom_meeting_create#Schedule a new Zoom meeting for a user.8 params
Schedule a new Zoom meeting for a user.
topicstringrequiredMeeting topic/titleuser_idstringrequiredUser ID or 'me' for the authenticated useragendastringoptionalMeeting description or agendadurationintegeroptionalMeeting duration in minutespasswordstringoptionalMeeting passcode (max 10 chars)start_timestringoptionalMeeting start time in ISO 8601 UTC formattimezonestringoptionalTimezone for the meeting (e.g. America/New_York)typeintegeroptional1=Instant, 2=Scheduled, 3=Recurring no fixed time, 8=Recurring fixed timezoom_meeting_delete#Delete a Zoom meeting.2 params
Delete a Zoom meeting.
meeting_idstringrequiredThe meeting ID to deleteoccurrence_idstringoptionalOccurrence ID for recurring meeting instanceszoom_meeting_get#Retrieve details of a specific Zoom meeting.1 param
Retrieve details of a specific Zoom meeting.
meeting_idstringrequiredThe meeting IDzoom_meeting_invitation_get#Retrieve the invitation text for a Zoom meeting.1 param
Retrieve the invitation text for a Zoom meeting.
meeting_idstringrequiredThe meeting IDzoom_meeting_recordings_delete#Delete all cloud recordings for a specific meeting.2 params
Delete all cloud recordings for a specific meeting.
meeting_idstringrequiredThe meeting ID or UUIDactionstringoptionaltrash (move to trash, default) or delete (permanent)zoom_meeting_recordings_get#Retrieve all cloud recordings for a specific meeting.1 param
Retrieve all cloud recordings for a specific meeting.
meeting_idstringrequiredThe meeting ID or UUIDzoom_meeting_registrant_add#Register a participant for a Zoom meeting.5 params
Register a participant for a Zoom meeting.
emailstringrequiredRegistrant's email addressfirst_namestringrequiredRegistrant's first namemeeting_idstringrequiredThe meeting IDlast_namestringoptionalRegistrant's last nameoccurrence_idsstringoptionalComma-separated occurrence IDs for recurring meetingszoom_meeting_registrants_list#List all registrants for a Zoom meeting.5 params
List all registrants for a Zoom meeting.
meeting_idstringrequiredThe meeting IDnext_page_tokenstringoptionalToken for next pageoccurrence_idstringoptionalOccurrence ID for recurring meetingspage_sizeintegeroptionalNumber of records per page (max 300)statusstringoptionalFilter by status: pending, approved, deniedzoom_meeting_status_update#Update the status of a Zoom meeting (e.g., end a meeting in progress).2 params
Update the status of a Zoom meeting (e.g., end a meeting in progress).
actionstringrequiredAction to perform: 'end' to end the meetingmeeting_idstringrequiredThe meeting IDzoom_meeting_update#Update an existing Zoom meeting's details.7 params
Update an existing Zoom meeting's details.
meeting_idstringrequiredThe meeting ID to updateagendastringoptionalNew meeting agendadurationintegeroptionalNew duration in minutespasswordstringoptionalNew meeting passcodestart_timestringoptionalNew start time in ISO 8601 UTC formattimezonestringoptionalTimezone for the meetingtopicstringoptionalNew meeting topiczoom_meetings_list#List all meetings scheduled by a user.4 params
List all meetings scheduled by a user.
user_idstringrequiredUser ID or 'me' for the authenticated usernext_page_tokenstringoptionalToken for next page of resultspage_sizeintegeroptionalNumber of records per page (max 300)typestringoptionalFilter: scheduled, live, upcoming, upcoming_meetings, previous_meetingszoom_past_meeting_get#Retrieve details of an ended Zoom meeting.1 param
Retrieve details of an ended Zoom meeting.
meeting_uuidstringrequiredThe meeting UUID (double-encode if contains / or //)zoom_recordings_list#List all cloud recordings for a user.7 params
List all cloud recordings for a user.
user_idstringrequiredUser ID or 'me' for the authenticated userfromstringoptionalStart date in yyyy-MM-dd format (default: current date minus 1 month)mcstringoptionalSet to true to retrieve recordings from Zoom Roomnext_page_tokenstringoptionalToken for next pagepage_sizeintegeroptionalNumber of records per page (max 300)tostringoptionalEnd date in yyyy-MM-dd format (max 1 month range)trashbooleanoptionalSet to true to list trashed recordingszoom_user_delete#Disassociate or permanently delete a Zoom user.3 params
Disassociate or permanently delete a Zoom user.
user_idstringrequiredThe user ID to deleteactionstringoptionaldisassociate (default) or deletetransfer_emailstringoptionalEmail to transfer data to before deletionzoom_user_get#Retrieve details of a specific Zoom user.1 param
Retrieve details of a specific Zoom user.
user_idstringrequiredUser ID or 'me' for the authenticated userzoom_user_permissions_get#Retrieve permissions for a Zoom user.1 param
Retrieve permissions for a Zoom user.
user_idstringrequiredUser ID or 'me' for the authenticated userzoom_user_settings_get#Retrieve settings for a Zoom user.1 param
Retrieve settings for a Zoom user.
user_idstringrequiredUser ID or 'me' for the authenticated userzoom_user_update#Update a Zoom user's profile information.8 params
Update a Zoom user's profile information.
user_idstringrequiredUser ID or 'me' for the authenticated usercompanystringoptionalUser's company namedisplay_namestringoptionalNew display namefirst_namestringoptionalNew first namejob_titlestringoptionalUser's job titlelast_namestringoptionalNew last namelocationstringoptionalUser's locationphone_numberstringoptionalUser's phone numberzoom_users_list#List all users on a Zoom account.4 params
List all users on a Zoom account.
next_page_tokenstringoptionalToken for next pagepage_sizeintegeroptionalNumber of records per page (max 300)role_idstringoptionalFilter users by role IDstatusstringoptionalFilter by status: active, inactive, pending