Dropbox connector
OAuth 2.0Files & DocumentsConnect to Dropbox. Manage files, folders, sharing, and cloud storage workflows
Dropbox connector
-
Install the SDK
Section titled “Install the SDK”Terminal window npm install @scalekit-sdk/nodeTerminal window pip install scalekit -
Set your credentials
Section titled “Set your credentials”Add your Scalekit credentials to your
.envfile. Find values in app.scalekit.com > Developers > API Credentials..env SCALEKIT_ENVIRONMENT_URL=<your-environment-url>SCALEKIT_CLIENT_ID=<your-client-id>SCALEKIT_CLIENT_SECRET=<your-client-secret> -
Set up the connector
Section titled “Set up the connector”Register your Dropbox credentials with Scalekit so it handles the token lifecycle. You do this once per environment.
Dashboard setup steps
Register your Scalekit environment with the Dropbox connector so Scalekit handles the authentication flow and token lifecycle for you. The connection name you create will be used to identify and invoke the connection programmatically. You’ll need your app credentials from the Dropbox App Console.
-
Set up auth redirects
-
In Scalekit dashboard, go to AgentKit > Connections > Create Connection.
-
Find Dropbox from the list of providers and click Create.
-
Click Use your own credentials and copy the redirect URI. It looks like
https://<SCALEKIT_ENVIRONMENT_URL>/sso/v1/oauth/<CONNECTION_ID>/callback.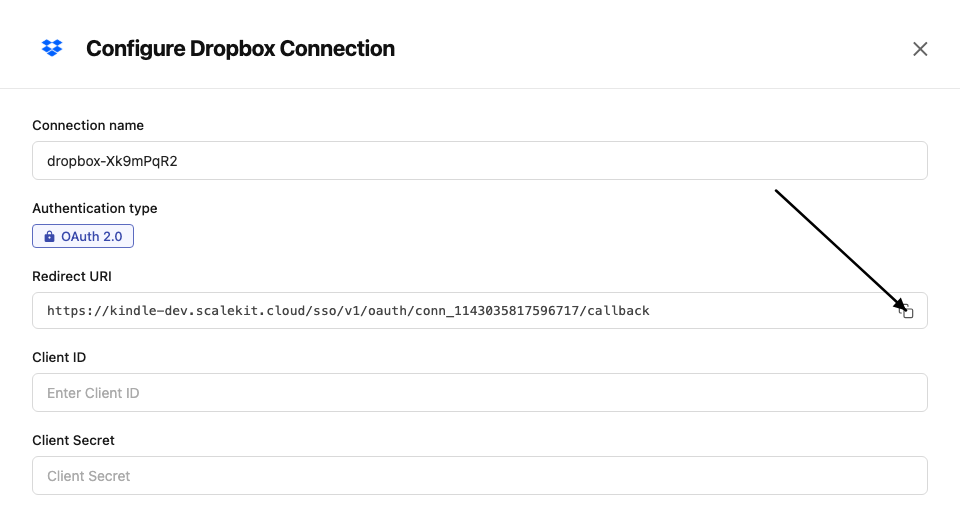
-
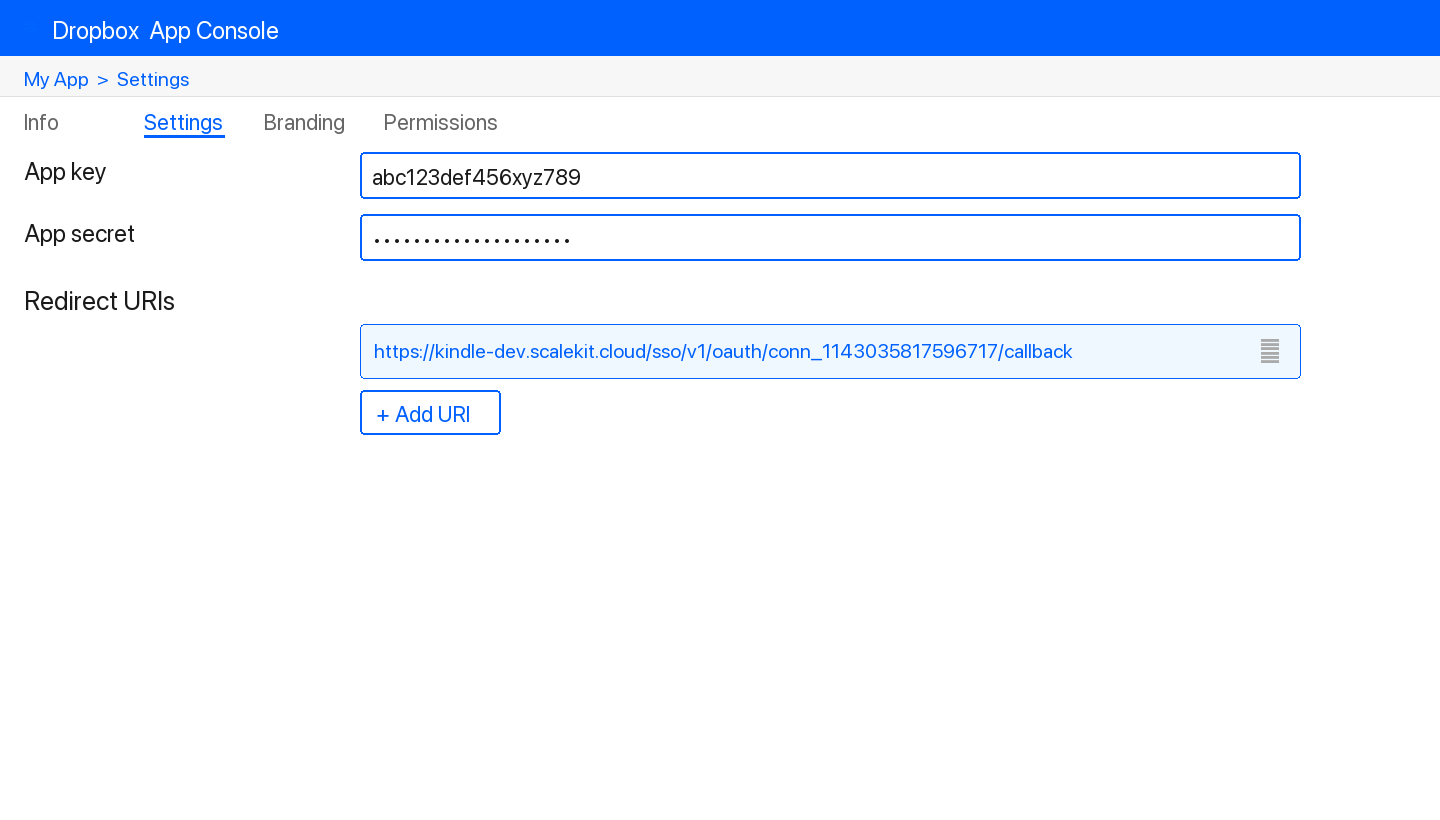
In the Dropbox App Console, open your app and go to the Settings tab.
-
Under Redirect URIs, paste the copied URI and click Add.
-
-
Get client credentials
- In the Dropbox App Console, open your app and go to the Settings tab:
- Client ID — listed under App key
- Client Secret — listed under App secret
- In the Dropbox App Console, open your app and go to the Settings tab:
-
Add credentials in Scalekit
-
In Scalekit dashboard, go to AgentKit > Connections and open the connection you created.
-
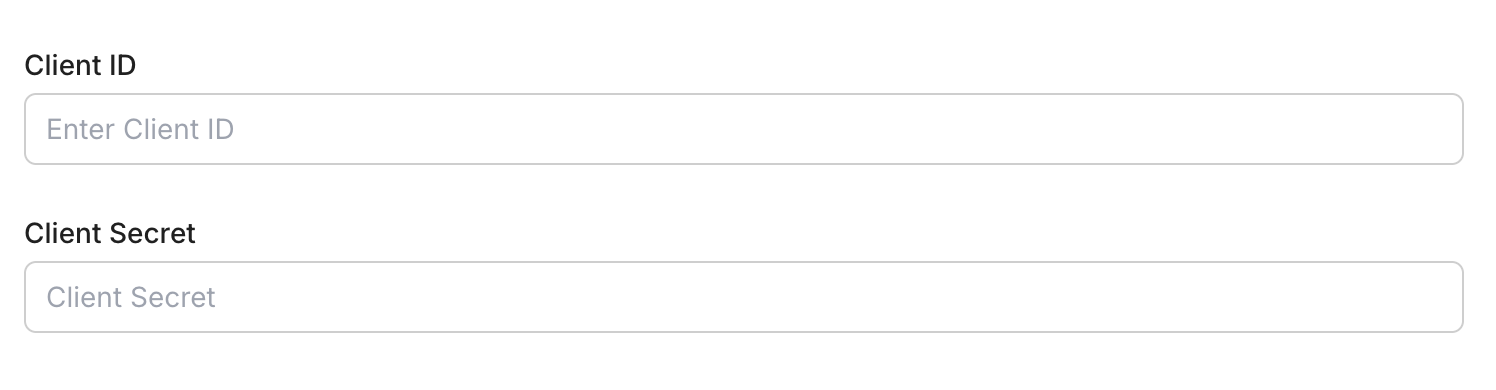
Enter your credentials:
- Client ID (App key from your Dropbox app)
- Client Secret (App secret from your Dropbox app)
- Permissions — select the scopes your app needs
-
Click Save.
-
-
-
Authorize and make your first call
Section titled “Authorize and make your first call”quickstart.ts import { ScalekitClient } from '@scalekit-sdk/node'import 'dotenv/config'const scalekit = new ScalekitClient(process.env.SCALEKIT_ENV_URL,process.env.SCALEKIT_CLIENT_ID,process.env.SCALEKIT_CLIENT_SECRET,)const actions = scalekit.actionsconst connector = 'dropbox'const identifier = 'user_123'// Generate an authorization link for the userconst { link } = await actions.getAuthorizationLink({ connectionName: connector, identifier })console.log('Authorize Dropbox:', link)process.stdout.write('Press Enter after authorizing...')await new Promise(r => process.stdin.once('data', r))// Make your first callconst result = await actions.executeTool({connector,identifier,toolName: 'dropbox_file_requests_list',toolInput: {},})console.log(result)quickstart.py import osfrom scalekit.client import ScalekitClientfrom dotenv import load_dotenvload_dotenv()scalekit_client = ScalekitClient(env_url=os.getenv("SCALEKIT_ENV_URL"),client_id=os.getenv("SCALEKIT_CLIENT_ID"),client_secret=os.getenv("SCALEKIT_CLIENT_SECRET"),)actions = scalekit_client.actionsconnection_name = "dropbox"identifier = "user_123"# Generate an authorization link for the userlink_response = actions.get_authorization_link(connection_name=connection_name,identifier=identifier,)print("Authorize Dropbox:", link_response.link)input("Press Enter after authorizing...")# Make your first callresult = actions.execute_tool(tool_input={},tool_name="dropbox_file_requests_list",connection_name=connection_name,identifier=identifier,)print(result)
What you can do
Section titled “What you can do”Connect this agent connector to let your agent:
- Get users, sharing — Get the current storage space usage for the authenticated Dropbox user, including used and allocated space
- Folder sharing share — Share a Dropbox folder with other users
- Link sharing revoke shared — Revoke a shared link in Dropbox, making it inaccessible
- List sharing, files — List shared links for a file or folder in Dropbox
- Create sharing, files, file requests — Create a shared link for a file or folder in Dropbox with optional visibility and access settings
- Member sharing add folder — Add one or more members to a Dropbox shared folder
Common workflows
Section titled “Common workflows”Proxy API call
const result = await actions.request({ connectionName: 'dropbox', identifier: 'user_123', path: '/2/users/get_current_account', method: 'POST',});console.log(result);result = actions.request( connection_name='dropbox', identifier='user_123', path="/2/users/get_current_account", method="POST",)print(result)Execute a tool
const result = await actions.executeTool({ connector: 'dropbox', identifier: 'user_123', toolName: 'dropbox_list', toolInput: {},});console.log(result);result = actions.execute_tool( connection_name='dropbox', identifier='user_123', tool_name='dropbox_list', tool_input={},)print(result)Tool list
Section titled “Tool list”Use the exact tool names from the Tool list below when you call execute_tool. If you’re not sure which name to use, list the tools available for the current user first.
dropbox_file_requests_create#Create a Dropbox file request that allows others to upload files to a designated Dropbox folder.6 params
Create a Dropbox file request that allows others to upload files to a designated Dropbox folder.
destinationstringrequiredThe Dropbox folder path where uploaded files will be saved.titlestringrequiredThe title of the file request, shown to contributors.deadline_allow_late_uploadsstringoptionalWhether to allow uploads after the deadline has passed.deadline_deadlinestringoptionalDeadline date for submissions in ISO 8601 format (e.g., '2024-12-31T23:59:59Z').descriptionstringoptionalA description of the file request, shown to contributors.openbooleanoptionalWhether the file request is open for submissions. Defaults to true.dropbox_file_requests_list#List all file requests created by the current Dropbox user.1 param
List all file requests created by the current Dropbox user.
limitintegeroptionalMaximum number of file requests to return.dropbox_files_copy#Copy a file or folder from one path to another in Dropbox. The original file is preserved. Optionally auto-rename if a conflict exists at the destination.5 params
Copy a file or folder from one path to another in Dropbox. The original file is preserved. Optionally auto-rename if a conflict exists at the destination.
from_pathstringrequiredThe path of the file or folder to copy.to_pathstringrequiredThe destination path for the copy.allow_ownership_transferbooleanoptionalAllow copies that change the file ownership.allow_shared_folderbooleanoptionalIf true, copy is allowed even if the destination is inside a shared folder.autorenamebooleanoptionalIf true, the destination will be automatically renamed if a file/folder already exists there.dropbox_files_create_folder#Create a new folder at the specified path in Dropbox. Optionally auto-rename if a folder with the same name already exists.2 params
Create a new folder at the specified path in Dropbox. Optionally auto-rename if a folder with the same name already exists.
pathstringrequiredThe path of the folder to create.autorenamebooleanoptionalIf true, the folder will be renamed automatically if a folder with the same name already exists.dropbox_files_delete#Delete a file or folder at the specified path in Dropbox. Deleted items are moved to the Dropbox trash and can be recovered within 30 days (or 180 days for Business accounts).2 params
Delete a file or folder at the specified path in Dropbox. Deleted items are moved to the Dropbox trash and can be recovered within 30 days (or 180 days for Business accounts).
pathstringrequiredThe path of the file or folder to delete.parent_revstringoptionalPerform delete only if the file's revision matches this value. Only applies to files, not folders.dropbox_files_get_metadata#Get metadata for a file or folder at the specified Dropbox path. Returns name, path, size, modification date, and other properties.4 params
Get metadata for a file or folder at the specified Dropbox path. Returns name, path, size, modification date, and other properties.
pathstringrequiredThe path to the file or folder to get metadata for.include_deletedbooleanoptionalIf true, deleted files and folders will be included in the results.include_has_explicit_shared_membersbooleanoptionalIf true, the result will include a flag indicating whether the file has explicit shared members.include_media_infobooleanoptionalIf true, the result will include media info (e.g., dimensions, duration) for photo and video files.dropbox_files_get_temporary_link#Get a temporary link to download a file from Dropbox. The link expires after 4 hours. Use this to share a file download URL without granting permanent access.1 param
Get a temporary link to download a file from Dropbox. The link expires after 4 hours. Use this to share a file download URL without granting permanent access.
pathstringrequiredThe path of the file to get a temporary download link for.dropbox_files_list_folder#List the contents of a folder in Dropbox. Returns files and subfolders at the given path. Supports recursive listing, filtering for deleted items, and pagination via cursor.6 params
List the contents of a folder in Dropbox. Returns files and subfolders at the given path. Supports recursive listing, filtering for deleted items, and pagination via cursor.
pathstringrequiredThe path to the folder to list. Use an empty string or '' to list the root of the Dropbox.include_deletedbooleanoptionalIf true, deleted files and folders will be included in the results.include_has_explicit_shared_membersbooleanoptionalIf true, the results will include a flag for each file indicating whether it has explicit shared members.include_media_infobooleanoptionalIf true, the results will include media info (e.g., dimensions, duration) for photo and video files.limitintegeroptionalThe maximum number of results to return per page. Default is determined by the server (typically 2000).recursivebooleanoptionalIf true, the listing will recurse into subfolders.dropbox_files_list_folder_continue#Continue listing folder contents using a cursor returned from a previous list_folder call. Use this to paginate through large folder listings.1 param
Continue listing folder contents using a cursor returned from a previous list_folder call. Use this to paginate through large folder listings.
cursorstringrequiredThe cursor returned by a previous list_folder or list_folder/continue call.dropbox_files_list_revisions#List all revisions of a file at the given path in Dropbox. Returns revision history including IDs, sizes, and modification dates. Useful for viewing version history and recovering older versions.3 params
List all revisions of a file at the given path in Dropbox. Returns revision history including IDs, sizes, and modification dates. Useful for viewing version history and recovering older versions.
pathstringrequiredThe path of the file to list revisions for.limitintegeroptionalThe maximum number of revisions to return (1–100). Defaults to 10.modestringoptionalDetermines how the path is interpreted. 'path' uses the file's current path; 'id' uses the file's unique ID.dropbox_files_move#Move a file or folder from one path to another in Dropbox. Optionally allow moving into shared folders or auto-rename if a conflict exists at the destination.5 params
Move a file or folder from one path to another in Dropbox. Optionally allow moving into shared folders or auto-rename if a conflict exists at the destination.
from_pathstringrequiredThe current path of the file or folder to move.to_pathstringrequiredThe destination path for the file or folder.allow_ownership_transferbooleanoptionalAllow moves that change the file ownership. Only relevant for moves from one user's Dropbox to another.allow_shared_folderbooleanoptionalIf true, move is allowed even if the destination is inside a shared folder.autorenamebooleanoptionalIf true, the destination will be automatically renamed if a file/folder already exists there.dropbox_files_restore#Restore a file in Dropbox to a specific revision. Requires the file path and revision identifier.2 params
Restore a file in Dropbox to a specific revision. Requires the file path and revision identifier.
pathstringrequiredThe path to the file to restore, e.g. '/Documents/notes.txt'.revstringrequiredThe revision identifier to restore the file to. Obtained from file revision history.dropbox_files_save_url#Save a file from a URL directly to a Dropbox path. The file is downloaded from the URL and saved to the specified Dropbox location.2 params
Save a file from a URL directly to a Dropbox path. The file is downloaded from the URL and saved to the specified Dropbox location.
pathstringrequiredThe Dropbox path where the file should be saved, e.g. '/Downloads/report.pdf'.urlstringrequiredThe URL of the file to download and save to Dropbox.dropbox_files_search#Search for files and folders in Dropbox by name or content. Supports filtering by path, file status, and limiting results. Returns matching file and folder entries.5 params
Search for files and folders in Dropbox by name or content. Supports filtering by path, file status, and limiting results. Returns matching file and folder entries.
querystringrequiredThe search query string. Matches file names, extensions, and content.options_file_statusstringoptionalRestricts search to files with this status. 'active' returns non-deleted files; 'deleted' returns only deleted files.options_filename_onlybooleanoptionalIf true, the search only matches filenames and not file content.options_max_resultsintegeroptionalThe maximum number of search results to return (1–1000).options_pathstringoptionalRestricts the search to this folder path and its subfolders.dropbox_sharing_add_folder_member#Add one or more members to a Dropbox shared folder. Each member is specified with an email address and access level.4 params
Add one or more members to a Dropbox shared folder. Each member is specified with an email address and access level.
membersarrayrequiredArray of members to add. Each member has an email and access level.shared_folder_idstringrequiredThe ID of the shared folder to add members to.custom_messagestringoptionalOptional custom message to include in the invitation email.quietbooleanoptionalIf true, do not send a notification email to added members.dropbox_sharing_list_folder_members#List all members (users and groups) of a Dropbox shared folder.2 params
List all members (users and groups) of a Dropbox shared folder.
shared_folder_idstringrequiredThe ID of the shared folder whose members to list.limitintegeroptionalMaximum number of members to return per page.dropbox_users_get_current_account#Get information about the current Dropbox user's account, including name, email, and account type.0 params
Get information about the current Dropbox user's account, including name, email, and account type.
dropbox_users_get_space_usage#Get the current storage space usage for the authenticated Dropbox user, including used and allocated space.0 params
Get the current storage space usage for the authenticated Dropbox user, including used and allocated space.