Airtable connector
OAuth 2.0Project ManagementAnalyticsConnect to Airtable. Manage databases, tables, records, and collaborate on structured data
Airtable connector
-
Install the SDK
Section titled “Install the SDK”Terminal window npm install @scalekit-sdk/nodeTerminal window pip install scalekit -
Set your credentials
Section titled “Set your credentials”Add your Scalekit credentials to your
.envfile. Find values in app.scalekit.com > Developers > API Credentials..env SCALEKIT_ENVIRONMENT_URL=<your-environment-url>SCALEKIT_CLIENT_ID=<your-client-id>SCALEKIT_CLIENT_SECRET=<your-client-secret> -
Set up the connector
Section titled “Set up the connector”Register your Airtable credentials with Scalekit so it handles the token lifecycle. You do this once per environment.
Dashboard setup steps
Register your Scalekit environment with the Airtable connector so Scalekit handles the authentication flow and token lifecycle for you. The connection name you create will be used to identify and invoke the connection programmatically. Then complete the configuration in your application as follows:
-
Create the Airtable connection in Scalekit
-
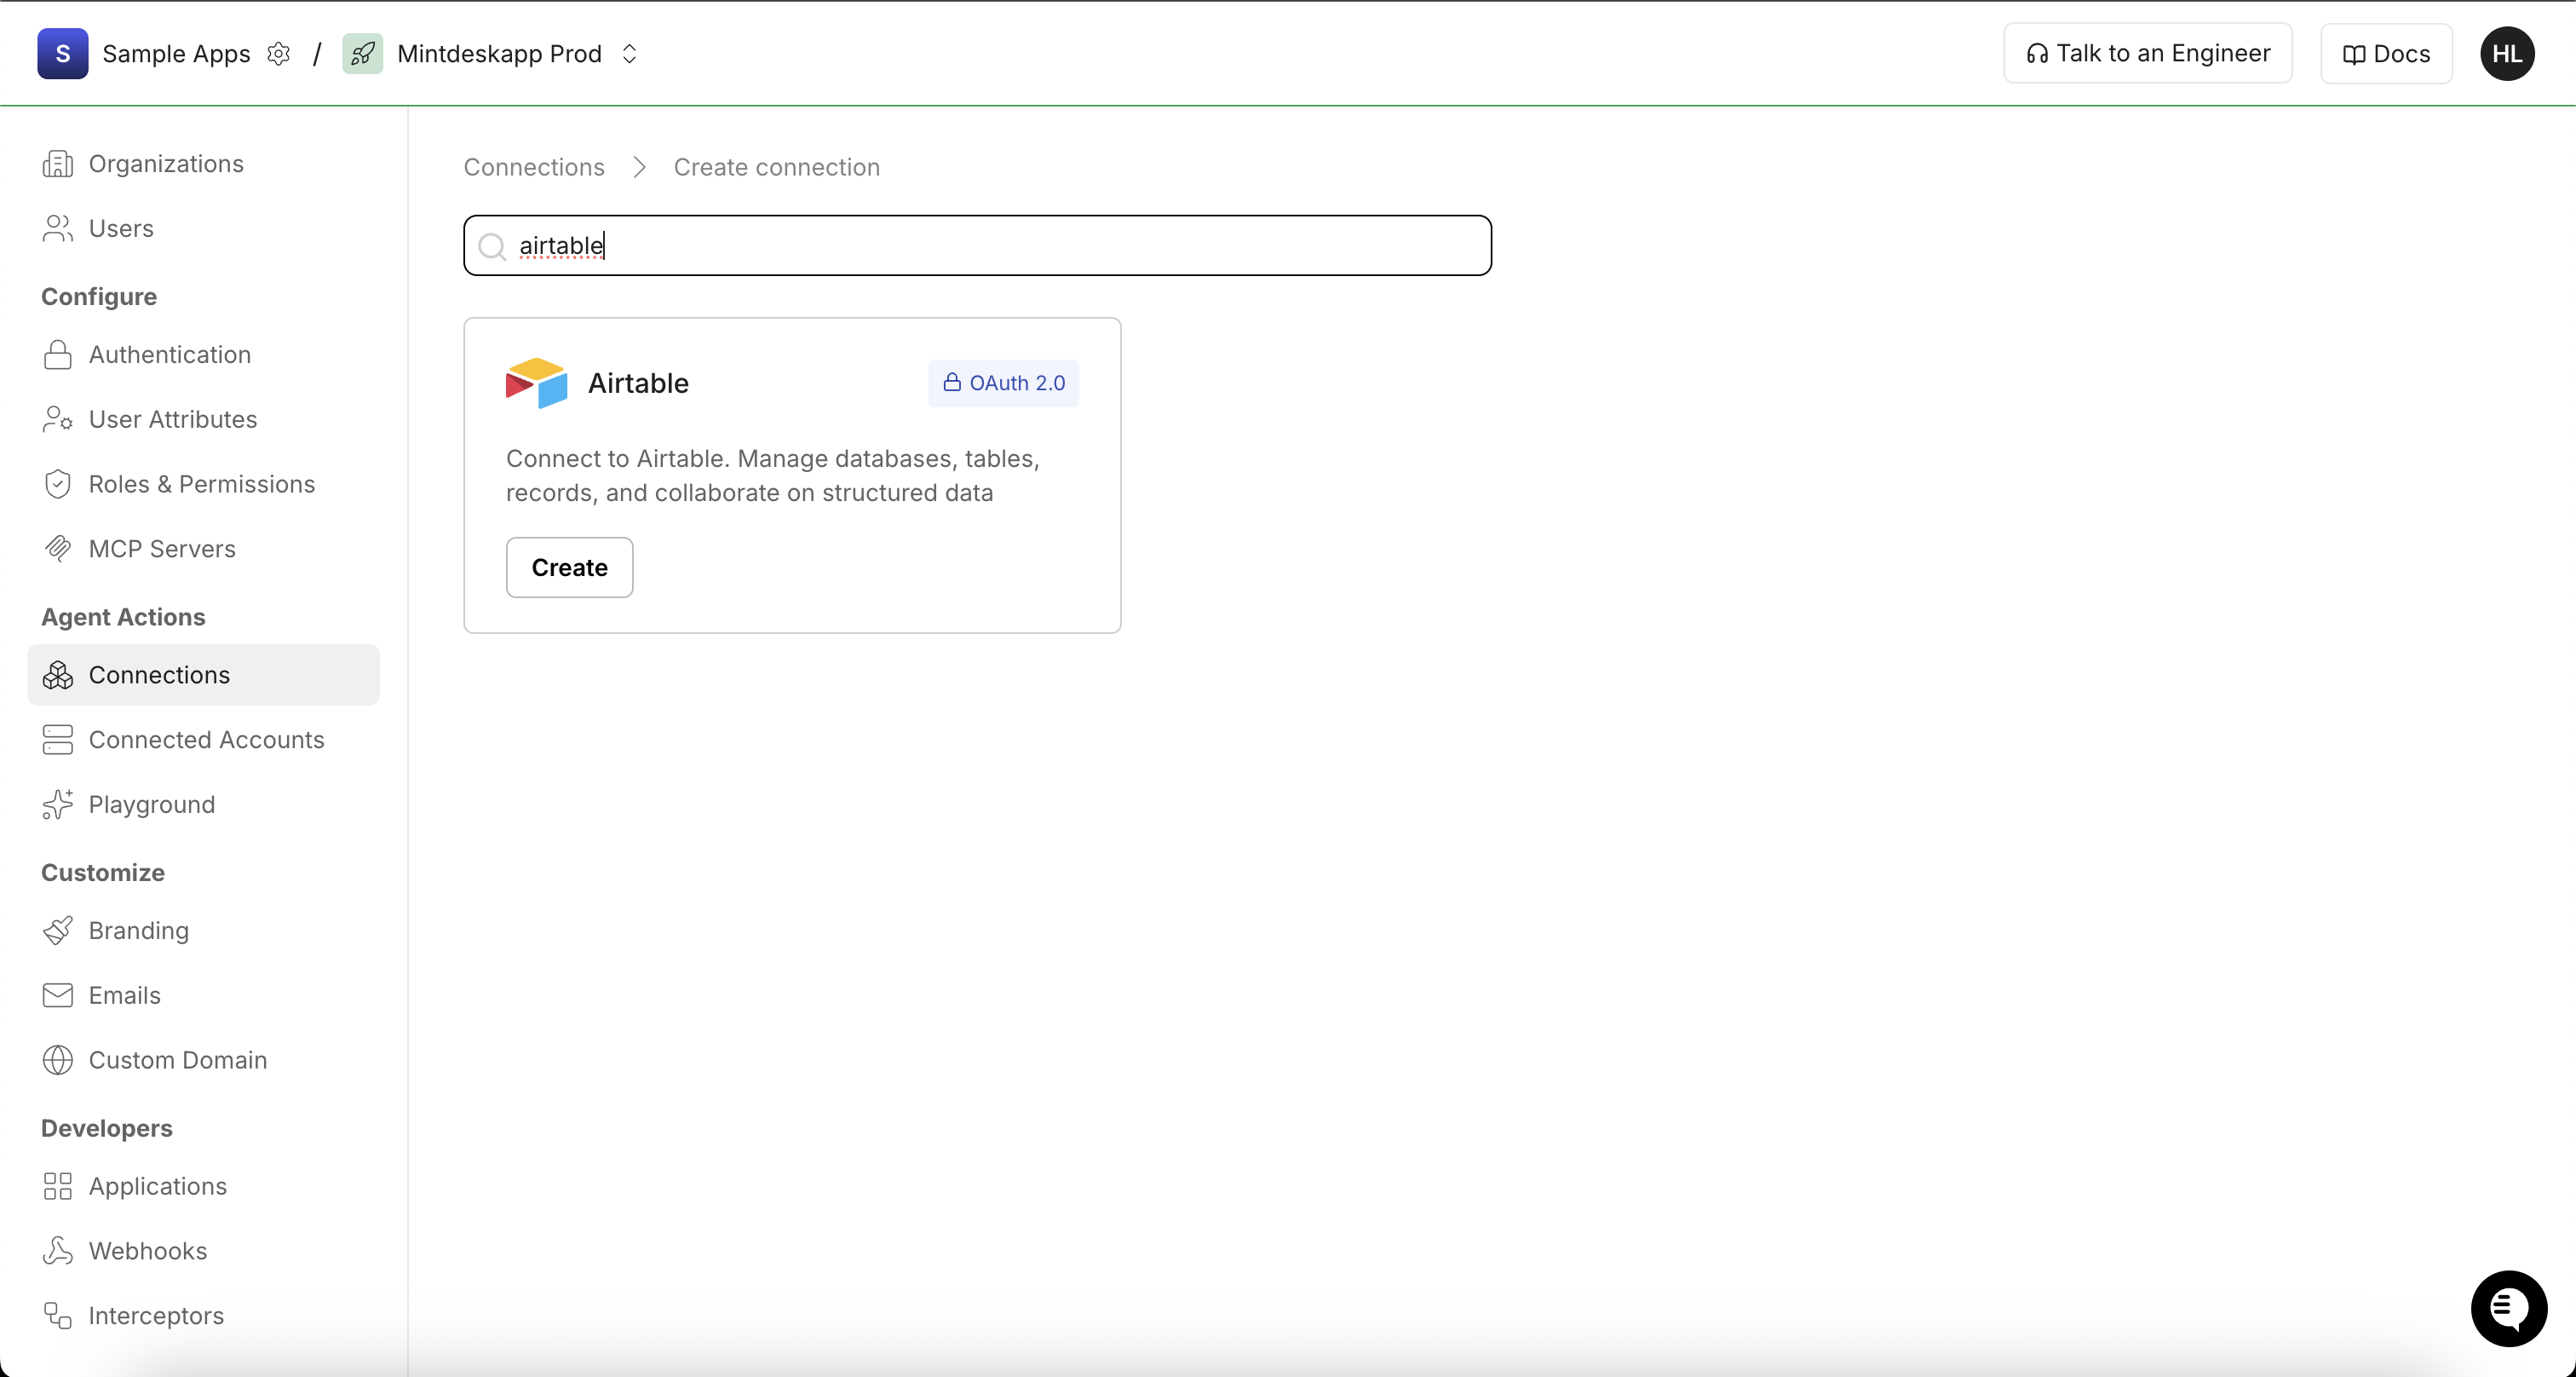
In Scalekit dashboard, go to AgentKit > Connections > Create Connection. Search for Airtable and click Create.
-
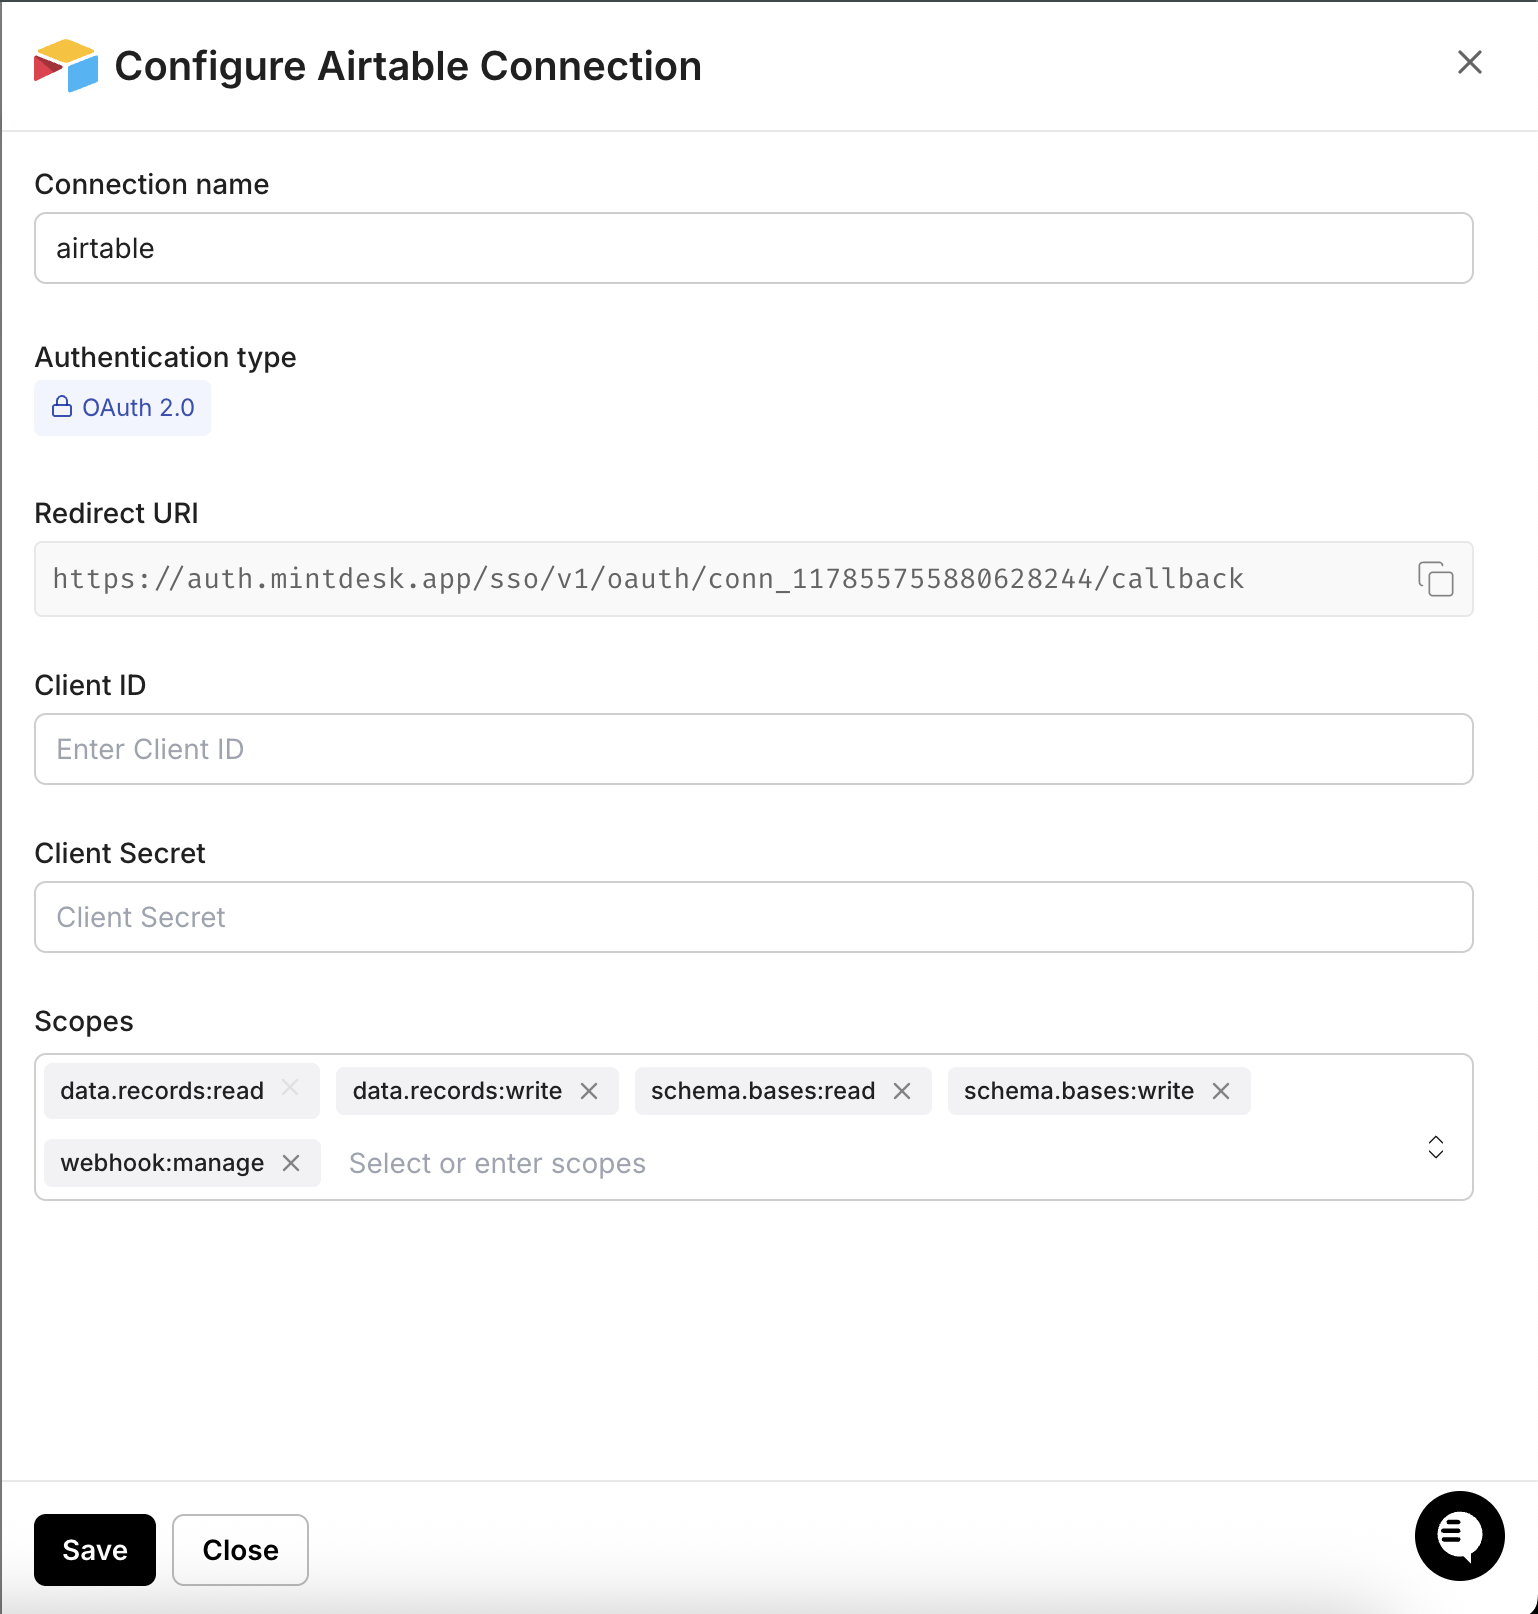
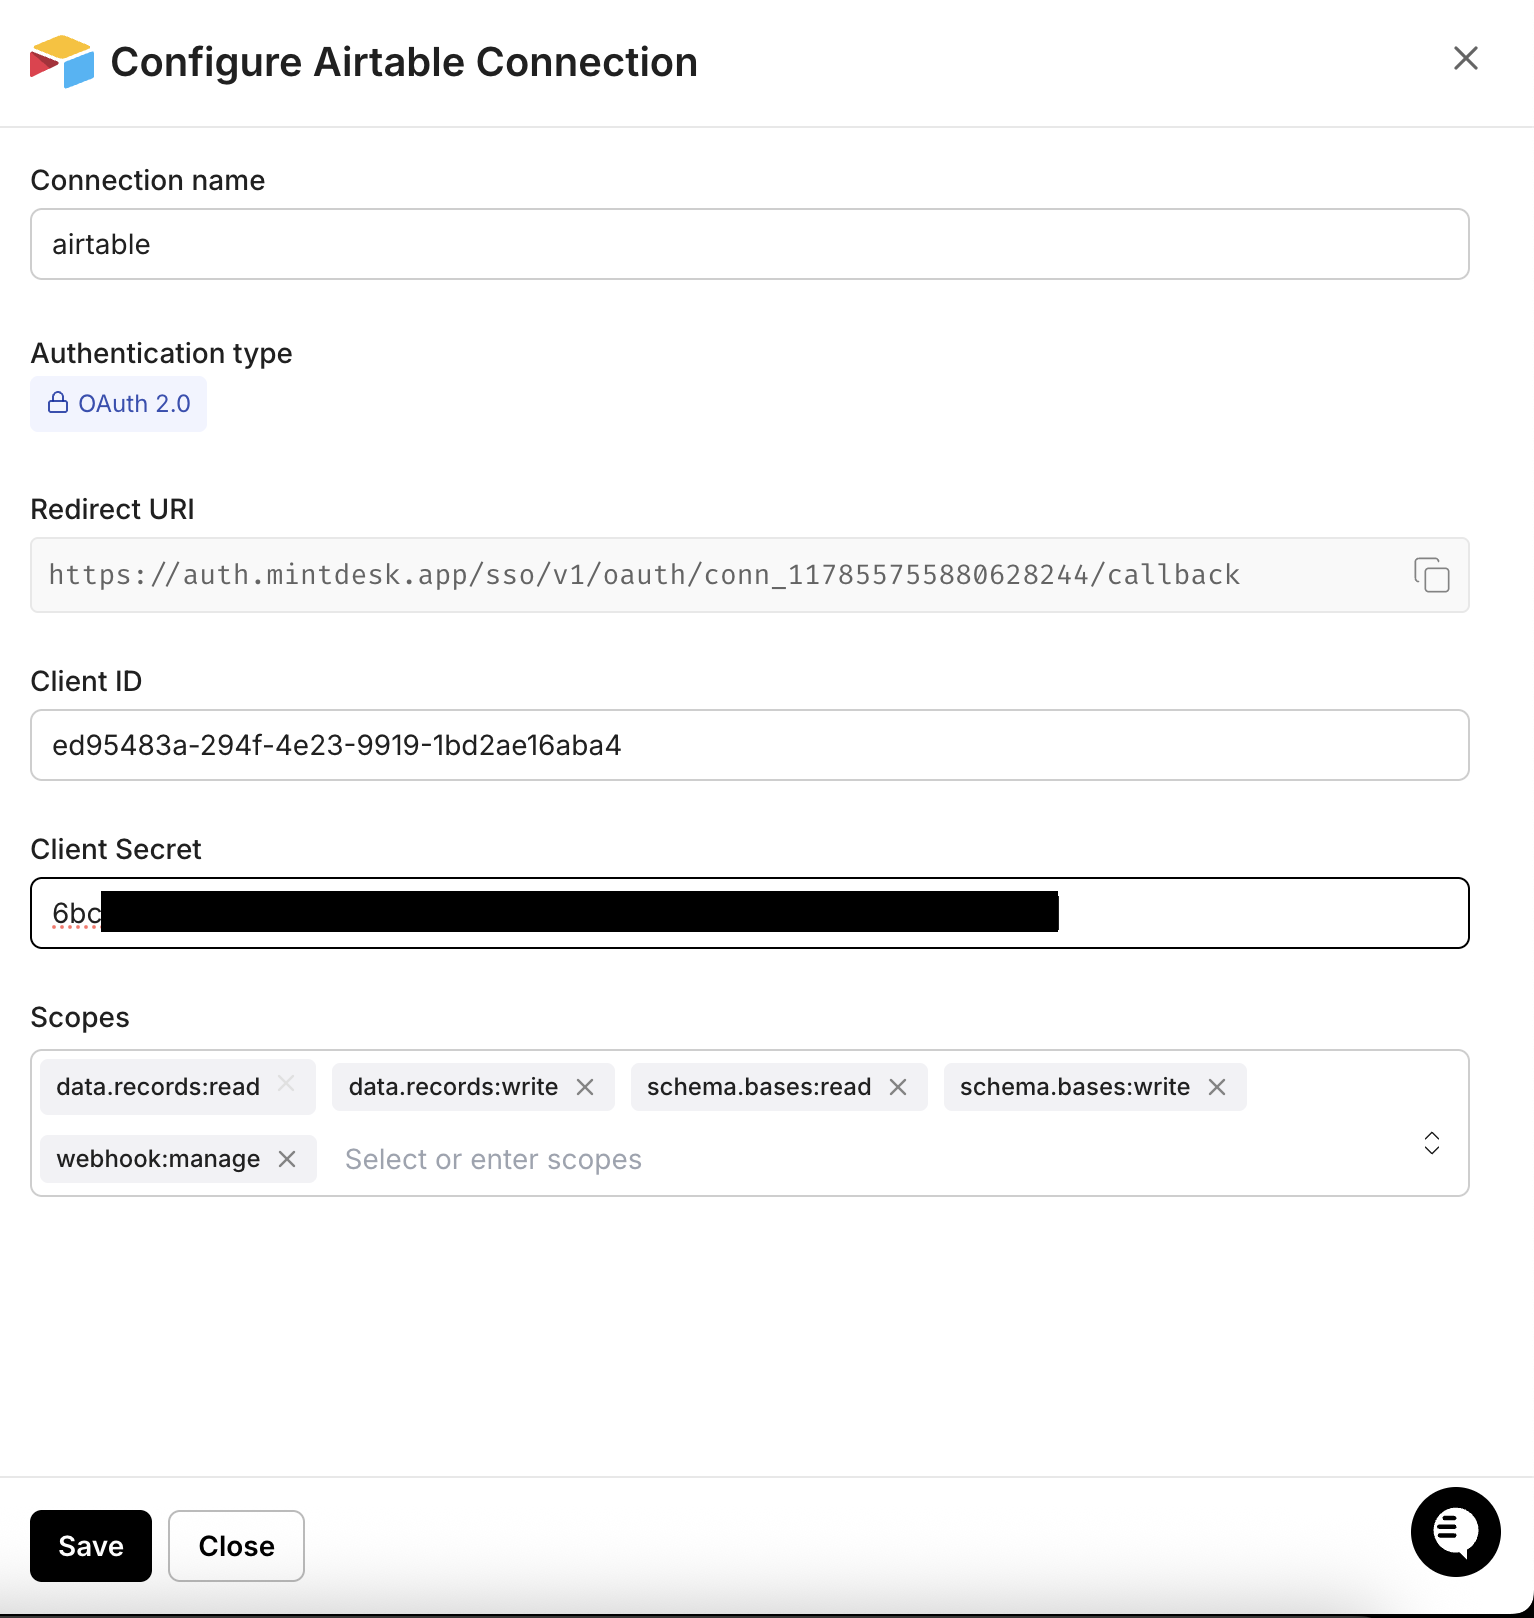
In the Configure Airtable Connection dialog, copy the Redirect URI. You will need this when registering your OAuth integration in Airtable.
-
-
Register an OAuth integration in Airtable
-
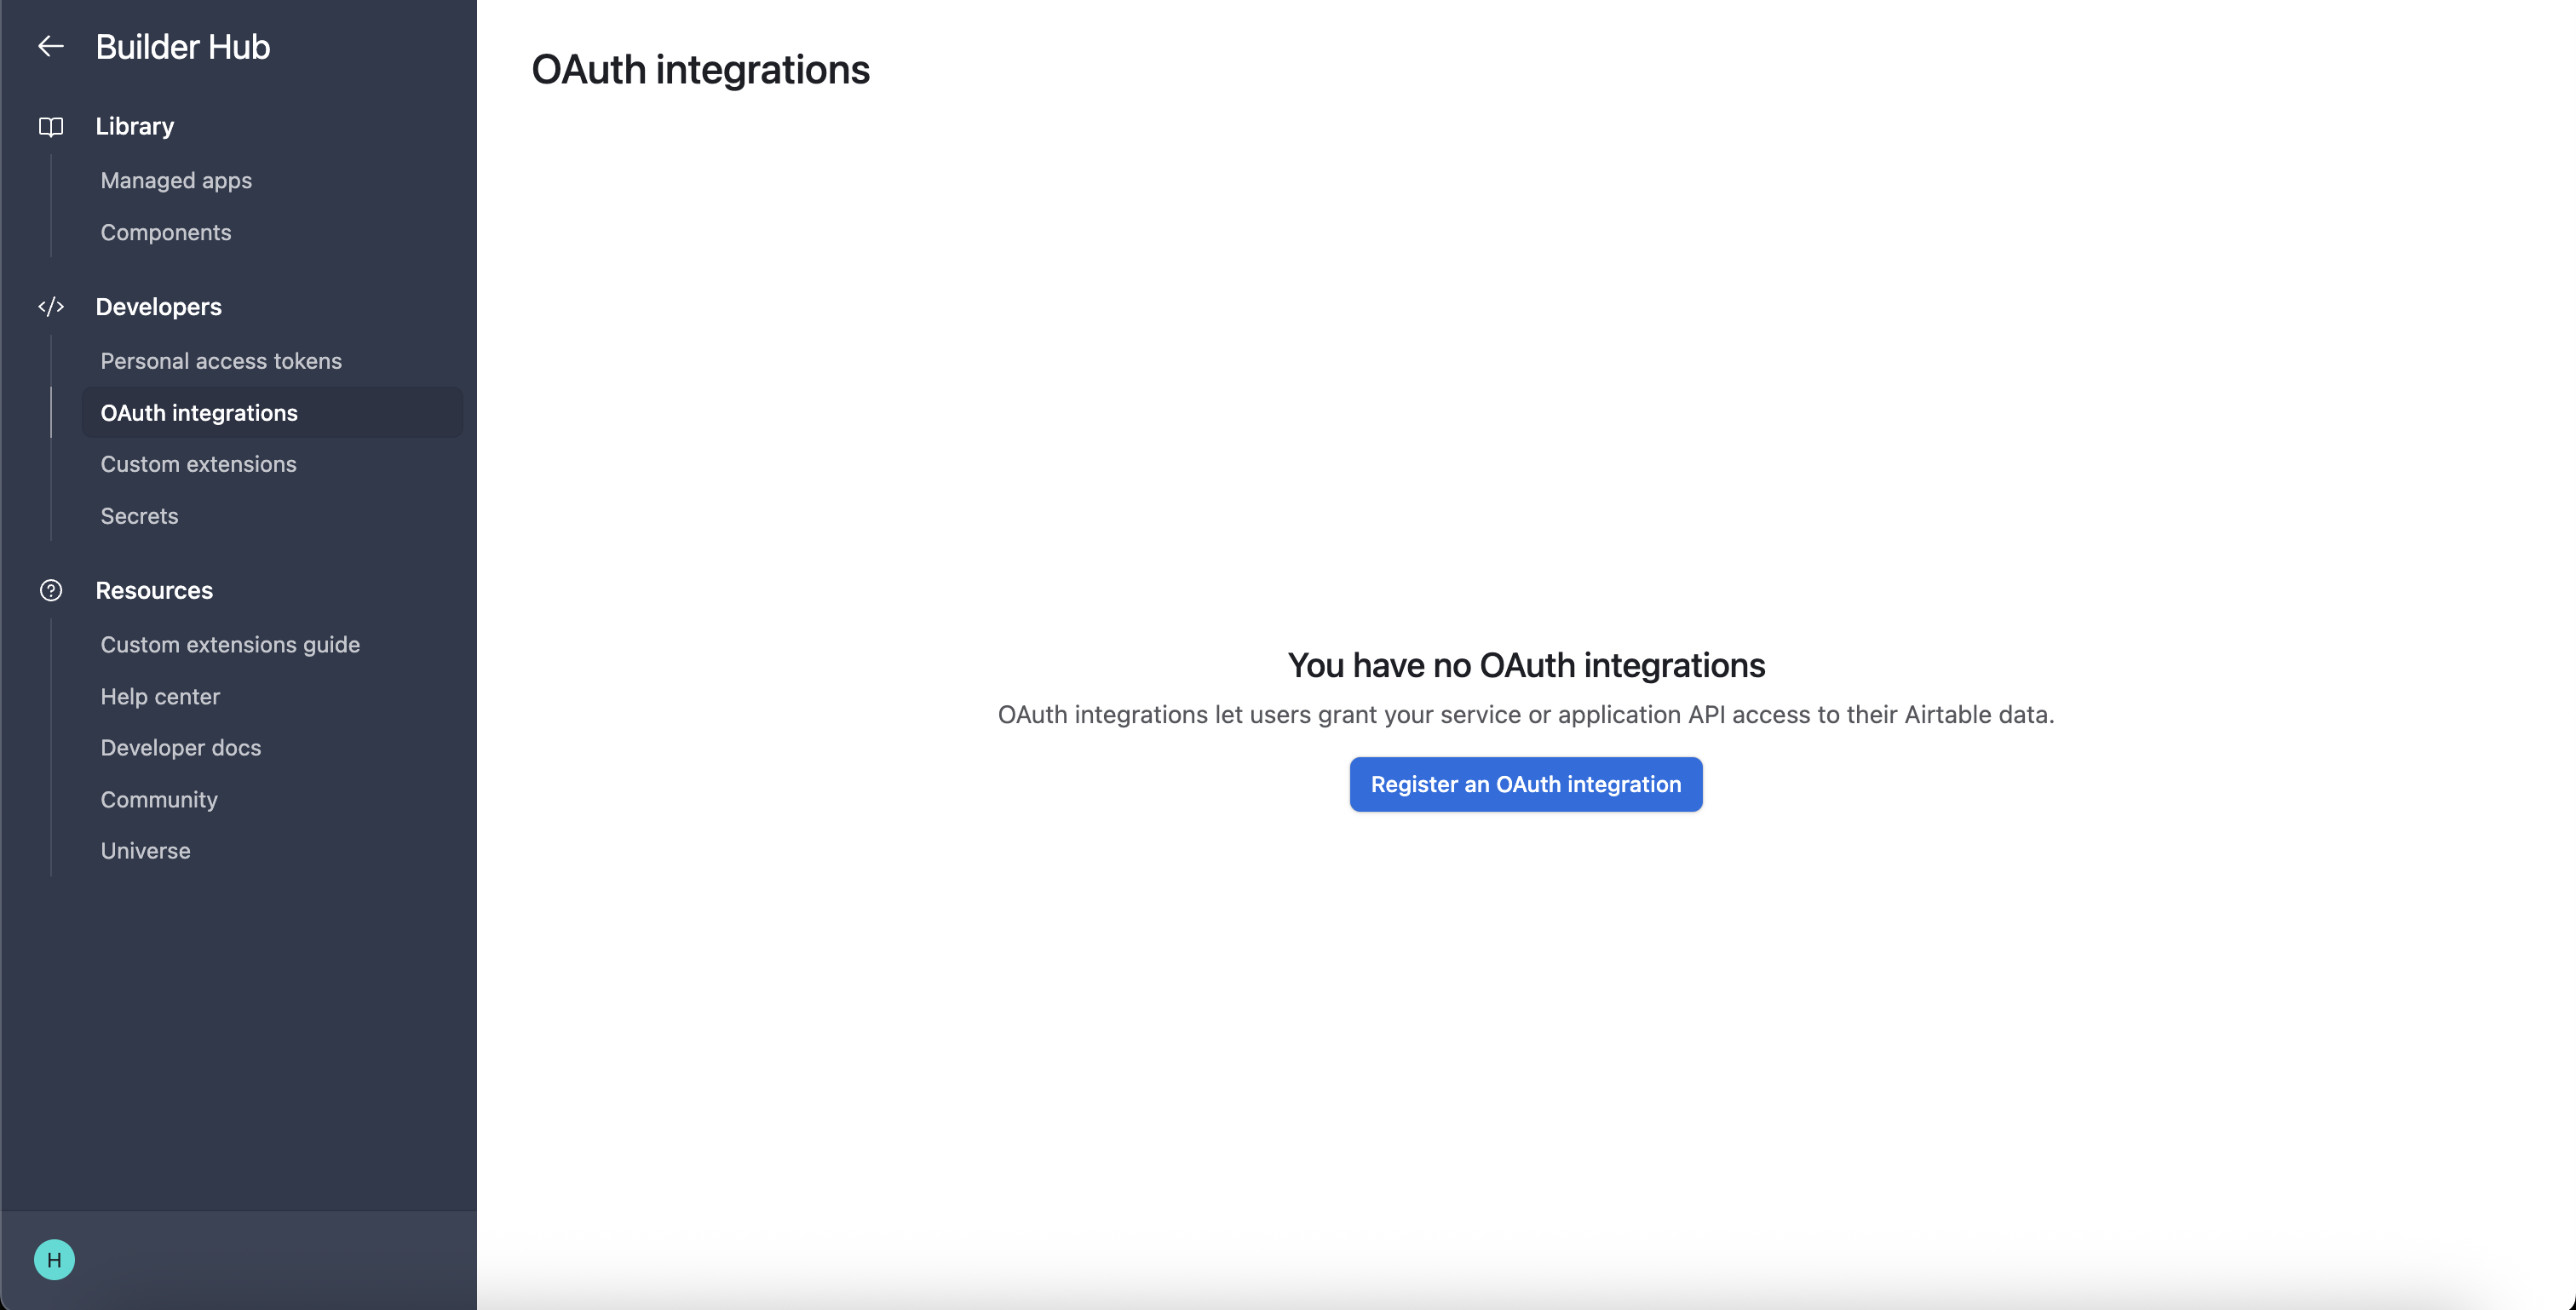
Go to the Airtable Builder Hub and navigate to OAuth integrations. Click Register an OAuth integration.
-
Fill in your integration details (name, description, and other required fields).
-
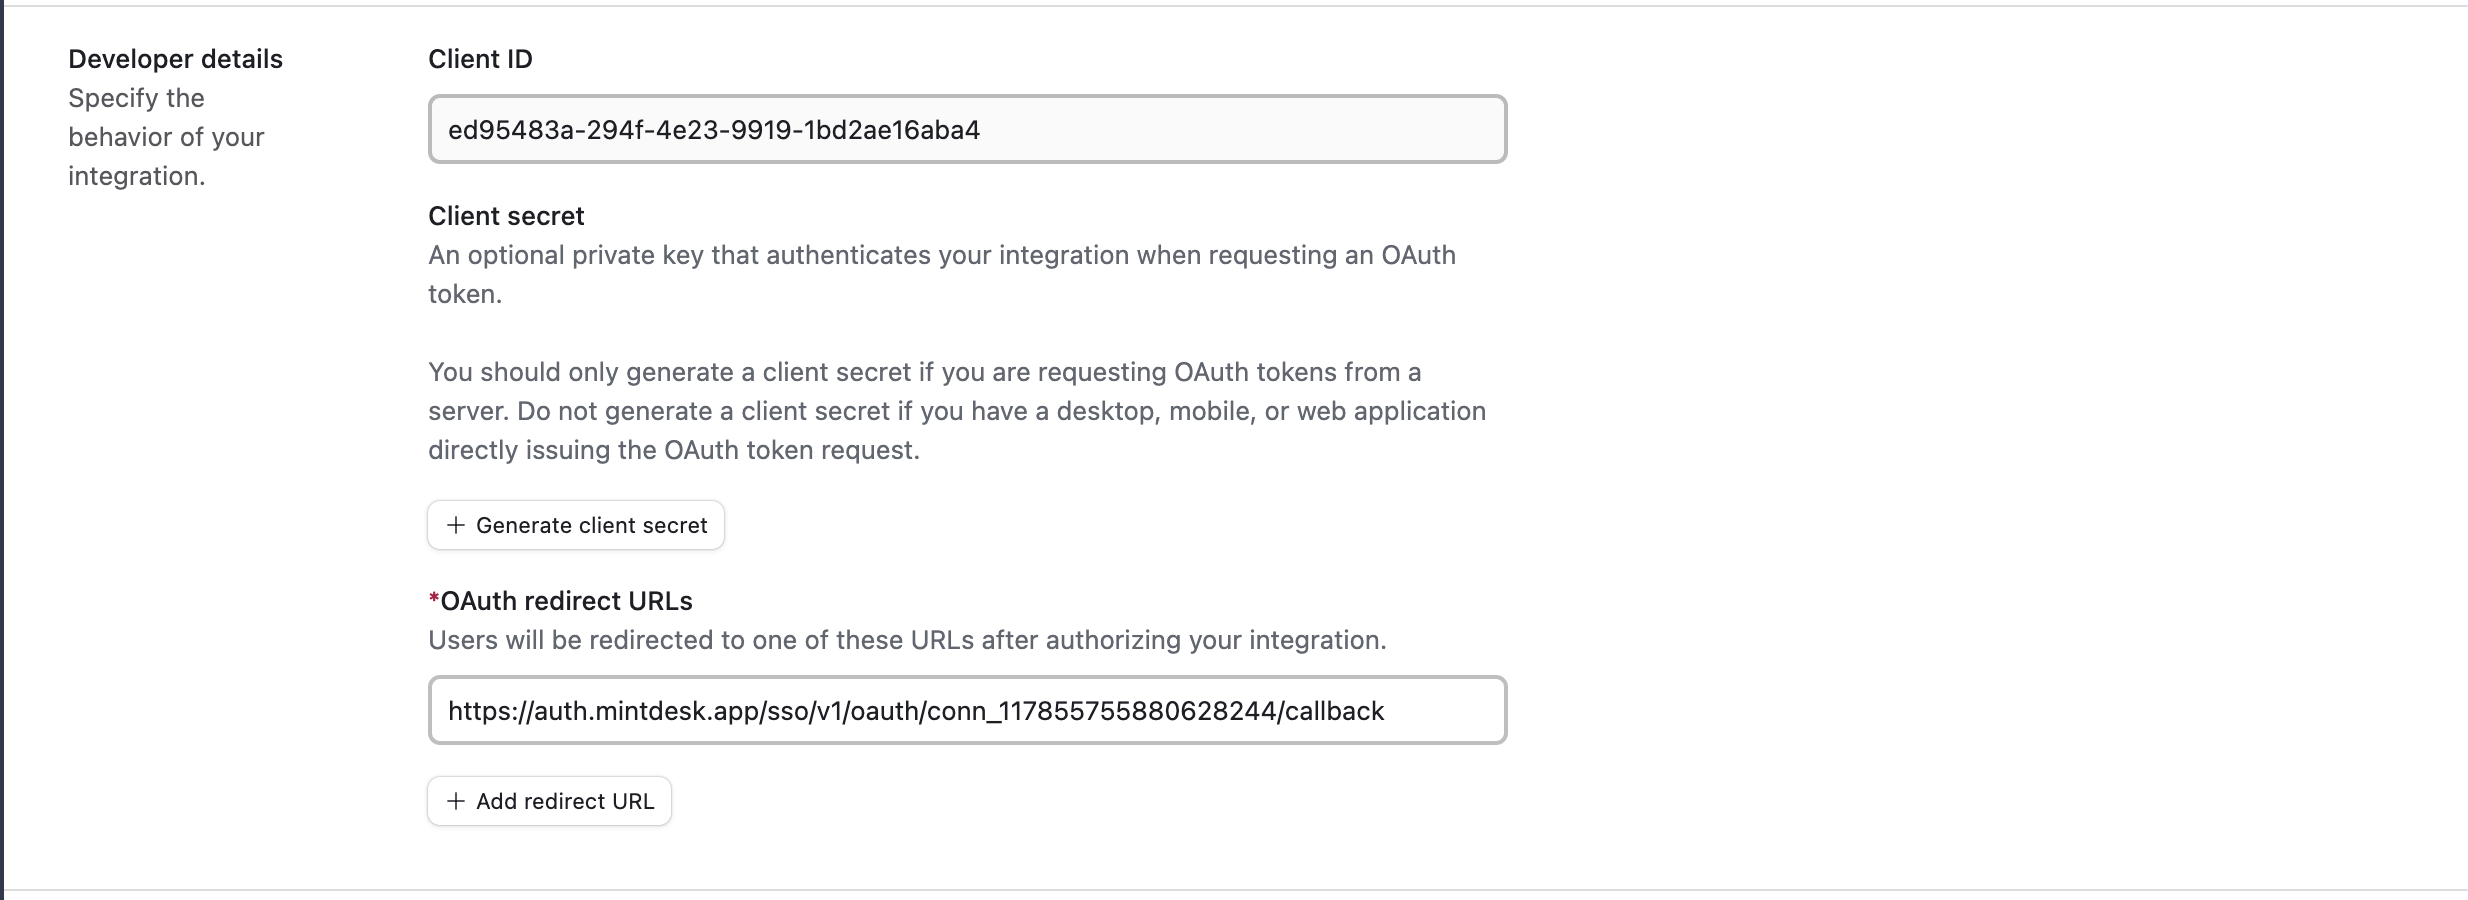
Under OAuth redirect URLs, paste the redirect URI you copied from the Scalekit dashboard.
-
-
Get your client credentials
-
On your OAuth integration page in the Airtable Builder Hub, find the Developer details section.
-
Copy the Client ID.
-
Click Generate client secret and copy the secret value immediately.
-
-
Add credentials in Scalekit
-
In Scalekit dashboard, go to AgentKit > Connections and open the Airtable connection you created.
-
Enter your credentials:
- Client ID — from the Airtable developer details
- Client Secret — the generated secret from Airtable
- Scopes — select the permissions your app needs (for example,
data.records:read,data.records:write,schema.bases:read,schema.bases:write,webhook.manage). See Airtable OAuth scopes reference for the full list.
-
Click Save.
-
-
-
Authorize and make your first call
Section titled “Authorize and make your first call”quickstart.ts import { ScalekitClient } from '@scalekit-sdk/node'import 'dotenv/config'const scalekit = new ScalekitClient(process.env.SCALEKIT_ENV_URL,process.env.SCALEKIT_CLIENT_ID,process.env.SCALEKIT_CLIENT_SECRET,)const actions = scalekit.actionsconst connector = 'airtable'const identifier = 'user_123'// Generate an authorization link for the userconst { link } = await actions.getAuthorizationLink({ connectionName: connector, identifier })console.log('Authorize Airtable:', link)process.stdout.write('Press Enter after authorizing...')await new Promise(r => process.stdin.once('data', r))// Make your first callconst result = await actions.executeTool({connector,identifier,toolName: 'airtable_list_bases',toolInput: {},})console.log(result)quickstart.py import osfrom scalekit.client import ScalekitClientfrom dotenv import load_dotenvload_dotenv()scalekit_client = ScalekitClient(env_url=os.getenv("SCALEKIT_ENV_URL"),client_id=os.getenv("SCALEKIT_CLIENT_ID"),client_secret=os.getenv("SCALEKIT_CLIENT_SECRET"),)actions = scalekit_client.actionsconnection_name = "airtable"identifier = "user_123"# Generate an authorization link for the userlink_response = actions.get_authorization_link(connection_name=connection_name,identifier=identifier,)print("Authorize Airtable:", link_response.link)input("Press Enter after authorizing...")# Make your first callresult = actions.execute_tool(tool_input={},tool_name="airtable_list_bases",connection_name=connection_name,identifier=identifier,)print(result)
What you can do
Section titled “What you can do”Connect this agent connector to let your agent:
- Update table, records, field — Update a table’s name or description in an Airtable base
- Webhook refresh — Refresh an Airtable webhook to extend its expiration time
- List webhooks, webhook payloads, records — List all webhooks configured for an Airtable base
- Get record, base schema — Retrieve a single record from an Airtable table by its record ID
- Delete webhook, records, record — Delete an Airtable webhook
- Create webhook, table, records — Create a new webhook for an Airtable base to receive real-time notifications when data changes
Common workflows
Section titled “Common workflows”Proxy API call
const result = await actions.request({ connectionName: 'airtable', identifier: 'user_123', path: '/v0/meta/whoami', method: 'GET',});console.log(result);result = actions.request( connection_name='airtable', identifier='user_123', path="/v0/meta/whoami", method="GET",)print(result)Execute a tool
const result = await actions.executeTool({ connector: 'airtable', identifier: 'user_123', toolName: 'airtable_list', toolInput: {},});console.log(result);result = actions.execute_tool( connection_name='airtable', identifier='user_123', tool_name='airtable_list', tool_input={},)print(result)Tool list
Section titled “Tool list”Use the exact tool names from the Tool list below when you call execute_tool. If you’re not sure which name to use, list the tools available for the current user first.
airtable_create_comment#Add a comment to an Airtable record. Optionally specify a parentCommentId to reply in an existing thread. You can mention users with @[userId] syntax in the text. Requires the data.recordComments:write scope.5 params
Add a comment to an Airtable record. Optionally specify a parentCommentId to reply in an existing thread. You can mention users with @[userId] syntax in the text. Requires the data.recordComments:write scope.
base_idstringrequiredThe ID of the Airtable base containing the table. Found in the base URL: airtable.com/{base_id}/...record_idstringrequiredThe unique ID of the record to comment on. Record IDs start with 'rec', e.g. recXXXXXXXXXXXXXX.table_id_or_namestringrequiredThe ID or name of the table containing the record. Table IDs start with 'tbl'; names are the display name of the table.textstringrequiredThe text content of the comment. Supports @[userId] syntax to mention users. Example: 'Please review this record @[usrXXXXXXXXXXXXXX]'.parentCommentIdstringoptionalThe ID of an existing comment to reply to, creating a threaded reply. Comment IDs start with 'com'. Omit to create a top-level comment.airtable_create_field#Create a new field (column) in an Airtable table. Specify the field name, type, and type-specific options. Common types include: singleLineText, multilineText, number, checkbox, singleSelect, multipleSelect, date, email, url, phoneNumber, currency, percent, duration, rating, formula, rollup, count, lookup, multipleRecordLinks, attachment. Requires schema.bases:write scope.6 params
Create a new field (column) in an Airtable table. Specify the field name, type, and type-specific options. Common types include: singleLineText, multilineText, number, checkbox, singleSelect, multipleSelect, date, email, url, phoneNumber, currency, percent, duration, rating, formula, rollup, count, lookup, multipleRecordLinks, attachment. Requires schema.bases:write scope.
base_idstringrequiredThe ID of the Airtable base containing the target table. Found in the base URL: airtable.com/{base_id}/... — always starts with 'app'.namestringrequiredThe display name for the new field. Must be unique within the table.table_idstringrequiredThe ID of the table to add the field to. Table IDs start with 'tbl'.typestringrequiredThe field type. Common values: singleLineText, multilineText, number, checkbox, singleSelect, multipleSelect, date, email, url, phoneNumber, currency, percent, duration, rating, formula, rollup, count, lookup, multipleRecordLinks, attachment.descriptionstringoptionalOptional description for the field, shown in the Airtable UI as field help text.optionsobjectoptionalType-specific field configuration object. For singleSelect/multipleSelect, provide {"choices": [{"name": "Option A"}, {"name": "Option B"}]}. For number, provide {"precision": 2}. For currency, provide {"precision": 2, "symbol": "$"}. For formula, provide {"formula": "UPPER({Name)"}. Refer to Airtable field options docs for each type.airtable_create_records#Create one or more records in an Airtable table. Provide an array of record objects, each with a 'fields' object mapping field names (or IDs) to values. Up to 10 records can be created in a single request. Returns the created records with their assigned IDs.5 params
Create one or more records in an Airtable table. Provide an array of record objects, each with a 'fields' object mapping field names (or IDs) to values. Up to 10 records can be created in a single request. Returns the created records with their assigned IDs.
base_idstringrequiredThe ID of the Airtable base containing the table. Found in the base URL: airtable.com/{base_id}/...recordsarrayrequiredArray of record objects to create, each containing a 'fields' object mapping field names or IDs to values. Up to 10 records per request. Example: [{"fields": {"Name": "Alice", "Status": "Active"}}]table_id_or_namestringrequiredThe ID or name of the table to create records in. Table IDs start with 'tbl'; names are the display name.returnFieldsByFieldIdbooleanoptionalIf true, field keys in the response will be field IDs (e.g. fldXXXXXXXXXXXXXX) instead of field names.typecastbooleanoptionalIf true, Airtable will attempt to auto-convert string values to the appropriate field type (e.g. '2025-01-15' to a date field). Useful when passing data from external sources.airtable_create_table#Create a new table in an Airtable base. Specify the table name and initial field definitions. The first field in the fields array becomes the primary field. Requires schema.bases:write scope.4 params
Create a new table in an Airtable base. Specify the table name and initial field definitions. The first field in the fields array becomes the primary field. Requires schema.bases:write scope.
base_idstringrequiredThe ID of the Airtable base where the new table will be created. Found in the base URL: airtable.com/{base_id}/... — always starts with 'app'.fieldsarrayrequiredArray of field definitions to create in the table. Each field must have at minimum a 'name' and 'type'. The first field becomes the primary field. Example: [{"name": "Name", "type": "singleLineText"}, {"name": "Status", "type": "singleSelect", "options": {"choices": [{"name": "Active"}, {"name": "Done"}]}}]namestringrequiredThe name for the new table. Must be unique within the base.descriptionstringoptionalOptional description for the new table. Maximum 20000 characters.airtable_create_webhook#Create a new webhook for an Airtable base to receive real-time notifications when data changes. Provide an HTTPS notification URL and optionally specify event filters (dataTypes, changeTypes, table/field scope). Returns the webhook ID, expiration time, and MAC secret for payload verification. Requires the webhook:manage scope.3 params
Create a new webhook for an Airtable base to receive real-time notifications when data changes. Provide an HTTPS notification URL and optionally specify event filters (dataTypes, changeTypes, table/field scope). Returns the webhook ID, expiration time, and MAC secret for payload verification. Requires the webhook:manage scope.
base_idstringrequiredThe ID of the Airtable base to create the webhook for. Found in the base URL: airtable.com/{base_id}/...notificationUrlstringrequiredThe HTTPS URL that Airtable will send webhook POST requests to when changes occur. Must be a publicly accessible HTTPS endpoint.specificationobjectoptionalOptional webhook specification object to filter which events trigger notifications. Shape: {options: {filters?: {fromSources?, dataTypes?, changeTypes?, watchDataInFieldIds?, watchSchemasOfFieldIds?, watchDataInTableIds?, watchSchemasOfTableIds?, recordChangeScope?}}}. Omit to receive all events.airtable_delete_comment#Delete a comment from an Airtable record. API users can only delete comments they created. Enterprise Admins can delete any comment. Requires the data.recordComments:write scope.4 params
Delete a comment from an Airtable record. API users can only delete comments they created. Enterprise Admins can delete any comment. Requires the data.recordComments:write scope.
base_idstringrequiredThe ID of the Airtable base containing the table. Found in the base URL: airtable.com/{base_id}/...comment_idstringrequiredThe unique ID of the comment to delete. Comment IDs start with 'com', e.g. comXXXXXXXXXXXXXX.record_idstringrequiredThe unique ID of the record containing the comment to delete. Record IDs start with 'rec', e.g. recXXXXXXXXXXXXXX.table_id_or_namestringrequiredThe ID or name of the table containing the record. Table IDs start with 'tbl'; names are the display name of the table.airtable_delete_record#Delete a single record from an Airtable table by its record ID. This action is permanent and cannot be undone — the record and all its field data will be removed from the table.3 params
Delete a single record from an Airtable table by its record ID. This action is permanent and cannot be undone — the record and all its field data will be removed from the table.
base_idstringrequiredThe ID of the Airtable base containing the table. Found in the base URL: airtable.com/{base_id}/...record_idstringrequiredThe unique ID of the record to delete. Record IDs start with 'rec', e.g. recXXXXXXXXXXXXXX. Deletion is permanent and cannot be undone.table_id_or_namestringrequiredThe ID or name of the table containing the record to delete. Table IDs start with 'tbl'; names are the display name.airtable_delete_records#Delete multiple records from an Airtable table in a single request. Provide up to 10 record IDs to delete. Each record ID must start with 'rec' (e.g. recABCDEFGHIJKLMN). Returns a list of deleted record IDs with confirmed deletion status.3 params
Delete multiple records from an Airtable table in a single request. Provide up to 10 record IDs to delete. Each record ID must start with 'rec' (e.g. recABCDEFGHIJKLMN). Returns a list of deleted record IDs with confirmed deletion status.
base_idstringrequiredThe ID of the Airtable base containing the table. Found in the base URL: airtable.com/{base_id}/...recordsarrayrequiredArray of record IDs to delete. Each ID must start with 'rec'. Maximum 10 records per request. Example: ["recABCDEFGHIJKLMN", "recXXXXXXXXXXXXXX"].table_id_or_namestringrequiredThe ID or name of the table from which records will be deleted. Table IDs start with 'tbl'; names are the display name of the table.airtable_delete_webhook#Delete an Airtable webhook. This permanently stops all future notifications from this webhook. Requires the webhook:manage scope.2 params
Delete an Airtable webhook. This permanently stops all future notifications from this webhook. Requires the webhook:manage scope.
base_idstringrequiredThe ID of the Airtable base containing the webhook. Found in the base URL: airtable.com/{base_id}/...webhook_idstringrequiredThe unique ID of the webhook to delete. Webhook IDs can be retrieved from the List Webhooks tool.airtable_get_base_schema#Retrieve the full schema of an Airtable base, including all tables, fields, views, and field options. Useful for discovering the structure of a base before reading or writing records. Requires schema.bases:read scope.2 params
Retrieve the full schema of an Airtable base, including all tables, fields, views, and field options. Useful for discovering the structure of a base before reading or writing records. Requires schema.bases:read scope.
base_idstringrequiredThe ID of the Airtable base to retrieve the schema for. Found in the base URL: airtable.com/{base_id}/... — always starts with 'app'.includearrayoptionalOptional array of additional data to include. Pass ["visibleFieldIds"] to include visible field IDs for each grid view in the schema response.airtable_get_record#Retrieve a single record from an Airtable table by its record ID. Returns the record's field values along with its ID and creation timestamp.6 params
Retrieve a single record from an Airtable table by its record ID. Returns the record's field values along with its ID and creation timestamp.
base_idstringrequiredThe ID of the Airtable base containing the table. Found in the base URL: airtable.com/{base_id}/...record_idstringrequiredThe unique ID of the record to retrieve. Record IDs start with 'rec', e.g. recXXXXXXXXXXXXXX.table_id_or_namestringrequiredThe ID or name of the table containing the record. Table IDs start with 'tbl'; names are the display name.cellFormatstringoptionalFormat for cell values. 'json' (default) returns structured objects; 'string' returns all values as strings. When using 'string', you must also provide timeZone and userLocale.includeDateDependencyMetadatabooleanoptionalIf true, includes additional metadata about date dependency fields in the response.returnFieldsByFieldIdbooleanoptionalIf true, field keys in the response will be field IDs (e.g. fldXXXXXXXXXXXXXX) instead of field names.airtable_list_bases#List all Airtable bases accessible to the authenticated user. Returns base IDs, names, and permission levels. Supports pagination via offset token when there are more bases than returned in a single response.1 param
List all Airtable bases accessible to the authenticated user. Returns base IDs, names, and permission levels. Supports pagination via offset token when there are more bases than returned in a single response.
offsetstringoptionalPagination token returned from a previous list bases response. Pass this value to retrieve the next page of bases.airtable_list_comments#List all comments on a specific Airtable record, ordered from newest to oldest. Supports pagination via pageSize and offset. Returns comment text, author details, timestamps, and threading information.5 params
List all comments on a specific Airtable record, ordered from newest to oldest. Supports pagination via pageSize and offset. Returns comment text, author details, timestamps, and threading information.
base_idstringrequiredThe ID of the Airtable base containing the table. Found in the base URL: airtable.com/{base_id}/...record_idstringrequiredThe unique ID of the record whose comments to list. Record IDs start with 'rec', e.g. recXXXXXXXXXXXXXX.table_id_or_namestringrequiredThe ID or name of the table containing the record. Table IDs start with 'tbl'; names are the display name of the table.offsetstringoptionalPagination offset token returned from a previous list comments response. Pass this value to retrieve the next page of comments.pageSizenumberoptionalNumber of comments to return per page. Maximum is 100. If not specified, Airtable defaults to returning all comments.airtable_list_records#List and query records from an Airtable table. Supports filtering by formula, sorting, pagination, field selection, and view scoping. Returns an array of records with their field values, and an offset token for fetching subsequent pages.12 params
List and query records from an Airtable table. Supports filtering by formula, sorting, pagination, field selection, and view scoping. Returns an array of records with their field values, and an offset token for fetching subsequent pages.
base_idstringrequiredThe ID of the Airtable base containing the table. Found in the base URL: airtable.com/{base_id}/...table_id_or_namestringrequiredThe ID or name of the table to list records from. Table IDs start with 'tbl'; names are the display name of the table.cellFormatstringoptionalFormat for cell values. 'json' (default) returns structured objects; 'string' returns all values as strings. When using 'string', you must also provide timeZone and userLocale.fieldsarrayoptionalArray of field names or IDs to include in the response. If omitted, all fields are returned. Example: ["Name", "Status", "fldXXXXXXXXXXXXXX"]filterByFormulastringoptionalAn Airtable formula to filter records. Only records where this formula evaluates to true will be returned. Example: {Status}='Active'maxRecordsnumberoptionalMaximum total number of records to return across all pages. Useful for capping large result sets.offsetstringoptionalPagination offset token returned from a previous list request. Pass this value to retrieve the next page of records.pageSizenumberoptionalNumber of records to return per page. Maximum is 100. If not specified, Airtable defaults to 100.returnFieldsByFieldIdbooleanoptionalIf true, field keys in the response will be field IDs (e.g. fldXXXXXXXXXXXXXX) instead of field names. Useful for fields with special characters or to avoid name-collision issues.timeZonestringoptionalIANA time zone identifier to use when cellFormat is 'string'. Required when cellFormat='string'. Example: 'America/New_York'.userLocalestringoptionalUser locale for date/time formatting when cellFormat is 'string'. Required when cellFormat='string'. Example: 'en-us'.viewstringoptionalThe name or ID of a view to scope results to. Records outside the view's filter and sort will be excluded.airtable_list_webhook_payloads#Retrieve past webhook payloads for an Airtable webhook. Useful for inspecting which changes triggered notifications and for cursor-based pagination through the payload history. Use the cursorForNextPayload value from the List Webhooks response as the cursor. Requires the webhook:manage scope.4 params
Retrieve past webhook payloads for an Airtable webhook. Useful for inspecting which changes triggered notifications and for cursor-based pagination through the payload history. Use the cursorForNextPayload value from the List Webhooks response as the cursor. Requires the webhook:manage scope.
base_idstringrequiredThe ID of the Airtable base containing the webhook. Found in the base URL: airtable.com/{base_id}/...webhook_idstringrequiredThe unique ID of the webhook whose payloads to retrieve. Webhook IDs can be retrieved from the List Webhooks tool.cursornumberoptionalNumeric cursor for pagination. Use the cursorForNextPayload value from the List Webhooks response to retrieve payloads starting from that position.limitnumberoptionalMaximum number of payload records to return per page. Leave blank to use the Airtable API default.airtable_list_webhooks#List all webhooks configured for an Airtable base. Returns webhook IDs, notification URLs, enabled status, expiration times, and event specifications. Requires the webhook:manage scope.1 param
List all webhooks configured for an Airtable base. Returns webhook IDs, notification URLs, enabled status, expiration times, and event specifications. Requires the webhook:manage scope.
base_idstringrequiredThe ID of the Airtable base whose webhooks to list. Found in the base URL: airtable.com/{base_id}/...airtable_refresh_webhook#Refresh an Airtable webhook to extend its expiration time. Webhooks expire after 7 days by default; call this endpoint periodically to keep them active. Returns the new expiration time. Requires the webhook:manage scope.2 params
Refresh an Airtable webhook to extend its expiration time. Webhooks expire after 7 days by default; call this endpoint periodically to keep them active. Returns the new expiration time. Requires the webhook:manage scope.
base_idstringrequiredThe ID of the Airtable base containing the webhook. Found in the base URL: airtable.com/{base_id}/...webhook_idstringrequiredThe unique ID of the webhook to refresh. Webhook IDs can be retrieved from the List Webhooks tool.airtable_update_comment#Update the text of an existing comment on an Airtable record. Only the comment's original author can update it via the API. Requires the data.recordComments:write scope.5 params
Update the text of an existing comment on an Airtable record. Only the comment's original author can update it via the API. Requires the data.recordComments:write scope.
base_idstringrequiredThe ID of the Airtable base containing the table. Found in the base URL: airtable.com/{base_id}/...comment_idstringrequiredThe unique ID of the comment to update. Comment IDs start with 'com', e.g. comXXXXXXXXXXXXXX.record_idstringrequiredThe unique ID of the record containing the comment. Record IDs start with 'rec', e.g. recXXXXXXXXXXXXXX.table_id_or_namestringrequiredThe ID or name of the table containing the record. Table IDs start with 'tbl'; names are the display name of the table.textstringrequiredThe new text content for the comment. Replaces the existing comment text entirely.airtable_update_field#Update a field's name, description, or options in an Airtable table. At least one of name, description, or options must be provided. Note: changing a field's type via update is not supported — create a new field instead. Requires schema.bases:write scope.6 params
Update a field's name, description, or options in an Airtable table. At least one of name, description, or options must be provided. Note: changing a field's type via update is not supported — create a new field instead. Requires schema.bases:write scope.
base_idstringrequiredThe ID of the Airtable base containing the target table. Found in the base URL: airtable.com/{base_id}/... — always starts with 'app'.field_idstringrequiredThe ID of the field to update. Field IDs start with 'fld'. Use airtable_get_base_schema to discover field IDs.table_idstringrequiredThe ID of the table containing the field to update. Table IDs start with 'tbl'.descriptionstringoptionalNew description for the field, shown in the Airtable UI as field help text. At least one of name, description, or options must be provided.namestringoptionalNew display name for the field. Must be unique within the table. At least one of name, description, or options must be provided.optionsobjectoptionalUpdated type-specific field configuration. For singleSelect/multipleSelect, provide {"choices": [{"name": "Option A"}, {"name": "Option B"}]}. For number, provide {"precision": 2}. At least one of name, description, or options must be provided.airtable_update_records#Update one or more existing records in an Airtable table using a merge (PATCH) strategy — only the fields you specify are changed; unspecified fields are left untouched. Provide an array of record objects each with an 'id' and 'fields'. Up to 10 records per request. Optionally enable upsert mode with 'performUpsert' to create records that don't match an existing ID.6 params
Update one or more existing records in an Airtable table using a merge (PATCH) strategy — only the fields you specify are changed; unspecified fields are left untouched. Provide an array of record objects each with an 'id' and 'fields'. Up to 10 records per request. Optionally enable upsert mode with 'performUpsert' to create records that don't match an existing ID.
base_idstringrequiredThe ID of the Airtable base containing the table. Found in the base URL: airtable.com/{base_id}/...recordsarrayrequiredArray of record objects to update. Each must have an 'id' (the record ID starting with 'rec') and a 'fields' object with the fields to update. Up to 10 records per request. Example: [{"id": "recXXXXXXXXXXXXXX", "fields": {"Status": "Done"}}]table_id_or_namestringrequiredThe ID or name of the table containing records to update. Table IDs start with 'tbl'; names are the display name.performUpsertobjectoptionalWhen provided, enables upsert mode. Must be an object with a 'fieldsToMergeOn' array specifying which field names to match on for upsert. Records matching on those fields will be updated; non-matching records will be created. Example: {"fieldsToMergeOn": ["Email"]}returnFieldsByFieldIdbooleanoptionalIf true, field keys in the response will be field IDs (e.g. fldXXXXXXXXXXXXXX) instead of field names.typecastbooleanoptionalIf true, Airtable will attempt to auto-convert string values to the appropriate field type. Useful when passing data from external sources.airtable_update_table#Update a table's name or description in an Airtable base. At least one of name or description must be provided. Requires schema.bases:write scope.4 params
Update a table's name or description in an Airtable base. At least one of name or description must be provided. Requires schema.bases:write scope.
base_idstringrequiredThe ID of the Airtable base containing the table. Found in the base URL: airtable.com/{base_id}/... — always starts with 'app'.table_id_or_namestringrequiredThe ID or name of the table to update. Table IDs start with 'tbl'; names are the display name of the table.descriptionstringoptionalNew description for the table. Maximum 20000 characters. At least one of name or description must be provided.namestringoptionalNew name for the table. Must be unique within the base. At least one of name or description must be provided.