Asana connector
OAuth 2.0Project ManagementCollaborationProductivityConnect to Asana. Manage tasks, projects, teams, and workflow automation
Asana connector
-
Install the SDK
Section titled “Install the SDK”Terminal window npm install @scalekit-sdk/nodeTerminal window pip install scalekit -
Set your credentials
Section titled “Set your credentials”Add your Scalekit credentials to your
.envfile. Find values in app.scalekit.com > Developers > API Credentials..env SCALEKIT_ENVIRONMENT_URL=<your-environment-url>SCALEKIT_CLIENT_ID=<your-client-id>SCALEKIT_CLIENT_SECRET=<your-client-secret> -
Set up the connector
Section titled “Set up the connector”Register your Asana credentials with Scalekit so it handles the token lifecycle. You do this once per environment.
Dashboard setup steps
Register your Scalekit environment with the Asana connector so Scalekit handles the authentication flow and token lifecycle for you. The connection name you create will be used to identify and invoke the connection programmatically. Then complete the configuration in your application as follows:
-
Set up auth redirects
-
In Scalekit dashboard, go to AgentKit > Connections > Create Connection. Find Asana and click Create. Copy the redirect URI. It looks like
https://<SCALEKIT_ENVIRONMENT_URL>/sso/v1/oauth/<CONNECTION_ID>/callback.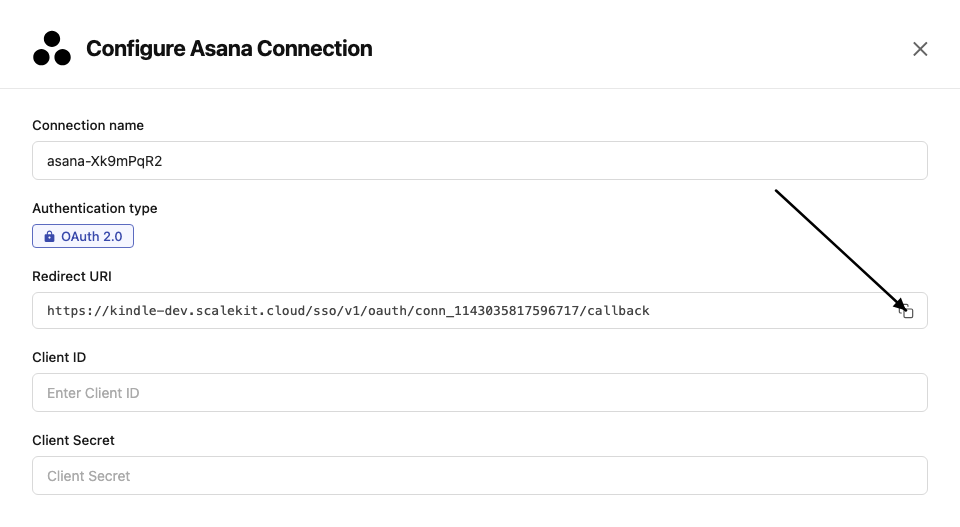
-
Go to Asana Developer Console and click Create new app. Enter an app name.
-
In the left menu, go to OAuth. Under Redirect URLs, click Add redirect URL, paste the redirect URI from Scalekit, and click Add.

-
-
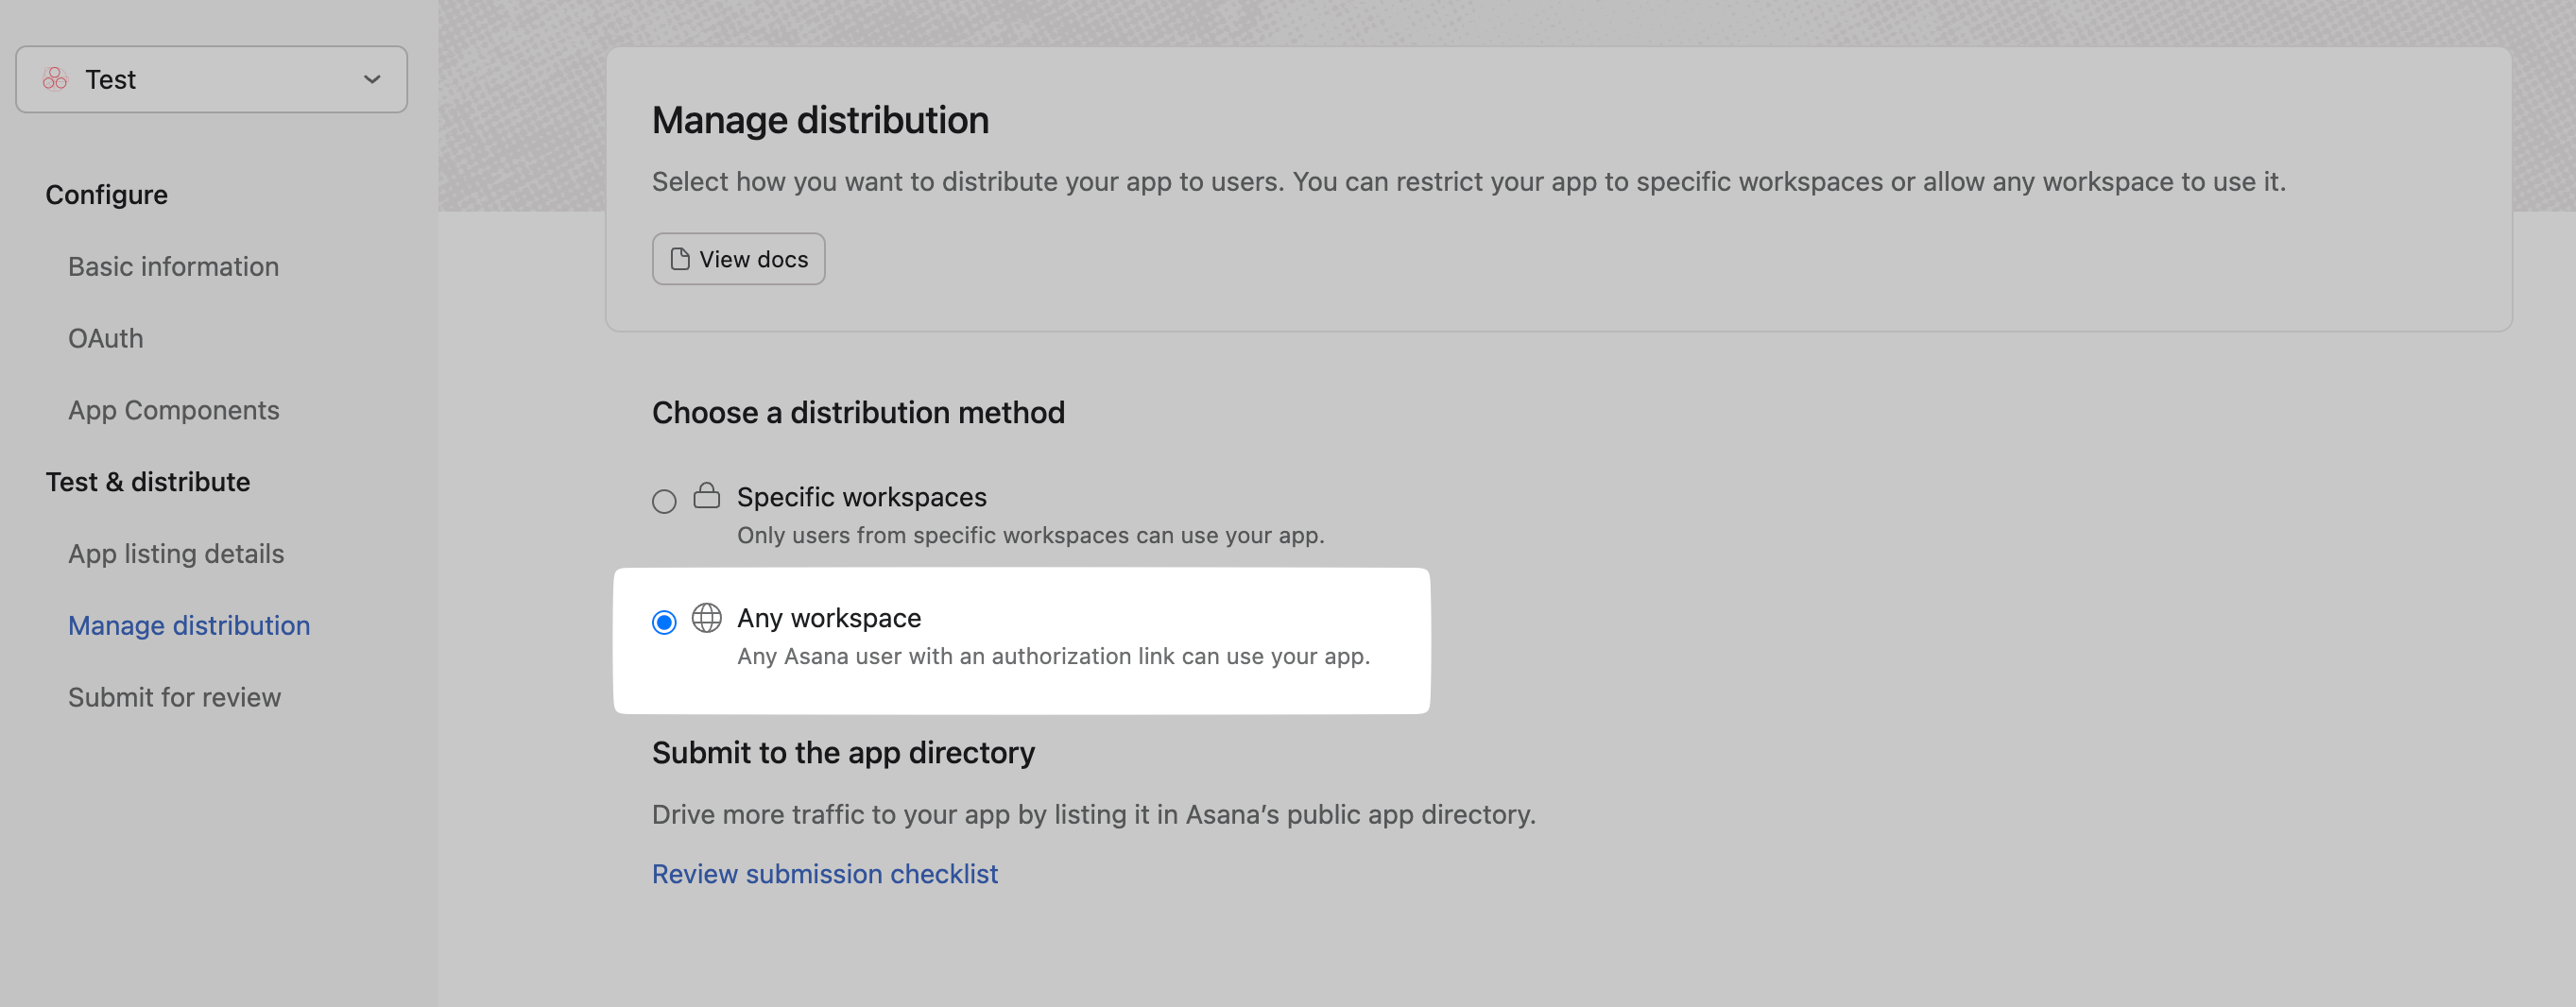
Enable multi-workspace install Optional
Enable this if you want users outside your Asana workspace to install the app.
-
In your app settings, go to OAuth → App permissions.
-
Under App install permissions, enable Allow users outside your workspace to install this app.
-
-
Get client credentials
- In Asana Developer Console, select your app.
- Under OAuth, copy your Client ID and Client Secret.
-
Add credentials in Scalekit
-
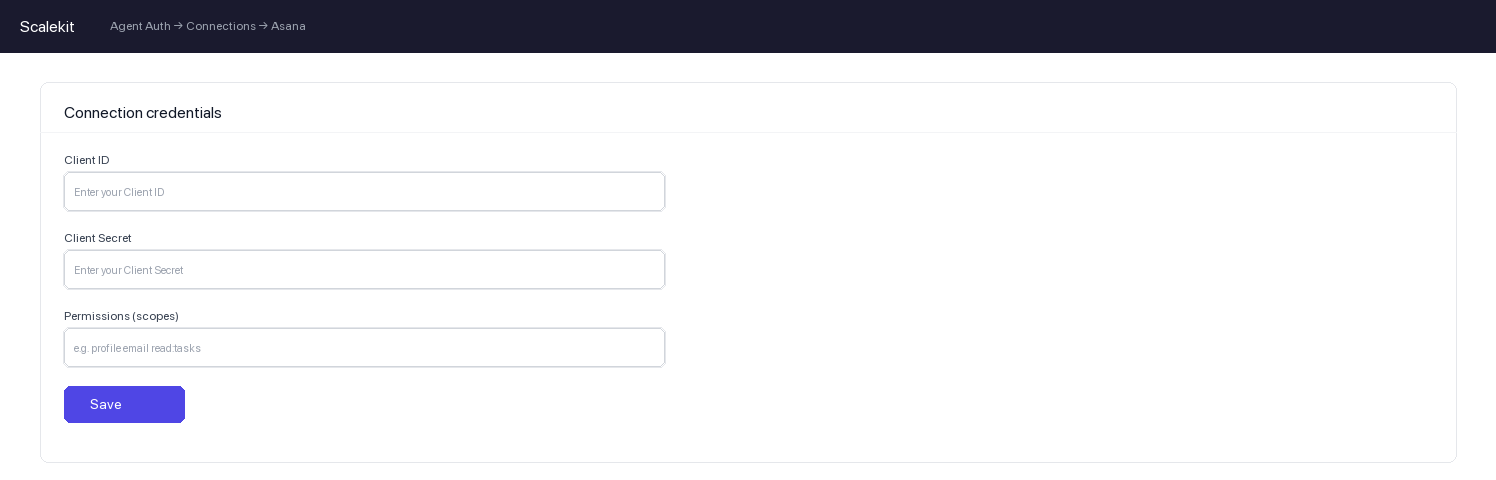
In Scalekit dashboard, go to AgentKit > Connections and open the connection you created.
-
Enter your credentials:
- Client ID (from above)
- Client Secret (from above)
- Permissions (scopes — see Asana OAuth scopes reference)
-
Click Save.
-
-
-
Authorize and make your first call
Section titled “Authorize and make your first call”quickstart.ts import { ScalekitClient } from '@scalekit-sdk/node'import 'dotenv/config'const scalekit = new ScalekitClient(process.env.SCALEKIT_ENV_URL,process.env.SCALEKIT_CLIENT_ID,process.env.SCALEKIT_CLIENT_SECRET,)const actions = scalekit.actionsconst connector = 'asana'const identifier = 'user_123'// Generate an authorization link for the userconst { link } = await actions.getAuthorizationLink({ connectionName: connector, identifier })console.log('Authorize Asana:', link)process.stdout.write('Press Enter after authorizing...')await new Promise(r => process.stdin.once('data', r))// Make your first callconst result = await actions.executeTool({connector,identifier,toolName: 'asana_allocations_list',toolInput: {},})console.log(result)quickstart.py import osfrom scalekit.client import ScalekitClientfrom dotenv import load_dotenvload_dotenv()scalekit_client = ScalekitClient(env_url=os.getenv("SCALEKIT_ENV_URL"),client_id=os.getenv("SCALEKIT_CLIENT_ID"),client_secret=os.getenv("SCALEKIT_CLIENT_SECRET"),)actions = scalekit_client.actionsconnection_name = "asana"identifier = "user_123"# Generate an authorization link for the userlink_response = actions.get_authorization_link(connection_name=connection_name,identifier=identifier,)print("Authorize Asana:", link_response.link)input("Press Enter after authorizing...")# Make your first callresult = actions.execute_tool(tool_input={},tool_name="asana_allocations_list",connection_name=connection_name,identifier=identifier,)print(result)
What you can do
Section titled “What you can do”Connect this agent connector to let your agent:
- Get workspace user, workspace membership, webhook — Get a user’s workspace-level membership details
- User workspace remove, workspace add, team remove — Remove a user from a workspace or organization in Asana
- List workspace memberships, workspace custom fields, user workspace memberships — List all members of a workspace
- Update webhook, time tracking entry, team — Update the filters on an existing webhook
- Delete webhook, time tracking entry, story — Permanently delete a webhook
- Create webhook, team, task time tracking entry — Create a webhook to receive event notifications for a resource
Common workflows
Section titled “Common workflows”Proxy API call
const result = await actions.request({ connectionName: 'asana', identifier: 'user_123', path: '/api/1.0/users/me', method: 'GET',});console.log(result);result = actions.request( connection_name='asana', identifier='user_123', path="/api/1.0/users/me", method="GET",)print(result)Tool list
Section titled “Tool list”Use the exact tool names from the Tool list below when you call execute_tool. If you’re not sure which name to use, list the tools available for the current user first.
asana_allocation_create#Create a resource allocation for a user on a project. Optionally specify start/end dates and effort percentage.5 params
Create a resource allocation for a user on a project. Optionally specify start/end dates and effort percentage.
assignee_gidstringrequiredGID of the user to allocate to the projectparent_gidstringrequiredGID of the project this allocation is foreffort_percentnumberoptionalEffort percentage for the allocation, from 0 to 100end_datestringoptionalEnd date of the allocation in YYYY-MM-DD formatstart_datestringoptionalStart date of the allocation in YYYY-MM-DD formatasana_allocation_delete#Permanently delete a resource allocation by its GID. This action cannot be undone.1 param
Permanently delete a resource allocation by its GID. This action cannot be undone.
allocation_gidstringrequiredGID of the allocation to deleteasana_allocation_get#Get a single resource allocation record by its GID.2 params
Get a single resource allocation record by its GID.
allocation_gidstringrequiredGID of the allocation to retrieveopt_fieldsstringoptionalComma-separated list of optional fields to include in the responseasana_allocation_update#Update an existing resource allocation. You can update start date, end date, and/or effort percentage. Only provided fields are updated.4 params
Update an existing resource allocation. You can update start date, end date, and/or effort percentage. Only provided fields are updated.
allocation_gidstringrequiredGID of the allocation to updateeffort_percentnumberoptionalNew effort percentage for the allocation, from 0 to 100end_datestringoptionalNew end date for the allocation in YYYY-MM-DD formatstart_datestringoptionalNew start date for the allocation in YYYY-MM-DD formatasana_allocations_list#List resource allocations. At least one of assignee_gid or parent_gid is required by the Asana API.3 params
List resource allocations. At least one of assignee_gid or parent_gid is required by the Asana API.
assignee_gidstringoptionalGID of the user to filter allocations by assigneeopt_fieldsstringoptionalComma-separated list of optional fields to include in the responseparent_gidstringoptionalGID of the parent project or portfolio to filter allocations byasana_attachment_create#Upload a file attachment to a task by URL (external/url attachment type).4 params
Upload a file attachment to a task by URL (external/url attachment type).
namestringrequiredThe display name (filename) for the attachmentparent_gidstringrequiredGID of the task to attach the file tourlstringrequiredThe publicly accessible URL of the file to attachdescriptionstringoptionalOptional description for the attachmentasana_attachment_delete#Delete an attachment permanently.1 param
Delete an attachment permanently.
attachment_gidstringrequiredGID of the attachment to deleteasana_attachment_get#Get details of a specific attachment by its GID.2 params
Get details of a specific attachment by its GID.
attachment_gidstringrequiredGID of the attachment to retrieveopt_fieldsstringoptionalComma-separated list of optional fields to include in responseasana_attachments_list#List all attachments for a task or project.2 params
List all attachments for a task or project.
parent_gidstringrequiredGID of the task or project to list attachments foropt_fieldsstringoptionalComma-separated list of optional fields to include in responseasana_custom_field_create#Create a custom field in a workspace.5 params
Create a custom field in a workspace.
field_typestringrequiredType of the custom field. One of: text, number, enum, multi_enum, date, peoplenamestringrequiredName of the custom fieldworkspace_gidstringrequiredGID of the workspace in which to create the custom fielddescriptionstringoptionalDescription of the custom fieldopt_fieldsstringoptionalComma-separated list of optional fields to include in responseasana_custom_field_delete#Permanently delete a custom field. This action cannot be undone.1 param
Permanently delete a custom field. This action cannot be undone.
custom_field_gidstringrequiredGID of the custom field to deleteasana_custom_field_enum_option_create#Add an enum option to a custom field of type enum or multi_enum.3 params
Add an enum option to a custom field of type enum or multi_enum.
custom_field_gidstringrequiredGID of the custom field to add an enum option tonamestringrequiredName of the enum optioncolorstringoptionalColor of the enum option (e.g. red, orange, yellow, green, teal, blue, indigo, purple, pink)asana_custom_field_get#Get a custom field definition by its GID.2 params
Get a custom field definition by its GID.
custom_field_gidstringrequiredGID of the custom field to retrieveopt_fieldsstringoptionalComma-separated list of optional fields to include in responseasana_custom_field_update#Update an existing custom field. Provide name and/or description to update.4 params
Update an existing custom field. Provide name and/or description to update.
custom_field_gidstringrequiredGID of the custom field to updatedescriptionstringoptionalNew description for the custom fieldnamestringoptionalNew name for the custom fieldopt_fieldsstringoptionalComma-separated list of optional fields to include in responseasana_enum_option_update#Update an enum option on a custom field. Can change the name, color, and enabled status.4 params
Update an enum option on a custom field. Can change the name, color, and enabled status.
enum_option_gidstringrequiredGID of the enum option to updatenamestringrequiredNew name for the enum optioncolorstringoptionalNew color for the enum option (e.g. red, orange, yellow, green, teal, blue, indigo, purple, pink)enabledbooleanoptionalWhether the enum option is enabled. Disabled options are hidden from the UI.asana_goal_add_followers#Add one or more followers to a goal.2 params
Add one or more followers to a goal.
followersstringrequiredComma-separated list of user GIDs to add as followersgoal_gidstringrequiredGID of the goal to add followers toasana_goal_add_supporting_relationship#Add a supporting relationship to a goal, linking a sub-goal, project, or task as a supporting resource.3 params
Add a supporting relationship to a goal, linking a sub-goal, project, or task as a supporting resource.
goal_gidstringrequiredGID of the goal to add a supporting relationship tosupporting_resource_gidstringrequiredGID of the goal, project, or task to link as a supporting resourcecontribution_weightnumberoptionalWeight of the supporting resource's contribution to the goal (0–1)asana_goal_create#Create a new goal in a workspace.6 params
Create a new goal in a workspace.
namestringrequiredName of the goalworkspace_gidstringrequiredGID of the workspace in which to create the goaldue_onstringoptionalDue date for the goal in ISO 8601 date format (YYYY-MM-DD)notesstringoptionalFree-form notes / description for the goalopt_fieldsstringoptionalComma-separated list of optional fields to include in responseownerstringoptionalGID of the user who owns this goal, or "me" for the current userasana_goal_delete#Permanently delete a goal. This action cannot be undone.1 param
Permanently delete a goal. This action cannot be undone.
goal_gidstringrequiredGID of the goal to deleteasana_goal_get#Get details of a specific goal including its metric and current value.2 params
Get details of a specific goal including its metric and current value.
goal_gidstringrequiredGID of the goal to retrieveopt_fieldsstringoptionalComma-separated list of optional fields to include in responseasana_goal_parent_goals_list#List all parent goals for a given goal.2 params
List all parent goals for a given goal.
goal_gidstringrequiredGID of the goal whose parent goals to listopt_fieldsstringoptionalComma-separated list of optional fields to include in responseasana_goal_relationship_get#Get a goal relationship by its GID.2 params
Get a goal relationship by its GID.
goal_relationship_gidstringrequiredGID of the goal relationship to retrieveopt_fieldsstringoptionalComma-separated list of optional fields to include in responseasana_goal_relationships_list#List goal relationships, optionally filtered by a supported goal.2 params
List goal relationships, optionally filtered by a supported goal.
supported_goal_gidstringrequiredGID of the goal whose relationships to listopt_fieldsstringoptionalComma-separated list of optional fields to include in responseasana_goal_remove_followers#Remove one or more followers from a goal.2 params
Remove one or more followers from a goal.
followersstringrequiredComma-separated list of user GIDs to remove as followersgoal_gidstringrequiredGID of the goal to remove followers fromasana_goal_remove_supporting_relationship#Remove a supporting relationship from a goal, unlinking a sub-goal, project, or task.2 params
Remove a supporting relationship from a goal, unlinking a sub-goal, project, or task.
goal_gidstringrequiredGID of the goal to remove the supporting relationship fromsupporting_resource_gidstringrequiredGID of the supporting resource to unlink from the goalasana_goal_set_metric#Set or update the metric for a goal (e.g. percentage, number, currency).4 params
Set or update the metric for a goal (e.g. percentage, number, currency).
goal_gidstringrequiredGID of the goal on which to set the metricmetric_typestringrequiredType of metric for this goaltarget_valuenumberoptionalTarget numeric value for the goal metricunitstringoptionalUnit label for the metric (e.g. USD, users, leads)asana_goal_set_metric_value#Update the current value of a goal metric to track progress.2 params
Update the current value of a goal metric to track progress.
current_valuenumberrequiredThe new current numeric value for the goal metricgoal_gidstringrequiredGID of the goal whose metric current value should be updatedasana_goal_stories_list#List stories (activity feed entries) for a goal.2 params
List stories (activity feed entries) for a goal.
goal_gidstringrequiredGID of the goal whose stories to listopt_fieldsstringoptionalComma-separated list of optional fields to include in responseasana_goal_story_create#Add a comment or story to a goal's activity feed.2 params
Add a comment or story to a goal's activity feed.
goal_gidstringrequiredGID of the goal to add a story totextstringrequiredText content of the story / comment to addasana_goal_update#Update an existing goal's name, notes, due date, or status.5 params
Update an existing goal's name, notes, due date, or status.
goal_gidstringrequiredGID of the goal to updatedue_onstringoptionalUpdated due date in ISO 8601 date format (YYYY-MM-DD)namestringoptionalUpdated name for the goalnotesstringoptionalUpdated free-form notes / description for the goalstatusstringoptionalUpdated status of the goalasana_goals_list#Get goals for a workspace, optionally filtered by team or time period.4 params
Get goals for a workspace, optionally filtered by team or time period.
workspace_gidstringrequiredGID of the workspace to list goals fromis_workspace_levelbooleanoptionalIf true, filter to only workspace-level goals (not team goals)opt_fieldsstringoptionalComma-separated list of optional fields to include in responseteam_gidstringoptionalGID of the team to filter goals byasana_job_get#Get the status of an async job (e.g. from project or task duplication). Poll until status is "succeeded" or "failed".2 params
Get the status of an async job (e.g. from project or task duplication). Poll until status is "succeeded" or "failed".
job_gidstringrequiredGID of the async job to retrieveopt_fieldsstringoptionalComma-separated list of optional fields to include in responseasana_me_get#Get the profile of the authenticated user.1 param
Get the profile of the authenticated user.
opt_fieldsstringoptionalComma-separated list of optional fields to include in responseasana_membership_create#Add a user as a member of a project or goal. Optionally specify a role for the membership.3 params
Add a user as a member of a project or goal. Optionally specify a role for the membership.
member_gidstringrequiredGID of the user to add as a memberparent_gidstringrequiredGID of the project or goal to add the member torolestringoptionalRole to assign to the new member (e.g. editor, commenter, viewer)asana_membership_delete#Remove a member from a project or goal by deleting the membership record. This action cannot be undone.1 param
Remove a member from a project or goal by deleting the membership record. This action cannot be undone.
membership_gidstringrequiredGID of the membership to deleteasana_membership_get#Get the details of a single membership record by its GID.2 params
Get the details of a single membership record by its GID.
membership_gidstringrequiredGID of the membership record to retrieveopt_fieldsstringoptionalComma-separated list of optional fields to include in the responseasana_membership_update#Update the role of an existing membership record.2 params
Update the role of an existing membership record.
membership_gidstringrequiredGID of the membership record to updaterolestringrequiredNew role to assign to the member (e.g. editor, commenter, viewer)asana_memberships_list#List memberships for a project or goal, optionally filtered by a specific member.3 params
List memberships for a project or goal, optionally filtered by a specific member.
parent_gidstringrequiredGID of the project or goal to list memberships formember_gidstringoptionalGID of a member (user) to filter memberships byopt_fieldsstringoptionalComma-separated list of optional fields to include in the responseasana_my_tasks_list#Get tasks from the authenticated user's personal My Tasks list in a workspace.3 params
Get tasks from the authenticated user's personal My Tasks list in a workspace.
user_task_list_gidstringrequiredGID of the user task list (My Tasks list) to retrieve tasks fromcompleted_sincestringoptionalISO 8601 timestamp; only return tasks completed after this timeopt_fieldsstringoptionalComma-separated list of optional fields to include in responseasana_portfolio_add_item#Add a project to a portfolio.2 params
Add a project to a portfolio.
item_gidstringrequiredGID of the project to add to the portfolioportfolio_gidstringrequiredGID of the portfolio to add an item toasana_portfolio_add_members#Add one or more members to a portfolio by their user GIDs.2 params
Add one or more members to a portfolio by their user GIDs.
membersstringrequiredComma-separated list of user GIDs to add as membersportfolio_gidstringrequiredGID of the portfolio to add members toasana_portfolio_create#Create a new portfolio in a workspace.4 params
Create a new portfolio in a workspace.
namestringrequiredName of the portfolioworkspace_gidstringrequiredGID of the workspace to create the portfolio incolorstringoptionalColor of the portfolioopt_fieldsstringoptionalComma-separated list of optional fields to include in responseasana_portfolio_custom_field_settings_list#List all custom field settings for a portfolio, including which custom fields are attached and their display configuration.2 params
List all custom field settings for a portfolio, including which custom fields are attached and their display configuration.
portfolio_gidstringrequiredGID of the portfolio to list custom field settings foropt_fieldsstringoptionalComma-separated list of optional fields to include in responseasana_portfolio_delete#Permanently delete a portfolio by its GID. This action cannot be undone.1 param
Permanently delete a portfolio by its GID. This action cannot be undone.
portfolio_gidstringrequiredGID of the portfolio to deleteasana_portfolio_get#Get details of a specific portfolio by its GID.2 params
Get details of a specific portfolio by its GID.
portfolio_gidstringrequiredGID of the portfolio to retrieveopt_fieldsstringoptionalComma-separated list of optional fields to include in responseasana_portfolio_items_list#Get all items (projects or portfolios) contained in a portfolio.2 params
Get all items (projects or portfolios) contained in a portfolio.
portfolio_gidstringrequiredGID of the portfolio whose items to listopt_fieldsstringoptionalComma-separated list of optional fields to include in responseasana_portfolio_membership_get#Get a single portfolio membership record by its GID.2 params
Get a single portfolio membership record by its GID.
portfolio_membership_gidstringrequiredGID of the portfolio membership to retrieveopt_fieldsstringoptionalComma-separated list of optional fields to include in the responseasana_portfolio_memberships_list#List all members of a portfolio, optionally filtered by a specific user.3 params
List all members of a portfolio, optionally filtered by a specific user.
portfolio_gidstringrequiredGID of the portfolio whose memberships to listopt_fieldsstringoptionalComma-separated list of optional fields to include in responseuser_gidstringoptionalGID of a user to filter memberships byasana_portfolio_remove_item#Remove a project from a portfolio.2 params
Remove a project from a portfolio.
item_gidstringrequiredGID of the project to remove from the portfolioportfolio_gidstringrequiredGID of the portfolio to remove an item fromasana_portfolio_remove_members#Remove one or more members from a portfolio by their user GIDs.2 params
Remove one or more members from a portfolio by their user GIDs.
membersstringrequiredComma-separated list of user GIDs to remove from the portfolioportfolio_gidstringrequiredGID of the portfolio to remove members fromasana_portfolio_update#Update a portfolio's name or color.4 params
Update a portfolio's name or color.
portfolio_gidstringrequiredGID of the portfolio to updatecolorstringoptionalNew color for the portfolionamestringoptionalNew name for the portfolioopt_fieldsstringoptionalComma-separated list of optional fields to include in responseasana_portfolios_list#Get all portfolios accessible to the authenticated user in a workspace.3 params
Get all portfolios accessible to the authenticated user in a workspace.
workspace_gidstringrequiredGID of the workspace to filter portfolios byopt_fieldsstringoptionalComma-separated list of optional fields to include in responseownerstringoptionalGID of a user or 'me' to filter portfolios by ownerasana_project_add_custom_field#Add a custom field to a project. Optionally mark the field as important (displayed prominently in the project view).3 params
Add a custom field to a project. Optionally mark the field as important (displayed prominently in the project view).
custom_field_gidstringrequiredGID of the custom field to add to the projectproject_gidstringrequiredGID of the project to add the custom field tois_importantbooleanoptionalWhether the custom field is important and should be displayed prominently in the project viewasana_project_add_followers#Add followers to a project by their GIDs.3 params
Add followers to a project by their GIDs.
followersstringrequiredComma-separated list of user GIDs to add as followersproject_gidstringrequiredGID of the project to add followers toopt_fieldsstringoptionalComma-separated list of optional fields to include in responseasana_project_add_members#Add members to a project by their GIDs.3 params
Add members to a project by their GIDs.
membersstringrequiredComma-separated list of user GIDs or 'me' to add as membersproject_gidstringrequiredGID of the project to add members toopt_fieldsstringoptionalComma-separated list of optional fields to include in responseasana_project_brief_create#Create a project brief for a project. A project brief is a rich text overview that describes the project's goals and context. Provide the project GID and a title; optionally include plain text or HTML content for the brief body.4 params
Create a project brief for a project. A project brief is a rich text overview that describes the project's goals and context. Provide the project GID and a title; optionally include plain text or HTML content for the brief body.
project_gidstringrequiredGlobally unique identifier for the project to create the brief for. e.g. 1234567890titlestringrequiredThe title of the project brief. e.g. 'Q3 Launch Plan'html_textstringoptionalHTML-formatted content for the project brief body. Cannot be used together with text. e.g. '<body><p>This project aims to...</p></body>'textstringoptionalPlain text content for the project brief body. Cannot be used together with html_text. e.g. 'This project aims to...'asana_project_brief_get#Get the project brief (rich text overview) for a project by its project brief GID. Returns the title, HTML text, and related project details.2 params
Get the project brief (rich text overview) for a project by its project brief GID. Returns the title, HTML text, and related project details.
project_brief_gidstringrequiredGlobally unique identifier for the project brief to retrieve. e.g. 1234567890opt_fieldsstringoptionalComma-separated list of optional fields to include in the response. e.g. title,html_text,project,project.nameasana_project_brief_update#Update an existing project brief. You can update the title, plain text body, or HTML body. Provide only the fields you want to change; omitted fields are left unchanged.4 params
Update an existing project brief. You can update the title, plain text body, or HTML body. Provide only the fields you want to change; omitted fields are left unchanged.
project_brief_gidstringrequiredGlobally unique identifier for the project brief to update. e.g. 1234567890html_textstringoptionalUpdated HTML content for the project brief body. Cannot be used together with text. e.g. '<body><p>Updated description</p></body>'textstringoptionalUpdated plain text content for the project brief body. Cannot be used together with html_text.titlestringoptionalNew title for the project brief. e.g. 'Updated Q3 Launch Plan'asana_project_create#Create a new project in a workspace.10 params
Create a new project in a workspace.
namestringrequiredName of the projectworkspace_gidstringrequiredGID of the workspace to create the project incolorstringoptionalColor of the projectdefault_viewstringoptionalDefault view for the projectdue_onstringoptionalDue date for the project (YYYY-MM-DD)notesstringoptionalFree-form text description for the projectopt_fieldsstringoptionalComma-separated list of optional fields to include in responseprivacy_settingstringoptionalPrivacy setting for the projectstart_onstringoptionalStart date for the project (YYYY-MM-DD)teamstringoptionalGID of the team to share the project withasana_project_custom_field_settings_list#List all custom field settings for a project, including which custom fields are attached and their display configuration.2 params
List all custom field settings for a project, including which custom fields are attached and their display configuration.
project_gidstringrequiredGID of the project to list custom field settings foropt_fieldsstringoptionalComma-separated list of optional fields to include in responseasana_project_delete#Delete a project permanently.1 param
Delete a project permanently.
project_gidstringrequiredGID of the project to deleteasana_project_duplicate#Create a duplicate of an existing project.4 params
Create a duplicate of an existing project.
namestringrequiredName for the duplicated projectproject_gidstringrequiredGID of the project to duplicateopt_fieldsstringoptionalComma-separated list of optional fields to include in responseteamstringoptionalGID of the team for the duplicated projectasana_project_get#Get details of a specific project by its GID.2 params
Get details of a specific project by its GID.
project_gidstringrequiredGID of the project to retrieveopt_fieldsstringoptionalComma-separated list of optional fields to include in responseasana_project_membership_get#Get a specific project membership record by its GID. Returns user identity and access level details for that membership.2 params
Get a specific project membership record by its GID. Returns user identity and access level details for that membership.
project_membership_gidstringrequiredGlobally unique identifier for the project membership record to retrieve. e.g. 1234567890opt_fieldsstringoptionalComma-separated list of optional fields to include in the response. e.g. user,user.name,access_level,projectasana_project_memberships_list#List all members of a project. Returns membership records including user and access level details for each member of the specified project.3 params
List all members of a project. Returns membership records including user and access level details for each member of the specified project.
project_gidstringrequiredGlobally unique identifier for the project whose members to list. e.g. 1234567890opt_fieldsstringoptionalComma-separated list of optional fields to include in the response. e.g. user,user.name,access_leveluser_gidstringoptionalFilter results to the membership record for a specific user GID. e.g. 987654321asana_project_remove_followers#Remove followers from a project by their GIDs.2 params
Remove followers from a project by their GIDs.
followersstringrequiredComma-separated list of user GIDs to remove as followersproject_gidstringrequiredGID of the project to remove followers fromasana_project_remove_members#Remove members from a project by their GIDs.2 params
Remove members from a project by their GIDs.
membersstringrequiredComma-separated list of user GIDs to remove as membersproject_gidstringrequiredGID of the project to remove members fromasana_project_status_create#Create a new status update for a project with a color-coded health indicator.5 params
Create a new status update for a project with a color-coded health indicator.
colorstringrequiredColor-coded health indicator for the status updateproject_gidstringrequiredGID of the project to post the status update totextstringrequiredThe status update text bodyopt_fieldsstringoptionalComma-separated list of optional fields to include in responsetitlestringoptionalOptional title for the status updateasana_project_status_get#Get a specific project status update by its GID.2 params
Get a specific project status update by its GID.
project_status_gidstringrequiredGID of the project status update to retrieveopt_fieldsstringoptionalComma-separated list of optional fields to include in responseasana_project_statuses_list#Get all status updates posted to a project.2 params
Get all status updates posted to a project.
project_gidstringrequiredGID of the project to retrieve status updates foropt_fieldsstringoptionalComma-separated list of optional fields to include in responseasana_project_task_counts_get#Get task completion counts for a project, including totals for completed and incomplete tasks.2 params
Get task completion counts for a project, including totals for completed and incomplete tasks.
project_gidstringrequiredGID of the project to retrieve task counts foropt_fieldsstringoptionalComma-separated list of optional fields to include in responseasana_project_tasks_list#List all tasks in a specific project.2 params
List all tasks in a specific project.
project_gidstringrequiredGID of the project to list tasks fromopt_fieldsstringoptionalComma-separated list of optional fields to include in responseasana_project_template_get#Get the details of a single project template by its GID.2 params
Get the details of a single project template by its GID.
project_template_gidstringrequiredGID of the project template to retrieveopt_fieldsstringoptionalComma-separated list of optional fields to include in the responseasana_project_template_instantiate#Create a new project from a project template. Returns a Job GID — poll asana_job_get until status is complete.4 params
Create a new project from a project template. Returns a Job GID — poll asana_job_get until status is complete.
namestringrequiredName of the new project to create from the templateproject_template_gidstringrequiredGID of the project template to instantiateteam_gidstringrequiredGID of the team the new project should belong tois_strictbooleanoptionalIf true, the endpoint will fail if any unresolvable variables are found in the templateasana_project_templates_list#List project templates available in a workspace or team.3 params
List project templates available in a workspace or team.
opt_fieldsstringoptionalComma-separated list of optional fields to include in the responseteam_gidstringoptionalGID of a team to filter project templates byworkspace_gidstringoptionalGID of the workspace to list project templates fromasana_project_update#Update an existing project's properties.10 params
Update an existing project's properties.
project_gidstringrequiredGID of the project to updatearchivedbooleanoptionalWhether the project is archivedcolorstringoptionalColor of the projectdefault_viewstringoptionalDefault view for the projectdue_onstringoptionalDue date for the project (YYYY-MM-DD)namestringoptionalNew name for the projectnotesstringoptionalFree-form text description for the projectopt_fieldsstringoptionalComma-separated list of optional fields to include in responseprivacy_settingstringoptionalPrivacy setting for the projectstart_onstringoptionalStart date for the project (YYYY-MM-DD)asana_projects_list#List projects in a workspace or team.3 params
List projects in a workspace or team.
opt_fieldsstringoptionalComma-separated list of optional fields to include in responseteamstringoptionalGID of a team to filter projects byworkspace_gidstringoptionalGID of the workspace to list projects fromasana_projects_search#Search for projects in a workspace by name or other criteria.4 params
Search for projects in a workspace by name or other criteria.
workspace_gidstringrequiredGID of the workspace to search projects inarchivedbooleanoptionalFilter by archived status; true for archived, false for active, null for bothnamestringoptionalFilter projects by name (partial match supported)opt_fieldsstringoptionalComma-separated list of optional fields to include in responseasana_section_add_task#Move a task into a specific section within a project.4 params
Move a task into a specific section within a project.
section_gidstringrequiredGID of the section to add the task totask_gidstringrequiredGID of the task to add to the sectioninsert_afterstringoptionalInsert the task after this task GID within the sectioninsert_beforestringoptionalInsert the task before this task GID within the sectionasana_section_create#Create a new section in a project.3 params
Create a new section in a project.
namestringrequiredName of the sectionproject_gidstringrequiredGID of the project to create a section inopt_fieldsstringoptionalComma-separated list of optional fields to include in responseasana_section_delete#Delete a section from a project.1 param
Delete a section from a project.
section_gidstringrequiredGID of the section to deleteasana_section_get#Get details of a specific section by its GID.2 params
Get details of a specific section by its GID.
section_gidstringrequiredGID of the section to retrieveopt_fieldsstringoptionalComma-separated list of optional fields to include in responseasana_section_tasks_list#List all tasks in a specific section in Asana.2 params
List all tasks in a specific section in Asana.
section_gidstringrequiredGID of the section whose tasks to listopt_fieldsstringoptionalComma-separated list of optional fields to include in responseasana_section_update#Update the name of a section.3 params
Update the name of a section.
namestringrequiredNew name for the sectionsection_gidstringrequiredGID of the section to updateopt_fieldsstringoptionalComma-separated list of optional fields to include in responseasana_sections_list#List all sections in a project.2 params
List all sections in a project.
project_gidstringrequiredGID of the project to list sections fromopt_fieldsstringoptionalComma-separated list of optional fields to include in responseasana_status_update_create#Create a status update for a project, portfolio, or goal. This is the preferred endpoint over project_status_create as it supports the newer Asana status updates API.4 params
Create a status update for a project, portfolio, or goal. This is the preferred endpoint over project_status_create as it supports the newer Asana status updates API.
parent_gidstringrequiredGID of the parent resource (project, portfolio, or goal) to create a status update forstatus_typestringrequiredThe type of status for this updatetextstringrequiredThe body text of the status updatetitlestringoptionalThe title of the status updateasana_status_update_delete#Permanently delete a status update.1 param
Permanently delete a status update.
status_update_gidstringrequiredThe GID of the status update to deleteasana_status_update_get#Get a status update by its GID.2 params
Get a status update by its GID.
status_update_gidstringrequiredThe GID of the status update to retrieveopt_fieldsstringoptionalComma-separated list of optional fields to include in responseasana_status_updates_list#List status updates for a parent resource such as a project, portfolio, or goal.2 params
List status updates for a parent resource such as a project, portfolio, or goal.
parent_gidstringrequiredGID of the parent resource (project, portfolio, or goal) to list status updates foropt_fieldsstringoptionalComma-separated list of optional fields to include in responseasana_story_create#Add a comment or story to a task.3 params
Add a comment or story to a task.
task_gidstringrequiredGID of the task to add the comment totextstringrequiredText of the comment to add to the taskopt_fieldsstringoptionalComma-separated list of optional fields to include in responseasana_story_delete#Delete a story (comment) in Asana. This action is irreversible.1 param
Delete a story (comment) in Asana. This action is irreversible.
story_gidstringrequiredGID of the story to deleteasana_story_get#Get details of a specific story by its GID.2 params
Get details of a specific story by its GID.
story_gidstringrequiredGID of the story to retrieveopt_fieldsstringoptionalComma-separated list of optional fields to include in responseasana_story_update#Update a story (comment) in Asana. Can edit the text of comments.2 params
Update a story (comment) in Asana. Can edit the text of comments.
story_gidstringrequiredGID of the story to updatetextstringrequiredUpdated text content of the commentasana_subtask_create#Create a subtask under an existing task.6 params
Create a subtask under an existing task.
namestringrequiredName of the subtasktask_gidstringrequiredGID of the parent taskassigneestringoptionalGID of the user to assign, or 'me'due_onstringoptionalDue date for the subtask (YYYY-MM-DD)notesstringoptionalFree-form description for the subtaskopt_fieldsstringoptionalComma-separated list of optional fields to include in responseasana_tag_create#Create a new tag in a workspace.4 params
Create a new tag in a workspace.
namestringrequiredName of the tagworkspace_gidstringrequiredGID of the workspace to create the tag incolorstringoptionalColor for the tagopt_fieldsstringoptionalComma-separated list of optional fields to include in responseasana_tag_delete#Delete a tag permanently.1 param
Delete a tag permanently.
tag_gidstringrequiredGID of the tag to deleteasana_tag_get#Get details of a specific tag by its GID.2 params
Get details of a specific tag by its GID.
tag_gidstringrequiredGID of the tag to retrieveopt_fieldsstringoptionalComma-separated list of optional fields to include in responseasana_tag_tasks_list#List all tasks that have a specific tag in Asana.2 params
List all tasks that have a specific tag in Asana.
tag_gidstringrequiredGID of the tag whose tasks to listopt_fieldsstringoptionalComma-separated list of optional fields to include in responseasana_tag_update#Update a tag's name or color.4 params
Update a tag's name or color.
tag_gidstringrequiredGID of the tag to updatecolorstringoptionalNew color for the tagnamestringoptionalNew name for the tagopt_fieldsstringoptionalComma-separated list of optional fields to include in responseasana_tags_list#List tags in a workspace.2 params
List tags in a workspace.
opt_fieldsstringoptionalComma-separated list of optional fields to include in responseworkspace_gidstringoptionalGID of the workspace to list tags fromasana_task_add_dependencies#Add dependencies to a task. Dependencies are tasks that must be completed before this task can start.3 params
Add dependencies to a task. Dependencies are tasks that must be completed before this task can start.
dependenciesstringrequiredComma-separated GIDs of tasks this task depends ontask_gidstringrequiredGID of the task to add dependencies toopt_fieldsstringoptionalComma-separated list of optional fields to include in responseasana_task_add_dependents#Add dependent tasks to a task in Asana. Dependents are tasks that depend on this task being completed first.2 params
Add dependent tasks to a task in Asana. Dependents are tasks that depend on this task being completed first.
dependentsstringrequiredComma-separated list of task GIDs that depend on this tasktask_gidstringrequiredGID of the task to add dependents toasana_task_add_followers#Add followers to a task.3 params
Add followers to a task.
followersstringrequiredComma-separated GIDs of users to add as followerstask_gidstringrequiredGID of the taskopt_fieldsstringoptionalComma-separated list of optional fields to include in responseasana_task_add_project#Add a task to a project.5 params
Add a task to a project.
projectstringrequiredGID of the project to add the task totask_gidstringrequiredGID of the task to add to a projectinsert_afterstringoptionalInsert the task after this task in the projectinsert_beforestringoptionalInsert the task before this task in the projectsectionstringoptionalGID of a section in the project to place the taskasana_task_add_tag#Add a tag to a task.2 params
Add a tag to a task.
tagstringrequiredGID of the tag to add to the tasktask_gidstringrequiredGID of the taskasana_task_create#Create a new task in Asana.9 params
Create a new task in Asana.
namestringrequiredName of the taskassigneestringoptionalGID of the user to assign, or 'me'due_onstringoptionalDue date for the task (YYYY-MM-DD)followersstringoptionalComma-separated GIDs of users to follow the tasknotesstringoptionalFree-form text description of the taskopt_fieldsstringoptionalComma-separated list of optional fields to include in responseprojectsstringoptionalComma-separated GIDs of projects to add the task tostart_onstringoptionalStart date for the task (YYYY-MM-DD)workspace_gidstringoptionalGID of the workspace to create the task in (required if no project)asana_task_delete#Delete a task permanently.1 param
Delete a task permanently.
task_gidstringrequiredGID of the task to deleteasana_task_dependencies_list#Get the list of tasks that a given task depends on.2 params
Get the list of tasks that a given task depends on.
task_gidstringrequiredGID of the task to retrieve dependencies foropt_fieldsstringoptionalComma-separated list of optional fields to include in responseasana_task_dependents_list#Get the list of tasks that depend on a given task (tasks blocked by this task).2 params
Get the list of tasks that depend on a given task (tasks blocked by this task).
task_gidstringrequiredGID of the task to retrieve dependents foropt_fieldsstringoptionalComma-separated list of optional fields to include in responseasana_task_duplicate#Create a duplicate of an existing task.4 params
Create a duplicate of an existing task.
namestringrequiredName for the duplicated tasktask_gidstringrequiredGID of the task to duplicateincludestringoptionalComma-separated list of fields to copy (assignee, attachments, dates, dependencies, notes, projects, subtasks, tags)opt_fieldsstringoptionalComma-separated list of optional fields to include in responseasana_task_get#Get details of a specific task by its GID.2 params
Get details of a specific task by its GID.
task_gidstringrequiredGID of the task to retrieveopt_fieldsstringoptionalComma-separated list of optional fields to include in responseasana_task_get_by_custom_id#Look up a task by its custom external ID within a given workspace.3 params
Look up a task by its custom external ID within a given workspace.
custom_idstringrequiredThe custom external ID of the task to look upworkspace_gidstringrequiredGID of the workspace to search withinopt_fieldsstringoptionalComma-separated list of optional fields to include in the responseasana_task_remove_dependencies#Remove dependencies from a task.3 params
Remove dependencies from a task.
dependenciesstringrequiredComma-separated GIDs of dependency tasks to removetask_gidstringrequiredGID of the task to remove dependencies fromopt_fieldsstringoptionalComma-separated list of optional fields to include in responseasana_task_remove_dependents#Remove one or more dependent tasks from a task. Dependents are tasks that depend on this task (i.e., this task blocks them). Provide a comma-separated list of dependent task GIDs to unlink.2 params
Remove one or more dependent tasks from a task. Dependents are tasks that depend on this task (i.e., this task blocks them). Provide a comma-separated list of dependent task GIDs to unlink.
dependentsstringrequiredComma-separated list of task GIDs to remove as dependents of this task. e.g. '111111,222222,333333'task_gidstringrequiredGlobally unique identifier for the task from which to remove dependents. e.g. 1234567890asana_task_remove_followers#Remove followers from a task.3 params
Remove followers from a task.
followersstringrequiredComma-separated GIDs of users to remove as followerstask_gidstringrequiredGID of the taskopt_fieldsstringoptionalComma-separated list of optional fields to include in responseasana_task_remove_project#Remove a task from a project.2 params
Remove a task from a project.
projectstringrequiredGID of the project to remove the task fromtask_gidstringrequiredGID of the task to remove from a projectasana_task_remove_tag#Remove a tag from a task.2 params
Remove a tag from a task.
tagstringrequiredGID of the tag to remove from the tasktask_gidstringrequiredGID of the taskasana_task_search#Search for tasks in a workspace using text and filter criteria.5 params
Search for tasks in a workspace using text and filter criteria.
workspace_gidstringrequiredGID of the workspace to search tasks inassigneestringoptionalFilter tasks by assignee GID or 'me'completedbooleanoptionalFilter by task completion status. True returns only completed tasks, false returns only incomplete tasks.opt_fieldsstringoptionalComma-separated list of optional fields to include in responsetextstringoptionalText to search for in task names and descriptionsasana_task_set_parent#Set or change the parent task of a task.5 params
Set or change the parent task of a task.
parentstringrequiredGID of the new parent task. Use null to make it a top-level task.task_gidstringrequiredGID of the task to set parent forinsert_afterstringoptionalA subtask GID to insert this task after in the parentinsert_beforestringoptionalA subtask GID to insert this task before in the parentopt_fieldsstringoptionalComma-separated list of optional fields to include in responseasana_task_stories_list#List stories (comments and activity) on a task.2 params
List stories (comments and activity) on a task.
task_gidstringrequiredGID of the task to list stories fromopt_fieldsstringoptionalComma-separated list of optional fields to include in responseasana_task_subtasks_list#List all subtasks of a task.2 params
List all subtasks of a task.
task_gidstringrequiredGID of the parent taskopt_fieldsstringoptionalComma-separated list of optional fields to include in responseasana_task_template_get#Get the details of a single task template by its GID.2 params
Get the details of a single task template by its GID.
task_template_gidstringrequiredGID of the task template to retrieveopt_fieldsstringoptionalComma-separated list of optional fields to include in the responseasana_task_template_instantiate#Create a new task from a task template. Optionally assign the new task to one or more projects.3 params
Create a new task from a task template. Optionally assign the new task to one or more projects.
namestringrequiredName of the new task to create from the templatetask_template_gidstringrequiredGID of the task template to instantiateprojectsstringoptionalComma-separated list of project GIDs to add the new task toasana_task_templates_list#List task templates for a project.2 params
List task templates for a project.
project_gidstringrequiredGID of the project to filter task templates byopt_fieldsstringoptionalComma-separated list of optional fields to include in the responseasana_task_time_tracking_entries_list#List all time tracking entries logged on a specific task.2 params
List all time tracking entries logged on a specific task.
task_gidstringrequiredGID of the task whose time tracking entries to listopt_fieldsstringoptionalComma-separated list of optional fields to include in the responseasana_task_time_tracking_entry_create#Log a new time tracking entry on a task.3 params
Log a new time tracking entry on a task.
duration_minutesintegerrequiredDuration of the time entry in minutesentered_onstringrequiredDate the time was entered, in ISO 8601 format (YYYY-MM-DD)task_gidstringrequiredGID of the task to log time onasana_task_update#Update an existing task's properties.8 params
Update an existing task's properties.
task_gidstringrequiredGID of the task to updateassigneestringoptionalGID of the user to assign, or 'me', or null to unassigncompletedbooleanoptionalMark the task as complete or incompletedue_onstringoptionalDue date for the task (YYYY-MM-DD)namestringoptionalNew name for the tasknotesstringoptionalUpdated description for the taskopt_fieldsstringoptionalComma-separated list of optional fields to include in responsestart_onstringoptionalStart date for the task (YYYY-MM-DD)asana_tasks_list#List tasks filtered by project, section, assignee, or workspace. At least one of project, section, assignee, or workspace_gid is required by the Asana API.6 params
List tasks filtered by project, section, assignee, or workspace. At least one of project, section, assignee, or workspace_gid is required by the Asana API.
assigneestringoptionalGID or 'me' to filter tasks by assigneecompleted_sincestringoptionalOnly return tasks completed after this date-time (ISO 8601)opt_fieldsstringoptionalComma-separated list of optional fields to include in responseprojectstringoptionalGID of a project to filter tasks bysectionstringoptionalGID of a section to filter tasks byworkspace_gidstringoptionalGID of the workspace (required if assignee is set without project)asana_team_add_user#Add a user to a team.3 params
Add a user to a team.
team_gidstringrequiredGID of the teamuserstringrequiredGID of the user to add to the teamopt_fieldsstringoptionalComma-separated list of optional fields to include in responseasana_team_create#Create a new team in an organization.4 params
Create a new team in an organization.
namestringrequiredName of the new teamorganization_gidstringrequiredGID of the organization in which to create the teamdescriptionstringoptionalOptional description for the teamopt_fieldsstringoptionalComma-separated list of optional fields to include in responseasana_team_get#Get details of a specific team by its GID.2 params
Get details of a specific team by its GID.
team_gidstringrequiredGID of the team to retrieveopt_fieldsstringoptionalComma-separated list of optional fields to include in responseasana_team_membership_get#Get a single team membership record by its GID.2 params
Get a single team membership record by its GID.
team_membership_gidstringrequiredGID of the team membership to retrieveopt_fieldsstringoptionalComma-separated list of optional fields to include in the responseasana_team_memberships_list#List team memberships, optionally filtered by team, user, or workspace.4 params
List team memberships, optionally filtered by team, user, or workspace.
opt_fieldsstringoptionalComma-separated list of optional fields to include in the responseteam_gidstringoptionalGID of the team to filter memberships byuser_gidstringoptionalGID of the user to filter memberships byworkspace_gidstringoptionalGID of the workspace to filter memberships byasana_team_projects_list#List all projects for a given team.3 params
List all projects for a given team.
team_gidstringrequiredGID of the team whose projects to listarchivedbooleanoptionalFilter by archived status; true for archived, false for active, null for bothopt_fieldsstringoptionalComma-separated list of optional fields to include in responseasana_team_remove_user#Remove a user from a team.2 params
Remove a user from a team.
team_gidstringrequiredGID of the teamuserstringrequiredGID of the user to remove from the teamasana_team_team_memberships_list#List all memberships for a specific team.2 params
List all memberships for a specific team.
team_gidstringrequiredGID of the team whose memberships to listopt_fieldsstringoptionalComma-separated list of optional fields to include in the responseasana_team_update#Update a team's name or description.4 params
Update a team's name or description.
team_gidstringrequiredGID of the team to updatedescriptionstringoptionalNew description for the teamnamestringoptionalNew name for the teamopt_fieldsstringoptionalComma-separated list of optional fields to include in responseasana_time_tracking_categories_list#List all time tracking categories available in a given workspace.2 params
List all time tracking categories available in a given workspace.
workspace_gidstringrequiredGID of the workspace whose time tracking categories to listopt_fieldsstringoptionalComma-separated list of optional fields to include in the responseasana_time_tracking_category_get#Get a single time tracking category by its GID.2 params
Get a single time tracking category by its GID.
time_tracking_category_gidstringrequiredGID of the time tracking category to retrieveopt_fieldsstringoptionalComma-separated list of optional fields to include in the responseasana_time_tracking_entries_list#List time tracking entries across a workspace, optionally filtered by user.3 params
List time tracking entries across a workspace, optionally filtered by user.
opt_fieldsstringoptionalComma-separated list of optional fields to include in the responseuser_gidstringoptionalGID of the user to filter time tracking entries byworkspace_gidstringoptionalGID of the workspace to list time tracking entries fromasana_time_tracking_entry_delete#Permanently delete a time tracking entry.1 param
Permanently delete a time tracking entry.
time_tracking_entry_gidstringrequiredGID of the time tracking entry to deleteasana_time_tracking_entry_get#Get a single time tracking entry by its GID.2 params
Get a single time tracking entry by its GID.
time_tracking_entry_gidstringrequiredGID of the time tracking entry to retrieveopt_fieldsstringoptionalComma-separated list of optional fields to include in the responseasana_time_tracking_entry_update#Update an existing time tracking entry's duration or date.3 params
Update an existing time tracking entry's duration or date.
time_tracking_entry_gidstringrequiredGID of the time tracking entry to updateduration_minutesintegeroptionalUpdated duration of the time entry in minutesentered_onstringoptionalUpdated date the time was entered, in ISO 8601 format (YYYY-MM-DD)asana_typeahead_search#Search for objects in a workspace by name prefix. Returns users, projects, tags, tasks, and portfolios matching the query. Useful for autocomplete and ID lookup.5 params
Search for objects in a workspace by name prefix. Returns users, projects, tags, tasks, and portfolios matching the query. Useful for autocomplete and ID lookup.
querystringrequiredName prefix to search forworkspace_gidstringrequiredGID of the workspace to search withincountintegeroptionalMaximum number of results to return (1-20)opt_fieldsstringoptionalComma-separated list of optional fields to include in responseresource_typestringoptionalType of resource to filter results byasana_user_favorites_list#List a user's favorited objects in a workspace in Asana. Optionally filter by resource type.4 params
List a user's favorited objects in a workspace in Asana. Optionally filter by resource type.
resource_typestringrequiredFilter favorites by resource typeuser_gidstringrequiredGID of the user whose favorites to listworkspace_gidstringrequiredGID of the workspace to scope the favoritesopt_fieldsstringoptionalComma-separated list of optional fields to include in responseasana_user_get#Get the profile of a specific user by GID.2 params
Get the profile of a specific user by GID.
user_gidstringrequiredGID of the user. Use 'me' for the authenticated user.opt_fieldsstringoptionalComma-separated list of optional fields to include in responseasana_user_task_list_for_user_get#Get the personal task list for a user in a workspace in Asana.3 params
Get the personal task list for a user in a workspace in Asana.
user_gidstringrequiredGID of the user whose task list to retrieveworkspace_gidstringrequiredGID of the workspace to scope the requestopt_fieldsstringoptionalComma-separated list of optional fields to include in responseasana_user_task_list_get#Get a user task list by its GID in Asana.2 params
Get a user task list by its GID in Asana.
user_task_list_gidstringrequiredGID of the user task list to retrieveopt_fieldsstringoptionalComma-separated list of optional fields to include in responseasana_user_team_memberships_list#List all team memberships for a specific user.3 params
List all team memberships for a specific user.
user_gidstringrequiredGID of the user whose team memberships to listopt_fieldsstringoptionalComma-separated list of optional fields to include in the responseworkspace_gidstringoptionalGID of the workspace to filter memberships byasana_user_teams_list#List all teams a user belongs to.3 params
List all teams a user belongs to.
user_gidstringrequiredGID of the user whose teams to list, or 'me' for the current useropt_fieldsstringoptionalComma-separated list of optional fields to include in responseorganization_gidstringoptionalGID of the organization to filter teams byasana_user_workspace_memberships_list#List all workspace memberships for a specific user. Returns membership records showing which workspaces the user belongs to and their role in each.2 params
List all workspace memberships for a specific user. Returns membership records showing which workspaces the user belongs to and their role in each.
user_gidstringrequiredGlobally unique identifier for the user whose workspace memberships to list. e.g. 987654321opt_fieldsstringoptionalComma-separated list of optional fields to include in the response. e.g. workspace,workspace.name,is_activeasana_users_list#List users in a workspace.2 params
List users in a workspace.
workspace_gidstringrequiredGID of the workspace to list users fromopt_fieldsstringoptionalComma-separated list of optional fields to include in responseasana_webhook_create#Create a webhook to receive event notifications for a resource.3 params
Create a webhook to receive event notifications for a resource.
resource_gidstringrequiredGID of the resource to watch for eventstarget_urlstringrequiredHTTPS URL that will receive event notificationsfiltersarrayoptionalArray of filter objects to narrow which events trigger the webhookasana_webhook_delete#Permanently delete a webhook. The webhook will no longer receive event notifications.1 param
Permanently delete a webhook. The webhook will no longer receive event notifications.
webhook_gidstringrequiredThe GID of the webhook to deleteasana_webhook_get#Get a webhook by its GID.2 params
Get a webhook by its GID.
webhook_gidstringrequiredThe GID of the webhook to retrieveopt_fieldsstringoptionalComma-separated list of optional fields to include in responseasana_webhook_update#Update the filters on an existing webhook.2 params
Update the filters on an existing webhook.
webhook_gidstringrequiredThe GID of the webhook to updatefiltersarrayoptionalArray of filter objects to replace the webhook's existing filtersasana_webhooks_list#List all webhooks for a workspace.3 params
List all webhooks for a workspace.
workspace_gidstringrequiredGID of the workspace to list webhooks foropt_fieldsstringoptionalComma-separated list of optional fields to include in responseresourcestringoptionalGID of a resource to filter webhooks byasana_workspace_add_user#Add a user to a workspace or organization in Asana.2 params
Add a user to a workspace or organization in Asana.
user_gidstringrequiredGID or email of the user to add to the workspaceworkspace_gidstringrequiredGID of the workspace to add the user toasana_workspace_custom_fields_list#List all custom fields in a workspace.2 params
List all custom fields in a workspace.
workspace_gidstringrequiredGID of the workspace to list custom fields foropt_fieldsstringoptionalComma-separated list of optional fields to include in responseasana_workspace_get#Get details of a specific workspace by its GID.2 params
Get details of a specific workspace by its GID.
workspace_gidstringrequiredGID of the workspace to retrieveopt_fieldsstringoptionalComma-separated list of optional fields to include in responseasana_workspace_membership_get#Get a specific workspace membership record by its GID. Returns user identity and workspace-level role details for that membership.2 params
Get a specific workspace membership record by its GID. Returns user identity and workspace-level role details for that membership.
workspace_membership_gidstringrequiredGlobally unique identifier for the workspace membership record to retrieve. e.g. 1234567890opt_fieldsstringoptionalComma-separated list of optional fields to include in the response. e.g. user,user.name,workspace,is_activeasana_workspace_memberships_list#List all members of a workspace. Returns membership records for all users in the specified workspace including their roles and status.2 params
List all members of a workspace. Returns membership records for all users in the specified workspace including their roles and status.
workspace_gidstringrequiredGlobally unique identifier for the workspace whose members to list. e.g. 1234567890opt_fieldsstringoptionalComma-separated list of optional fields to include in the response. e.g. user,user.name,is_activeasana_workspace_remove_user#Remove a user from a workspace or organization in Asana.2 params
Remove a user from a workspace or organization in Asana.
user_gidstringrequiredGID of the user to remove from the workspaceworkspace_gidstringrequiredGID of the workspace to remove the user fromasana_workspace_teams_list#List all teams in a workspace.2 params
List all teams in a workspace.
workspace_gidstringrequiredGID of the workspaceopt_fieldsstringoptionalComma-separated list of optional fields to include in responseasana_workspace_user_get#Get a user's workspace-level membership details. Returns the user's profile and role information within the specified workspace.3 params
Get a user's workspace-level membership details. Returns the user's profile and role information within the specified workspace.
user_gidstringrequiredGlobally unique identifier for the user to look up in the workspace. e.g. 987654321workspace_gidstringrequiredGlobally unique identifier for the workspace. e.g. 1234567890opt_fieldsstringoptionalComma-separated list of optional fields to include in the response. e.g. name,email,workspacesasana_workspaces_list#List all workspaces the authenticated user has access to.1 param
List all workspaces the authenticated user has access to.
opt_fieldsstringoptionalComma-separated list of optional fields to include in response