Microsoft Word connector
OAuth 2.0Files & DocumentsConnect to Microsoft Word. Authenticate with your Microsoft account to create, read, and edit Word documents stored in OneDrive or SharePoint through...
Microsoft Word connector
-
Install the SDK
Section titled “Install the SDK”Terminal window npm install @scalekit-sdk/nodeTerminal window pip install scalekit -
Set your credentials
Section titled “Set your credentials”Add your Scalekit credentials to your
.envfile. Find values in app.scalekit.com > Developers > API Credentials..env SCALEKIT_ENVIRONMENT_URL=<your-environment-url>SCALEKIT_CLIENT_ID=<your-client-id>SCALEKIT_CLIENT_SECRET=<your-client-secret> -
Set up the connector
Section titled “Set up the connector”Register your Microsoft Word credentials with Scalekit so it handles the token lifecycle. You do this once per environment.
Dashboard setup steps
Register your Scalekit environment with the Microsoft Word connector so Scalekit handles the authentication flow and token lifecycle for you. The connection name you create will be used to identify and invoke the connection programmatically. Then complete the configuration in your application as follows:
-
Set up auth redirects
-
In Scalekit dashboard, go to AgentKit > Connections > Create Connection. Find Word and click Create. Copy the redirect URI. It will look like
https://<SCALEKIT_ENVIRONMENT_URL>/sso/v1/oauth/<CONNECTION_ID>/callback.
-
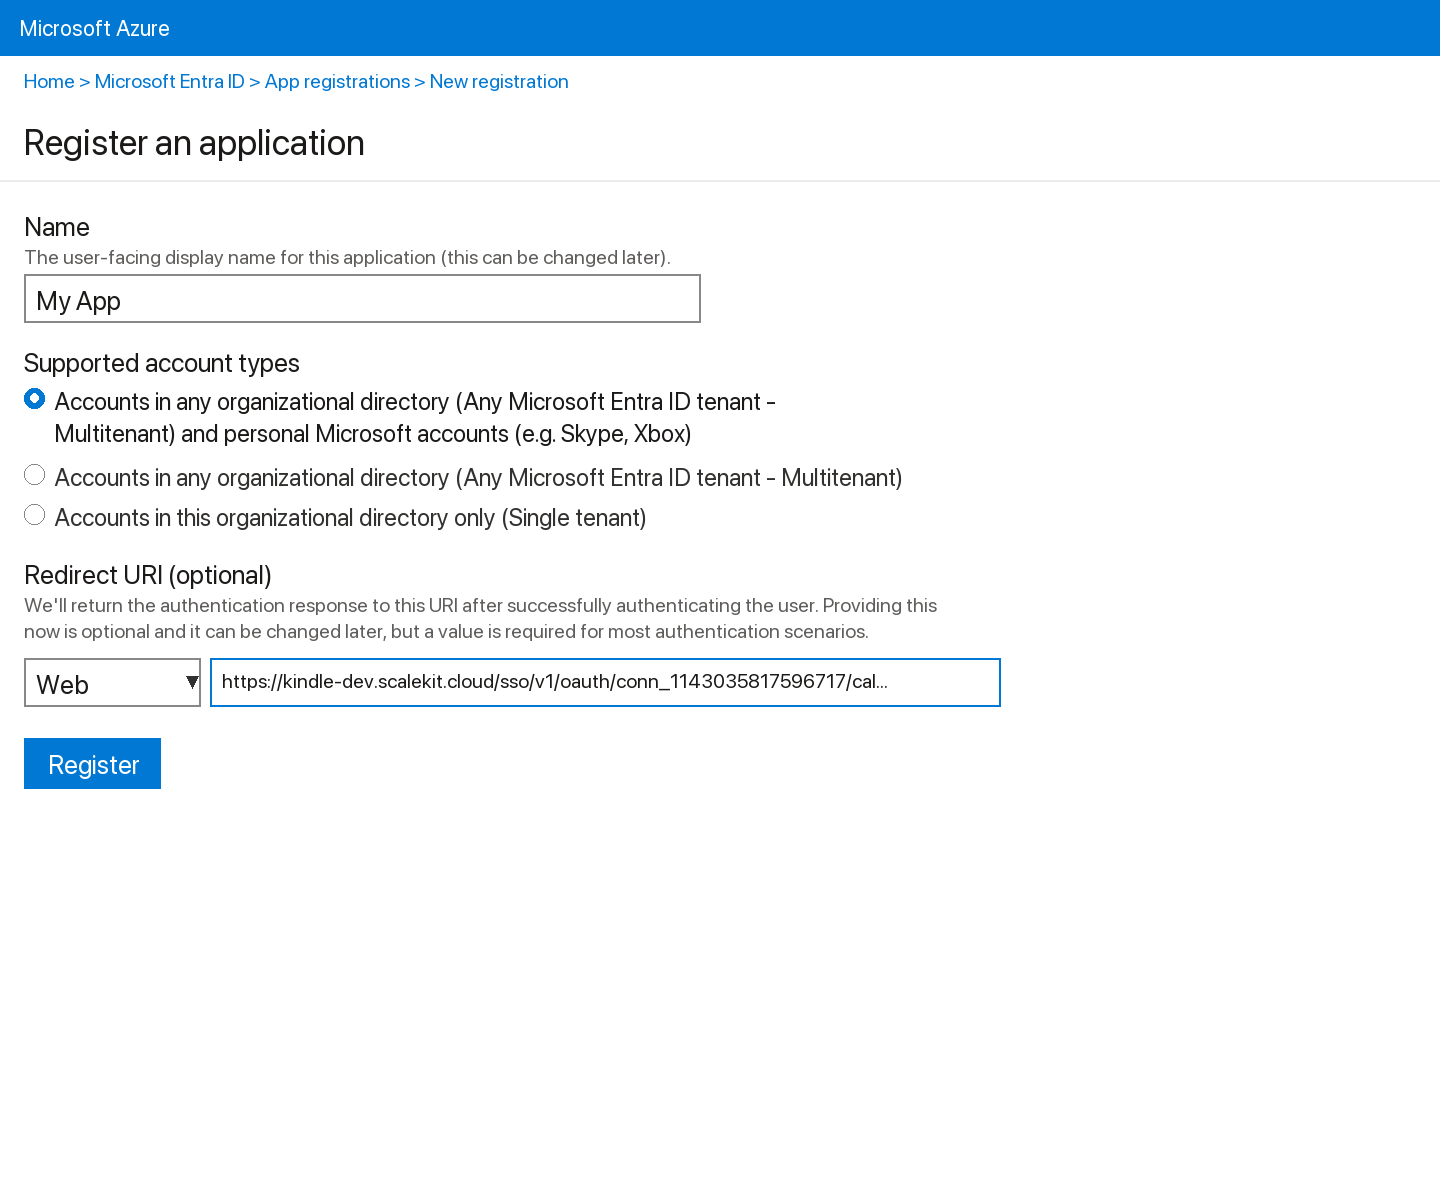
Sign into portal.azure.com and go to Microsoft Entra ID → App registrations → New registration.
-
Enter a name for your app.
-
Under Supported account types, select Accounts in any organizational directory (Any Azure AD directory - Multitenant) and personal Microsoft accounts.
-
Under Redirect URI, select Web and paste the redirect URI from step 1. Click Register.
-
-
Get your client credentials
-
Go to Certificates & secrets → New client secret, set an expiry, and click Add. Copy the Value immediately.
-
From the Overview page, copy the Application (client) ID.
-
-
Add credentials in Scalekit
-
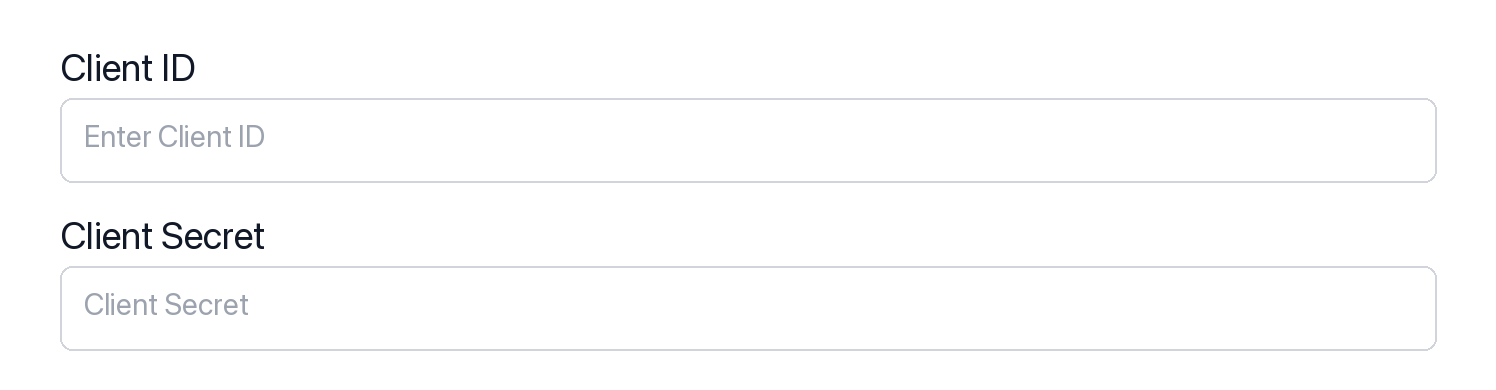
In Scalekit dashboard, go to AgentKit > Connections and open the connection you created.
-
Enter your credentials:
- Client ID (Application (client) ID from Azure)
- Client Secret (from Certificates & secrets)
- Permissions (scopes — see Microsoft Graph permissions reference)
-
Click Save.
-
-
-
Authorize and make your first call
Section titled “Authorize and make your first call”quickstart.ts import { ScalekitClient } from '@scalekit-sdk/node'import 'dotenv/config'const scalekit = new ScalekitClient(process.env.SCALEKIT_ENV_URL,process.env.SCALEKIT_CLIENT_ID,process.env.SCALEKIT_CLIENT_SECRET,)const actions = scalekit.actionsconst connector = 'microsoftword'const identifier = 'user_123'// Generate an authorization link for the userconst { link } = await actions.getAuthorizationLink({ connectionName: connector, identifier })console.log('Authorize Microsoft Word:', link)process.stdout.write('Press Enter after authorizing...')await new Promise(r => process.stdin.once('data', r))// Make your first callconst result = await actions.executeTool({connector,identifier,toolName: 'microsoftword_read_document',toolInput: { item_id: 'YOUR_ITEM_ID' },})console.log(result)quickstart.py import osfrom scalekit.client import ScalekitClientfrom dotenv import load_dotenvload_dotenv()scalekit_client = ScalekitClient(env_url=os.getenv("SCALEKIT_ENV_URL"),client_id=os.getenv("SCALEKIT_CLIENT_ID"),client_secret=os.getenv("SCALEKIT_CLIENT_SECRET"),)actions = scalekit_client.actionsconnection_name = "microsoftword"identifier = "user_123"# Generate an authorization link for the userlink_response = actions.get_authorization_link(connection_name=connection_name,identifier=identifier,)print("Authorize Microsoft Word:", link_response.link)input("Press Enter after authorizing...")# Make your first callresult = actions.execute_tool(tool_input={"item_id":"YOUR_ITEM_ID"},tool_name="microsoftword_read_document",connection_name=connection_name,identifier=identifier,)print(result)
What you can do
Section titled “What you can do”Connect this agent connector to let your agent:
- Read document — Export a Word document (.docx) from OneDrive as a PDF by requesting the file content with the format=pdf conversion parameter
- Create document — Create a new Word document (.docx) in OneDrive by initiating a resumable upload session
Common workflows
Section titled “Common workflows”Proxy API call
const result = await actions.request({ connectionName: 'microsoftword', identifier: 'user_123', path: '/v1.0/me', method: 'GET',});console.log(result);result = actions.request( connection_name='microsoftword', identifier='user_123', path="/v1.0/me", method="GET")print(result)Execute a tool
const result = await actions.executeTool({ connector: 'microsoftword', identifier: 'user_123', toolName: 'microsoftword_list', toolInput: {},});console.log(result);result = actions.execute_tool( connection_name='microsoftword', identifier='user_123', tool_name='microsoftword_list', tool_input={},)print(result)Tool list
Section titled “Tool list”Use the exact tool names from the Tool list below when you call execute_tool. If you’re not sure which name to use, list the tools available for the current user first.
microsoftword_create_document#Create a new Word document (.docx) in OneDrive by initiating a resumable upload session. Returns an uploadUrl that the caller must use to upload the .docx file bytes via one or more PUT requests. The document is placed under the specified parent folder with the given filename. Requires Files.ReadWrite or Files.ReadWrite.All scope.3 params
Create a new Word document (.docx) in OneDrive by initiating a resumable upload session. Returns an uploadUrl that the caller must use to upload the .docx file bytes via one or more PUT requests. The document is placed under the specified parent folder with the given filename. Requires Files.ReadWrite or Files.ReadWrite.All scope.
filenamestringrequiredThe base name of the Word document to create, without the .docx extension. The extension is appended automatically. Example: "Project Proposal" creates "Project Proposal.docx".parent_idstringrequiredThe OneDrive item ID of the parent folder where the document will be created. Use "root" to create the document at the top level of OneDrive. Obtain folder IDs from list or get drive item operations.conflict_behaviorstringoptionalBehavior when a file with the same name already exists in the target folder. "fail" aborts and returns an error, "replace" overwrites the existing file, "rename" saves the new document with a different auto-generated name. Default: replace.microsoftword_read_document#Export a Word document (.docx) from OneDrive as a PDF by requesting the file content with the format=pdf conversion parameter. Returns the PDF binary of the document. Note: Microsoft Graph converts the document server-side to PDF; it does not return Markdown or plain text. Client-side parsing is required to extract text from the returned PDF. Requires Files.Read or Files.ReadWrite scope.1 param
Export a Word document (.docx) from OneDrive as a PDF by requesting the file content with the format=pdf conversion parameter. Returns the PDF binary of the document. Note: Microsoft Graph converts the document server-side to PDF; it does not return Markdown or plain text. Client-side parsing is required to extract text from the returned PDF. Requires Files.Read or Files.ReadWrite scope.
item_idstringrequiredThe unique OneDrive item ID of the Word document (.docx) to export as PDF. Obtain item IDs from list drive items, search drive items, or get drive item operations. Example: "01BYE5RZ6QN3ZWBTUFOFD3GSPGOHDJD36K".