Confluence connector
OAuth 2.0Project ManagementFiles & DocumentsCollaborationConnect to Confluence. Manage spaces, pages, content, and team collaboration
Confluence connector
-
Install the SDK
Section titled “Install the SDK”Terminal window npm install @scalekit-sdk/nodeTerminal window pip install scalekit -
Set your credentials
Section titled “Set your credentials”Add your Scalekit credentials to your
.envfile. Find values in app.scalekit.com > Developers > API Credentials..env SCALEKIT_ENVIRONMENT_URL=<your-environment-url>SCALEKIT_CLIENT_ID=<your-client-id>SCALEKIT_CLIENT_SECRET=<your-client-secret> -
Set up the connector
Section titled “Set up the connector”Register your Confluence credentials with Scalekit so it handles the token lifecycle. You do this once per environment.
Dashboard setup steps
Register your Scalekit environment with the Confluence connector so Scalekit handles the authentication flow and token lifecycle for you. The connection name you create will be used to identify and invoke the connection programmatically. Then complete the configuration in your application as follows:
-
Set up auth redirects
-
In Scalekit dashboard, go to AgentKit > Connections > Create Connection. Find Confluence and click Create. Copy the redirect URI. It looks like
https://<SCALEKIT_ENVIRONMENT_URL>/sso/v1/oauth/<CONNECTION_ID>/callback.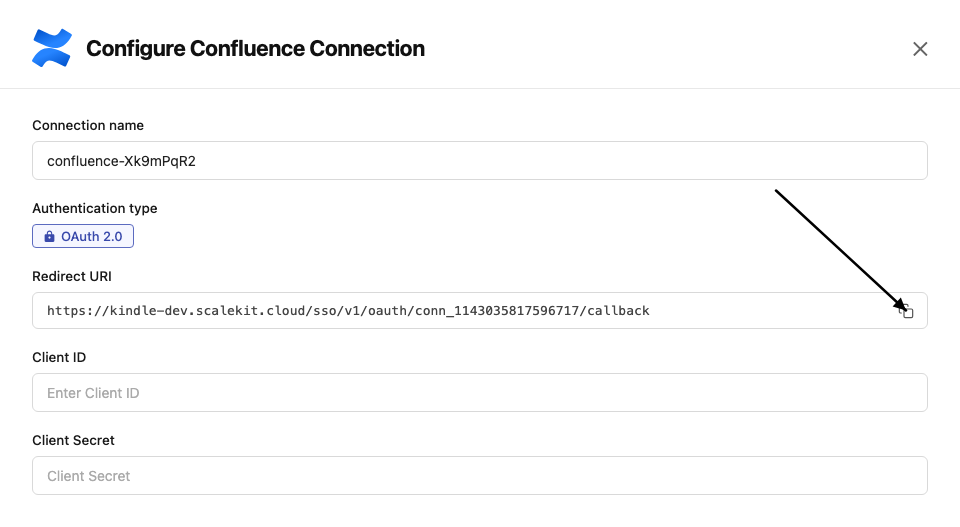
-
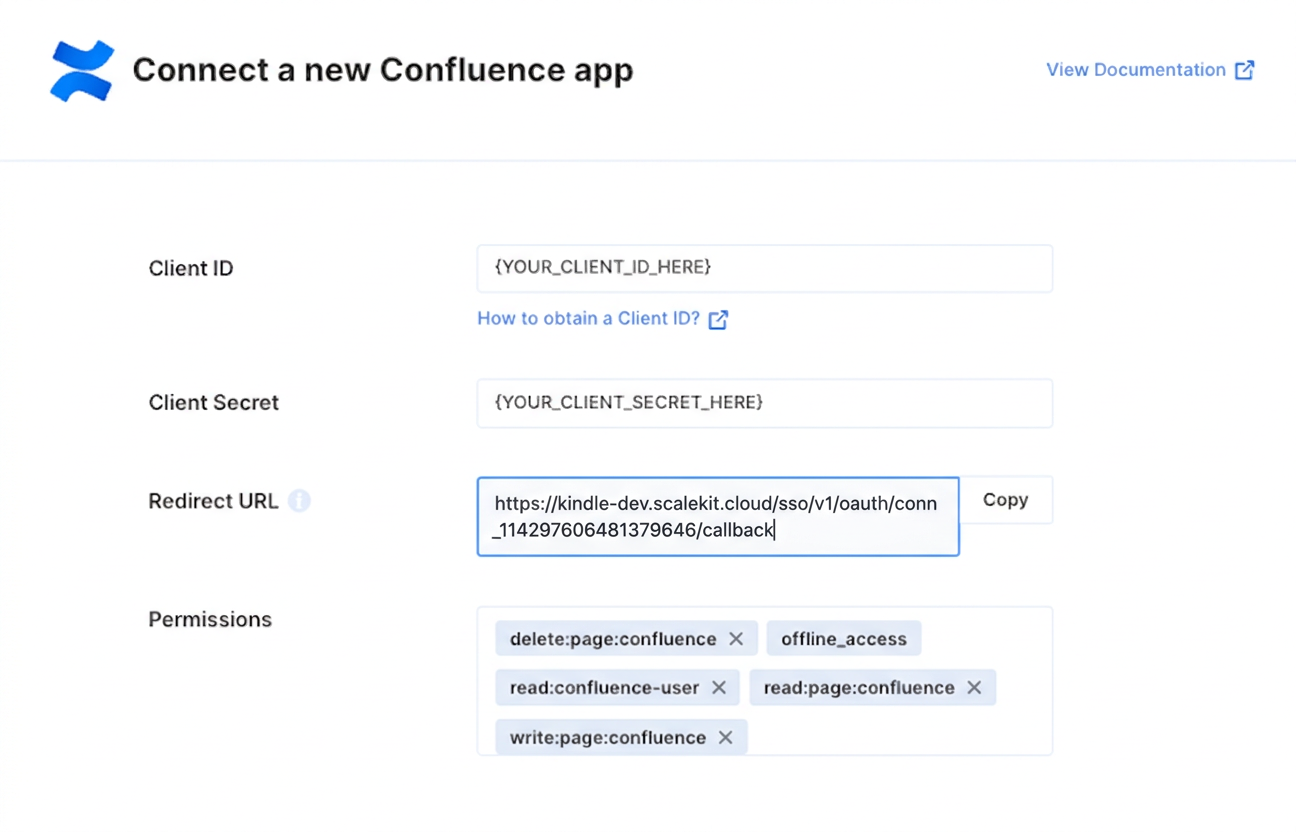
In the Atlassian Developer Console, open your app and go to Authorization → OAuth 2.0 (3LO) → Configure.
-
Paste the copied URI into the Callback URL field and click Save changes.
-
-
Get client credentials
In the Atlassian Developer Console, open your app and go to Settings:
- Client ID — listed under Client ID
- Client Secret — listed under Secret
-
Add credentials in Scalekit
-
In Scalekit dashboard, go to AgentKit > Connections and open the connection you created.
-
Enter your credentials:
- Client ID (from your Atlassian app settings)
- Client Secret (from your Atlassian app settings)
- Permissions (scopes — see Confluence OAuth scopes reference)
-
Click Save.
-
-
-
Authorize and make your first call
Section titled “Authorize and make your first call”quickstart.ts import { ScalekitClient } from '@scalekit-sdk/node'import 'dotenv/config'const scalekit = new ScalekitClient(process.env.SCALEKIT_ENV_URL,process.env.SCALEKIT_CLIENT_ID,process.env.SCALEKIT_CLIENT_SECRET,)const actions = scalekit.actionsconst connector = 'confluence'const identifier = 'user_123'// Generate an authorization link for the userconst { link } = await actions.getAuthorizationLink({ connectionName: connector, identifier })console.log('Authorize Confluence:', link)process.stdout.write('Press Enter after authorizing...')await new Promise(r => process.stdin.once('data', r))// Make your first callconst result = await actions.executeTool({connector,identifier,toolName: 'confluence_attachments_list',toolInput: {},})console.log(result)quickstart.py import osfrom scalekit.client import ScalekitClientfrom dotenv import load_dotenvload_dotenv()scalekit_client = ScalekitClient(env_url=os.getenv("SCALEKIT_ENV_URL"),client_id=os.getenv("SCALEKIT_CLIENT_ID"),client_secret=os.getenv("SCALEKIT_CLIENT_SECRET"),)actions = scalekit_client.actionsconnection_name = "confluence"identifier = "user_123"# Generate an authorization link for the userlink_response = actions.get_authorization_link(connection_name=connection_name,identifier=identifier,)print("Authorize Confluence:", link_response.link)input("Press Enter after authorizing...")# Make your first callresult = actions.execute_tool(tool_input={},tool_name="confluence_attachments_list",connection_name=connection_name,identifier=identifier,)print(result)
What you can do
Section titled “What you can do”Connect this agent connector to let your agent:
- Get whiteboard, whiteboard descendants, whiteboard children — Retrieve a single Confluence whiteboard by its ID
- Delete whiteboard, space role, inline comment — Delete a Confluence whiteboard by its ID
- Create whiteboard, space role, space — Create a new whiteboard in a specified Confluence space
- Lookup users bulk — Look up user details in bulk for a list of account IDs
- Update task, space role, page title — Update a Confluence task by ID
- List task, space roles, space role assignments — List all Confluence tasks the current user has permission to view
Common workflows
Section titled “Common workflows”Proxy API call
Don’t worry about the Confluence cloud ID in the path. Scalekit automatically resolves {{cloud_id}} from the connected account’s configuration. For example, a request with path="/wiki/rest/api/user/current" will be sent to https://api.atlassian.com/ex/confluence/a1b2c3d4-e5f6-7890-abcd-ef1234567890/wiki/rest/api/user/current automatically.
const result = await actions.request({ connectionName: 'confluence', identifier: 'user_123', path: '/wiki/rest/api/user/current', method: 'GET',});console.log(result);result = actions.request( connection_name='confluence', identifier='user_123', path="/wiki/rest/api/user/current", method="GET")print(result)Execute a tool
const result = await actions.executeTool({ connector: 'confluence', identifier: 'user_123', toolName: 'confluence_list', toolInput: {},});console.log(result);result = actions.execute_tool( tool_input={}, tool_name='confluence_list', connection_name='confluence', identifier='user_123',)print(result)Tool list
Section titled “Tool list”Use the exact tool names from the Tool list below when you call execute_tool. If you’re not sure which name to use, list the tools available for the current user first.
confluence_access_by_email_check#Check site access for a list of emails. Returns the subset of emails from the input list that do NOT currently have access to the Confluence site. Requires permission to access the Confluence site.1 param
Check site access for a list of emails. Returns the subset of emails from the input list that do NOT currently have access to the Confluence site. Requires permission to access the Confluence site.
emailsarrayrequiredJSON array of email addresses to check for site accessconfluence_access_by_email_invite#Invite a list of emails to the Confluence site. Invalid emails are ignored and no action is taken for emails that already have access. This API is asynchronous and may take some time to complete. Requires permission to access the Confluence site.1 param
Invite a list of emails to the Confluence site. Invalid emails are ignored and no action is taken for emails that already have access. This API is asynchronous and may take some time to complete. Requires permission to access the Confluence site.
emailsarrayrequiredJSON array of email addresses to invite to the siteconfluence_attachment_comments_get#Retrieve footer comments for a specific Confluence attachment. Returns paginated comment results including author, content, creation time, and reply counts. Supports cursor-based pagination and optional body format, and can retrieve comments for a specific attachment version.6 params
Retrieve footer comments for a specific Confluence attachment. Returns paginated comment results including author, content, creation time, and reply counts. Supports cursor-based pagination and optional body format, and can retrieve comments for a specific attachment version.
idstringrequiredThe ID of the attachment for which comments should be returnedbody_formatstringoptionalThe content format type to be returned in the body field of the responsecursorstringoptionalCursor token for pagination, returned in the previous response as _links.nextlimitintegeroptionalMaximum number of comments to return per page (default 25, max 250)sortstringoptionalSort order for comments (e.g. created-date, -created-date, modified-date, -modified-date)versionintegeroptionalVersion number of the attachment to retrieve comments for. If not provided, retrieves comments for the latest version.confluence_attachment_delete#Delete a Confluence attachment by its ID. By default moves the attachment to the trash; set purge=true to permanently delete a trashed attachment without recovery. This action requires permission to delete attachments in the space, and space admin permission to purge.2 params
Delete a Confluence attachment by its ID. By default moves the attachment to the trash; set purge=true to permanently delete a trashed attachment without recovery. This action requires permission to delete attachments in the space, and space admin permission to purge.
idstringrequiredThe ID of the attachment to deletepurgebooleanoptionalSet to true to permanently delete a trashed attachment, bypassing recoveryconfluence_attachment_get#Retrieve a specific Confluence attachment by its ID. Returns metadata including filename, media type, file size, download URL, and optionally labels, content properties, operations, versions, and collaborators. Use the Get Attachments tool if you don't know the attachment ID.8 params
Retrieve a specific Confluence attachment by its ID. Returns metadata including filename, media type, file size, download URL, and optionally labels, content properties, operations, versions, and collaborators. Use the Get Attachments tool if you don't know the attachment ID.
idstringrequiredThe ID of the attachment to retrieveinclude_collaboratorsbooleanoptionalSet to true to include collaborators on the attachmentinclude_labelsbooleanoptionalSet to true to include labels associated with this attachmentinclude_operationsbooleanoptionalSet to true to include operations associated with this attachmentinclude_propertiesbooleanoptionalSet to true to include content properties associated with this attachmentinclude_versionbooleanoptionalSet to false to exclude the current version details from the responseinclude_versionsbooleanoptionalSet to true to include all versions associated with this attachmentversionintegeroptionalSpecific version number of the attachment to retrieve (defaults to latest)confluence_attachment_labels_get#Retrieve all labels attached to a specific Confluence attachment. Labels can be filtered by prefix (e.g. global, my, team, system). Returns a paginated list of label names and prefixes. Only labels the caller has permission to view are returned.5 params
Retrieve all labels attached to a specific Confluence attachment. Labels can be filtered by prefix (e.g. global, my, team, system). Returns a paginated list of label names and prefixes. Only labels the caller has permission to view are returned.
idstringrequiredThe ID of the attachment whose labels to retrievecursorstringoptionalCursor token for pagination, returned in the previous response as _links.nextlimitintegeroptionalMaximum number of labels to return per page (default 25, max 250)prefixstringoptionalFilter labels by prefix (e.g. my, team, global, system)sortstringoptionalSort order for labels (e.g. created-date, -created-date, id, -id, name, -name)confluence_attachment_thumbnail_get#Download an attachment's thumbnail image by attachment ID. Redirects to a URL that serves the thumbnail's binary data. Optionally control the thumbnail dimensions or retrieve a previous version. Requires permission to view the attachment's container.4 params
Download an attachment's thumbnail image by attachment ID. Redirects to a URL that serves the thumbnail's binary data. Optionally control the thumbnail dimensions or retrieve a previous version. Requires permission to view the attachment's container.
idstringrequiredThe ID of the attachment whose thumbnail is to be returnedheightintegeroptionalAllows you to define the thumbnail heightversionintegeroptionalAllows you to retrieve a previously published version. Specify the previous version's number to retrieve its detailswidthintegeroptionalAllows you to define the thumbnail widthconfluence_attachment_version_get#Retrieve the version details for a specific version of a Confluence attachment. Returns metadata about that version, including author and modification date. Use the Get Attachment Versions tool to list available version numbers first.2 params
Retrieve the version details for a specific version of a Confluence attachment. Returns metadata about that version, including author and modification date. Use the Get Attachment Versions tool to list available version numbers first.
attachment_idstringrequiredThe ID of the attachment for which version details should be returnedversion_numberintegerrequiredThe version number of the attachment to be returnedconfluence_attachment_versions_get#Retrieve the version history of a specific Confluence attachment. Returns a paginated list of versions including version numbers, authors, and modification dates. Use the Get Attachment Version Details tool to fetch full details for a single version.4 params
Retrieve the version history of a specific Confluence attachment. Returns a paginated list of versions including version numbers, authors, and modification dates. Use the Get Attachment Version Details tool to fetch full details for a single version.
idstringrequiredThe ID of the attachment whose versions to retrievecursorstringoptionalCursor token for pagination, returned in the previous response as _links.nextlimitintegeroptionalMaximum number of versions to return per page (default 25, max 250)sortstringoptionalSort order for versions (e.g. modified-date, -modified-date)confluence_attachments_list#List all attachments across the Confluence instance. Returns a paginated collection of attachments with metadata including filename, media type, file size, and download URL. Supports filtering by status, media type, or filename and cursor-based pagination.6 params
List all attachments across the Confluence instance. Returns a paginated collection of attachments with metadata including filename, media type, file size, and download URL. Supports filtering by status, media type, or filename and cursor-based pagination.
cursorstringoptionalCursor token for pagination, returned in the previous response as _links.nextfilenamestringoptionalFilter attachments by exact filenamelimitintegeroptionalMaximum number of attachments to return per page (default 50, max 250)media_typestringoptionalFilter attachments by MIME media type (e.g. image/png, application/pdf)sortstringoptionalSort order for attachments (e.g. created-date, -created-date, modified-date, -modified-date)statusarrayoptionalFilter attachments by status (current, archived, trashed). By default current and archived are returned.confluence_blogpost_attachments_get#Retrieve all attachments on a Confluence blog post. Returns a paginated list of attachments with metadata including filename, media type, file size, and download URL. Supports filtering by status, media type, or filename and cursor-based pagination.7 params
Retrieve all attachments on a Confluence blog post. Returns a paginated list of attachments with metadata including filename, media type, file size, and download URL. Supports filtering by status, media type, or filename and cursor-based pagination.
idstringrequiredThe ID of the blog post for which attachments should be returnedcursorstringoptionalCursor token for pagination, returned in the previous response as _links.nextfilenamestringoptionalFilter attachments by exact filenamelimitintegeroptionalMaximum number of attachments to return per page (default 50, max 250)media_typestringoptionalFilter attachments by MIME media type (e.g. image/png, application/pdf)sortstringoptionalSort order for attachments (e.g. created-date, -created-date, modified-date, -modified-date)statusarrayoptionalFilter attachments by status (current, archived, trashed). By default current and archived are returned.confluence_blogpost_create#Create a new blog post in a Confluence space. Requires a target space ID and a title. Optionally set the status (published or draft) and provide body content in storage or atlas_doc_format representation. Set the private query parameter to restrict visibility.6 params
Create a new blog post in a Confluence space. Requires a target space ID and a title. Optionally set the status (published or draft) and provide body content in storage or atlas_doc_format representation. Set the private query parameter to restrict visibility.
spaceIdstringrequiredThe ID of the space to create the blog post intitlestringrequiredTitle of the blog postbody_representationstringoptionalStorage format of the body contentbody_valuestringoptionalThe content of the blog post bodyprivatebooleanoptionalWhether to create the blog post as privatestatusstringoptionalPublication status of the blog postconfluence_blogpost_custom_content_list#Returns all custom content of a given type within a specific Confluence blog post. Custom content is app-defined content stored under a container such as a blog post. Results are paginated via cursor; use the type parameter to filter to a specific custom content type.6 params
Returns all custom content of a given type within a specific Confluence blog post. Custom content is app-defined content stored under a container such as a blog post. Results are paginated via cursor; use the type parameter to filter to a specific custom content type.
idstringrequiredThe ID of the blog post for which custom content should be returnedtypestringrequiredThe type of custom content being requestedbody_formatstringoptionalThe content format to return in the body field of the response (e.g. raw, storage, atlas_doc_format)cursorstringoptionalCursor token for pagination, returned in previous response as _links.nextlimitintegeroptionalMaximum number of custom content items to return per page (default 25, max 250)sortstringoptionalUsed to sort the result by a particular field (e.g. id, -id, created-date, -created-date, modified-date, -modified-date, title, -title)confluence_blogpost_delete#Delete a Confluence blog post by its ID. By default deletes non-draft blog posts, moving them to the trash where they can be restored later. Set draft=true to delete a draft blog post instead (discarded drafts are permanently deleted, not trashed). Set purge=true to permanently delete a trashed blog post without recovery.3 params
Delete a Confluence blog post by its ID. By default deletes non-draft blog posts, moving them to the trash where they can be restored later. Set draft=true to delete a draft blog post instead (discarded drafts are permanently deleted, not trashed). Set purge=true to permanently delete a trashed blog post without recovery.
idstringrequiredThe ID of the blog post to deletedraftbooleanoptionalSet to true to delete a blog post that is a draftpurgebooleanoptionalSet to true to permanently delete a trashed blog post, bypassing recoveryconfluence_blogpost_get#Retrieve a specific Confluence blog post by its ID. Returns the blog post content, metadata, author, space, status, and version history. Optionally include body content in a specified format, fetch a draft version, or a historical version.5 params
Retrieve a specific Confluence blog post by its ID. Returns the blog post content, metadata, author, space, status, and version history. Optionally include body content in a specified format, fetch a draft version, or a historical version.
idstringrequiredThe numeric ID of the blog post to retrievebody_formatstringoptionalFormat of the blog post body to include in the responseget_draftbooleanoptionalWhether to retrieve the draft version of the blog postinclude_labelsbooleanoptionalWhether to include labels applied to the blog postversionintegeroptionalVersion number of the blog post to retrieveconfluence_blogpost_inline_comments_get#Retrieve the root inline comments of a specific Confluence blog post. Returns paginated comment results including author, content, and status. Supports filtering by status and resolution status, sorting, and cursor-based pagination.7 params
Retrieve the root inline comments of a specific Confluence blog post. Returns paginated comment results including author, content, and status. Supports filtering by status and resolution status, sorting, and cursor-based pagination.
idstringrequiredThe numeric ID of the blog post whose inline comments to retrievebody_formatstringoptionalFormat of the comment body to include in the responsecursorstringoptionalCursor token for fetching the next page of resultslimitintegeroptionalMaximum number of inline comments to return per pageresolution_statusarrayoptionalFilter inline comments by resolution status. Accepts an array of values: resolved, open, dangling, reopened.sortstringoptionalSort order for the commentsstatusarrayoptionalFilter inline comments by status. Accepts an array of values: current, deleted, trashed, historical, draft.confluence_blogpost_labels_get#Retrieve all labels attached to a Confluence blog post. Labels can be filtered by prefix (e.g. global, my, team, system). Returns a paginated list of label names and prefixes. Only labels the requesting user has permission to view are returned.5 params
Retrieve all labels attached to a Confluence blog post. Labels can be filtered by prefix (e.g. global, my, team, system). Returns a paginated list of label names and prefixes. Only labels the requesting user has permission to view are returned.
idstringrequiredThe ID of the blog post for which labels should be returnedcursorstringoptionalCursor token for pagination, returned in previous response as _links.nextlimitintegeroptionalMaximum number of labels to return per page (default 25, max 250)prefixstringoptionalFilter the results to labels based on their prefix (e.g. my, team, global, system)sortstringoptionalUsed to sort the result by a particular field (e.g. created-date, -created-date, id, -id, name, -name)confluence_blogpost_like_count_get#Retrieve the total count of likes on a specific Confluence blog post.1 param
Retrieve the total count of likes on a specific Confluence blog post.
idstringrequiredThe ID of the blog post for which like count should be returnedconfluence_blogpost_like_users_get#Retrieve the account IDs of users who liked a specific Confluence blog post. Results are paginated via cursor.3 params
Retrieve the account IDs of users who liked a specific Confluence blog post. Results are paginated via cursor.
idstringrequiredThe ID of the blog post for which account IDs of likes should be returnedcursorstringoptionalCursor token for pagination, returned in previous response as _links.nextlimitintegeroptionalMaximum number of account IDs to return per page (default 25, max 250)confluence_blogpost_list#List blog posts in Confluence. Filter by blog post IDs, space IDs, sort order, status, title, or body format. Returns paginated results with cursor-based navigation.8 params
List blog posts in Confluence. Filter by blog post IDs, space IDs, sort order, status, title, or body format. Returns paginated results with cursor-based navigation.
body_formatstringoptionalFormat of the blog post body to returncursorstringoptionalCursor token for fetching the next page of resultsidarrayoptionalFilter by specific blog post IDslimitintegeroptionalMaximum number of blog posts to return per pagesortstringoptionalSort order for the resultsspace_idarrayoptionalFilter blog posts by space IDsstatusstringoptionalFilter blog posts by statustitlestringoptionalFilter blog posts by title (partial match)confluence_blogpost_update#Update an existing Confluence blog post. Requires the blog post ID, current status, title, and the next version number (must be exactly current version + 1). Optionally update the body content or add a version message. Retrieve the current version number with the Get Blog Post tool before calling this.7 params
Update an existing Confluence blog post. Requires the blog post ID, current status, title, and the next version number (must be exactly current version + 1). Optionally update the body content or add a version message. Retrieve the current version number with the Get Blog Post tool before calling this.
idstringrequiredThe ID of the blog post to updatestatusstringrequiredStatus of the blog post after the update (e.g. current, draft)titlestringrequiredUpdated title of the blog postversion_numberintegerrequiredThe new version number for this update. Must be exactly the current version number plus 1.body_representationstringoptionalFormat for the updated body content (e.g. storage, atlas_doc_format). Must be set together with body_value.body_valuestringoptionalThe updated body content in the format specified by body_representation. Must be set together with body_representation.version_messagestringoptionalOptional message describing what changed in this versionconfluence_blogpost_version_get#Retrieve the details of a specific historical version of a Confluence blog post, identified by blog post ID and version number.2 params
Retrieve the details of a specific historical version of a Confluence blog post, identified by blog post ID and version number.
blogpost_idstringrequiredThe ID of the blog post for which version details should be returnedversion_numberintegerrequiredThe version number of the blog post to be returnedconfluence_blogpost_versions_list#Retrieve the version history of a specific Confluence blog post. Returns a paginated list of versions with metadata such as author and modification date. Use cursor-based pagination for blog posts with many versions.5 params
Retrieve the version history of a specific Confluence blog post. Returns a paginated list of versions with metadata such as author and modification date. Use cursor-based pagination for blog posts with many versions.
idstringrequiredThe ID of the blog post to be queried for its versionsbody_formatstringoptionalThe content format to return in the body field of each version (e.g. storage, atlas_doc_format)cursorstringoptionalCursor token for pagination, returned in previous response as _links.nextlimitintegeroptionalMaximum number of versions to return per page (default 25, max 250)sortstringoptionalUsed to sort the result by a particular field (e.g. modified-date, -modified-date)confluence_custom_content_attachments_get#Retrieve the attachments of a specific Confluence custom content item. Supports filtering by status, media type, or filename, and cursor-based pagination for items with many attachments.7 params
Retrieve the attachments of a specific Confluence custom content item. Supports filtering by status, media type, or filename, and cursor-based pagination for items with many attachments.
idstringrequiredThe ID of the custom content for which attachments should be returnedcursorstringoptionalCursor token for pagination, returned in the previous response as _links.nextfilenamestringoptionalFilter attachments by their filename (only one filename may be specified)limitintegeroptionalMaximum number of attachments to return per page (default 50, max 250)media_typestringoptionalFilter attachments by media type (only one media type may be specified)sortstringoptionalSort order for attachments (e.g. created-date, -created-date, modified-date, -modified-date)statusstringoptionalFilter attachments by status (comma-separated list). By default current and archived are used.confluence_custom_content_children_get#Retrieve all child custom content for a given custom content ID. Results are paginated via cursor. Only custom content the user has permission to view is returned.4 params
Retrieve all child custom content for a given custom content ID. Results are paginated via cursor. Only custom content the user has permission to view is returned.
idstringrequiredThe ID of the parent custom content. If you don't know the custom content ID, use List Custom Content and filter the resultscursorstringoptionalCursor token for pagination, returned in the previous response as _links.nextlimitintegeroptionalMaximum number of pages per result to return (default 25, max 250)sortstringoptionalUsed to sort the result by a particular field (e.g. created-date, -created-date, id, -id, modified-date, -modified-date)confluence_custom_content_comments_get#Retrieve the footer comments of a specific Confluence custom content item. Supports body format selection and cursor-based pagination for items with many comments.5 params
Retrieve the footer comments of a specific Confluence custom content item. Supports body format selection and cursor-based pagination for items with many comments.
idstringrequiredThe ID of the custom content for which comments should be returnedbody_formatstringoptionalThe content format to return in the body field of each comment (e.g. storage, atlas_doc_format)cursorstringoptionalCursor token for pagination, returned in the previous response as _links.nextlimitintegeroptionalMaximum number of comments to return per page (default 25, max 250)sortstringoptionalSort order for comments (e.g. created-date, -created-date, modified-date, -modified-date)confluence_custom_content_create#Create a new Confluence custom content item under a space, page, blog post, or other custom content. Exactly one of space_id, page_id, blog_post_id, or custom_content_id must be provided as the container. Requires a type and title; optionally set the initial status and body content.9 params
Create a new Confluence custom content item under a space, page, blog post, or other custom content. Exactly one of space_id, page_id, blog_post_id, or custom_content_id must be provided as the container. Requires a type and title; optionally set the initial status and body content.
titlestringrequiredTitle of the new custom contenttypestringrequiredThe app-defined type of custom content to createblog_post_idstringoptionalThe ID of the blog post to create the custom content under. Provide exactly one of space_id, page_id, blog_post_id, or custom_content_id.body_representationstringoptionalThe markup format for the custom content body (e.g. storage, atlas_doc_format). Must be set together with body_value.body_valuestringoptionalThe raw content of the custom content body in the format specified by body_representation. Must be set together with body_representation.custom_content_idstringoptionalThe ID of another custom content item to nest this custom content under. Provide exactly one of space_id, page_id, blog_post_id, or custom_content_id.page_idstringoptionalThe ID of the page to create the custom content under. Provide exactly one of space_id, page_id, blog_post_id, or custom_content_id.space_idstringoptionalThe ID of the space to create the custom content under. Provide exactly one of space_id, page_id, blog_post_id, or custom_content_id.statusstringoptionalInitial status of the custom content (e.g. current, draft)confluence_custom_content_delete#Delete a Confluence custom content item by its ID. By default moves the custom content to the trash; set purge=true to permanently delete a trashed item without recovery. This action is irreversible when purge is enabled.2 params
Delete a Confluence custom content item by its ID. By default moves the custom content to the trash; set purge=true to permanently delete a trashed item without recovery. This action is irreversible when purge is enabled.
idstringrequiredThe ID of the custom content to be deletedpurgebooleanoptionalSet to true to permanently delete an already-trashed custom content item, bypassing recoveryconfluence_custom_content_get#Retrieve a specific piece of Confluence custom content by its ID. Optionally include labels, content properties, operations, version history, the current version, or collaborators in the response.9 params
Retrieve a specific piece of Confluence custom content by its ID. Optionally include labels, content properties, operations, version history, the current version, or collaborators in the response.
idstringrequiredThe ID of the custom content to be returnedbody_formatstringoptionalThe content format to return in the body field of the response (e.g. raw, storage, atlas_doc_format, view, export_view, anonymous_export_view)include_collaboratorsbooleanoptionalSet to true to include collaborators on the custom contentinclude_labelsbooleanoptionalSet to true to include labels associated with this custom content in the responseinclude_operationsbooleanoptionalSet to true to include operations associated with this custom content in the responseinclude_propertiesbooleanoptionalSet to true to include content properties associated with this custom content in the responseinclude_versionbooleanoptionalIncludes the current version associated with this custom content in the response. Defaults to true.include_versionsbooleanoptionalSet to true to include versions associated with this custom content in the responseversionintegeroptionalAllows you to retrieve a previously published version. Specify the previous version's number to retrieve its details.confluence_custom_content_labels_get#Retrieve all labels attached to a Confluence custom content item. Labels can be filtered by prefix (e.g. global, my, team, system). Returns a paginated list of label names and prefixes; only labels the user can view are returned.5 params
Retrieve all labels attached to a Confluence custom content item. Labels can be filtered by prefix (e.g. global, my, team, system). Returns a paginated list of label names and prefixes; only labels the user can view are returned.
idstringrequiredThe ID of the custom content for which labels should be returnedcursorstringoptionalCursor token for pagination, returned in the previous response as _links.nextlimitintegeroptionalMaximum number of labels to return per page (default 25, max 250)prefixstringoptionalFilter labels by prefix (e.g. my, team, global, system)sortstringoptionalSort order for labels (e.g. created-date, -created-date, id, -id, name, -name)confluence_custom_content_list#Returns all Confluence custom content for a given type, optionally filtered by custom content IDs or space IDs. Custom content is app-defined content that can live under a page, blog post, space, or other custom content. Results are paginated via cursor.7 params
Returns all Confluence custom content for a given type, optionally filtered by custom content IDs or space IDs. Custom content is app-defined content that can live under a page, blog post, space, or other custom content. Results are paginated via cursor.
typestringrequiredThe type of custom content being requestedbody_formatstringoptionalThe content format to return in the body field of the response (e.g. raw, storage, atlas_doc_format)cursorstringoptionalCursor token for pagination, returned in previous response as _links.nextidstringoptionalFilter the results based on custom content IDs (comma-separated string, up to 250 IDs)limitintegeroptionalMaximum number of custom content items to return per page (default 25, max 250)sortstringoptionalUsed to sort the result by a particular field (e.g. id, -id, created-date, -created-date, modified-date, -modified-date, title, -title)space_idstringoptionalFilter the results based on space IDs (comma-separated string, up to 100 IDs)confluence_custom_content_update#Update an existing Confluence custom content item by ID. Requires the current status, title, type, and the next version number (must be exactly current version + 1). At most one of space_id, page_id, blog_post_id, or custom_content_id may be set; if space_id is specified it must match the space used when the custom content was created, since moving custom content between spaces is not supported. Retrieve the current version number with the Get Custom Content tool before calling this.12 params
Update an existing Confluence custom content item by ID. Requires the current status, title, type, and the next version number (must be exactly current version + 1). At most one of space_id, page_id, blog_post_id, or custom_content_id may be set; if space_id is specified it must match the space used when the custom content was created, since moving custom content between spaces is not supported. Retrieve the current version number with the Get Custom Content tool before calling this.
idstringrequiredThe ID of the custom content to be updatedstatusstringrequiredStatus of the custom content after the update (e.g. current, draft)titlestringrequiredUpdated title of the custom contenttypestringrequiredThe app-defined type of the custom contentversion_numberintegerrequiredThe new version number for this update. Must be exactly the current version number plus 1.blog_post_idstringoptionalThe ID of the blog post this custom content belongs tobody_representationstringoptionalFormat for the updated body content (e.g. storage, atlas_doc_format). Must be set together with body_value.body_valuestringoptionalThe updated body content in the format specified by body_representation. Must be set together with body_representation.custom_content_idstringoptionalThe ID of a parent custom content item this custom content belongs topage_idstringoptionalThe ID of the page this custom content belongs tospace_idstringoptionalThe ID of the space this custom content belongs to. If specified, must match the space used when the custom content was created.version_messagestringoptionalOptional message describing what changed in this versionconfluence_custom_content_version_get#Retrieve version details for a specific version number of Confluence custom content.2 params
Retrieve version details for a specific version number of Confluence custom content.
custom_content_idstringrequiredThe ID of the custom content for which version details should be returnedversion_numberstringrequiredThe version number of the custom content to be returnedconfluence_custom_content_versions_list#Retrieve the versions of specific Confluence custom content. Supports filtering the returned body format and cursor-based pagination.5 params
Retrieve the versions of specific Confluence custom content. Supports filtering the returned body format and cursor-based pagination.
custom_content_idstringrequiredThe ID of the custom content to be queried for its versionsbody_formatstringoptionalThe content format to be returned in the body field of the response (raw, storage, atlas_doc_format)cursorstringoptionalCursor token for pagination, returned in the previous response as _links.nextlimitintegeroptionalMaximum number of versions per result to return (default 25, max 250)sortstringoptionalSort order for versions (modified-date or -modified-date)confluence_database_ancestors_get#Retrieve all ancestors of a Confluence database in the content tree, in top-to-bottom order (the highest ancestor is first in the response). If more results exist, call again using the ID of the first ancestor returned.2 params
Retrieve all ancestors of a Confluence database in the content tree, in top-to-bottom order (the highest ancestor is first in the response). If more results exist, call again using the ID of the first ancestor returned.
idstringrequiredThe ID of the databaselimitintegeroptionalMaximum number of items to return (default 25, max 250)confluence_database_create#Create a new Confluence smart-linked database (Database content type) in a specified space. Requires a space ID. Optionally set a title and a parent content ID. Set private=true to restrict visibility to the creator.4 params
Create a new Confluence smart-linked database (Database content type) in a specified space. Requires a space ID. Optionally set a title and a parent content ID. Set private=true to restrict visibility to the creator.
space_idstringrequiredThe ID of the space in which to create the databaseparent_idstringoptionalThe parent content ID of the databaseprivatebooleanoptionalSet to true to create the database as private, visible only to the creatortitlestringoptionalTitle of the databaseconfluence_database_delete#Delete a Confluence database by its ID. Deleting a database moves it to the trash, where it can be restored later. Requires permission to view the database and its corresponding space, and permission to delete databases in the space.1 param
Delete a Confluence database by its ID. Deleting a database moves it to the trash, where it can be restored later. Requires permission to view the database and its corresponding space, and permission to delete databases in the space.
idstringrequiredThe ID of the database to be deletedconfluence_database_descendants_get#Retrieve descendants in the content tree for a Confluence database, in top-to-bottom order (the highest descendant is first in the response). Supports a depth parameter to limit how many levels of descendants are returned, and cursor-based pagination for additional results.4 params
Retrieve descendants in the content tree for a Confluence database, in top-to-bottom order (the highest descendant is first in the response). Supports a depth parameter to limit how many levels of descendants are returned, and cursor-based pagination for additional results.
idstringrequiredThe ID of the databasecursorstringoptionalOpaque cursor for pagination, returned in the Link response header of a previous calldepthintegeroptionalMaximum depth of descendants to return (default 2, max 10)limitintegeroptionalMaximum number of items to return per result (default 25, max 250)confluence_database_direct_children_get#Retrieve the direct children of a Confluence database in the content tree (database, embed, folder, page, or whiteboard types). Returns minimal information about each child; use cursor-based pagination via the returned Link header to fetch more results.4 params
Retrieve the direct children of a Confluence database in the content tree (database, embed, folder, page, or whiteboard types). Returns minimal information about each child; use cursor-based pagination via the returned Link header to fetch more results.
idstringrequiredThe ID of the parent databasecursorstringoptionalOpaque cursor for pagination, returned in the Link response header of a previous calllimitintegeroptionalMaximum number of items to return per result (default 25, max 250)sortstringoptionalField and direction to sort the results by. Valid values: created-date, -created-date, id, -id, modified-date, -modified-date, child-position, -child-position, title, -titleconfluence_database_get#Retrieve a specific Confluence database (a Confluence Whiteboard-style structured database object) by its ID. Returns core database metadata and optionally its collaborators, direct children, operations, and content properties. Requires permission to view the database and its corresponding space.5 params
Retrieve a specific Confluence database (a Confluence Whiteboard-style structured database object) by its ID. Returns core database metadata and optionally its collaborators, direct children, operations, and content properties. Requires permission to view the database and its corresponding space.
idstringrequiredThe ID of the database to be returnedinclude_collaboratorsbooleanoptionalSet to true to include collaborators on the database in the responseinclude_direct_childrenbooleanoptionalSet to true to include direct children of the database, as defined in the ChildrenResponse objectinclude_operationsbooleanoptionalSet to true to include operations associated with this database. Results are limited to 50 and sorted in default orderinclude_propertiesbooleanoptionalSet to true to include content properties associated with this database. Results are limited to 50 and sorted in default orderconfluence_folder_ancestors_get#Retrieve all ancestors of a Confluence folder in top-to-bottom order (the highest ancestor first). Returns minimal information about each ancestor.2 params
Retrieve all ancestors of a Confluence folder in top-to-bottom order (the highest ancestor first). Returns minimal information about each ancestor.
idstringrequiredThe ID of the folderlimitintegeroptionalMaximum number of items per result to return (default 25, max 250)confluence_folder_create#Create a new folder in a Confluence space. Requires a space ID. Optionally set a title and a parent folder ID to nest the folder under another folder. Requires permission to view the corresponding space and permission to create a folder in the space.3 params
Create a new folder in a Confluence space. Requires a space ID. Optionally set a title and a parent folder ID to nest the folder under another folder. Requires permission to view the corresponding space and permission to create a folder in the space.
space_idstringrequiredThe ID of the space in which to create the folderparent_idstringoptionalID of the parent folder under which this folder will be createdtitlestringoptionalTitle of the new folderconfluence_folder_delete#Delete a Confluence folder by its ID. Deleting a folder moves it to the trash, where it can be restored later.1 param
Delete a Confluence folder by its ID. Deleting a folder moves it to the trash, where it can be restored later.
idstringrequiredThe ID of the folder to be deletedconfluence_folder_descendants_get#Retrieve descendants of a Confluence folder in the content tree, in top-to-bottom order. Returns database, embed, folder, page, and whiteboard content types. Control how deep to traverse with the depth parameter, and paginate with cursor.4 params
Retrieve descendants of a Confluence folder in the content tree, in top-to-bottom order. Returns database, embed, folder, page, and whiteboard content types. Control how deep to traverse with the depth parameter, and paginate with cursor.
idstringrequiredThe ID of the foldercursorstringoptionalCursor token for pagination, returned in the previous responsedepthintegeroptionalMaximum depth of descendants to return (default 2, min 1, max 10)limitintegeroptionalMaximum number of items per result to return (default 25, max 250)confluence_folder_direct_children_get#Retrieve the direct children of a Confluence folder in the content tree. Returns minimal information about each child (database, embed, folder, page, or whiteboard). Use cursor-based pagination for folders with many children.4 params
Retrieve the direct children of a Confluence folder in the content tree. Returns minimal information about each child (database, embed, folder, page, or whiteboard). Use cursor-based pagination for folders with many children.
idstringrequiredThe ID of the parent foldercursorstringoptionalCursor token for pagination, returned in the previous response as _links.nextlimitintegeroptionalMaximum number of items per result to return (default 25, max 250)sortstringoptionalSort order for children (e.g. created-date, -created-date, id, -id, modified-date, -modified-date, child-position, -child-position, title, -title)confluence_folder_get#Retrieve a specific Confluence folder by its ID. Returns core folder metadata and optionally its collaborators, direct children, operations, and content properties. Requires permission to view the folder and its corresponding space.5 params
Retrieve a specific Confluence folder by its ID. Returns core folder metadata and optionally its collaborators, direct children, operations, and content properties. Requires permission to view the folder and its corresponding space.
idstringrequiredThe ID of the folder to be returnedinclude_collaboratorsbooleanoptionalSet to true to include collaborators on the folder in the responseinclude_direct_childrenbooleanoptionalSet to true to include direct children of the folder, as defined in the ChildrenResponse objectinclude_operationsbooleanoptionalSet to true to include operations associated with this folder. Results are limited to 50 and sorted in default orderinclude_propertiesbooleanoptionalSet to true to include content properties associated with this folder. Results are limited to 50 and sorted in default orderconfluence_inline_comment_children_get#Retrieve the child (reply) inline comments of a specific Confluence inline comment. Returns a paginated list of replies. Supports optional body format, sort order, and cursor-based pagination.5 params
Retrieve the child (reply) inline comments of a specific Confluence inline comment. Returns a paginated list of replies. Supports optional body format, sort order, and cursor-based pagination.
idstringrequiredThe ID of the parent comment for which inline comment children should be returnedbody_formatstringoptionalThe content format type to be returned in the body field of the responsecursorstringoptionalCursor token for fetching the next page of resultslimitintegeroptionalMaximum number of child comments per result to returnsortstringoptionalSort order for the child commentsconfluence_inline_comment_create#Create an inline comment on a Confluence page or blog post, or as a reply to an existing inline comment. Requires body content with a representation format and exactly one parent target: page_id, blogpost_id, or parent_comment_id. For top-level comments (page_id or blogpost_id), inline_comment_text_selection is required to specify the text to highlight.8 params
Create an inline comment on a Confluence page or blog post, or as a reply to an existing inline comment. Requires body content with a representation format and exactly one parent target: page_id, blogpost_id, or parent_comment_id. For top-level comments (page_id or blogpost_id), inline_comment_text_selection is required to specify the text to highlight.
body_representationstringrequiredStorage format of the comment body contentbody_valuestringrequiredThe content of the commentblogpost_idstringoptionalID of the blog post to attach this inline comment toinline_comment_text_selectionstringoptionalThe text on the page/blog post to highlight for this inline comment. Required for top-level inline comments (page_id or blogpost_id); not applicable for replies.inline_comment_text_selection_match_countintegeroptionalThe number of matches for the selected text on the page. Should be strictly greater than inline_comment_text_selection_match_index.inline_comment_text_selection_match_indexintegeroptionalThe zero-based match index of the selected text occurrence to highlight. For example, to highlight the second occurrence of 3 matches, pass 1 for this field and 3 for inline_comment_text_selection_match_count.page_idstringoptionalID of the page to attach this inline comment toparent_comment_idstringoptionalID of the parent inline comment to reply toconfluence_inline_comment_delete#Permanently delete a Confluence inline comment by its ID. This action cannot be reverted.1 param
Permanently delete a Confluence inline comment by its ID. This action cannot be reverted.
comment_idstringrequiredThe ID of the comment to be deletedconfluence_inline_comment_get#Retrieve a single Confluence inline comment by its ID. Returns the comment body, resolved state, and highlighted text metadata. Optionally include content properties, operations, likes, and version information.8 params
Retrieve a single Confluence inline comment by its ID. Returns the comment body, resolved state, and highlighted text metadata. Optionally include content properties, operations, likes, and version information.
comment_idstringrequiredThe ID of the comment to be retrievedbody_formatstringoptionalThe content format type to be returned in the body field of the responseinclude_likesbooleanoptionalIncludes likes associated with this inline comment in the responseinclude_operationsbooleanoptionalIncludes operations associated with this inline comment in the responseinclude_propertiesbooleanoptionalIncludes content properties associated with this inline comment in the responseinclude_versionbooleanoptionalIncludes the current version associated with this inline comment in the response. By default this is included.include_versionsbooleanoptionalIncludes versions associated with this inline comment in the responseversionintegeroptionalAllows you to retrieve a previously published version. Specify the previous version's number to retrieve its details.confluence_inline_comment_like_count_get#Retrieve the number of likes for a specific Confluence inline comment.1 param
Retrieve the number of likes for a specific Confluence inline comment.
idstringrequiredThe ID of the inline comment for which like count should be returnedconfluence_inline_comment_like_users_get#Retrieve the account IDs of users who liked a specific Confluence inline comment. Results are paginated via cursor.3 params
Retrieve the account IDs of users who liked a specific Confluence inline comment. Results are paginated via cursor.
idstringrequiredThe ID of the inline comment for which account IDs of likes should be returnedcursorstringoptionalCursor token for pagination, returned in the previous response as _links.nextlimitintegeroptionalMaximum number of account IDs to return per page (default 25, max 250)confluence_inline_comment_update#Update an existing Confluence inline comment. Use this to change the body text and/or resolve or reopen the comment. Requires the new version number (one higher than the comment's current version).6 params
Update an existing Confluence inline comment. Use this to change the body text and/or resolve or reopen the comment. Requires the new version number (one higher than the comment's current version).
comment_idstringrequiredThe ID of the comment to be updatedversion_numberintegerrequiredNumber of the new version. Should be 1 higher than the current version of the comment.body_representationstringoptionalStorage format of the comment body content. Must be set together with body_value.body_valuestringoptionalThe new content of the comment. Must be set together with body_representation.resolvedbooleanoptionalResolved state of the comment. Set to true to resolve the comment, set to false to reopen it. A dangling comment cannot be updated.version_messagestringoptionalOptional message to store for the new versionconfluence_inline_comment_version_get#Retrieve the version details for a specific version of a Confluence inline comment. Returns metadata about that version, including author and modification date. Use the Get Inline Comment Versions tool to list available version numbers first.2 params
Retrieve the version details for a specific version of a Confluence inline comment. Returns metadata about that version, including author and modification date. Use the Get Inline Comment Versions tool to list available version numbers first.
idstringrequiredThe ID of the inline comment for which version details should be returnedversion_numberintegerrequiredThe version number of the inline comment to be returnedconfluence_inline_comment_versions_get#Retrieve the version history of a specific Confluence inline comment. Returns a paginated list of versions including version numbers, authors, and modification dates. Use the Get Inline Comment Version tool to fetch full details for a single version.5 params
Retrieve the version history of a specific Confluence inline comment. Returns a paginated list of versions including version numbers, authors, and modification dates. Use the Get Inline Comment Version tool to fetch full details for a single version.
idstringrequiredThe ID of the inline comment for which versions should be returnedbody_formatstringoptionalThe content format types to be returned in the body field of the response (e.g. storage, atlas_doc_format)cursorstringoptionalCursor token for pagination, returned in the previous response as _links.nextlimitintegeroptionalMaximum number of versions to return per page (default 25, max 250)sortstringoptionalUsed to sort the result by a particular field (e.g. modified-date, -modified-date)confluence_inline_comments_list#Retrieve all inline comments across Confluence. Returns a paginated list of inline comments including author, content, and highlighted text metadata. Supports optional body format, sort order, and cursor-based pagination.4 params
Retrieve all inline comments across Confluence. Returns a paginated list of inline comments including author, content, and highlighted text metadata. Supports optional body format, sort order, and cursor-based pagination.
body_formatstringoptionalThe content format type to be returned in the body field of the responsecursorstringoptionalCursor token for fetching the next page of resultslimitintegeroptionalMaximum number of inline comments per result to returnsortstringoptionalSort order for the commentsconfluence_label_attachments_get#Retrieve the attachments associated with a specific Confluence label. Returns a paginated list of attachments; use cursor-based pagination for labels with many attachments.4 params
Retrieve the attachments associated with a specific Confluence label. Returns a paginated list of attachments; use cursor-based pagination for labels with many attachments.
idstringrequiredThe ID of the label for which attachments should be returnedcursorstringoptionalCursor token for pagination, returned in the previous response as _links.nextlimitintegeroptionalMaximum number of attachments to return per page (default 25, max 250)sortstringoptionalSort order for attachments (e.g. created-date, -created-date, modified-date, -modified-date)confluence_label_blog_posts_get#Retrieve the blog posts associated with a specific Confluence label. Supports filtering by space IDs, body format selection, and cursor-based pagination for labels with many blog posts.6 params
Retrieve the blog posts associated with a specific Confluence label. Supports filtering by space IDs, body format selection, and cursor-based pagination for labels with many blog posts.
idstringrequiredThe ID of the label for which blog posts should be returnedbody_formatstringoptionalThe content format to return in the body field of each blog post (e.g. storage, atlas_doc_format)cursorstringoptionalCursor token for pagination, returned in the previous response as _links.nextlimitintegeroptionalMaximum number of blog posts to return per page (default 25, max 250)sortstringoptionalSort order for blog posts (e.g. id, -id, created-date, -created-date, modified-date, -modified-date)space_idstringoptionalFilter results by one or more space IDs, specified as a comma-separated list (max 100)confluence_label_pages_get#Retrieve the pages associated with a specific Confluence label. Supports filtering by space IDs, body format selection, and cursor-based pagination for labels with many pages.6 params
Retrieve the pages associated with a specific Confluence label. Supports filtering by space IDs, body format selection, and cursor-based pagination for labels with many pages.
idstringrequiredThe ID of the label for which pages should be returnedbody_formatstringoptionalThe content format to return in the body field of each page (e.g. storage, atlas_doc_format)cursorstringoptionalCursor token for pagination, returned in the previous response as _links.nextlimitintegeroptionalMaximum number of pages to return per page (default 25, max 250)sortstringoptionalSort order for pages (e.g. id, -id, created-date, -created-date, modified-date, -modified-date, title, -title)space_idstringoptionalFilter results by one or more space IDs, specified as a comma-separated list (max 100)confluence_labels_list#List all labels across the Confluence site. Supports filtering by label ID or prefix, and cursor-based pagination. Only labels that the user has permission to view are returned.5 params
List all labels across the Confluence site. Supports filtering by label ID or prefix, and cursor-based pagination. Only labels that the user has permission to view are returned.
cursorstringoptionalCursor token for pagination, returned in the previous response as _links.nextlabel_idstringoptionalFilter by one or more label IDs, specified as a comma-separated listlimitintegeroptionalMaximum number of labels to return per page (default 25, max 250)prefixstringoptionalFilter by one or more label prefixes, specified as a comma-separated listsortstringoptionalSort order for labels (e.g. created-date, -created-date, id, -id, name, -name)confluence_page_ancestors_get#Retrieve all ancestors of a Confluence page in top-to-bottom order (the highest ancestor first). Returns minimal information about each ancestor; use the Get Page tool for full details.2 params
Retrieve all ancestors of a Confluence page in top-to-bottom order (the highest ancestor first). Returns minimal information about each ancestor; use the Get Page tool for full details.
idstringrequiredThe ID of the pagelimitintegeroptionalMaximum number of pages per result to return (default 25, max 250). If more results exist, call this endpoint with the highest ancestor's IDconfluence_page_attachments_get#Retrieve all attachments on a Confluence page. Returns a paginated list of attachments with metadata including filename, media type, file size, and download URL. Supports filtering by media type or filename and cursor-based pagination.6 params
Retrieve all attachments on a Confluence page. Returns a paginated list of attachments with metadata including filename, media type, file size, and download URL. Supports filtering by media type or filename and cursor-based pagination.
idstringrequiredThe ID of the page whose attachments to retrievecursorstringoptionalCursor token for pagination, returned in the previous response as _links.nextfilenamestringoptionalFilter attachments by exact filenamelimitintegeroptionalMaximum number of attachments to return per page (default 25, max 250)media_typestringoptionalFilter attachments by MIME media type (e.g. image/png, application/pdf)sortstringoptionalSort order for attachments (e.g. created-date, -created-date, modified-date, -modified-date)confluence_page_children_get#Retrieve the direct child pages of a given Confluence page. Returns a paginated list of child pages with their IDs, titles, and statuses. Use cursor-based pagination to iterate through large result sets.4 params
Retrieve the direct child pages of a given Confluence page. Returns a paginated list of child pages with their IDs, titles, and statuses. Use cursor-based pagination to iterate through large result sets.
idstringrequiredThe ID of the parent page whose children to retrievecursorstringoptionalCursor token for pagination, returned in the previous response as _links.nextlimitintegeroptionalMaximum number of child pages to return (default 25, max 250)sortstringoptionalSort order for child pages (e.g. -modified-date, id, title, -title)confluence_page_create#Create a new Confluence page in a specified space. Requires a space ID and title. Optionally set the initial status (current for published, draft for unpublished), a parent page, and body content. The body requires both body_representation and body_value to be provided together.8 params
Create a new Confluence page in a specified space. Requires a space ID and title. Optionally set the initial status (current for published, draft for unpublished), a parent page, and body content. The body requires both body_representation and body_value to be provided together.
spaceIdstringrequiredThe ID of the space in which to create the pagetitlestringrequiredTitle of the new pagebody_representationstringoptionalThe markup format for the page body (e.g. storage, atlas_doc_format). Must be set together with body_value.body_valuestringoptionalThe raw content of the page body in the format specified by body_representation. Must be set together with body_representation.parentIdstringoptionalID of the parent page under which this page will be createdprivatebooleanoptionalSet to true to create the page as a private page visible only to the creatorroot_levelbooleanoptionalSet to true to create the page at the root level of the space (no parent)statusstringoptionalInitial status of the page: current (published) or draft (unpublished)confluence_page_custom_content_get#Retrieve all custom content of a given type within a specific Confluence page. The type parameter is required and identifies which kind of custom content to return. Supports body format selection and cursor-based pagination.6 params
Retrieve all custom content of a given type within a specific Confluence page. The type parameter is required and identifies which kind of custom content to return. Supports body format selection and cursor-based pagination.
idstringrequiredThe ID of the page for which custom content should be returnedtypestringrequiredThe type of custom content being requested (e.g. a registered app's custom content type identifier)body_formatstringoptionalThe content format to return in the body field of each custom content item (e.g. raw, storage, atlas_doc_format)cursorstringoptionalCursor token for pagination, returned in the previous response as _links.nextlimitintegeroptionalMaximum number of custom content items to return per page (default 25, max 250)sortstringoptionalSort order for custom content (e.g. id, -id, created-date, -created-date, modified-date, -modified-date, title, -title)confluence_page_delete#Delete a Confluence page by its ID. By default moves the page to the trash; set purge=true to permanently delete without recovery. Set draft=true to delete a draft version instead of the published page. This action is irreversible when purge is enabled.3 params
Delete a Confluence page by its ID. By default moves the page to the trash; set purge=true to permanently delete without recovery. Set draft=true to delete a draft version instead of the published page. This action is irreversible when purge is enabled.
idstringrequiredThe ID of the page to deletedraftbooleanoptionalSet to true to delete the draft version of the page rather than the published versionpurgebooleanoptionalSet to true to permanently delete the page, bypassing the trashconfluence_page_descendants_get#Retrieve descendants of a Confluence page in the content tree, in top-to-bottom order (database, embed, folder, page, or whiteboard). Control how deep to traverse with the depth parameter, and paginate with cursor.4 params
Retrieve descendants of a Confluence page in the content tree, in top-to-bottom order (database, embed, folder, page, or whiteboard). Control how deep to traverse with the depth parameter, and paginate with cursor.
idstringrequiredThe ID of the pagecursorstringoptionalCursor token for pagination, returned in the previous response as the cursor to fetch the next set of resultsdepthintegeroptionalMaximum depth of descendants to return (default 2, min 1, max 10)limitintegeroptionalMaximum number of items per result to return (default 25, max 250)confluence_page_direct_children_get#Retrieve the direct children of a Confluence page in the content tree (database, embed, folder, page, or whiteboard). Returns minimal information about each child; use a related get-by-id endpoint for full details. Results are paginated via cursor.4 params
Retrieve the direct children of a Confluence page in the content tree (database, embed, folder, page, or whiteboard). Returns minimal information about each child; use a related get-by-id endpoint for full details. Results are paginated via cursor.
idstringrequiredThe ID of the parent pagecursorstringoptionalCursor token for pagination, returned in the previous response as _links.nextlimitintegeroptionalMaximum number of items per result to return (default 25, max 250)sortstringoptionalUsed to sort the result by a particular field (e.g. created-date, -created-date, id, -id, modified-date, -modified-date, child-position, -child-position, title, -title)confluence_page_get#Retrieve a single Confluence page by its ID. Returns the page title, status, version, space, and optionally the full body content. Use body_format to control the markup format returned. Additional flags expose labels, properties, and version history.7 params
Retrieve a single Confluence page by its ID. Returns the page title, status, version, space, and optionally the full body content. Use body_format to control the markup format returned. Additional flags expose labels, properties, and version history.
idstringrequiredThe ID of the page to retrievebody_formatstringoptionalFormat for the returned page body (e.g. storage, atlas_doc_format, anonymous_export_view)get_draftbooleanoptionalSet to true to retrieve the draft version of the page instead of the published versioninclude_labelsbooleanoptionalSet to true to include labels attached to the page in the responseinclude_propertiesbooleanoptionalSet to true to include content properties attached to the pageinclude_versionbooleanoptionalSet to true to include full version details in the responseversionintegeroptionalSpecific version number of the page to retrieve (defaults to latest)confluence_page_inline_comments_get#Retrieve the root inline comments of a specific Confluence page. Returns paginated comment results including author, content, and status. Supports filtering by status and resolution status, sorting, and cursor-based pagination.7 params
Retrieve the root inline comments of a specific Confluence page. Returns paginated comment results including author, content, and status. Supports filtering by status and resolution status, sorting, and cursor-based pagination.
idstringrequiredThe numeric ID of the page whose inline comments to retrievebody_formatstringoptionalFormat of the comment body to include in the responsecursorstringoptionalCursor token for fetching the next page of resultslimitintegeroptionalMaximum number of inline comments to return per pageresolution_statusarrayoptionalFilter inline comments by resolution status. Accepts an array of values: resolved, open, dangling, reopened.sortstringoptionalSort order for the commentsstatusarrayoptionalFilter inline comments by status. Accepts an array of values: current, archived, trashed, deleted, historical, draft.confluence_page_labels_get#Retrieve all labels attached to a Confluence page. Labels can be filtered by prefix (e.g. global, my, team). Returns a paginated list of label names and prefixes. Use cursor-based pagination for pages with many labels.5 params
Retrieve all labels attached to a Confluence page. Labels can be filtered by prefix (e.g. global, my, team). Returns a paginated list of label names and prefixes. Use cursor-based pagination for pages with many labels.
idstringrequiredThe ID of the page whose labels to retrievecursorstringoptionalCursor token for pagination, returned in the previous response as _links.nextlimitintegeroptionalMaximum number of labels to return per page (default 25, max 250)prefixstringoptionalFilter labels by prefix (e.g. global, my, team, system)sortstringoptionalSort order for labels (e.g. created-date, -created-date, name, -name)confluence_page_like_count_get#Retrieve the total count of likes on a specific Confluence page.1 param
Retrieve the total count of likes on a specific Confluence page.
idstringrequiredThe ID of the page for which like count should be returnedconfluence_page_likes_get#Retrieve the account IDs of users who liked a specific Confluence page. Returns a paginated list of account IDs. Use cursor-based pagination to iterate through large result sets.3 params
Retrieve the account IDs of users who liked a specific Confluence page. Returns a paginated list of account IDs. Use cursor-based pagination to iterate through large result sets.
idstringrequiredThe ID of the page for which like count should be returnedcursorstringoptionalUsed for pagination, this opaque cursor will be returned in the next URL in the Link response headerlimitintegeroptionalMaximum number of account IDs per result to return (default 25, max 250)confluence_page_list#List Confluence pages with optional filtering by space, status, title, or page IDs. Returns a paginated collection of pages. Use the cursor parameter to fetch subsequent pages. Supports body format selection for inline content retrieval.8 params
List Confluence pages with optional filtering by space, status, title, or page IDs. Returns a paginated collection of pages. Use the cursor parameter to fetch subsequent pages. Supports body format selection for inline content retrieval.
body_formatstringoptionalThe content format to return for page bodies (e.g. storage, atlas_doc_format, anonymous_export_view)cursorstringoptionalCursor token for pagination, returned in previous response as _links.nextidstringoptionalFilter by one or more page IDs (comma-separated or repeated query param)limitintegeroptionalMaximum number of pages to return per page (default 25, max 250)sortstringoptionalSort order for results (e.g. -modified-date, id, title, -title)space_idstringoptionalFilter by one or more space IDs (comma-separated)statusstringoptionalFilter pages by status (e.g. current, archived, deleted, trashed)titlestringoptionalFilter pages by title (exact match)confluence_page_title_update#Update only the title of an existing Confluence page, without needing to supply the full page body or version number. Requires the page ID, the desired status (current or draft), and the new title.3 params
Update only the title of an existing Confluence page, without needing to supply the full page body or version number. Requires the page ID, the desired status (current or draft), and the new title.
idstringrequiredThe ID of the page to be updatedstatusstringrequiredThe status of the page: current or drafttitlestringrequiredThe updated title for the pageconfluence_page_update#Update an existing Confluence page. Requires the page ID, current status, title, and the next version number (must be exactly current version + 1). Optionally update the page body, change the parent, or add a version message. Retrieve the current version number with the Get Page tool before calling this.8 params
Update an existing Confluence page. Requires the page ID, current status, title, and the next version number (must be exactly current version + 1). Optionally update the page body, change the parent, or add a version message. Retrieve the current version number with the Get Page tool before calling this.
idstringrequiredThe ID of the page to updatestatusstringrequiredStatus of the page after the update (e.g. current, draft)titlestringrequiredUpdated title of the pageversion_numberintegerrequiredThe new version number for this update. Must be exactly the current version number plus 1.body_representationstringoptionalFormat for the updated body content (e.g. storage, atlas_doc_format). Must be set together with body_value.body_valuestringoptionalThe updated body content in the format specified by body_representation. Must be set together with body_representation.parentIdstringoptionalID of the new parent page (to move the page in the hierarchy)version_messagestringoptionalOptional message describing what changed in this versionconfluence_page_version_get#Retrieve version details for a specific version number of a Confluence page.2 params
Retrieve version details for a specific version number of a Confluence page.
page_idstringrequiredThe ID of the page for which version details should be returnedversion_numberstringrequiredThe version number of the page to be returnedconfluence_page_versions_get#Retrieve the version history of a specific Confluence page. Returns a paginated list of versions with metadata such as version number, author, and creation date. Use body_format to include body content per version and sort to control ordering.5 params
Retrieve the version history of a specific Confluence page. Returns a paginated list of versions with metadata such as version number, author, and creation date. Use body_format to include body content per version and sort to control ordering.
idstringrequiredThe ID of the page to be queried for its versionsbody_formatstringoptionalThe content format types to be returned in the body field of the response (storage or atlas_doc_format)cursorstringoptionalUsed for pagination, this opaque cursor will be returned in the next URL in the Link response headerlimitintegeroptionalMaximum number of versions per result to return (default 25, max 250)sortstringoptionalUsed to sort the result by a particular field (modified-date or -modified-date)confluence_search#Search Confluence content using Confluence Query Language (CQL). CQL is a powerful structured query language for finding pages, blog posts, spaces, attachments, and comments. Returns matching content with metadata including title, space, author, and last modified date.5 params
Search Confluence content using Confluence Query Language (CQL). CQL is a powerful structured query language for finding pages, blog posts, spaces, attachments, and comments. Returns matching content with metadata including title, space, author, and last modified date.
cqlstringrequiredConfluence Query Language (CQL) query stringcursorstringoptionalCursor token for fetching the next page of resultsexcerptstringoptionalControls excerpt handling in search resultsexpandstringoptionalComma-separated list of properties to expand in resultslimitintegeroptionalMaximum number of results to returnconfluence_smart_link_ancestors_get#Retrieve all ancestors of a Confluence Smart Link (embed) in the content tree, in top-to-bottom order (the highest ancestor is first in the response). If more results exist, call again using the ID of the first ancestor returned.2 params
Retrieve all ancestors of a Confluence Smart Link (embed) in the content tree, in top-to-bottom order (the highest ancestor is first in the response). If more results exist, call again using the ID of the first ancestor returned.
idstringrequiredThe ID of the Smart Link (embed) in the content treelimitintegeroptionalMaximum number of items to return (default 25, max 250)confluence_smart_link_descendants_get#Retrieve descendants in the content tree for a Confluence Smart Link (embed), in top-to-bottom order (the highest descendant is first in the response). Supports a depth parameter to limit how many levels of descendants are returned, and cursor-based pagination for additional results.4 params
Retrieve descendants in the content tree for a Confluence Smart Link (embed), in top-to-bottom order (the highest descendant is first in the response). Supports a depth parameter to limit how many levels of descendants are returned, and cursor-based pagination for additional results.
idstringrequiredThe ID of the Smart Link (embed)cursorstringoptionalOpaque cursor for pagination, returned in the Link response header of a previous calldepthintegeroptionalMaximum depth of descendants to return (default 2, max 10)limitintegeroptionalMaximum number of items to return per result (default 25, max 250)confluence_smart_link_direct_children_get#Retrieve the direct children of a Confluence Smart Link (embed) in the content tree (database, embed, folder, page, or whiteboard types). Returns minimal information about each child; use cursor-based pagination via the returned Link header to fetch more results.4 params
Retrieve the direct children of a Confluence Smart Link (embed) in the content tree (database, embed, folder, page, or whiteboard types). Returns minimal information about each child; use cursor-based pagination via the returned Link header to fetch more results.
idstringrequiredThe ID of the parent Smart Link (embed)cursorstringoptionalOpaque cursor for pagination, returned in the Link response header of a previous calllimitintegeroptionalMaximum number of items to return per result (default 25, max 250)sortstringoptionalField and direction to sort the results by. Valid values: created-date, -created-date, id, -id, modified-date, -modified-date, child-position, -child-position, title, -titleconfluence_space_blogposts_list#Retrieve all blog posts in a specific Confluence space. Supports filtering by status and title, control of returned body format, and cursor-based pagination.7 params
Retrieve all blog posts in a specific Confluence space. Supports filtering by status and title, control of returned body format, and cursor-based pagination.
idstringrequiredThe ID of the space for which blog posts should be returnedbody_formatstringoptionalFormat of the blog post body to return (storage or atlas_doc_format)cursorstringoptionalCursor token for pagination, returned in the previous response as _links.nextlimitintegeroptionalMaximum number of blog posts per result to return (default 25, max 250)sortstringoptionalSort order for the results (id, -id, created-date, -created-date, modified-date, -modified-date)statusarrayoptionalFilter results to blog posts based on their status (current, deleted, trashed). Defaults to current.titlestringoptionalFilter results to blog posts based on their titleconfluence_space_content_labels_get#Retrieve labels attached to content (pages, blog posts, etc.) within a Confluence space. Only labels the caller has permission to view are returned. Supports filtering by prefix, sorting, and cursor-based pagination.5 params
Retrieve labels attached to content (pages, blog posts, etc.) within a Confluence space. Only labels the caller has permission to view are returned. Supports filtering by prefix, sorting, and cursor-based pagination.
idstringrequiredThe ID of the space for which content labels should be returnedcursorstringoptionalCursor token for pagination, returned in the previous response as _links.nextlimitintegeroptionalMaximum number of labels to return per page (default 25, max 250)prefixstringoptionalFilter the results to labels based on their prefix (e.g. my, team)sortstringoptionalUsed to sort the result by a particular field (e.g. created-date, -created-date, id, -id, name, -name)confluence_space_create#Create a new Confluence space. Requires a name; optionally set a unique space key, description (in plain or view format), and alias. Available on tenants with Role-Based Access Control.4 params
Create a new Confluence space. Requires a name; optionally set a unique space key, description (in plain or view format), and alias. Available on tenants with Role-Based Access Control.
namestringrequiredThe display name of the new spacealiasstringoptionalAlternative alias for the space, used in some URL contextsdescriptionstringoptionalPlain text description of the space's purposekeystringoptionalUnique short key that identifies the space (e.g. DEV, TEAM). Auto-generated from name if omitted.confluence_space_custom_content_list#Returns all custom content of a given type within a specific Confluence space. Custom content is app-defined content stored under a container such as a space. Results are paginated via cursor; use the type parameter to filter to a specific custom content type.5 params
Returns all custom content of a given type within a specific Confluence space. Custom content is app-defined content stored under a container such as a space. Results are paginated via cursor; use the type parameter to filter to a specific custom content type.
idstringrequiredThe ID of the space for which custom content should be returnedtypestringrequiredThe type of custom content being requestedbody_formatstringoptionalThe content format types to be returned in the body field of the response (e.g. raw, storage, atlas_doc_format)cursorstringoptionalCursor token for pagination, returned in previous response as _links.nextlimitintegeroptionalMaximum number of custom content items to return per page (default 25, max 250)confluence_space_get#Retrieve details of a specific Confluence space by its ID. Returns space metadata including key, name, type, status, description, homepage, and permissions. Optionally include the space icon and labels.4 params
Retrieve details of a specific Confluence space by its ID. Returns space metadata including key, name, type, status, description, homepage, and permissions. Optionally include the space icon and labels.
idstringrequiredThe numeric ID of the space to retrievedescription_formatstringoptionalFormat for the space description in the responseinclude_iconbooleanoptionalWhether to include the space icon in the responseinclude_labelsbooleanoptionalWhether to include labels applied to the spaceconfluence_space_labels_list#Retrieve the labels of a specific Confluence space. Only labels the user has permission to view are returned. Supports filtering by prefix and cursor-based pagination.5 params
Retrieve the labels of a specific Confluence space. Only labels the user has permission to view are returned. Supports filtering by prefix and cursor-based pagination.
idstringrequiredThe ID of the space for which labels should be returnedcursorstringoptionalCursor token for pagination, returned in the previous response as _links.nextlimitintegeroptionalMaximum number of labels per result to return (default 25, max 250)prefixstringoptionalFilter the results to labels based on their prefix (my or team)sortstringoptionalSort order for labels (created-date, -created-date, id, -id, name, -name)confluence_space_list#List Confluence spaces accessible to the authenticated user. Supports filtering by space IDs, keys, type (global or personal), status (current or archived), and labels. Returns paginated results with cursor-based navigation.9 params
List Confluence spaces accessible to the authenticated user. Supports filtering by space IDs, keys, type (global or personal), status (current or archived), and labels. Returns paginated results with cursor-based navigation.
cursorstringoptionalCursor token for fetching the next page of resultsdescription_formatstringoptionalFormat for the space description in the responseidsarrayoptionalFilter spaces by their numeric IDskeysarrayoptionalFilter spaces by their space keyslabelsarrayoptionalFilter spaces by labelslimitintegeroptionalMaximum number of spaces to return per pagesortstringoptionalSort order for the resultsstatusstringoptionalFilter spaces by statustypestringoptionalFilter spaces by typeconfluence_space_pages_list#Returns all pages in a Confluence space. Only pages the caller has permission to view are returned. Supports filtering by depth, status, and title, sorting, and cursor-based pagination.8 params
Returns all pages in a Confluence space. Only pages the caller has permission to view are returned. Supports filtering by depth, status, and title, sorting, and cursor-based pagination.
idstringrequiredThe ID of the space for which pages should be returnedbody_formatstringoptionalThe content format types to be returned in the body field of the response (e.g. storage, atlas_doc_format)cursorstringoptionalCursor token for pagination, returned in previous response as _links.nextdepthstringoptionalFilter the results to pages at the root level of the space or to all pages in the space (all, root)limitintegeroptionalMaximum number of pages to return per page (default 25, max 250)sortstringoptionalUsed to sort the result by a particular field (e.g. id, -id, created-date, -created-date, modified-date, -modified-date, title, -title)statusstringoptionalFilter pages by status, comma-separated (e.g. current, archived, deleted, trashed). Defaults to current and archived.titlestringoptionalFilter the results to pages based on their titleconfluence_space_role_assignments_list#Retrieve the space role assignments for a Confluence space. Only available on tenants with Role-Based Access Control enabled. Requires permission to view the space. Supports filtering by role, principal, and cursor-based pagination.7 params
Retrieve the space role assignments for a Confluence space. Only available on tenants with Role-Based Access Control enabled. Requires permission to view the space. Supports filtering by role, principal, and cursor-based pagination.
idstringrequiredThe ID of the space for which to retrieve role assignmentscursorstringoptionalCursor token for pagination, returned in the previous response as _links.nextlimitintegeroptionalMaximum number of space roles to return per page (default 25, max 250)principal_idstringoptionalFilters the returned role assignments to the provided principal id. If specified, principal_type must also be specified. Paired with principal_type of ACCESS_CLASS, valid values include anonymous-users, jsm-project-admins, authenticated-users, all-licensed-users, all-product-adminsprincipal_typestringoptionalFilters the returned role assignments to the provided principal type (USER, GROUP, ACCESS_CLASS). If specified, principal_id must also be specified.role_idstringoptionalFilters the returned role assignments to the provided role IDrole_typestringoptionalFilters the returned role assignments to the provided role typeconfluence_space_role_assignments_set#Set role assignments for a Confluence space. For each principal provided with a roleId, that principal is assigned the role. For each principal provided without a roleId, the existing role assignment for that principal (if any) is removed. Available only on tenants with Role-Based Access Control enabled. Requires permission to manage roles in the space.2 params
Set role assignments for a Confluence space. For each principal provided with a roleId, that principal is assigned the role. For each principal provided without a roleId, the existing role assignment for that principal (if any) is removed. Available only on tenants with Role-Based Access Control enabled. Requires permission to manage roles in the space.
idstringrequiredThe ID of the space for which to set role assignmentsrole_assignmentsarrayrequiredJSON array of role assignment objects. Each object has a principal (with id and type, e.g. 'user' or 'group') and an optional roleId. Omitting roleId removes the principal's existing role assignment.confluence_space_role_create#Create a new space role for the tenant. Only available on tenants with Role-Based Access Control enabled. Requires organization or site admin permissions. Connect and Forge app users cannot access this resource.3 params
Create a new space role for the tenant. Only available on tenants with Role-Based Access Control enabled. Requires organization or site admin permissions. Connect and Forge app users cannot access this resource.
descriptionstringrequiredDescription for the space rolenamestringrequiredName of the space rolespace_permissionsarrayrequiredThe ids of the space permissions associated with the space role, as a JSON array of strings. Sample value "read/space"; retrieve ids from the GET /space-permissions endpointconfluence_space_role_delete#Delete a space role by its ID. Only available on tenants with Role-Based Access Control enabled. Requires organization or site admin permissions. This action is irreversible.1 param
Delete a space role by its ID. Only available on tenants with Role-Based Access Control enabled. Requires organization or site admin permissions. This action is irreversible.
idstringrequiredId of the space role to deleteconfluence_space_role_get#Retrieve a single space role by its ID. Only available on tenants with Role-Based Access Control enabled. Requires permission to access the Confluence site.1 param
Retrieve a single space role by its ID. Only available on tenants with Role-Based Access Control enabled. Requires permission to access the Confluence site.
idstringrequiredThe ID of the space role to retrieveconfluence_space_role_mode_get#Retrieve the tenant's current space role mode. Only available on tenants with Role-Based Access Control enabled. Requires the 'Can use' global permission on the Confluence site.0 params
Retrieve the tenant's current space role mode. Only available on tenants with Role-Based Access Control enabled. Requires the 'Can use' global permission on the Confluence site.
confluence_space_role_update#Update an existing space role. Only available on tenants with Role-Based Access Control enabled. Requires organization or site admin permissions. Optionally reassign anonymous or guest role assignments to another role when they are removed from this role.6 params
Update an existing space role. Only available on tenants with Role-Based Access Control enabled. Requires organization or site admin permissions. Optionally reassign anonymous or guest role assignments to another role when they are removed from this role.
descriptionstringrequiredDescription for the space roleidstringrequiredId of the space role to updatenamestringrequiredName of the space rolespace_permissionsarrayrequiredThe ids of the space permissions associated with the space role, as a JSON array of strings. Sample value "read/space"; retrieve ids from the GET /space-permissions endpointanonymous_reassignment_role_idstringoptionalIf space anonymous access is assigned to the role being modified, the Id of a role to migrate those assignments to can be specified. Anonymous access role assignments are left unchanged if unspecified.guest_reassignment_role_idstringoptionalIf guests are assigned to the role being modified, the Id of a role to migrate those assignments to can be specified. Guest role assignments are left unchanged if unspecified.confluence_space_roles_list#Retrieve the available space roles for the tenant, optionally filtered to a specific space. Only available on tenants with Role-Based Access Control enabled. Supports filtering by role type, principal, and cursor-based pagination.6 params
Retrieve the available space roles for the tenant, optionally filtered to a specific space. Only available on tenants with Role-Based Access Control enabled. Supports filtering by role type, principal, and cursor-based pagination.
cursorstringoptionalCursor token for pagination, returned in the previous response as _links.nextlimitintegeroptionalMaximum number of space roles to return per page (default 25, max 250)principal_idstringoptionalThe principal ID to filter results by. If specified, principal_type must also be specified. Paired with principal_type of ACCESS_CLASS, valid values include anonymous-users, jsm-project-admins, authenticated-users, all-licensed-users, all-product-adminsprincipal_typestringoptionalThe principal type to filter results by (USER, GROUP, ACCESS_CLASS). If specified, principal_id must also be specified.role_typestringoptionalThe space role type to filter results byspace_idstringoptionalThe space ID for which to filter available space roles; if empty, returns all available space roles for the tenantconfluence_task_get#Retrieve a specific Confluence task by its ID. Returns the task text, status, and location within its containing page or blog post.2 params
Retrieve a specific Confluence task by its ID. Returns the task text, status, and location within its containing page or blog post.
idstringrequiredThe ID of the task to be returned. If you don't know the task ID, use List Tasks and filter the resultsbody_formatstringoptionalThe content format types to be returned in the body field of the response (e.g. storage, atlas_doc_format)confluence_task_list#List all Confluence tasks the current user has permission to view. Supports filtering by status, space, page, blog post, creator, assignee, completer, and various date ranges. Results are paginated via cursor.18 params
List all Confluence tasks the current user has permission to view. Supports filtering by status, space, page, blog post, creator, assignee, completer, and various date ranges. Results are paginated via cursor.
assigned_tostringoptionalFilters on the Account ID of the user to whom this task is assigned (comma-separated string, up to 250 IDs)blogpost_idstringoptionalFilters on the blog post ID of the task (comma-separated string, up to 250 IDs). Can be used together with page-id filtersbody_formatstringoptionalThe content format types to be returned in the body field of the response (e.g. storage, atlas_doc_format)completed_at_fromintegeroptionalFilters on start of date-time range of task based on completion date (inclusive). Epoch time in millisecondscompleted_at_tointegeroptionalFilters on end of date-time range of task based on completion date (inclusive). Epoch time in millisecondscompleted_bystringoptionalFilters on the Account ID of the user who completed this task (comma-separated string, up to 250 IDs)created_at_fromintegeroptionalFilters on start of date-time range of task based on creation date (inclusive). Epoch time in millisecondscreated_at_tointegeroptionalFilters on end of date-time range of task based on creation date (inclusive). Epoch time in millisecondscreated_bystringoptionalFilters on the Account ID of the user who created this task (comma-separated string, up to 250 IDs)cursorstringoptionalCursor token for pagination, returned in the previous response as _links.nextdue_at_fromintegeroptionalFilters on start of date-time range of task based on due date (inclusive). Epoch time in millisecondsdue_at_tointegeroptionalFilters on end of date-time range of task based on due date (inclusive). Epoch time in millisecondsinclude_blank_tasksbooleanoptionalSpecifies whether to include blank tasks in the response. Defaults to truelimitintegeroptionalMaximum number of tasks to return per page (default 25, max 250)page_idstringoptionalFilters on the page ID of the task (comma-separated string, up to 250 IDs). Can be used together with blogpost-id filtersspace_idstringoptionalFilters on the space ID of the task (comma-separated string, up to 250 IDs)statusstringoptionalFilters on the status of the task (complete or incomplete)task_idstringoptionalFilters on task ID (comma-separated string, up to 250 IDs)confluence_task_update#Update a Confluence task by ID. This endpoint currently only supports updating the task status (complete or incomplete). Requires the current version number of the containing content plus 1.4 params
Update a Confluence task by ID. This endpoint currently only supports updating the task status (complete or incomplete). Requires the current version number of the containing content plus 1.
idstringrequiredThe ID of the task to be updated. If you don't know the task ID, use List Tasks and filter the resultsstatusstringrequiredThe new status of the task (complete or incomplete)version_numberintegerrequiredThe new version number for this update. Must be exactly the current version number of the task plus 1body_formatstringoptionalThe content format types to be returned in the body field of the response (e.g. storage, atlas_doc_format)confluence_users_bulk_lookup#Look up user details in bulk for a list of account IDs. Returns user details for each ID provided that the requester has permission to view. Requires permission to access the Confluence site and to view user profiles.1 param
Look up user details in bulk for a list of account IDs. Returns user details for each ID provided that the requester has permission to view. Requires permission to access the Confluence site and to view user profiles.
idsarrayrequiredJSON array of account IDs to look up user details forconfluence_whiteboard_ancestors_get#Retrieve all ancestors of a given Confluence whiteboard in top-to-bottom order (the highest ancestor is first in the response). Returns minimal information about each ancestor; use a type-specific tool such as Get Whiteboard to fetch more details.2 params
Retrieve all ancestors of a given Confluence whiteboard in top-to-bottom order (the highest ancestor is first in the response). Returns minimal information about each ancestor; use a type-specific tool such as Get Whiteboard to fetch more details.
idstringrequiredThe ID of the whiteboardlimitintegeroptionalMaximum number of items per result to return (default 25, max 250)confluence_whiteboard_children_get#Retrieve the direct children of a given Confluence whiteboard in the content tree (database, embed, folder, page, or whiteboard). Returns minimal information about each child; use a type-specific tool to fetch more details.4 params
Retrieve the direct children of a given Confluence whiteboard in the content tree (database, embed, folder, page, or whiteboard). Returns minimal information about each child; use a type-specific tool to fetch more details.
idstringrequiredThe ID of the parent whiteboardcursorstringoptionalUsed for pagination, this opaque cursor will be returned in the next URL in the Link response headerlimitintegeroptionalMaximum number of items per result to return (default 25, max 250)sortstringoptionalUsed to sort the result by a particular field (e.g. created-date, id, modified-date, child-position, title, and their descending variants)confluence_whiteboard_create#Create a new whiteboard in a specified Confluence space. Requires a space ID. Optionally set a title, a parent content ID, a template to pre-populate the whiteboard, and a locale for the template. Set private=true to restrict visibility to the creator.6 params
Create a new whiteboard in a specified Confluence space. Requires a space ID. Optionally set a title, a parent content ID, a template to pre-populate the whiteboard, and a locale for the template. Set private=true to restrict visibility to the creator.
space_idstringrequiredThe ID of the space in which to create the whiteboardlocalestringoptionalIf template_key is provided, locale determines the language the template is created withparent_idstringoptionalThe parent content ID of the whiteboardprivatebooleanoptionalSet to true to create the whiteboard as private, visible only to the creatortemplate_keystringoptionalProviding a template key will add that template to the new whiteboard (e.g. kanban-board, sprint-planning, swot-analysis)titlestringoptionalTitle of the whiteboardconfluence_whiteboard_delete#Delete a Confluence whiteboard by its ID. Moves the whiteboard to the trash, where it can be restored later.1 param
Delete a Confluence whiteboard by its ID. Moves the whiteboard to the trash, where it can be restored later.
idstringrequiredThe ID of the whiteboard to be deletedconfluence_whiteboard_descendants_get#Retrieve descendants of a given Confluence whiteboard in top-to-bottom order (database, embed, folder, page, or whiteboard). Use depth to control how many levels deep to fetch, and cursor for pagination through additional results.4 params
Retrieve descendants of a given Confluence whiteboard in top-to-bottom order (database, embed, folder, page, or whiteboard). Use depth to control how many levels deep to fetch, and cursor for pagination through additional results.
idstringrequiredThe ID of the whiteboardcursorstringoptionalUsed for pagination, this opaque cursor will be returned in the response payload for fetching the next set of resultsdepthintegeroptionalMaximum depth of descendants to return (default 2, max 10)limitintegeroptionalMaximum number of items per result to return (default 25, max 250)confluence_whiteboard_get#Retrieve a single Confluence whiteboard by its ID. Returns the whiteboard title, space, and status. Optional flags expose collaborators, direct children, operations, and content properties.5 params
Retrieve a single Confluence whiteboard by its ID. Returns the whiteboard title, space, and status. Optional flags expose collaborators, direct children, operations, and content properties.
idstringrequiredThe ID of the whiteboard to be returnedinclude_collaboratorsbooleanoptionalSet to true to include collaborators on the whiteboardinclude_direct_childrenbooleanoptionalSet to true to include direct children of the whiteboardinclude_operationsbooleanoptionalSet to true to include operations associated with this whiteboard (limited to 50 results)include_propertiesbooleanoptionalSet to true to include content properties associated with this whiteboard (limited to 50 results)