ServiceNow connector
OAuth 2.0Customer SupportCommunicationConnect to ServiceNow. Manage incidents, service requests, CMDB, and IT service management workflows
ServiceNow connector
-
Install the SDK
Section titled “Install the SDK”Terminal window npm install @scalekit-sdk/nodeTerminal window pip install scalekit -
Set your credentials
Section titled “Set your credentials”Add your Scalekit credentials to your
.envfile. Find values in app.scalekit.com > Developers > API Credentials..env SCALEKIT_ENVIRONMENT_URL=<your-environment-url>SCALEKIT_CLIENT_ID=<your-client-id>SCALEKIT_CLIENT_SECRET=<your-client-secret> -
Set up the connector
Section titled “Set up the connector”Register your ServiceNow credentials with Scalekit so it handles the token lifecycle. You do this once per environment.
Dashboard setup steps
Register your Scalekit environment with ServiceNow so Scalekit handles the OAuth flow and token lifecycle for your users. Create an OAuth application registry in your ServiceNow instance, then add its Client ID and Client Secret to your Scalekit connection.
-
Copy the redirect URI from Scalekit
-
In the Scalekit dashboard, go to AgentKit > Connections > Create Connection. Find ServiceNow and click Create.
-
Click Use your own credentials and copy the redirect URI. It looks like
https://<SCALEKIT_ENVIRONMENT_URL>/sso/v1/oauth/<CONNECTION_ID>/callback.
-
-
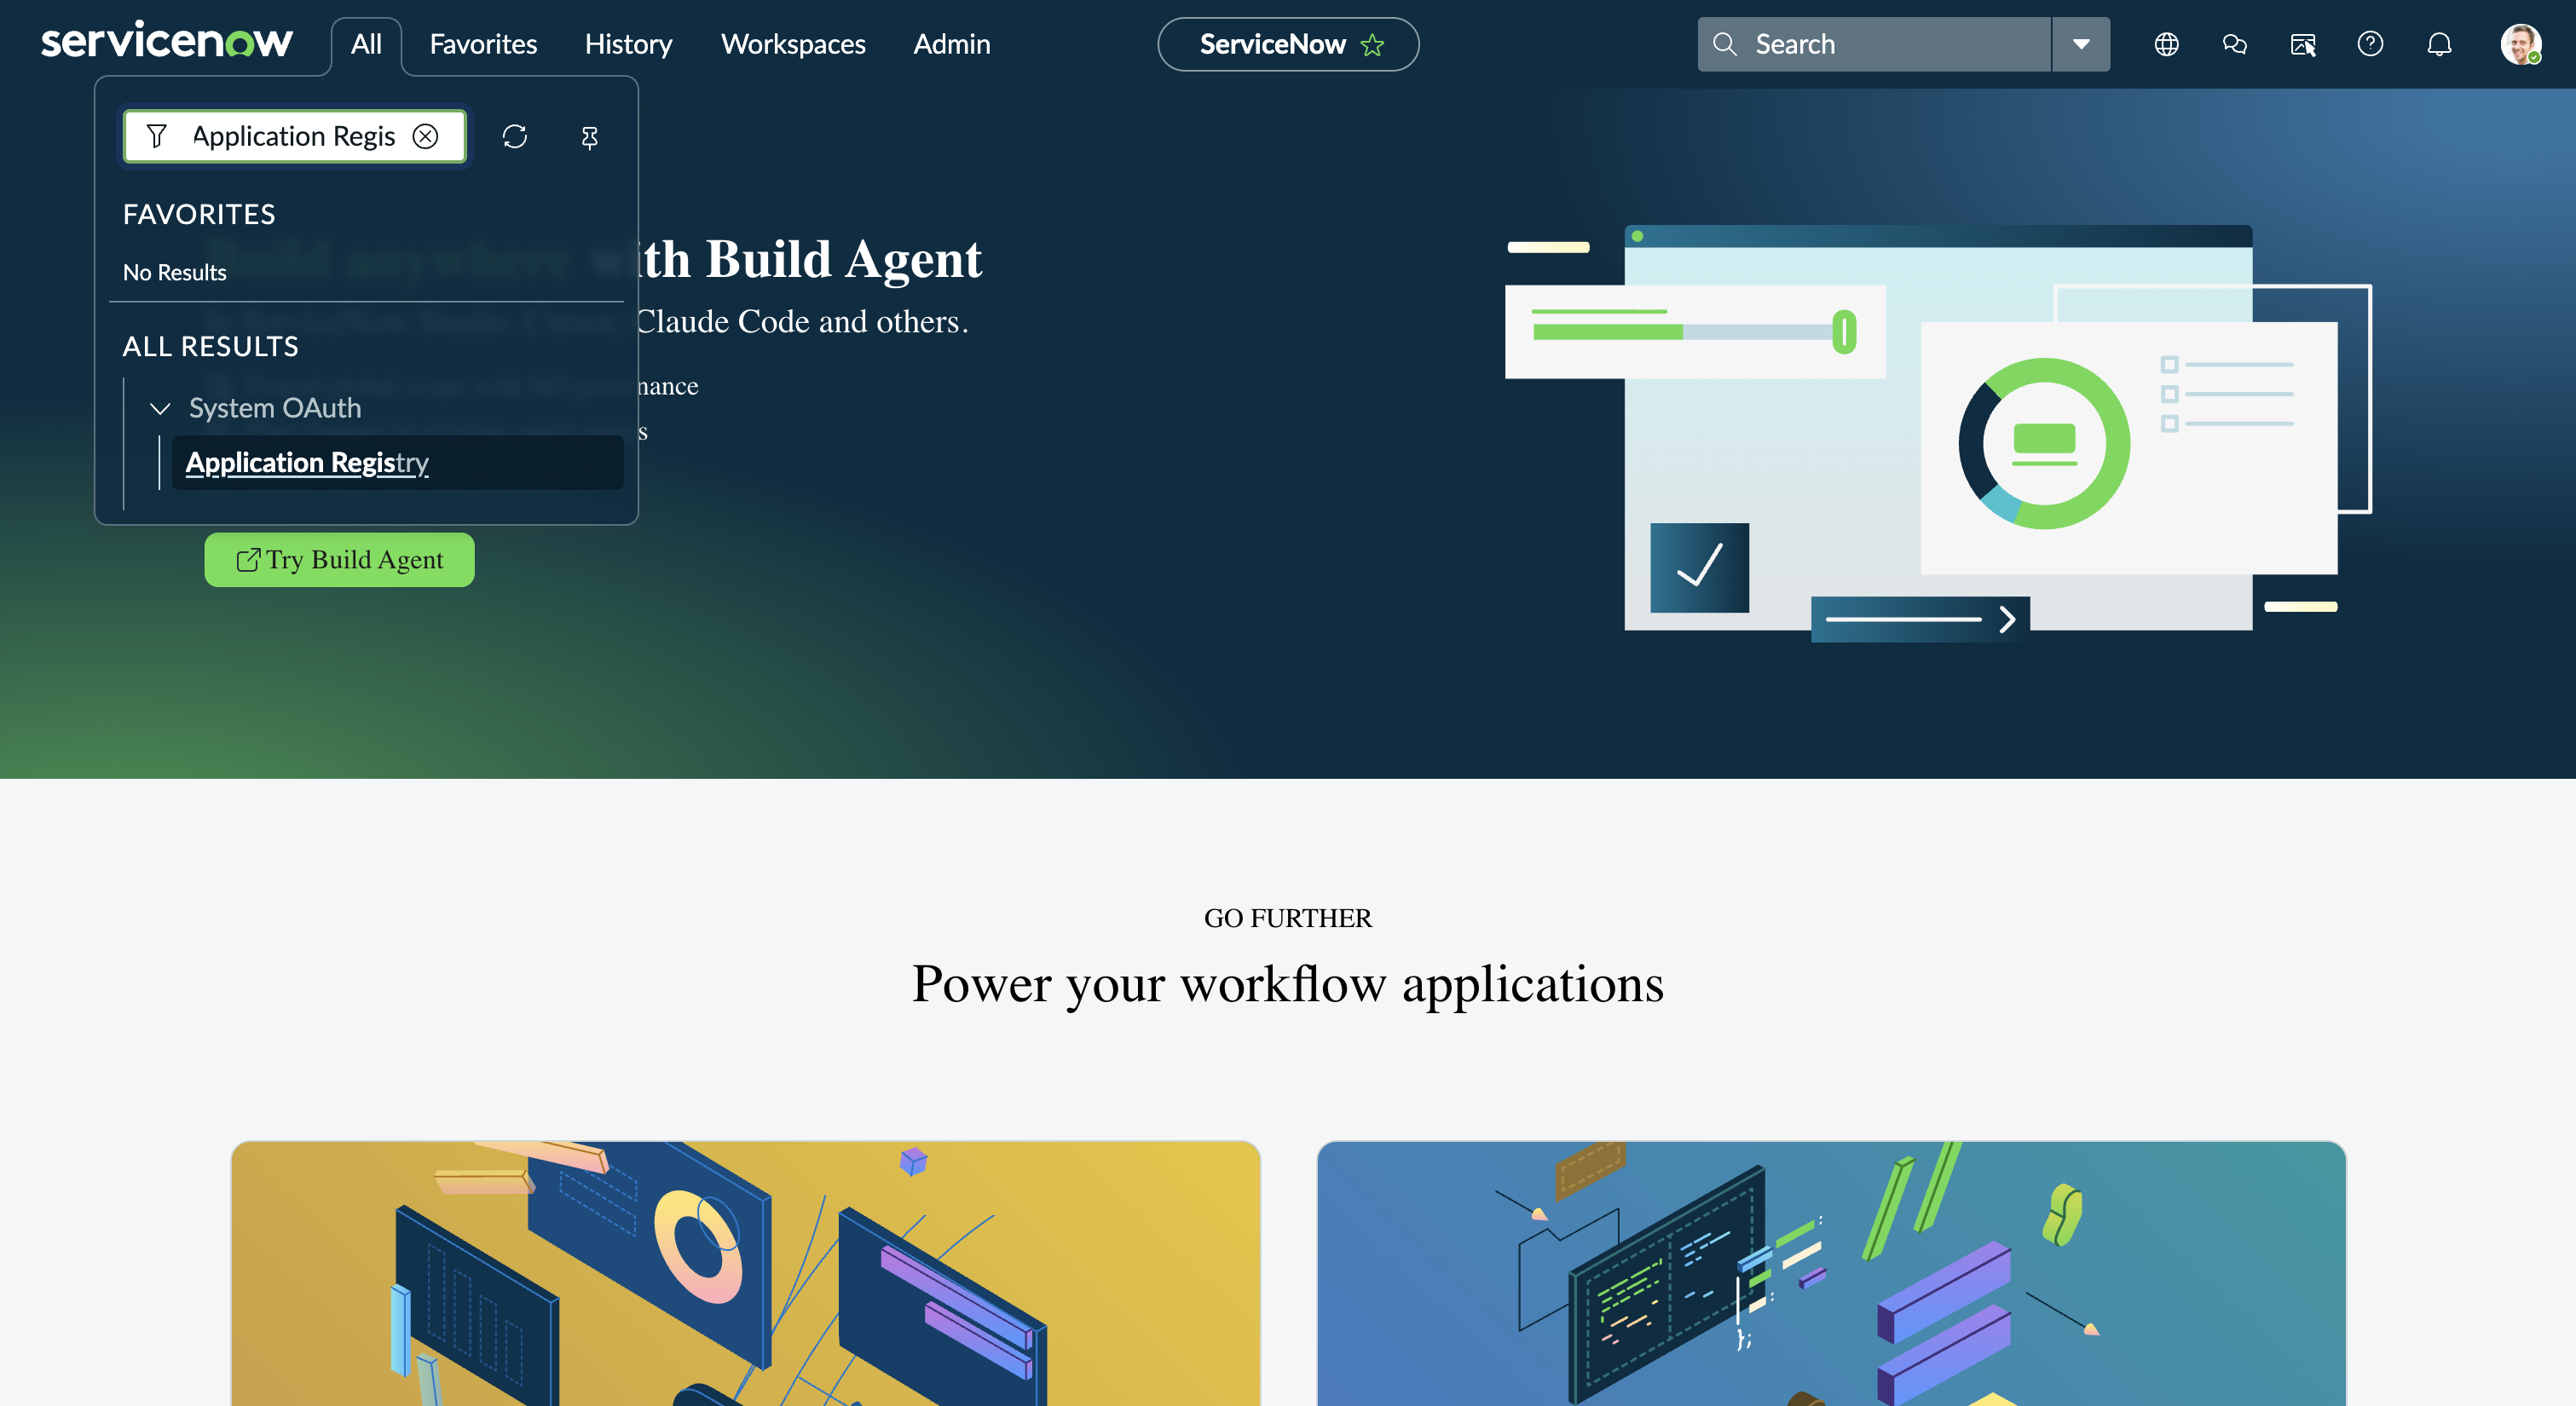
Open Application Registry in ServiceNow
-
Log in to your ServiceNow instance.
-
Use the top navigation search to find Application Registry under System OAuth.
-
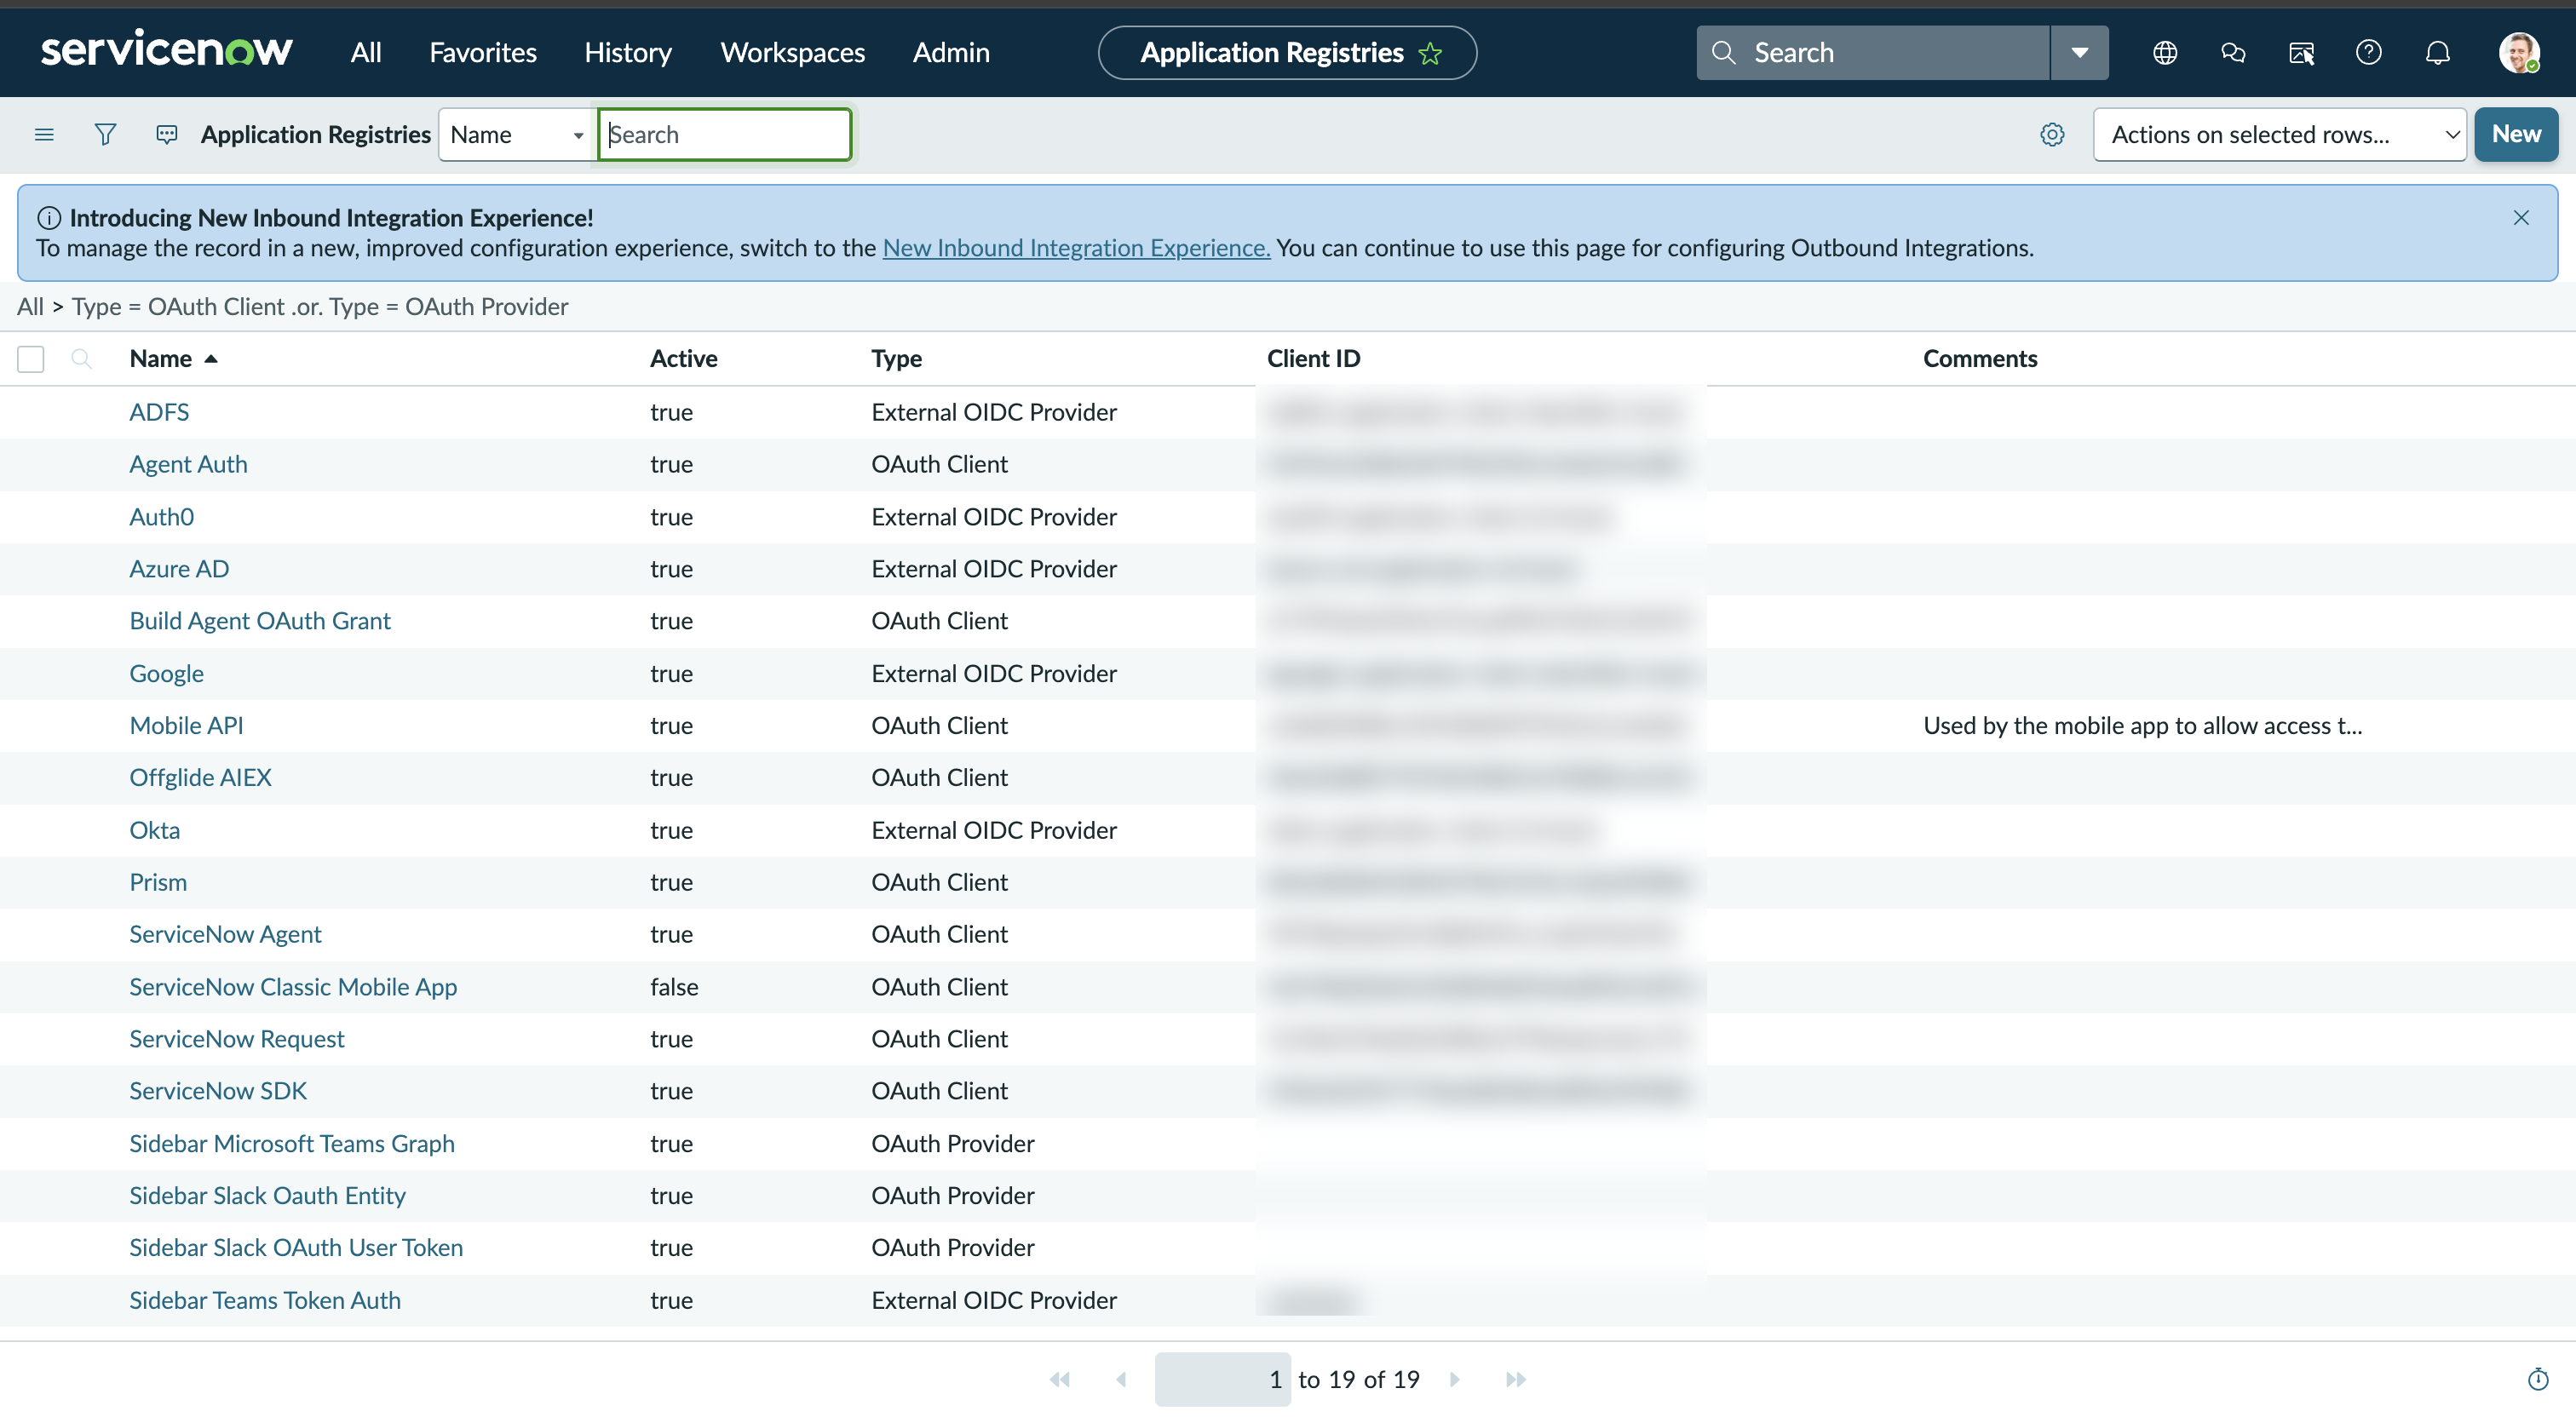
The Application Registries list shows every OAuth client and provider already configured on your instance.
-
-
Create a new OAuth application
-
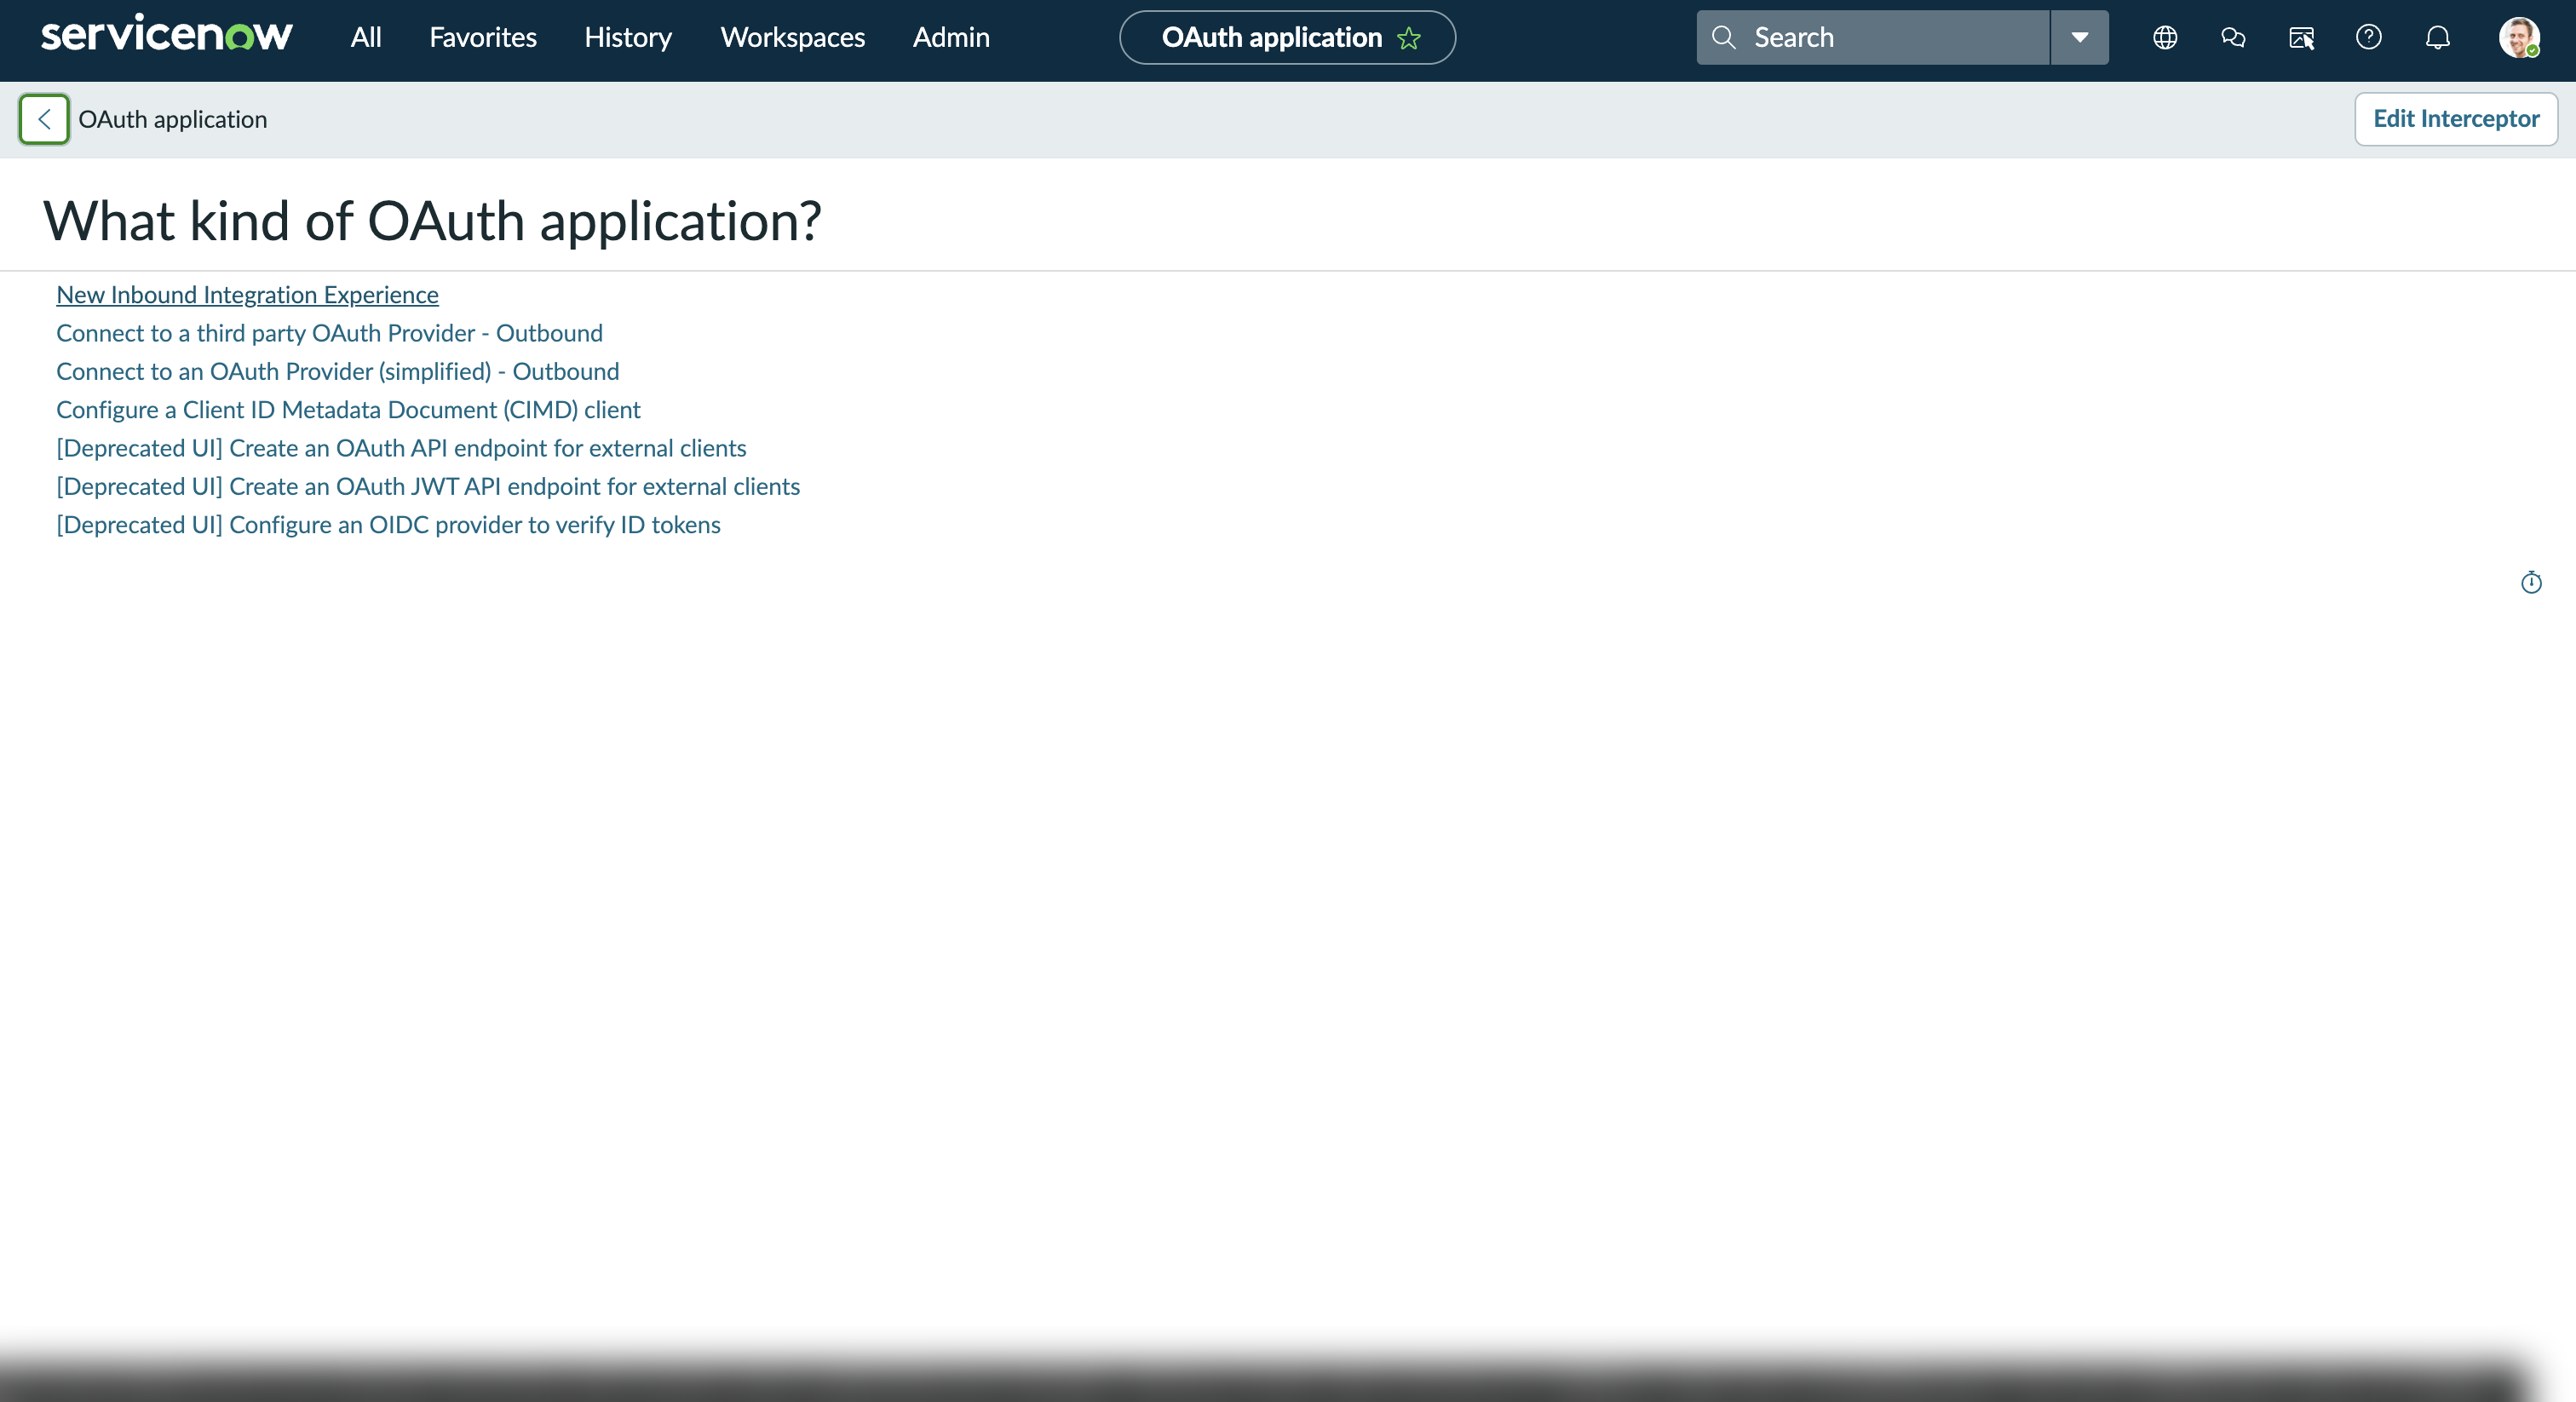
Click New. ServiceNow asks What kind of OAuth application?
-
Select New Inbound Integration Experience.
-
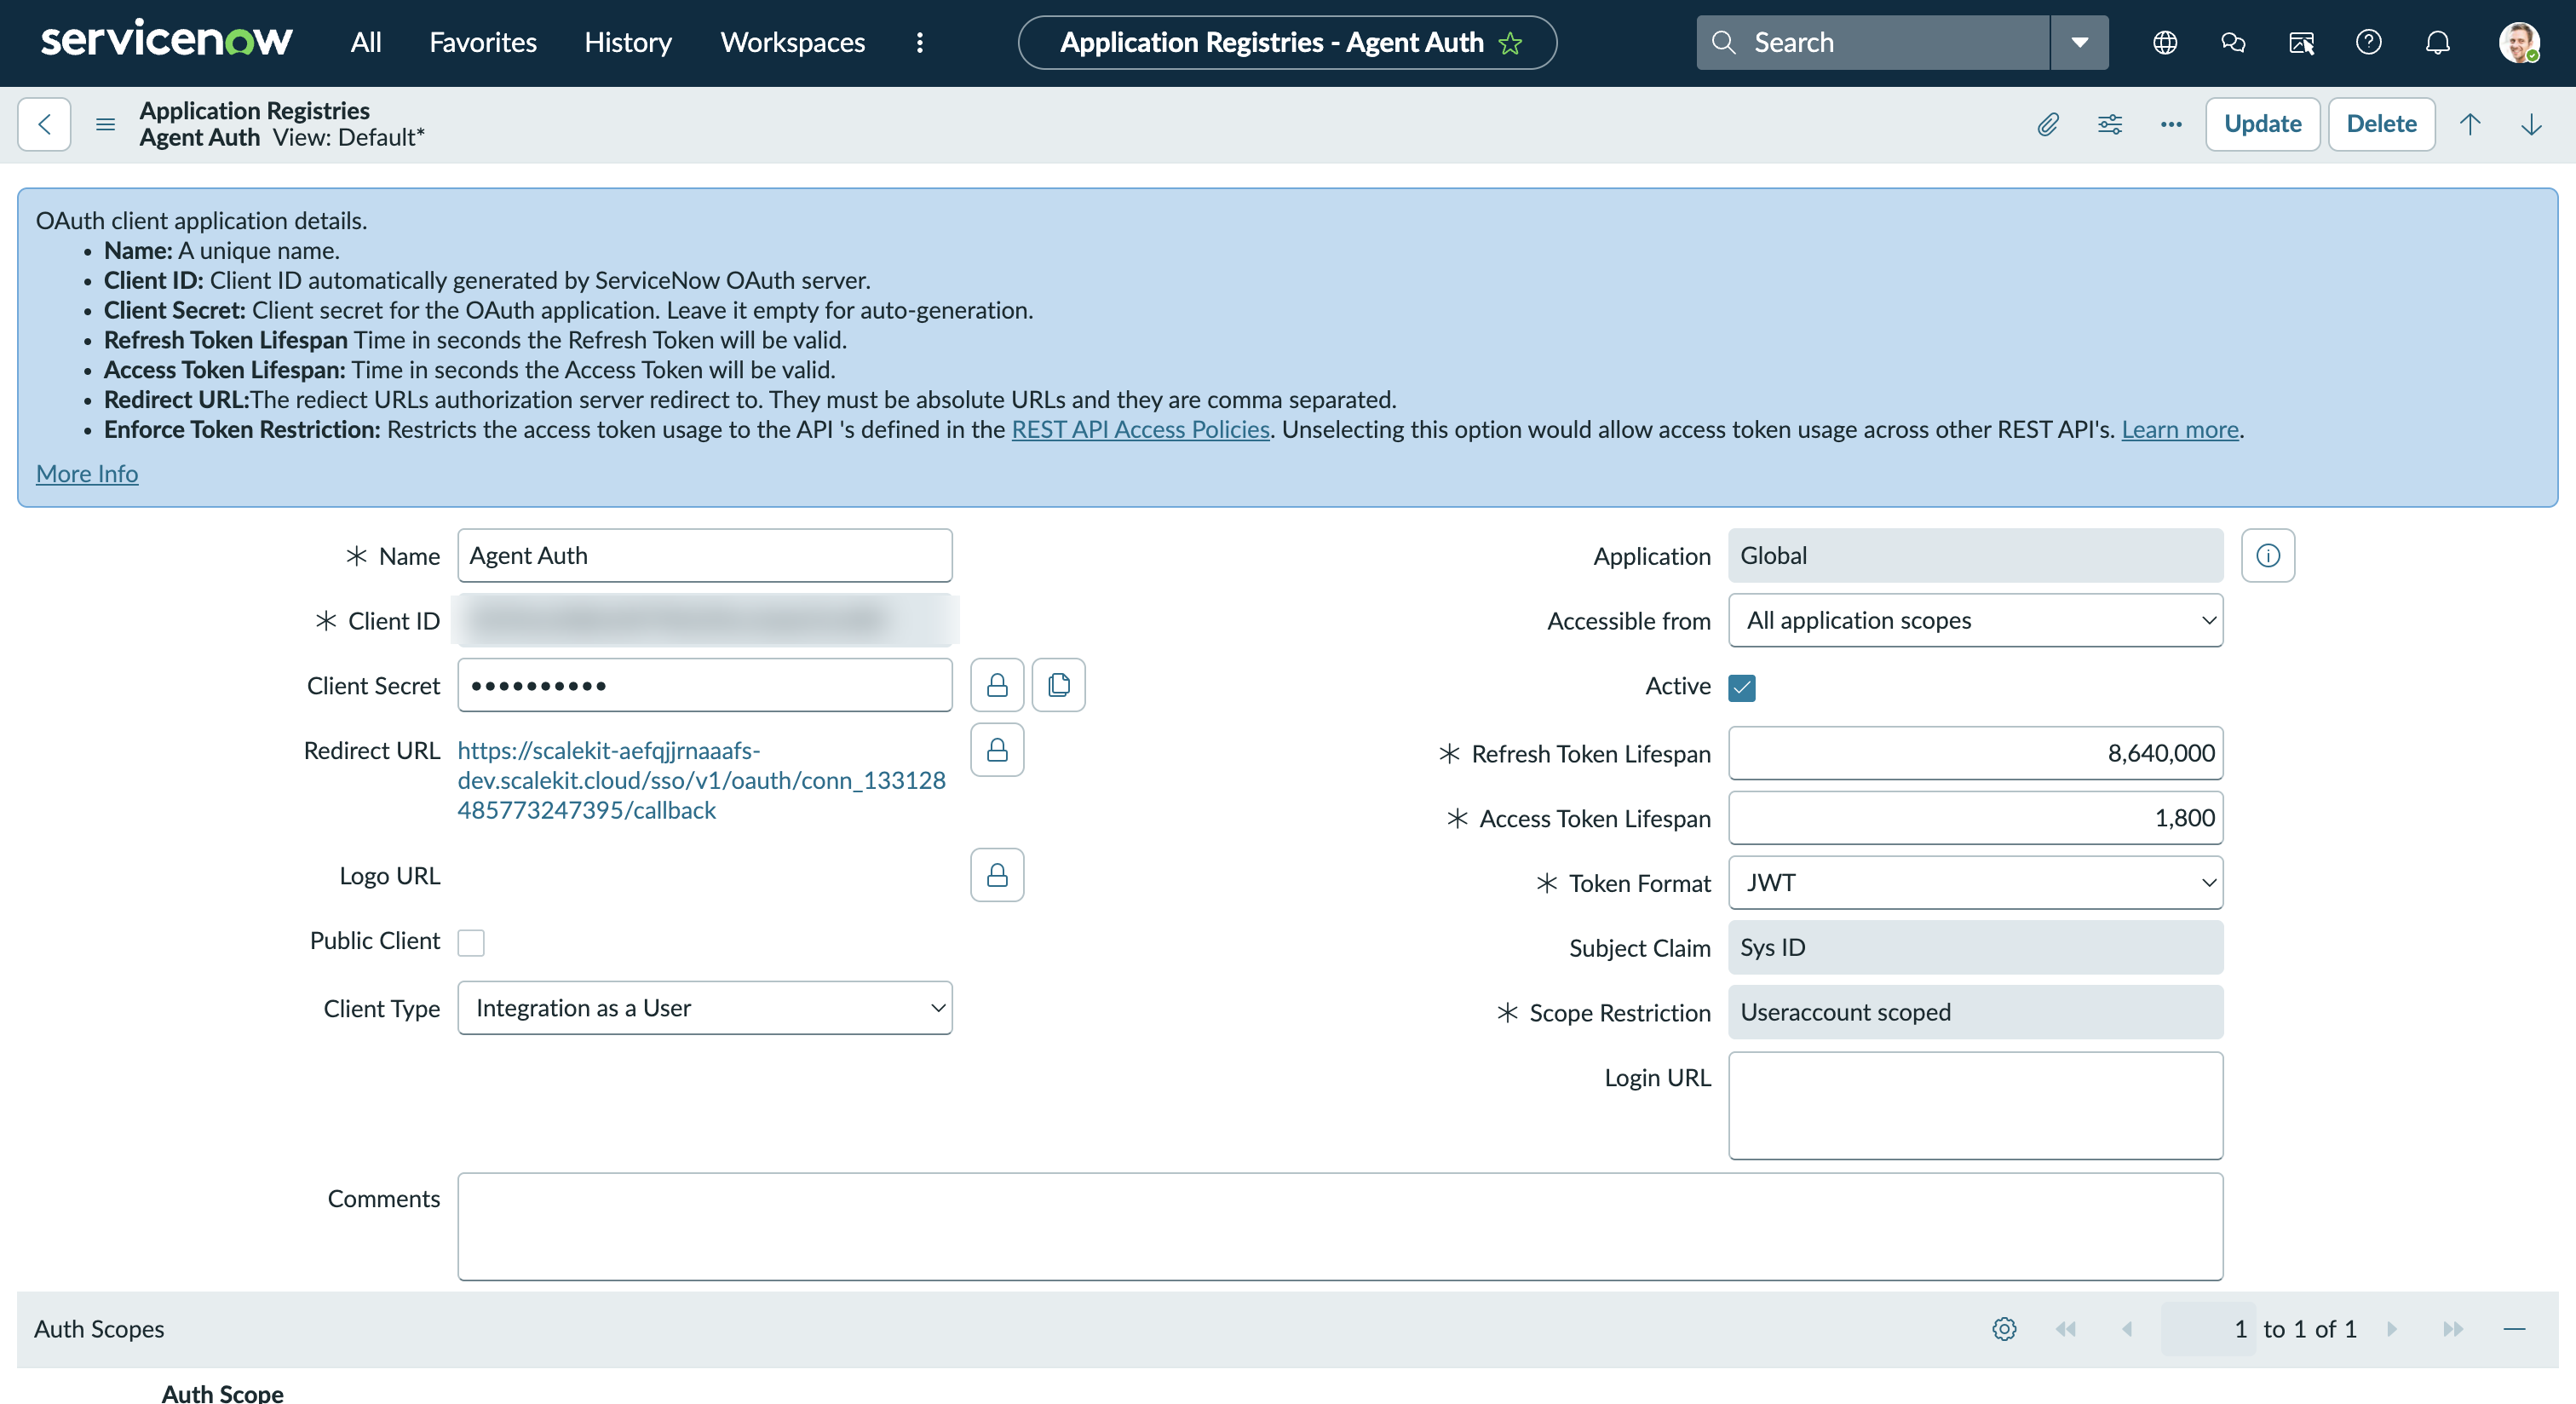
Give the application a Name (for example,
Agent Auth) and paste the redirect URI you copied in step 1 into the Redirect URL field. -
Save the record.
-
-
Copy your Client ID and Client Secret
-
Open the application record you just created under Application Registries.
-
Copy the Client ID shown on the record.
-
Click the lock icon next to Client Secret to reveal and copy it.
-
-
Add credentials in Scalekit
- Return to the connection you created in Scalekit and enter:
- Client ID — from your ServiceNow application registry
- Client Secret — from your ServiceNow application registry
- Click Save.
- Return to the connection you created in Scalekit and enter:
-
-
Authorize and make your first call
Section titled “Authorize and make your first call”quickstart.ts import { ScalekitClient } from '@scalekit-sdk/node'import 'dotenv/config'const scalekit = new ScalekitClient(process.env.SCALEKIT_ENV_URL,process.env.SCALEKIT_CLIENT_ID,process.env.SCALEKIT_CLIENT_SECRET,)const actions = scalekit.actionsconst connector = 'servicenow'const identifier = 'user_123'// Generate an authorization link for the userconst { link } = await actions.getAuthorizationLink({ connectionName: connector, identifier })console.log('Authorize ServiceNow:', link)process.stdout.write('Press Enter after authorizing...')await new Promise(r => process.stdin.once('data', r))// Make your first callconst result = await actions.executeTool({connector,identifier,toolName: 'servicenow_attachment_list',toolInput: {},})console.log(result)quickstart.py import osfrom scalekit.client import ScalekitClientfrom dotenv import load_dotenvload_dotenv()scalekit_client = ScalekitClient(env_url=os.getenv("SCALEKIT_ENV_URL"),client_id=os.getenv("SCALEKIT_CLIENT_ID"),client_secret=os.getenv("SCALEKIT_CLIENT_SECRET"),)actions = scalekit_client.actionsconnection_name = "servicenow"identifier = "user_123"# Generate an authorization link for the userlink_response = actions.get_authorization_link(connection_name=connection_name,identifier=identifier,)print("Authorize ServiceNow:", link_response.link)input("Press Enter after authorizing...")# Make your first callresult = actions.execute_tool(tool_input={},tool_name="servicenow_attachment_list",connection_name=connection_name,identifier=identifier,)print(result)
What you can do
Section titled “What you can do”Connect this agent connector to let your agent:
- Stats aggregate — Retrieve aggregate statistics (COUNT, SUM, AVG, MIN, MAX) for any ServiceNow table
- Delete attachment, catalog cart item, cmdb ci — Delete a file attachment from a ServiceNow record
- Download attachment — Download the binary file contents of an attachment from ServiceNow
- Get attachment, catalog cart, catalog category — Retrieve metadata for a specific attachment by its sys_id
- List attachment, catalog categories, catalog item — Retrieve a list of attachments associated with a record in ServiceNow
- Upload attachment — Upload a file attachment to a ServiceNow record using base64 data
Common workflows
Section titled “Common workflows”Don’t worry about your ServiceNow instance domain in the path. Scalekit automatically resolves {{domain}} from the connected account’s configuration. For example, a request with path="/api/now/table/sys_user" will be sent to https://mycompany.service-now.com/api/now/table/sys_user automatically.
Proxy API call
const result = await actions.request({ connectionName: 'servicenow', identifier: 'user_123', path: '/api/now/table/sys_user', method: 'GET',});console.log(result);result = actions.request( connection_name='servicenow', identifier='user_123', path="/api/now/table/sys_user", method="GET")print(result)Execute a tool
const result = await actions.executeTool({ connector: 'servicenow', identifier: 'user_123', toolName: 'servicenow_list', toolInput: {},});console.log(result);result = actions.execute_tool( tool_input={}, tool_name='servicenow_list', connection_name='servicenow', identifier='user_123',)print(result)Tool list
Section titled “Tool list”Use the exact tool names from the Tool list below when you call execute_tool. If you’re not sure which name to use, list the tools available for the current user first.
servicenow_aggregate_stats#Retrieve aggregate statistics (COUNT, SUM, AVG, MIN, MAX) for any ServiceNow table. Group results by fields for dashboard-style analytics.10 params
Retrieve aggregate statistics (COUNT, SUM, AVG, MIN, MAX) for any ServiceNow table. Group results by fields for dashboard-style analytics.
table_namestringrequiredName of the ServiceNow table to aggregate (e.g., incident, change_request)sysparm_avg_fieldsstringoptionalComma-separated list of fields to compute the AVERAGE forsysparm_countbooleanoptionalWhen true, include a COUNT of all matching records in the resultsysparm_display_valuestringoptionalReturn display values alongside actual values. Use 'true', 'false', or 'all'sysparm_group_bystringoptionalComma-separated fields to GROUP BY in the aggregate querysysparm_max_fieldsstringoptionalComma-separated list of fields to find the MAXIMUM value forsysparm_min_fieldsstringoptionalComma-separated list of fields to find the MINIMUM value forsysparm_order_bystringoptionalField name to order grouped aggregate results bysysparm_querystringoptionalEncoded query string to filter records before aggregation (ServiceNow query syntax)sysparm_sum_fieldsstringoptionalComma-separated list of fields to SUMservicenow_attachment_delete#Delete a file attachment from a ServiceNow record. This action is permanent.1 param
Delete a file attachment from a ServiceNow record. This action is permanent.
sys_idstringrequiredSys ID of the attachment to delete.servicenow_attachment_download#Download the binary file contents of an attachment from ServiceNow. Returns the raw file data. Use servicenow_attachment_get to first retrieve metadata (filename, content_type).1 param
Download the binary file contents of an attachment from ServiceNow. Returns the raw file data. Use servicenow_attachment_get to first retrieve metadata (filename, content_type).
sys_idstringrequiredThe sys_id of the attachment record whose binary content to download.servicenow_attachment_get#Retrieve metadata for a specific attachment by its sys_id. Returns details such as filename, content type, size, and the associated record.1 param
Retrieve metadata for a specific attachment by its sys_id. Returns details such as filename, content type, size, and the associated record.
sys_idstringrequiredThe sys_id of the attachment to retrieve.servicenow_attachment_list#Retrieve a list of attachments associated with a record in ServiceNow. Filter by table name and record sys_id to find attachments for a specific record.5 params
Retrieve a list of attachments associated with a record in ServiceNow. Filter by table name and record sys_id to find attachments for a specific record.
file_namestringoptionalFilter attachments by filename.sysparm_limitintegeroptionalMaximum number of records to return (default: 10).sysparm_offsetintegeroptionalNumber of records to skip for pagination.table_namestringoptionalTable name of the parent record (e.g., `incident`, `change_request`).table_sys_idstringoptionalsys_id of the parent record whose attachments to retrieve.servicenow_attachment_upload#Upload a file attachment to a ServiceNow record using base64 data. Associates the file with the specified table record.5 params
Upload a file attachment to a ServiceNow record using base64 data. Associates the file with the specified table record.
file_contentstringrequiredBase64-encoded content of the file to upload.file_namestringrequiredFilename including extension for the uploaded file.table_namestringrequiredTarget table name of the record to attach the file to (e.g., `incident`, `change_request`).table_sys_idstringrequiredsys_id of the record to attach the file to.content_typestringoptionalMIME type of the file (e.g., `application/pdf`, `image/png`, `text/plain`).servicenow_batch_request#Execute multiple ServiceNow REST API calls in a single HTTP request. Each sub-request runs independently and all results are returned together.2 params
Execute multiple ServiceNow REST API calls in a single HTTP request. Each sub-request runs independently and all results are returned together.
rest_requestsarrayrequiredArray of REST requests. Each request: {id: string, method: string, url: string (e.g. /api/now/table/incident), headers: [{name: string, value: string}], exclude_response_headers: bool, body: string (optional)}batch_request_idstringoptionalOptional identifier for the overall batch request.servicenow_catalog_cart_checkout#Perform the first step of a two-step checkout in the ServiceNow Service Catalog. Returns the cart with pricing and validation before final submission. Follow up with servicenow_catalog_cart_submit to complete the order.0 params
Perform the first step of a two-step checkout in the ServiceNow Service Catalog. Returns the cart with pricing and validation before final submission. Follow up with servicenow_catalog_cart_submit to complete the order.
servicenow_catalog_cart_get#Retrieve the current user's shopping cart contents.0 params
Retrieve the current user's shopping cart contents.
servicenow_catalog_cart_item_delete#Remove an item from the ServiceNow service catalog cart.1 param
Remove an item from the ServiceNow service catalog cart.
cart_item_idstringrequiredThe sys_id of the cart item to remove.servicenow_catalog_cart_item_update#Update the quantity or variables for an item already in the ServiceNow service catalog cart.3 params
Update the quantity or variables for an item already in the ServiceNow service catalog cart.
cart_item_idstringrequiredThe sys_id of the cart item to update.sysparm_quantityintegeroptionalNew quantity for the cart item.variablesobjectoptionalUpdated variable values for the cart item as a key-value object.servicenow_catalog_cart_submit#Submit all items in the current user's shopping cart as a service request.0 params
Submit all items in the current user's shopping cart as a service request.
servicenow_catalog_categories_list#List all Service Catalog categories from ServiceNow. Returns category names, descriptions, and their parent catalog associations.3 params
List all Service Catalog categories from ServiceNow. Returns category names, descriptions, and their parent catalog associations.
sysparm_fieldsstringoptionalComma-separated list of fields to return in the response.sysparm_limitintegeroptionalMaximum number of records to return.sysparm_offsetintegeroptionalNumber of records to skip for pagination.servicenow_catalog_category_get#Retrieve details of a specific service catalog category, including its catalog items.1 param
Retrieve details of a specific service catalog category, including its catalog items.
sys_idstringrequiredThe sys_id of the catalog category to retrieve.servicenow_catalog_get#Retrieve details of a specific service catalog by its sys_id from the ServiceNow Service Catalog API.1 param
Retrieve details of a specific service catalog by its sys_id from the ServiceNow Service Catalog API.
sysparm_catalogstringrequiredThe sys_id of the service catalog to retrieveservicenow_catalog_item_add_to_cart#Add a service catalog item to the current user's shopping cart.3 params
Add a service catalog item to the current user's shopping cart.
sys_idstringrequiredSys ID of the catalog item to add to the cart.sysparm_quantityintegeroptionalQuantity of the item to add. Defaults to 1.variablesobjectoptionalCatalog item variable values as key-value pairs.servicenow_catalog_item_get#Retrieve details of a specific service catalog item including its variables and parameters.2 params
Retrieve details of a specific service catalog item including its variables and parameters.
sys_idstringrequiredThe sys_id of the catalog item to retrieve.sysparm_fieldsstringoptionalComma-separated list of fields to return in the response.servicenow_catalog_item_list#Retrieve a list of service catalog items available to the current user.5 params
Retrieve a list of service catalog items available to the current user.
sysparm_categorystringoptionalFilter catalog items by category sys_id.sysparm_fieldsstringoptionalComma-separated list of fields to return in the response.sysparm_limitintegeroptionalMaximum number of records to return.sysparm_offsetintegeroptionalNumber of records to skip for pagination.sysparm_textstringoptionalFull-text search filter to match catalog items by keyword.servicenow_catalog_item_order#Submit an order for a service catalog item. Returns the created request and request item sys_ids.4 params
Submit an order for a service catalog item. Returns the created request and request item sys_ids.
sys_idstringrequiredThe sys_id of the catalog item to order.sysparm_item_guidstringoptionalCart item GUID for tracking the order in the shopping cart.sysparm_quantityintegeroptionalNumber of items to order. Defaults to 1 if not specified.variablesobjectoptionalKey-value pairs for catalog item variables/parameters required to fulfill the request.servicenow_catalog_item_variables_get#Retrieve the variable definitions (form fields) for a specific service catalog item.1 param
Retrieve the variable definitions (form fields) for a specific service catalog item.
sys_idstringrequiredsys_id of the catalog item to retrieve variable definitions for.servicenow_catalog_list#List all service catalogs available in the ServiceNow Service Catalog.2 params
List all service catalogs available in the ServiceNow Service Catalog.
sysparm_limitintegeroptionalMaximum number of records to return.sysparm_offsetintegeroptionalNumber of records to skip for pagination.servicenow_change_conflict_scan#Run a conflict scan on a change request to detect scheduling conflicts with other changes.1 param
Run a conflict scan on a change request to detect scheduling conflicts with other changes.
change_sys_idstringrequiredsys_id of the change request to scan for conflicts.servicenow_change_conflicts_get#Retrieve the results of a conflict scan for a change request.1 param
Retrieve the results of a conflict scan for a change request.
change_sys_idstringrequiredsys_id of the change request to retrieve conflict results for.servicenow_change_get#Retrieve a change request using the dedicated Change Management API. Returns richer change-specific fields including workflow state, approvals, and risk assessment compared to the generic table API.1 param
Retrieve a change request using the dedicated Change Management API. Returns richer change-specific fields including workflow state, approvals, and risk assessment compared to the generic table API.
change_sys_idstringrequiredThe sys_id of the change request to retrieve.servicenow_change_request_create#Create a new change request in ServiceNow. Returns the created record with its sys_id. Use type to specify normal, standard, or emergency change.11 params
Create a new change request in ServiceNow. Returns the created record with its sys_id. Use type to specify normal, standard, or emergency change.
short_descriptionstringrequiredBrief summary of the change request.assigned_tostringoptionalsys_id or username of the individual assigned to the change.assignment_groupstringoptionalsys_id or name of the group to assign the change request to.descriptionstringoptionalDetailed description of the change request.end_datestringoptionalPlanned end date and time in ISO 8601 format.implementation_planstringoptionalStep-by-step plan for implementing the change.justificationstringoptionalBusiness justification for the change.prioritystringoptionalPriority: `1`=Critical, `2`=High, `3`=Moderate, `4`=Low.riskstringoptionalRisk level: `1`=High, `2`=Moderate, `3`=Low, `4`=Very Low.start_datestringoptionalPlanned start date and time in ISO 8601 format.typestringoptionalChange type: `normal`, `standard`, or `emergency`.servicenow_change_request_emergency_create#Create an Emergency change request using the dedicated Change Management API for urgent, unplanned changes.13 params
Create an Emergency change request using the dedicated Change Management API for urgent, unplanned changes.
short_descriptionstringrequiredBrief summary of the emergency change request.assigned_tostringoptionalsys_id or username of the individual assigned to the emergency change.assignment_groupstringoptionalsys_id or name of the group to assign the emergency change to.backout_planstringoptionalPlan for reverting the emergency change if it fails.cmdb_cistringoptionalsys_id or name of the configuration item affected by this emergency change.descriptionstringoptionalDetailed description of the emergency change.end_datestringoptionalPlanned end date and time in ISO 8601 format.impactstringoptionalImpact level: `1`=High, `2`=Medium, `3`=Low.implementation_planstringoptionalStep-by-step plan for implementing the emergency change.justificationstringoptionalBusiness justification for the emergency change.riskstringoptionalRisk level: `1`=High, `2`=Moderate, `3`=Low, `4`=Very Low.start_datestringoptionalPlanned start date and time in ISO 8601 format.test_planstringoptionalPlan for testing the emergency change after implementation.servicenow_change_request_get#Retrieve details of a specific change request by sys_id from ServiceNow.3 params
Retrieve details of a specific change request by sys_id from ServiceNow.
sys_idstringrequiredThe sys_id of the change request to retrieve.sysparm_display_valuestringoptionalReturn field display values instead of raw values. Options: `true`, `false`, or `all`.sysparm_fieldsstringoptionalComma-separated list of fields to return in the response.servicenow_change_request_list#Retrieve a list of change requests from ServiceNow with filtering and pagination. Use sysparm_query for encoded queries (e.g., `state=implement^type=normal`).5 params
Retrieve a list of change requests from ServiceNow with filtering and pagination. Use sysparm_query for encoded queries (e.g., `state=implement^type=normal`).
sysparm_display_valuestringoptionalReturn field display values instead of raw values. Options: `true`, `false`, or `all`.sysparm_fieldsstringoptionalComma-separated list of fields to return in the response.sysparm_limitintegeroptionalMaximum number of records to return (default: 10, max: 10000).sysparm_offsetintegeroptionalNumber of records to skip for pagination.sysparm_querystringoptionalEncoded query string to filter results (e.g., `state=implement^type=normal`).servicenow_change_request_normal_create#Create a Normal change request using the dedicated Change Management API. Enforces workflow rules and approvals. Use this instead of the generic table API when workflow compliance is required.13 params
Create a Normal change request using the dedicated Change Management API. Enforces workflow rules and approvals. Use this instead of the generic table API when workflow compliance is required.
short_descriptionstringrequiredBrief summary of the normal change request.assigned_tostringoptionalsys_id or username of the individual assigned to the change.assignment_groupstringoptionalsys_id or name of the group to assign the change request to.backout_planstringoptionalPlan for reverting the change if it fails.cmdb_cistringoptionalsys_id or name of the configuration item affected by this change.descriptionstringoptionalDetailed description of the change.end_datestringoptionalPlanned end date and time in ISO 8601 format.impactstringoptionalImpact level: `1`=High, `2`=Medium, `3`=Low.implementation_planstringoptionalStep-by-step plan for implementing the change.justificationstringoptionalBusiness justification for the change.riskstringoptionalRisk level: `1`=High, `2`=Moderate, `3`=Low, `4`=Very Low.start_datestringoptionalPlanned start date and time in ISO 8601 format.test_planstringoptionalPlan for testing the change after implementation.servicenow_change_request_standard_create#Create a Standard change request from a pre-approved standard change template.6 params
Create a Standard change request from a pre-approved standard change template.
template_sys_idstringrequiredsys_id of the standard change template to use.assigned_tostringoptionalsys_id or username of the individual assigned to the change.assignment_groupstringoptionalsys_id or name of the group to assign the change to.end_datestringoptionalPlanned end date and time in ISO 8601 format.short_descriptionstringoptionalOverride the template's short description for this specific change.start_datestringoptionalPlanned start date and time in ISO 8601 format.servicenow_change_request_update#Update fields on an existing change request in ServiceNow. State values: assess=-5, authorize=-4, scheduled=-3, implement=-2, review=-1, closed=0.9 params
Update fields on an existing change request in ServiceNow. State values: assess=-5, authorize=-4, scheduled=-3, implement=-2, review=-1, closed=0.
sys_idstringrequiredThe sys_id of the change request to update.assigned_tostringoptionalsys_id or username of the individual assigned to the change.assignment_groupstringoptionalsys_id or name of the group to assign the change request to.close_notesstringoptionalClosure notes summarizing the outcome of the change.descriptionstringoptionalUpdated detailed description of the change.riskstringoptionalRisk level: `1`=High, `2`=Moderate, `3`=Low, `4`=Very Low.short_descriptionstringoptionalUpdated brief summary of the change request.statestringoptionalChange state: `-5`=assess, `-4`=authorize, `-3`=scheduled, `-2`=implement, `-1`=review, `0`=closed.work_notesstringoptionalInternal work notes to add to the change request (not visible to end users).servicenow_change_standard_templates_list#Retrieve a list of available standard change templates.3 params
Retrieve a list of available standard change templates.
sysparm_fieldsstringoptionalComma-separated list of fields to return in the response.sysparm_limitintegeroptionalMaximum number of templates to return.sysparm_offsetintegeroptionalNumber of records to skip for pagination.servicenow_change_task_create#Create a task for a specific change request in ServiceNow. Requires the parent change request sys_id and a short description. Optionally assign the task to a user or group and set planned start/end dates.7 params
Create a task for a specific change request in ServiceNow. Requires the parent change request sys_id and a short description. Optionally assign the task to a user or group and set planned start/end dates.
change_sys_idstringrequiredsys_id of the parent change request this task belongs toshort_descriptionstringrequiredBrief summary of the change taskassigned_tostringoptionalsys_id or user name of the user to assign the task toassignment_groupstringoptionalsys_id of the group to assign the task todescriptionstringoptionalDetailed description of the change taskplanned_end_datestringoptionalPlanned end date and time for the task in ISO 8601 formatplanned_start_datestringoptionalPlanned start date and time for the task in ISO 8601 formatservicenow_change_task_get#Retrieve the full details of a specific change task by its sys_id. Requires the parent change request sys_id and the task sys_id.3 params
Retrieve the full details of a specific change task by its sys_id. Requires the parent change request sys_id and the task sys_id.
change_sys_idstringrequiredsys_id of the parent change requesttask_sys_idstringrequiredsys_id of the specific change task to retrievesysparm_fieldsstringoptionalComma-separated list of fields to return in the task recordservicenow_change_task_list#Retrieve a list of tasks associated with a change request in ServiceNow. Use the parent change request's sys_id to fetch all its related tasks with optional pagination and field filtering.4 params
Retrieve a list of tasks associated with a change request in ServiceNow. Use the parent change request's sys_id to fetch all its related tasks with optional pagination and field filtering.
change_sys_idstringrequiredThe sys_id of the parent change request whose tasks to listsysparm_fieldsstringoptionalComma-separated list of fields to return in each task recordsysparm_limitintegeroptionalMaximum number of task records to returnsysparm_offsetintegeroptionalNumber of task records to skip for paginationservicenow_change_task_update#Update one or more fields on a specific change task. Provide only the fields you want to change. Supports updating the description, state, work notes, and assignment.7 params
Update one or more fields on a specific change task. Provide only the fields you want to change. Supports updating the description, state, work notes, and assignment.
change_sys_idstringrequiredsys_id of the parent change requesttask_sys_idstringrequiredsys_id of the specific change task to updateassigned_tostringoptionalsys_id or username of the user to assign the task todescriptionstringoptionalUpdated detailed description of the change taskshort_descriptionstringoptionalUpdated brief summary of the change taskstatestringoptionalTask state: 1=Open, 2=Work in Progress, 3=Closed Complete, 4=Closed Incompletework_notesstringoptionalWork notes to append to the change task activity logservicenow_change_update#Update a change request using the dedicated Change Management API. Enforces workflow rules and validations. Use this for state transitions and risk assessment updates.9 params
Update a change request using the dedicated Change Management API. Enforces workflow rules and validations. Use this for state transitions and risk assessment updates.
change_sys_idstringrequiredThe sys_id of the change request to update.assigned_tostringoptionalsys_id of the user assigned to implement the change.assignment_groupstringoptionalsys_id of the group assigned to implement the change.descriptionstringoptionalDetailed description of the change request.end_datestringoptionalPlanned end date and time of the change (ISO 8601 format).riskstringoptionalRisk level of the change. 1=High, 2=Moderate, 3=Low, 4=Very Low.short_descriptionstringoptionalBrief summary of the change request.start_datestringoptionalPlanned start date and time of the change (ISO 8601 format).statestringoptionalNew state value for the change request (workflow-controlled).servicenow_cmdb_ci_create#Create a new Configuration Item in the CMDB. Returns the created CI record with its sys_id.9 params
Create a new Configuration Item in the CMDB. Returns the created CI record with its sys_id.
namestringrequiredDisplay name of the Configuration Item.assigned_tostringoptionalsys_id of the user assigned to this CI.ip_addressstringoptionalIP address of the Configuration Item.manufacturerstringoptionalManufacturer of the CI hardware or software.model_idstringoptionalsys_id of the model record for this CI.osstringoptionalOperating system running on the CI.short_descriptionstringoptionalBrief description of the Configuration Item.support_groupstringoptionalsys_id of the support group responsible for this CI.sys_class_namestringoptionalCI class that determines the type of configuration item (e.g., `cmdb_ci_server`, `cmdb_ci_application`).servicenow_cmdb_ci_delete#Delete a Configuration Item from the ServiceNow CMDB using the Table API. This action is irreversible.1 param
Delete a Configuration Item from the ServiceNow CMDB using the Table API. This action is irreversible.
sys_idstringrequiredThe sys_id of the CMDB Configuration Item to delete.servicenow_cmdb_ci_get#Retrieve details of a specific Configuration Item by sys_id.2 params
Retrieve details of a specific Configuration Item by sys_id.
sys_idstringrequiredThe sys_id of the Configuration Item to retrieve.sysparm_fieldsstringoptionalComma-separated list of fields to return in the response.servicenow_cmdb_ci_list#Retrieve a list of Configuration Items (CIs) from the CMDB. Filter by class using sysparm_query (e.g., `sys_class_name=cmdb_ci_server`).4 params
Retrieve a list of Configuration Items (CIs) from the CMDB. Filter by class using sysparm_query (e.g., `sys_class_name=cmdb_ci_server`).
sysparm_fieldsstringoptionalComma-separated list of fields to return in the response.sysparm_limitintegeroptionalMaximum number of records to return (default: 10).sysparm_offsetintegeroptionalNumber of records to skip for pagination.sysparm_querystringoptionalEncoded query string to filter results (e.g., `sys_class_name=cmdb_ci_server`).servicenow_cmdb_ci_relationships_create#Create a relationship between two Configuration Items in the CMDB.3 params
Create a relationship between two Configuration Items in the CMDB.
childstringrequiredSys ID of the child (target) CIparentstringrequiredSys ID of the parent (source) CItypestringrequiredSys ID of the relationship type from cmdb_rel_type tableservicenow_cmdb_ci_relationships_get#Get all CI relationships for a Configuration Item. Returns both inbound and outbound relationships from the cmdb_rel_ci table.3 params
Get all CI relationships for a Configuration Item. Returns both inbound and outbound relationships from the cmdb_rel_ci table.
sys_idstringrequiredSys ID of the Configuration Item.sysparm_limitintegeroptionalMaximum number of relationships to return.sysparm_offsetintegeroptionalNumber of relationships to skip (for pagination).servicenow_cmdb_ci_update#Update fields on an existing Configuration Item in the CMDB. Only fields provided will be updated.8 params
Update fields on an existing Configuration Item in the CMDB. Only fields provided will be updated.
sys_idstringrequiredThe sys_id of the Configuration Item to update.assigned_tostringoptionalsys_id of the user assigned to this CI.install_statusstringoptionalInstallation status of the CI (e.g., `1`=Installed, `2`=In Stock, `6`=Retired).ip_addressstringoptionalUpdated IP address of the Configuration Item.namestringoptionalUpdated display name of the Configuration Item.osstringoptionalUpdated operating system running on the CI.short_descriptionstringoptionalUpdated brief description of the Configuration Item.support_groupstringoptionalsys_id of the support group responsible for this CI.servicenow_cmdb_meta_get#Retrieve the class schema, attributes, and hierarchy for a CMDB CI class.1 param
Retrieve the class schema, attributes, and hierarchy for a CMDB CI class.
class_namestringrequiredCI class name to retrieve the schema for (e.g., cmdb_ci_server).servicenow_flow_execution_status#Check the status and result of a triggered Flow Designer flow execution.2 params
Check the status and result of a triggered Flow Designer flow execution.
execution_idstringrequiredThe execution ID returned by the flow trigger operation.flow_api_namestringrequiredThe API name of the Flow Designer flow.servicenow_flow_get#Retrieve details and schema of a specific Flow Designer flow by its API name.1 param
Retrieve details and schema of a specific Flow Designer flow by its API name.
flow_api_namestringrequiredThe API name of the Flow Designer flow to retrieve.servicenow_flow_list#List all Flow Designer flows available in the ServiceNow instance.2 params
List all Flow Designer flows available in the ServiceNow instance.
sysparm_limitintegeroptionalMaximum number of flows to return.sysparm_offsetintegeroptionalNumber of flows to skip for pagination.servicenow_flow_trigger#Trigger a Flow Designer flow by its API name.2 params
Trigger a Flow Designer flow by its API name.
flow_api_namestringrequiredAPI name of the Flow Designer flow to trigger.inputsobjectoptionalInput values for the flow as key-value pairs.servicenow_global_search#Perform a full-text search across all configured ServiceNow tables simultaneously. Returns matching records from multiple tables in a single response.3 params
Perform a full-text search across all configured ServiceNow tables simultaneously. Returns matching records from multiple tables in a single response.
sysparm_searchstringrequiredFull-text search query to match against all indexed ServiceNow tablessysparm_fieldsstringoptionalComma-separated list of fields to return in each matching recordsysparm_limitintegeroptionalMaximum number of results to return per tableservicenow_import_set_get#Retrieve the transform result and status for a previously inserted import set record to check if the transform succeeded and what target records were created or updated.2 params
Retrieve the transform result and status for a previously inserted import set record to check if the transform succeeded and what target records were created or updated.
staging_tablestringrequiredThe name of the import staging table the record was inserted into.sys_idstringrequiredThe sys_id of the import set staging record to check.servicenow_import_set_insert#Insert a single record into a ServiceNow import set staging table and trigger transform maps to process it. Returns the transformed record's sys_id and status.2 params
Insert a single record into a ServiceNow import set staging table and trigger transform maps to process it. Returns the transformed record's sys_id and status.
record_dataobjectrequiredKey-value pairs matching the columns of the staging table to insertstaging_tablestringrequiredName of the import set staging table to insert into (e.g., u_import_incidents)servicenow_import_set_insert_multiple#Insert multiple records into a ServiceNow import set staging table asynchronously. Returns an import set ID for polling results.2 params
Insert multiple records into a ServiceNow import set staging table asynchronously. Returns an import set ID for polling results.
recordsarrayrequiredArray of record objects to insert into the staging table.staging_tablestringrequiredName of the import set staging table to insert records into.servicenow_incident_close#Close a resolved incident by setting its state to Closed (7). The incident must already be in Resolved state before it can be closed.2 params
Close a resolved incident by setting its state to Closed (7). The incident must already be in Resolved state before it can be closed.
sys_idstringrequiredThe unique sys_id of the incident to close.close_notesstringoptionalOptional closing notes to append to the incident.servicenow_incident_create#Create a new incident in ServiceNow. Returns the created incident record with its sys_id.11 params
Create a new incident in ServiceNow. Returns the created incident record with its sys_id.
short_descriptionstringrequiredBrief summary of the incident.assigned_tostringoptionalsys_id or username of the individual assigned to resolve the incident.assignment_groupstringoptionalsys_id or name of the group assigned to resolve the incident.caller_idstringoptionalsys_id or username of the person reporting the incident.categorystringoptionalIncident category (e.g., `Network`, `Software`, `Hardware`).cmdb_cistringoptionalsys_id of the affected Configuration Item (CI) in the CMDB.descriptionstringoptionalDetailed description of the incident.impactstringoptionalImpact of the incident: `1`=High, `2`=Medium, `3`=Low.prioritystringoptionalIncident priority: `1`=Critical, `2`=High, `3`=Moderate, `4`=Low.subcategorystringoptionalIncident subcategory under the selected category.urgencystringoptionalUrgency of the incident: `1`=High, `2`=Medium, `3`=Low.servicenow_incident_get#Retrieve details of a specific incident by its sys_id.3 params
Retrieve details of a specific incident by its sys_id.
sys_idstringrequiredThe unique sys_id of the incident to retrieve.sysparm_display_valuestringoptionalReturn field display values instead of raw values. Options: `true`, `false`, or `all`.sysparm_fieldsstringoptionalComma-separated list of fields to return in the response.servicenow_incident_list#Retrieve a list of incidents from ServiceNow with filtering and pagination. Use sysparm_query for encoded queries (e.g., `active=true^priority=1`).7 params
Retrieve a list of incidents from ServiceNow with filtering and pagination. Use sysparm_query for encoded queries (e.g., `active=true^priority=1`).
sysparm_display_valuestringoptionalReturn field display values instead of raw values. Options: `true`, `false`, or `all`.sysparm_fieldsstringoptionalComma-separated list of fields to return in the response.sysparm_limitintegeroptionalMaximum number of records to return (default: 10, max: 10000).sysparm_offsetintegeroptionalNumber of records to skip for pagination.sysparm_order_bystringoptionalField name to order results by.sysparm_order_dirstringoptionalSort direction: `asc` or `desc`.sysparm_querystringoptionalEncoded query string to filter results (e.g., `active=true^priority=1`).servicenow_incident_resolve#Resolve an incident by setting its state to Resolved (6). Requires a resolution code and resolution notes.4 params
Resolve an incident by setting its state to Resolved (6). Requires a resolution code and resolution notes.
close_codestringrequiredResolution code describing how the incident was resolved.close_notesstringrequiredDetailed notes explaining how the incident was resolved.sys_idstringrequiredThe unique sys_id of the incident to resolve.work_notesstringoptionalInternal work notes visible only to support staff.servicenow_incident_update#Update fields on an existing incident. Only provided fields are modified; omitted fields are left unchanged.9 params
Update fields on an existing incident. Only provided fields are modified; omitted fields are left unchanged.
sys_idstringrequiredThe unique sys_id of the incident to update.assigned_tostringoptionalUpdated sys_id or username of the individual assigned to resolve the incident.assignment_groupstringoptionalUpdated sys_id or name of the assignment group.commentsstringoptionalCustomer-visible comments added to the incident activity log.descriptionstringoptionalUpdated detailed description of the incident.prioritystringoptionalUpdated priority: `1`=Critical, `2`=High, `3`=Moderate, `4`=Low.short_descriptionstringoptionalUpdated brief summary of the incident.statestringoptionalUpdated incident state: `1`=New, `2`=In Progress, `3`=On Hold, `6`=Resolved, `7`=Closed.work_notesstringoptionalInternal work notes visible only to support staff.servicenow_knowledge_article_create#Create a new knowledge base article in ServiceNow. Returns the created article record with its sys_id.6 params
Create a new knowledge base article in ServiceNow. Returns the created article record with its sys_id.
short_descriptionstringrequiredTitle or summary of the knowledge article.authorstringoptionalsys_id of the user who authored this article.kb_categorystringoptionalsys_id of the knowledge base category for this article.kb_knowledge_basestringoptionalsys_id of the knowledge base this article belongs to.textstringoptionalBody content of the article (supports HTML or plain text).workflow_statestringoptionalPublication state of the article: `draft`, `published`, or `retired`.servicenow_knowledge_article_delete#Delete a knowledge base article by sys_id. This action is irreversible and permanently removes the article.1 param
Delete a knowledge base article by sys_id. This action is irreversible and permanently removes the article.
sys_idstringrequiredThe sys_id of the knowledge article to delete.servicenow_knowledge_article_get#Retrieve details of a specific knowledge base article by sys_id.3 params
Retrieve details of a specific knowledge base article by sys_id.
sys_idstringrequiredThe sys_id of the knowledge article to retrieve.sysparm_display_valuestringoptionalReturn field display values instead of raw values. Options: `true`, `false`, or `all`.sysparm_fieldsstringoptionalComma-separated list of fields to return in the response.servicenow_knowledge_article_list#Retrieve a list of knowledge base articles with filtering and pagination. Use sysparm_query to filter by workflow state, category, or other fields.5 params
Retrieve a list of knowledge base articles with filtering and pagination. Use sysparm_query to filter by workflow state, category, or other fields.
sysparm_display_valuestringoptionalReturn field display values instead of raw values. Options: `true`, `false`, or `all`.sysparm_fieldsstringoptionalComma-separated list of fields to return in the response.sysparm_limitintegeroptionalMaximum number of records to return (default: 10).sysparm_offsetintegeroptionalNumber of records to skip for pagination.sysparm_querystringoptionalEncoded query string to filter results (e.g., `workflow_state=published^kb_category=<sys_id>`).servicenow_knowledge_article_update#Update fields on an existing knowledge base article. Only provided fields are modified; omitted fields are left unchanged.5 params
Update fields on an existing knowledge base article. Only provided fields are modified; omitted fields are left unchanged.
sys_idstringrequiredThe sys_id of the knowledge article to update.kb_knowledge_basestringoptionalsys_id of the target knowledge base to associate this article with.short_descriptionstringoptionalUpdated article title.textstringoptionalUpdated article body content in HTML.workflow_statestringoptionalUpdated article workflow state, e.g. `draft`, `review`, `published`.servicenow_knowledge_base_list#Retrieve a list of knowledge bases available in ServiceNow.4 params
Retrieve a list of knowledge bases available in ServiceNow.
sysparm_fieldsstringoptionalComma-separated list of fields to return for each knowledge base.sysparm_limitintegeroptionalMaximum number of knowledge bases to return.sysparm_offsetintegeroptionalStarting offset for pagination.sysparm_querystringoptionalEncoded query string to filter knowledge bases.servicenow_pa_indicators_list#List all Performance Analytics indicator definitions available in ServiceNow. Use the returned sys_ids to filter scorecards via servicenow_pa_scorecards_get.2 params
List all Performance Analytics indicator definitions available in ServiceNow. Use the returned sys_ids to filter scorecards via servicenow_pa_scorecards_get.
sysparm_limitintegeroptionalMaximum number of PA indicator records to return.sysparm_offsetintegeroptionalNumber of records to skip for pagination.servicenow_pa_scorecards_get#Retrieve Performance Analytics scorecard data including KPI values, trend data, and targets from ServiceNow PA.4 params
Retrieve Performance Analytics scorecard data including KPI values, trend data, and targets from ServiceNow PA.
sysparm_breakdownstringoptionalsys_id of a breakdown to segment scorecard data.sysparm_fieldstringoptionalsys_id of a specific PA indicator to filter scorecards.sysparm_include_scoresbooleanoptionalSet to true to include historical score data points in the response.sysparm_limitintegeroptionalMaximum number of scorecard records to return.servicenow_problem_create#Create a new problem record in ServiceNow to track root causes of recurring incidents. Returns the created record with its sys_id.7 params
Create a new problem record in ServiceNow to track root causes of recurring incidents. Returns the created record with its sys_id.
short_descriptionstringrequiredBrief summary of the problem.assigned_tostringoptionalsys_id or username of the individual assigned to investigate the problem.assignment_groupstringoptionalsys_id or name of the group to assign the problem to.cmdb_cistringoptionalsys_id of the Configuration Item (CI) related to the problem.descriptionstringoptionalDetailed description of the problem.prioritystringoptionalPriority: `1`=Critical, `2`=High, `3`=Moderate, `4`=Low.workaroundstringoptionalTemporary workaround to mitigate the problem until a fix is implemented.servicenow_problem_get#Retrieve details of a specific problem record by sys_id from ServiceNow.3 params
Retrieve details of a specific problem record by sys_id from ServiceNow.
sys_idstringrequiredThe sys_id of the problem record to retrieve.sysparm_display_valuestringoptionalReturn field display values instead of raw values. Options: `true`, `false`, or `all`.sysparm_fieldsstringoptionalComma-separated list of fields to return in the response.servicenow_problem_list#Retrieve a list of problems from ServiceNow with filtering and pagination. Use sysparm_query for encoded queries (e.g., `state=101^priority=1`).5 params
Retrieve a list of problems from ServiceNow with filtering and pagination. Use sysparm_query for encoded queries (e.g., `state=101^priority=1`).
sysparm_display_valuestringoptionalReturn field display values instead of raw values. Options: `true`, `false`, or `all`.sysparm_fieldsstringoptionalComma-separated list of fields to return in the response.sysparm_limitintegeroptionalMaximum number of records to return (default: 10, max: 10000).sysparm_offsetintegeroptionalNumber of records to skip for pagination.sysparm_querystringoptionalEncoded query string to filter results (e.g., `state=101^priority=1`).servicenow_problem_task_create#Create a new problem task to track investigation, root cause analysis, or resolution steps for a Problem record.5 params
Create a new problem task to track investigation, root cause analysis, or resolution steps for a Problem record.
problem_idstringrequiredThe sys_id of the parent Problem record this task belongs to.short_descriptionstringrequiredBrief summary of what this problem task is for.assigned_tostringoptionalUsername or sys_id of the person assigned to this problem task.assignment_groupstringoptionalName or sys_id of the group responsible for this problem task.descriptionstringoptionalDetailed description of the problem task scope and objectives.servicenow_problem_task_get#Retrieve a specific problem task by its sys_id. Returns all fields for the problem task record including state, assignment, and work notes.1 param
Retrieve a specific problem task by its sys_id. Returns all fields for the problem task record including state, assignment, and work notes.
sys_idstringrequiredThe sys_id of the problem task to retrieve.servicenow_problem_task_list#List problem tasks (investigation and resolution sub-tasks) associated with problems in ServiceNow. Filter by problem sys_id using sysparm_query.3 params
List problem tasks (investigation and resolution sub-tasks) associated with problems in ServiceNow. Filter by problem sys_id using sysparm_query.
sysparm_fieldsstringoptionalComma-separated list of field names to include in the response.sysparm_limitintegeroptionalMaximum number of problem task records to return.sysparm_querystringoptionalEncoded query string to filter problem tasks, e.g. `problem=<problem_sys_id>` or `state=1`.servicenow_problem_task_update#Update fields on an existing problem task. Only provided fields are modified; omitted fields are left unchanged.6 params
Update fields on an existing problem task. Only provided fields are modified; omitted fields are left unchanged.
sys_idstringrequiredThe sys_id of the problem task to update.assigned_tostringoptionalUpdated username or sys_id of the assignee.descriptionstringoptionalUpdated detailed description of the problem task.short_descriptionstringoptionalUpdated brief summary of the problem task.statestringoptionalUpdated state: `1`=Open, `2`=Work in Progress, `3`=Closed Incomplete, `4`=Closed Complete.work_notesstringoptionalInternal work notes to append to the problem task activity log.servicenow_problem_update#Update fields on an existing problem record in ServiceNow. State values: 101=Open, 102=Known Error, 103=Pending Change, 104=Closed/Resolved.10 params
Update fields on an existing problem record in ServiceNow. State values: 101=Open, 102=Known Error, 103=Pending Change, 104=Closed/Resolved.
sys_idstringrequiredThe sys_id of the problem record to update.assigned_tostringoptionalsys_id or username of the individual assigned to the problem.assignment_groupstringoptionalsys_id or name of the group to assign the problem to.descriptionstringoptionalUpdated detailed description of the problem.fix_notesstringoptionalNotes describing the permanent fix applied to resolve the problem.known_errorstringoptionalMark as a known error (`true` or `false`).short_descriptionstringoptionalUpdated brief summary of the problem.statestringoptionalProblem state: `101`=Open, `102`=Known Error, `103`=Pending Change, `104`=Closed/Resolved.work_notesstringoptionalInternal work notes to add to the problem (not visible to end users).workaroundstringoptionalTemporary workaround to mitigate the problem.servicenow_sc_req_item_update#Update fields on a specific Requested Item (RITM / sc_req_item).5 params
Update fields on a specific Requested Item (RITM / sc_req_item).
sys_idstringrequiredSys ID of the Requested Item (RITM) to update.assigned_tostringoptionalSys ID of the user to assign the request item to.assignment_groupstringoptionalSys ID of the group to assign the request item to.statestringoptionalState value to set on the request item (e.g., '1' for Open, '3' for Closed Complete).work_notesstringoptionalWork notes to add to the request item.servicenow_service_request_get#Retrieve details of a specific service request by sys_id.3 params
Retrieve details of a specific service request by sys_id.
sys_idstringrequiredThe sys_id of the service request to retrieve.sysparm_display_valuestringoptionalReturn field display values instead of raw values. Options: `true`, `false`, or `all`.sysparm_fieldsstringoptionalComma-separated list of fields to return in the response.servicenow_service_request_item_list#Retrieve a list of requested items (sc_req_item) - individual line items within service requests.5 params
Retrieve a list of requested items (sc_req_item) - individual line items within service requests.
sysparm_display_valuestringoptionalReturn field display values instead of raw values. Options: `true`, `false`, or `all`.sysparm_fieldsstringoptionalComma-separated list of fields to return in the response.sysparm_limitintegeroptionalMaximum number of records to return (default: 10, max: 10000).sysparm_offsetintegeroptionalNumber of records to skip for pagination.sysparm_querystringoptionalEncoded query string to filter results. Use `request=<sys_id>` to filter by parent request.servicenow_service_request_list#Retrieve a list of service requests (sc_request) with filtering and pagination.5 params
Retrieve a list of service requests (sc_request) with filtering and pagination.
sysparm_display_valuestringoptionalReturn field display values instead of raw values. Options: `true`, `false`, or `all`.sysparm_fieldsstringoptionalComma-separated list of fields to return in the response.sysparm_limitintegeroptionalMaximum number of records to return (default: 10, max: 10000).sysparm_offsetintegeroptionalNumber of records to skip for pagination.sysparm_querystringoptionalEncoded query string to filter results (e.g., `active=true^requested_for=abc123`).servicenow_table_record_create#Create a new record in any ServiceNow table using the generic Table API. Provide the table name and field values as a JSON object in `record_data`.2 params
Create a new record in any ServiceNow table using the generic Table API. Provide the table name and field values as a JSON object in `record_data`.
record_dataobjectrequiredJSON object containing field name-value pairs for the new record.table_namestringrequiredName of the ServiceNow table in which to create the record (e.g., `incident`, `task`, `change_request`).servicenow_table_record_delete#Delete a record from any ServiceNow table by sys_id. This action is permanent and irreversible.2 params
Delete a record from any ServiceNow table by sys_id. This action is permanent and irreversible.
sys_idstringrequiredThe sys_id of the record to delete.table_namestringrequiredName of the ServiceNow table containing the record to delete (e.g., `incident`, `task`, `change_request`).servicenow_table_record_get#Retrieve a single record from any ServiceNow table by sys_id. Specify the table name and the record's sys_id.4 params
Retrieve a single record from any ServiceNow table by sys_id. Specify the table name and the record's sys_id.
sys_idstringrequiredThe sys_id of the record to retrieve.table_namestringrequiredName of the ServiceNow table (e.g., `incident`, `task`, `change_request`).sysparm_display_valuestringoptionalReturn field display values instead of raw values. Options: `true`, `false`, or `all`.sysparm_fieldsstringoptionalComma-separated list of fields to return in the response.servicenow_table_record_list#Retrieve records from any ServiceNow table using the generic Table API. Specify the table name (e.g., `incident`, `task`, `sys_user`) to query any table in your instance.6 params
Retrieve records from any ServiceNow table using the generic Table API. Specify the table name (e.g., `incident`, `task`, `sys_user`) to query any table in your instance.
table_namestringrequiredName of the ServiceNow table to query (e.g., `incident`, `task`, `change_request`).sysparm_display_valuestringoptionalReturn field display values instead of raw values. Options: `true`, `false`, or `all`.sysparm_fieldsstringoptionalComma-separated list of fields to return in the response.sysparm_limitintegeroptionalMaximum number of records to return (default: 10).sysparm_offsetintegeroptionalNumber of records to skip for pagination.sysparm_querystringoptionalEncoded query string to filter results (e.g., `active=true^state=1`).servicenow_table_record_update#Update fields on an existing record in any ServiceNow table using the generic Table API. Only fields provided in `record_data` will be updated.3 params
Update fields on an existing record in any ServiceNow table using the generic Table API. Only fields provided in `record_data` will be updated.
record_dataobjectrequiredJSON object containing field name-value pairs to update on the record.sys_idstringrequiredThe sys_id of the record to update.table_namestringrequiredName of the ServiceNow table containing the record to update (e.g., `incident`, `task`, `change_request`).servicenow_table_schema_get#Retrieve the field definitions, types, labels, and reference relationships for any ServiceNow table. Useful for understanding table structure before querying or creating records.1 param
Retrieve the field definitions, types, labels, and reference relationships for any ServiceNow table. Useful for understanding table structure before querying or creating records.
table_namestringrequiredThe internal name of the ServiceNow table whose schema to retrieve.servicenow_user_create#Create a new user in ServiceNow. Returns the created user record with its sys_id.10 params
Create a new user in ServiceNow. Returns the created user record with its sys_id.
user_namestringrequiredUsername (login ID) for the new user.activebooleanoptionalWhether the user account is active.departmentstringoptionalDepartment of the user. Can be a sys_id or department name.emailstringoptionalEmail address of the user.first_namestringoptionalFirst name of the user.last_namestringoptionalLast name of the user.managerstringoptionalsys_id of the user's manager.mobile_phonestringoptionalMobile phone number of the user.phonestringoptionalBusiness phone number of the user.titlestringoptionalJob title of the user.servicenow_user_delete#Delete a user record from ServiceNow. This action is irreversible. Deactivating the user (setting active=false) is typically preferred over deletion.1 param
Delete a user record from ServiceNow. This action is irreversible. Deactivating the user (setting active=false) is typically preferred over deletion.
sys_idstringrequiredThe sys_id of the sys_user record to delete.servicenow_user_get#Retrieve details of a specific user by sys_id.3 params
Retrieve details of a specific user by sys_id.
sys_idstringrequiredThe sys_id of the user record to retrieve.sysparm_display_valuestringoptionalReturn display values for reference fields. Options: true, false, or all.sysparm_fieldsstringoptionalComma-separated list of fields to return in the response.servicenow_user_group_create#Create a new user group in ServiceNow. Returns the created group record with its sys_id.5 params
Create a new user group in ServiceNow. Returns the created group record with its sys_id.
namestringrequiredName of the user group.activebooleanoptionalWhether the group is active.descriptionstringoptionalDescription of the user group.emailstringoptionalEmail address for the group.managerstringoptionalsys_id or username of the group manager.servicenow_user_group_delete#Delete a user group from ServiceNow. This action is irreversible and removes the group and all its membership records.1 param
Delete a user group from ServiceNow. This action is irreversible and removes the group and all its membership records.
sys_idstringrequiredThe sys_id of the sys_user_group record to delete.servicenow_user_group_get#Retrieve details of a specific user group by sys_id.2 params
Retrieve details of a specific user group by sys_id.
sys_idstringrequiredThe sys_id of the user group record to retrieve.sysparm_fieldsstringoptionalComma-separated list of fields to return in the response.servicenow_user_group_list#Retrieve a list of user groups from ServiceNow with filtering and pagination.5 params
Retrieve a list of user groups from ServiceNow with filtering and pagination.
sysparm_display_valuestringoptionalReturn display values for reference fields. Options: true, false, or all.sysparm_fieldsstringoptionalComma-separated list of fields to return in the response.sysparm_limitintegeroptionalMaximum number of records to return.sysparm_offsetintegeroptionalStarting record index for pagination.sysparm_querystringoptionalEncoded query string to filter groups (e.g., active=true^nameSTARTSWITHNetwork).servicenow_user_group_member_add#Add a user to a user group in ServiceNow by creating a group member record in the sys_user_grmember table.2 params
Add a user to a user group in ServiceNow by creating a group member record in the sys_user_grmember table.
groupstringrequiredThe sys_id of the group to add the user to.userstringrequiredThe sys_id of the user to add to the group.servicenow_user_group_member_list#Retrieve members of a user group from ServiceNow. Filter by group sys_id using group_sys_id parameter.4 params
Retrieve members of a user group from ServiceNow. Filter by group sys_id using group_sys_id parameter.
group_sys_idstringoptionalFilter results to members of a specific group by providing the group's sys_id.sysparm_fieldsstringoptionalComma-separated list of fields to return in the response.sysparm_limitintegeroptionalMaximum number of records to return.sysparm_offsetintegeroptionalStarting record index for pagination.servicenow_user_group_member_remove#Remove a user from a ServiceNow user group by deleting the group membership record (sys_user_grmember). Use servicenow_user_group_member_list to find the membership record sys_id.1 param
Remove a user from a ServiceNow user group by deleting the group membership record (sys_user_grmember). Use servicenow_user_group_member_list to find the membership record sys_id.
sys_idstringrequiredThe sys_id of the sys_user_grmember record (group membership record) to delete.servicenow_user_list#Retrieve a list of users from ServiceNow with filtering and pagination.5 params
Retrieve a list of users from ServiceNow with filtering and pagination.
sysparm_display_valuestringoptionalReturn display values for reference fields. Options: true, false, or all.sysparm_fieldsstringoptionalComma-separated list of fields to return in the response.sysparm_limitintegeroptionalMaximum number of records to return.sysparm_offsetintegeroptionalStarting record index for pagination.sysparm_querystringoptionalEncoded query string to filter users (e.g., active=true^department=IT).servicenow_user_role_assign#Assign a role to a ServiceNow user by creating a sys_user_has_role record linking the user's sys_id to the role's sys_id.2 params
Assign a role to a ServiceNow user by creating a sys_user_has_role record linking the user's sys_id to the role's sys_id.
rolestringrequiredsys_id of the role to assign to the useruserstringrequiredsys_id of the user to assign the role toservicenow_user_role_list#Retrieve a list of all available roles defined in ServiceNow. Supports pagination and field filtering to narrow the returned data.4 params
Retrieve a list of all available roles defined in ServiceNow. Supports pagination and field filtering to narrow the returned data.
sysparm_fieldsstringoptionalComma-separated list of fields to return for each rolesysparm_limitintegeroptionalMaximum number of role records to returnsysparm_offsetintegeroptionalNumber of records to skip for paginationsysparm_querystringoptionalEncoded query string to filter roles (ServiceNow query syntax)servicenow_user_role_remove#Remove a role from a ServiceNow user by deleting the sys_user_has_role record that links the user to the role. Provide the sys_id of the sys_user_has_role record (not the user or role sys_id).1 param
Remove a role from a ServiceNow user by deleting the sys_user_has_role record that links the user to the role. Provide the sys_id of the sys_user_has_role record (not the user or role sys_id).
sys_idstringrequiredsys_id of the sys_user_has_role record to deleteservicenow_user_update#Update fields on an existing user record in ServiceNow. Only the fields provided will be updated.10 params
Update fields on an existing user record in ServiceNow. Only the fields provided will be updated.
sys_idstringrequiredThe sys_id of the user record to update.activebooleanoptionalWhether the user account is active.departmentstringoptionalUpdated department. Can be a sys_id or department name.emailstringoptionalUpdated email address of the user.first_namestringoptionalUpdated first name of the user.last_namestringoptionalUpdated last name of the user.managerstringoptionalUpdated sys_id of the user's manager.mobile_phonestringoptionalUpdated mobile phone number.phonestringoptionalUpdated business phone number.titlestringoptionalUpdated job title of the user.